“Is it possible to recover data from RAID 6 drives after a disk failure?”
Yes. Throughout this guide, you’ll learn about the risks of failure for RAID 6, how to minimize them, and the data recovery process through parity and third-party RAID 6 recovery software. As the latest RAID (Redundant Array of Independent Disks) iteration featuring more reliable database access, RAID 6 is used by government and privately-owned organizations. However, RAID 6 disk failure instances can still occur, either through ransomware or hardware disruptions. It is, thus, a great idea to keep a few things in mind regarding RAID 6 data recovery.
Table of Content
Part 1. How to Recover Data from RAID 6 Disk Failure?
You should stay calm if your server experiences a disk. In most cases, you can recover the data without physically removing the disks. Depending on the extent of the damage, you can utilize any of the following methods for RAID 6 data recovery.
Situation 1: RAID 6 Failure with Three or More Disks
If you Google 'raid 6 how many disks can fail', you’ll know that the configuration allows for a maximum of two disk failures. Thus, you need RAID data recovery software for three or more disk failure.
- Recover data from all RAID levels, including RAID 0, RAID 1, RAID 5, RAID 6, RAID 10, etc.
- Recover files lost due to disk failure, accidental deletion, hard drive formatting, system corruption, or any other causes.
- Use the preview feature to ensure you’re recovering the right files.
- Get the Recoverit Free that can recover up to 100 MB
- Supports storage media & RAID arrays having FAT, exFAT, & NTFS file system.

After downloading Recoverit RAID 6 recovery software, you can recover your lost data in 3 simple steps.
Step1 Select the RAID 6 Hard Drives
Launch the application and go to the Hard Drives and Locations tab. Choose the RAID 6 drive(s) for which you wish to recover the data.

Step2 Scan the disk
Once the location is specified, Recoverit will start an all-round scan and display the data found on the disk or site.

Step2 Preview and Recover
Once the scan completes, you can browse through all the recoverable files. Use the Preview button to see if it's the correct file you want. Select the required files and finally click on the Recover button.

Situation 2: RAID 6 Single-Disk or Dual-Disk Failure
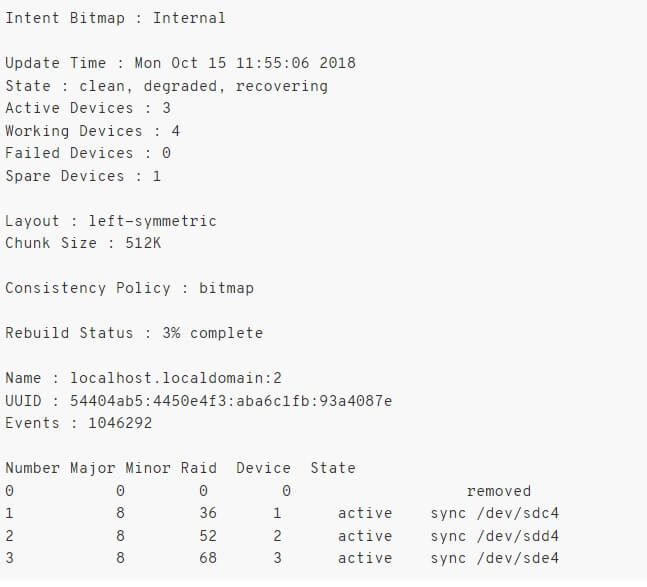
If you experience a single or dual-disk failure, you can recover the data through parity reconfiguration. Since most servers today use Linux, let’s observe how you can do it through mdadm:
- First, identify the problem by using the following command:
[root@server loc]# mdadm --query --detail /dev/md2
It will fetch you a report to show if any drives have failed or been removed. The information looks something like the following image.

- If you detect any failed or removed drives, you should confirm their status by using this command:
[root@server loc]# cat /proc/mdstat
It will show you the status of all the drives within the RAID 6 array. If you see (F) next to the drive name, that means the drive or partition has failed.
- Before removing the drive, you need to isolate it from the remaining array. You need to retain its serial number if it is a physical drive. Type the command mentioned below.
[root@server loc]# smartctl -–all /dev/sdb | grep -i 'Serial'
Note the serial number to remove the disk once it’s been isolated from the system.
- Then, use the following command to remove the disk from the array:
[root@server loc]# mdadm --manage /dev/md2 --remove /dev/sdb4
You can replace 'sdb4' with the appropriate disk number. After giving the above command, you should recheck the array's status using 'cat /proc/mdstat.' It should no longer display the failed disk.
- Next, shut down the system and remove the faulty disk. You can skip this step if the disk in question is virtual.
- You now need to replicate the data from the old disk to a new disk or partition through the sgdisk utility by installing the gdisk package. Use the following command for the same:
[root@server loc]# yum install gdisk - Launch the sgdisk utility and use the -R augment to replicate the partition from another active disk. Just type the following command and replace ‘sdb’ and ‘sdc’ with the respective disk drives on your system.
[root@server loc]# sgdisk -R /dev/sdb /dev/sdc - Here, you need the following command to prevent GUID conflicts between the two discs:
[root@server loc]# sgdisk -G /dev/sdb - Press the Enter key, and you should see a confirmation on the screen that the operation was completed successfully.

- You can now add it to the RAID 6 array using the below-mentioned command:
[root@server loc]# mdadm --manage /dev/md2 --add /dev/sdb2 - Now, you can retrieve the data from the parity of the original disk. Use the command below for the same, replacing the drive names where required.
[root@server loc]# mdadm --assemble --run --force --update=resync /dev/md2 /dev/sdb2 - Finally, Verify the recovery using the cat /proc/mdstat command. It should give you a report similar to the following image.

You can repeat the same process to recover data for another failed drive.
Tips to Avoid RAID 6 Drive Failure
There are a few crucial things to remember if you want to avoid the hassle of data recovery for your servers. They include but are not limited to
- Run a thorough scan of all your drives every weekend or when you're sure there is not enough stress on the servers.
- Keep the server room isolated, clean, and well-ventilated.
- Check the current and voltage on random drives and peripherals every week. It may bring to your notice any power defects for the system.
- Use commands like 'cat /proc/mdstat' and '--detail /dev/md2' regularly to check for faults in your drives and controllers.
- Maintain strict access control and log all server activities in detail.
- Before updating the software, please review the patch notes to ensure that your hardware supports it.
- Develop a contingency plan with spare drives, multiple power sources, and extra hardware to account for any server issues and give you enough time to make repairs.
An Overview of RAID 6 Data Recovery
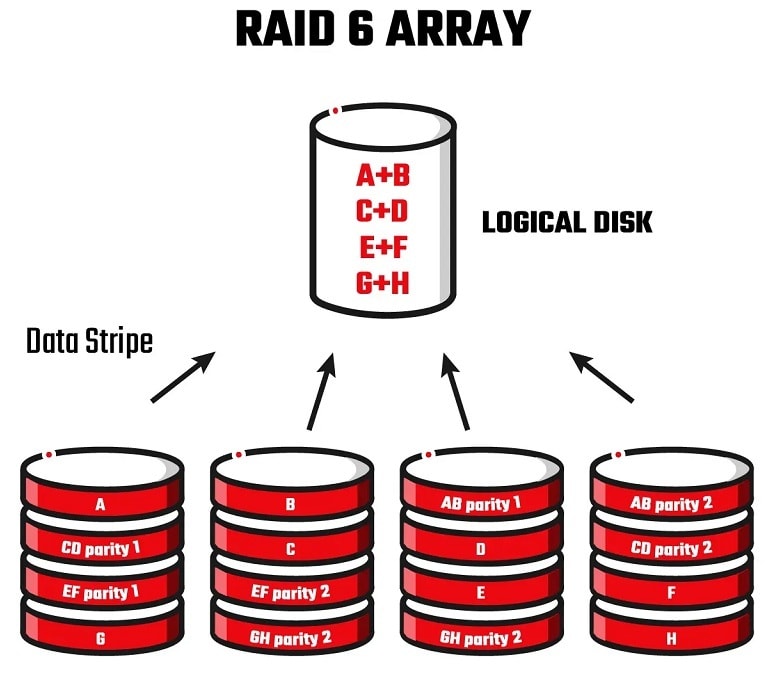
RAID 6 array stores data and its parity in a striped block form. That means each block contains some portion of the data stored in all the active disks. The parity is stored in either of the two backup disks. In regular functions, you can access the data on the disks using the address attached to each data block.

You can recover the lost RAID 6 data through its corresponding parity if a failure occurs on one or two disks simultaneously or consecutively. However, there might be instances of extensive data loss on more than two disks, which is when a third-party RAID 6 recovery software can lend you a hand.
Causes of RAID 6 Disk Failure
Here are a few reasons due to which your RAID 6 disk may run failure or go intact.
- Windows’s check disk action: If the disk partition or the files of RAID 6 go unreadable, Windows operating system executes its in-built disk check tool automatically when you reboot your PC. It is especially so when your RAID 6 disk is readable, resulting in data corruption on the RAID disk.
- Corruption of Hard Disk in RAID 6: If any of the arrays of RAID 6 has bad sectors on the hard drive, the particular drive will typically stop working once the two hard drives get failure. You can also get some signs of the hard drive being offline.
- Failed disk space expand actions: When you wish to extend your disk space without any damage to the previous data, there are high chances of data loss. Due to bad sectors and sudden power-offs, you end up in data loss on the expanding process.
- Sudden computer power off: Designed by the combination of hard disks, RAID 6 is a logical array hard drive controlled by a RAID Card. When huge amount of data is stored on RAID Card or the mainframe, sudden power off your computer may not store the information on ROM, resulting in data loss and RAID array failure.
- RAID controller failure: The RAID controller failing due to a defective port or a power surge.
- RAID controller failure: The RAID controller failing due to a defective port or a power surge.
- Corrupt headers due to virus or malware intrusion
- Missing partition by accident or by the drive aging out
- A DDOS (Distributed Denial of Service) attack
Symptoms of RAID 6 Disk Failure
Some sure signs or symptoms would reveal to you that the disks of RAID 6 are infected or the array hard disk has encountered failures.
- Failed Mount Actions: When you enter or run the mount commands, you cannot mount the file systems.
- The disappearance of Partitions: When the array has bad sectors, the file partition and the content get lost.
- Inaccessibility to the operating system: If the RAID array fails, the hard disk becomes inaccessible and unrecognizable that give errors. You can see messages like “Disk Boot Failure Insert System and Press Enter” and “Operating System not found.”
If you encounter any of these, it is best to check the entire server system thoroughly as soon as possible. Scan all the disk sectors for any viruses or corrupted data. It also pays to secure physical wires and cables to each station.
Conclusion
Maintaining server data integrity is hard, even when using the most advanced configuration. We hope you learned all about the RAID 6 recovery process. Do you still have any queries? Let us know in the comments below.


 ChatGPT
 Perplexity
 Google AI Mode
 Grok
Grok


