


 TL;DR:
To create a multi-bootable USB drive that runs multiple operating systems or tools from a single device, you can use specialized utilities like Ventoy, WinSetupFromUSB, MultiBootUSB, XBoot, or YUMI.
● Ventoy enables direct booting by dragging and dropping GNU/Linux, BSD, and Windows ISO files directly onto the USB drive without requiring file extraction.
● WinSetupFromUSB requires selecting the "Auto format it with FBinst" option for the initial ISO installation, and using FAT32 for UEFI compatibility will prompt the tool to split any ISO files larger than 4GB.
● MultiBootUSB supports both Syslinux and GRUB bootloaders while offering persistence settings to save files directly on the disk, whereas post-boot data recovery requires dedicated software like Wondershare Recoverit.
Ask AI for a summary
 ChatGPT
 Perplexity
 Gemini
 Claude
 Grok
Grok
In today's digital age, having a multi-bootable USB can be incredibly convenient. Whether you're a tech enthusiast, a system administrator, or just someone who likes to tinker with different operating systems, a multi-bootable USB allows you to easily switch between various operating systems whenever you want. In this article, we will explore what a multi-bootable USB is, and more importantly, how to create one by yourself.
In this article

What Does a Multiboot USB Do?
A multi-bootable USB is a USB drive that contains multiple operating systems or tools that can be booted directly from the USB. This means that you can carry around a single USB drive and have access to different operating systems without the need for separate installation media. With great flexibility and convenience, it helps you rescue your tools and complete live systems or backups effortlessly.
How to Make a Multi-Bootable USB | 5 Ways
Creating a multi-bootable USB is easier than you think. Here are 5 tools for your choice: Ventoy, WinSetupFromUSB, MultiBootUSB, XBoot, and YUMI. With these utilities at your disposal, you can create a multi-bootable USB in no time. Let's scroll through these five methods.
Method 1: Make a Multi-Bootable USB Using Ventoy
Ventoy is a lightweight and open-source tool that helps you to create a multi-bootable USB. It allows you to boot from ISO files directly, with no extractions needed. Besides, it can support various files, including GNU/Linux, BSD, and even Windows ISO files.
To make a multi-bootable USB with Ventoy, follow the steps below:
- Download the Ventoy from their official website and install it on your computer.
- Once installed, insert your USB drive, and extract the zip file. Open the extracted folder and click on Ventoy2disk.exe to launch Ventoy.

- After the launching the app, you should see your USB drive listed. Select your USB drive from the list and click on the install button.

- Ventoy is installed on your USB flash drive. Now, you can simply drag and drop ISO files onto the USB drive. Ventoy will automatically detect the ISO files and make them bootable. It's a straightforward process that doesn't require any additional configuration.
Method 2: Make a Multi-Bootable USB Using WinSetupFromUSB
WinSetupFromUSB is a Windows program designed to create bootable USB drives that contain multiple operating systems. This would be a huge blessing for technicians or users who usually work with different operating systems. Moreover, this tool also supports various file systems, such as FAT32, NTFS, and exFAT, providing more convenience for users to choose file systems they like. In addition, it has a customized boot menu, with personalized colors, fonts, and backgrounds for users to choose from.
To use WinsetupFromUSB, follow the steps below:
- Start by downloading WinSetupFromUSB and install it on your computer.
- Launch the application and connect your USB flash drive.
- Select your USB drive from the displaying list. Now tick Auto format it with FBinst and then and click on Advanced options.

 Note: You have to tick this option only for the first ISO installation. Choose FAT32 if your computer is set to boot using UEFI mode or if UEFI sounds strange to your ears. Else, go with the NTFS option.
 - Tick Custom menu names for the Vista/7/8/Server Source. Now, exit Advanced options with a single click on the cross(X) button.
- Choose the operating system installation files you want to include on your multi-bootable USB drive under Add to USB disk.
 Note: If the size of your ISO is larger than 4 Gb, it will show a message to split the file into parts. This is because you've chosen the FAT32 option. Click OK.
 - Click GO. This warning will be displayed. Click Yes.
- Another warning will be displayed on your screen. Just informing you that the partitions will be formatted. Click Yes.

- Now, WinSetupFromUSB will ask for the folder name. Type the name and it'll auto select. Click OK.

- Click Ok. WinSetupFromUSB will take care of the rest.

Method 3: Make a Multi-Bootable USB Using MultiBootUSB
MultiBootUSB is another user-friendly tool that simplifies the process of creating a multi-bootable USB drive. This tool is very compatible with a wide range of Linux distributions, system rescue tools, and other bootable applications. Also, it supports various bootloaders, such as Syslinux and GRUB, allowing you to choose the one you prefer.
To use it, follow the steps below:
- Download MultiBootUSB and install it on your computer.
- Once installed, insert your USB drive and launch the MultiBootUSB application. Select your USB drive from the list.

- Under Select image, choose your ISO image. Select your desired amount of persistence if you want to be able to save files on the disk, and click install distro.

- MultiBootUSB will automatically detect the ISO files and create a bootable USB drive that allows you to choose between multiple operating systems or tools.

Method 4: Make a Multi-Bootable USB Using XBoot
XBoot is a versatile tool that enables you to create a multi-bootable USB drive with ease. As a Windows-based utility, the tool features an interface that is easy to use drag and drop function. Thus, you can create a multi-bootable USB in just a few clicks.
Follow the steps below to use it:
- Begin by downloading XBoot and install it on your computer. Launch the application and insert your USB drive.
- Drag and drop the ISO files of the operating systems or tools you want to include on your multi-bootable USB drive.

- Click on Create USB, you'll have to select the target USB drive and select the kind of bootloader you want to use. Then, click on OK. XBoot will automatically detect the ISO files and create a multi bootable USB drive.
Method 5: Make a Multi-Bootable USB Using YUMI
YUMI, short for Your Universal Multiboot Installer, is considered one of the best bootable USB creators. It's a powerful tool to store and run more than one distribution, making it a perfect choice to create a multi-bootable USB. Moreover, its interface is very user-friendly and intuitive, making it accessible to any person who needs to work with multiple operating systems.
To proceed, follow the steps below:
- Download YUMI and install it on your computer.
- Launch the application, connect your USB drive and select your USB drive from the list.

- Then, choose the ISO files of the operating systems or tools you want to include on your multi-bootable USB drive.
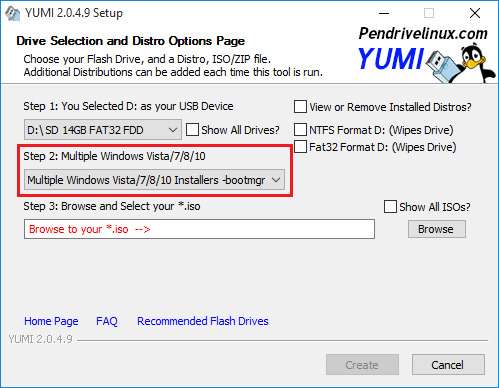
- Click the create button, and the process is ready to go.

How to Recover Data After Successfully booting your PC with Multi-Bootable USB?
Now that you have your multi-bootable USB wonderfully up and running, it's essential to understand how to recover vital data in case of any mishaps. One reliable data recovery software that can assist you in such situations is Wondershare Recoverit. Recoverit is a powerful and user-friendly tool that allows you to recover lost or deleted data from various storage devices, including your PC.
To recover data after using a multi-bootable USB, follow these simple steps:
- Download, install and launch Recoverit on your computer.
- Initiate the software and choose the location where your lost data was saved.

- Recoverit will analyze your storage device, and then start the scanning process.

- After the scan is finished, you can preview the files and choose the ones you wish to restore.

- Click the Recover button and select a secure location to save the restored files.

Recoverit is a reliable data recovery software that ensures the highest chances of successful data recovery after any data loss incidents.
Conclusion
Creating a multi-bootable USB drive can greatly enhance your productivity and flexibility when it comes to working with different operating systems or tools. With the methods outlined in this article, you can easily create your own multi-bootable USB drive and have access to multiple operating systems at your fingertips. Remember to use reliable software like Recoverit to recover any lost or deleted data after using your multi-bootable USB. Now let's unlock a whole new world of convenience and versatility with Recoverit.


