Synology NAS is considered to be one of the easiest and most efficient ways to sync files to Windows. It is a network-enabled platform that offers security and privacy. Moreover, one of the most notable aspects of Synology NAS is that it allows syncing files for hard drives, SSDs, cloud storage platforms and external files.
You must understand how to sync files to Synology NAS on Windows to save the files. It creates an extra source of backup, also allowing for very little chance of data loss. It is important to adopt the right methods and synchronize the files accordingly. This blog will guide you about file synchronization for syncing files to Synology NAS on Windows.
Try Wondershare Recoverit to Perform Data Recovery

In this article
What Is Synology NAS & Why Sync Files to NAS?
Synology NAS (Network Attached Storage) refers to a storage device that connects to the network. This system can further be used to store, access, and create a backup of files. You can also use Synology NAS for file synchronization.
Synology NAS may be used for a wide range of tools that assist with file sync and sharing. It is advisable to look into the different tools so as to get access to a variety of benefits. Some of the key tools that you can use with Synology NAS include Cloud Station, Shared Folder Sync and DS Cloud.
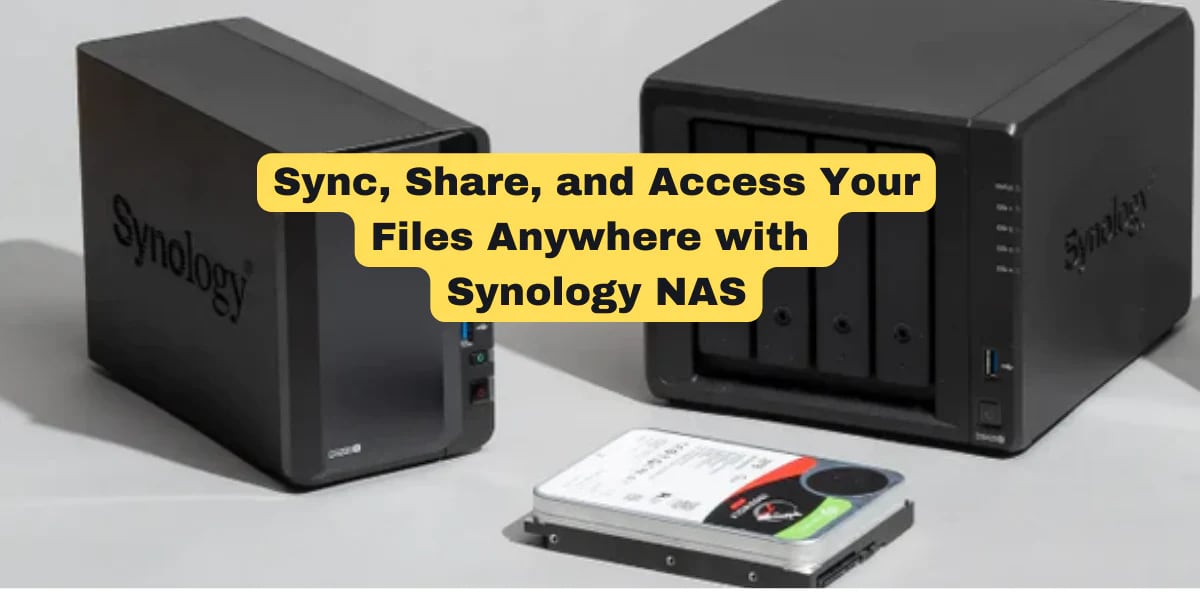
Most of the users prefer file sync synology NAS for a wide range of reasons, such as the following:
- Centralized storage: NAS files provide the benefits of centralized storage for data like videos, photos, and documents.
- Backup: Syncing files to NAS also offers the benefit of regular backups for external drives. It can also assist with cloud and different Synology NAS devices.
- Data redundancy: Synology NAS can be helpful for multiple hard drives and SSDs. This allows users to create a RAID configuration, which can help overcome data redundancy.
- File sharing: Syncing files to NAS also offers the benefit of sharing files which can be centralized to the organization's intranet.
Things You Need To Do Before Performing Windows Backup to NAS
Before you do Windows Backup to NAS, you must follow a few steps. This is to ensure that the Windows system is able to create a backup for NAS.
You can follow the steps given below to file sync Windows to Synology NAS and other NAS units:
Step 1: Access the NAS Unit
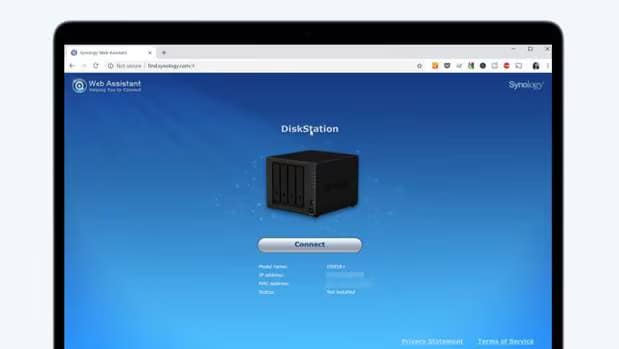
Open any internet browser on the system and visit the NAS user interface. Synology NAS users can visit find.synology.com. Once the NAS unit opens, click on the connect button so as to get access to the user dashboard. However, if you have information about the IP address, you can use it to connect.
Step 2: Create a Backup Folder
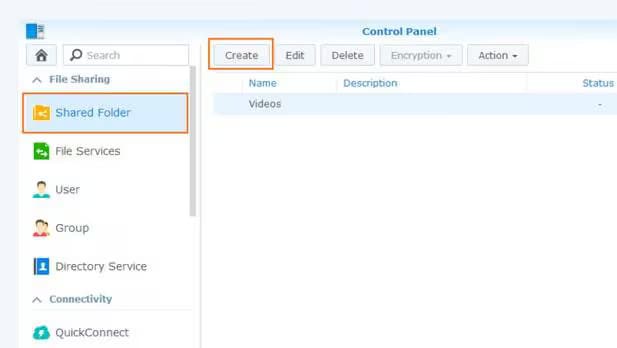
Once the NAS unit is connected, you will have to create a backup folder to save all your Windows backups. You can select the Shared Folder option under Create. Now, you may name the folder as you want. However, make sure to determine case sensitivity for the same.
Step 3: Select the Storage Volume and Set User Rights
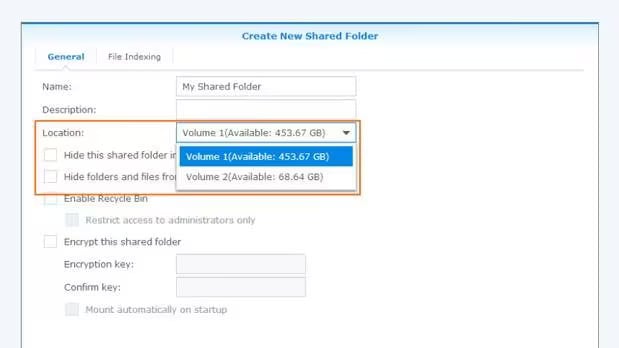
As soon as the shared folder is created, you will now receive a prompt asking you to select the storage volume. Choose the NAS storage volume of your preference.
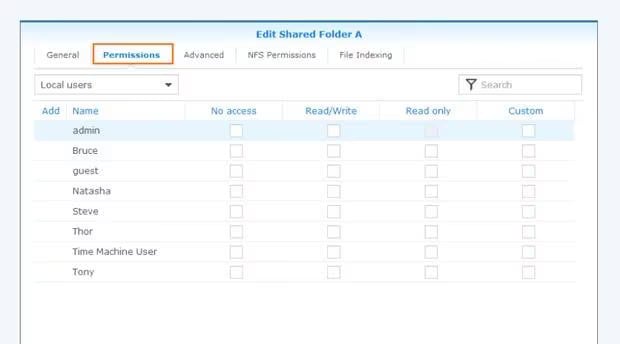
Visit the permissions tab. Set it to allow users to read/write the folder. Check the Read/Write option. Then, hit the Apply button.
Step 4: Map the NAS Network Drive to Windows
Open This PC from File Explorer in your system. Navigate and visit the Map network drive section available on the main menu.
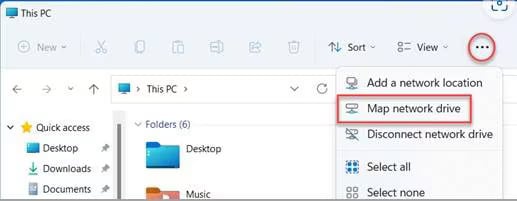
A new window will open where you will have to select a drive letter from the drop-down menu. Opt for the backup folder to be a NAS unit and start browsing. Go through the network shared drive option. Complete the process by clicking on Finish.
Once the NAS is set up, you can begin the backup to Windows.
How to Sync Files to Synology NAS on Windows 11/10/8/7??
Irrespective of the Windows Version you're using, you must opt for file sync to Synology NAS properly. There are different methods through which you can do it and enhance the entire setup process.
Below are some of the prominent ways through which you can sync files to Synology NAS:
Way 1. With a Backup Tool
Having a backup tool by your side is hailed as one of the most prominent ways to sync files from Synology NAS to Windows. Wondershare UBackit is a reliable backup tool that you can use to streamline the Windows backup process. It is available for download for Windows OS and Mac OS. You can avail of the one-month trial feature to create the backup from UBackit.
You can follow the steps given below to Windows file sync for the files to Synology NAS on Windows using UBackit:
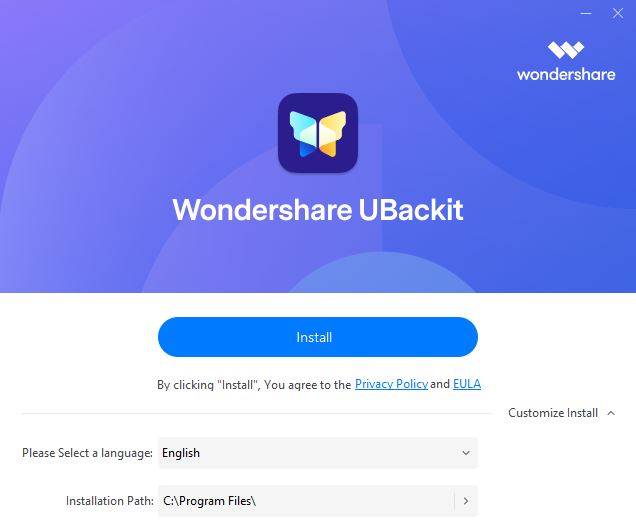
Step 1: Download and install Wondershare UBackit on your Windows system. Once it is installed, launch the program.
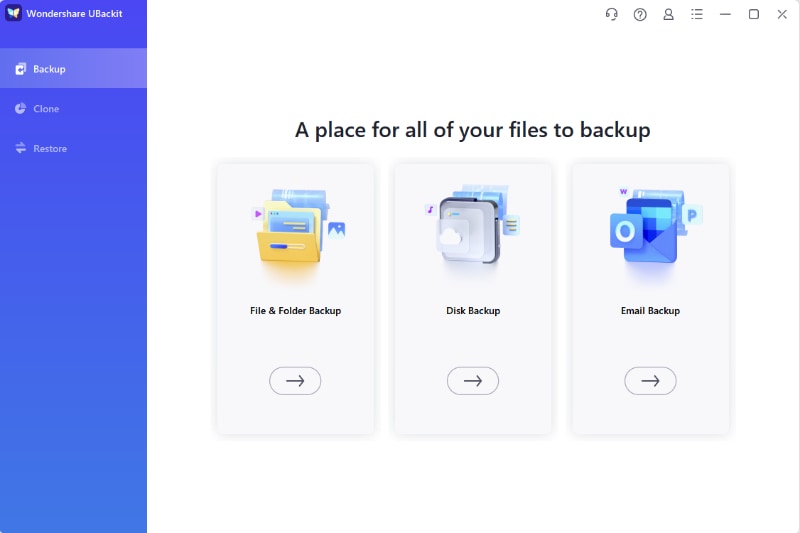
Step 2: The main window of the app will open with Backup as the default setting. Different options will be available. Click on the Disk Backup option.
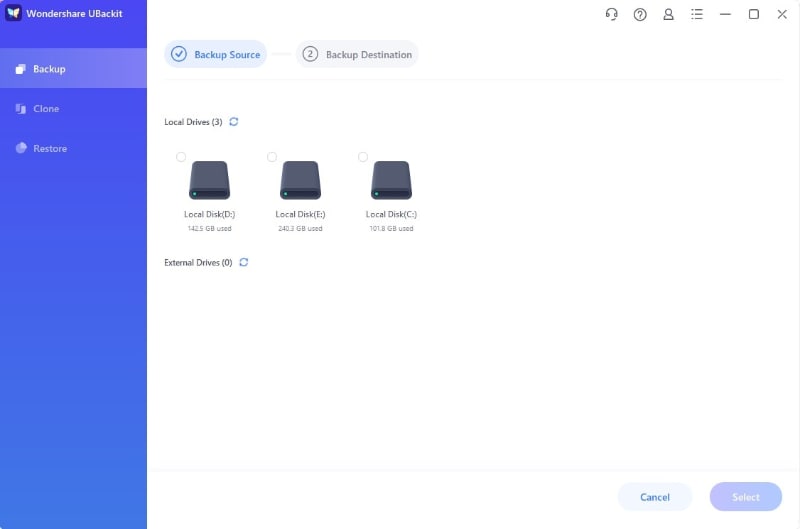
Step 3: Now, select the backup source drive and click on the Select option.
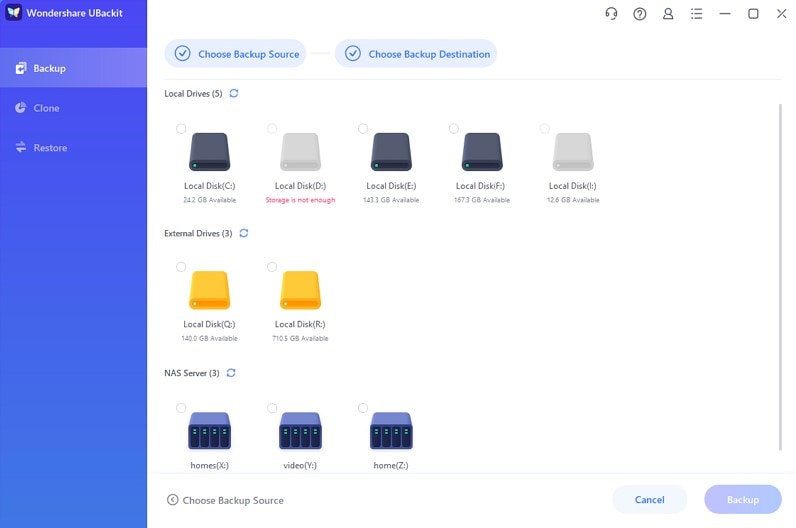
Step 4: In the next step, you will have to select the Backup drive option. Here, you must choose the NAS directory to select the mapped drive letter. This is your backup destination. So, upon selecting, click on the Backup option.
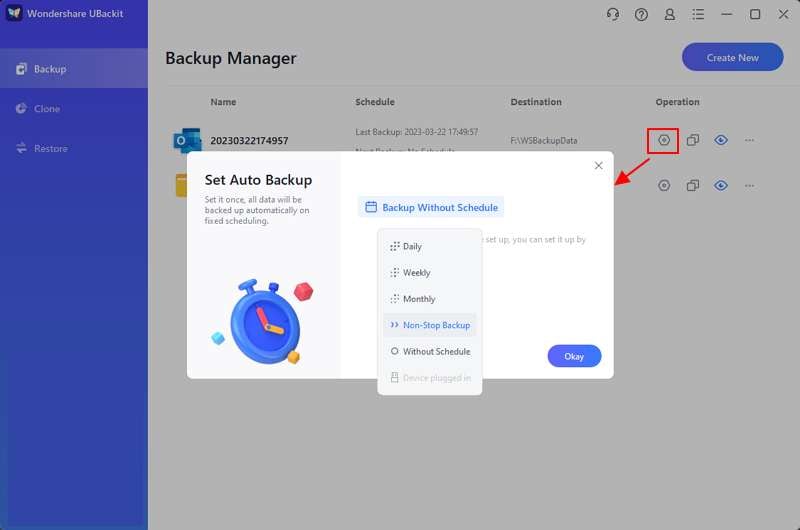
Step 5: The backup process will take a few minutes, depending on the size of the drive. Once the process is complete, a pop-up message will appear on the screen. The backups will be available in Backup Manager. Visit that section and rename the field if you want. Apart from that, you can also set passwords or schedule automatic backups.
Way 2. With Windows Backup and Restore
Windows Backup and Restore feature can also be a useful feature for getting the data backup to NAS. Choosing to file sync windows 11 will restore the data.
You need to follow the steps given below to sync files to synology NAS using Windows Backup and Restore:
Step 1: Open Control Panel
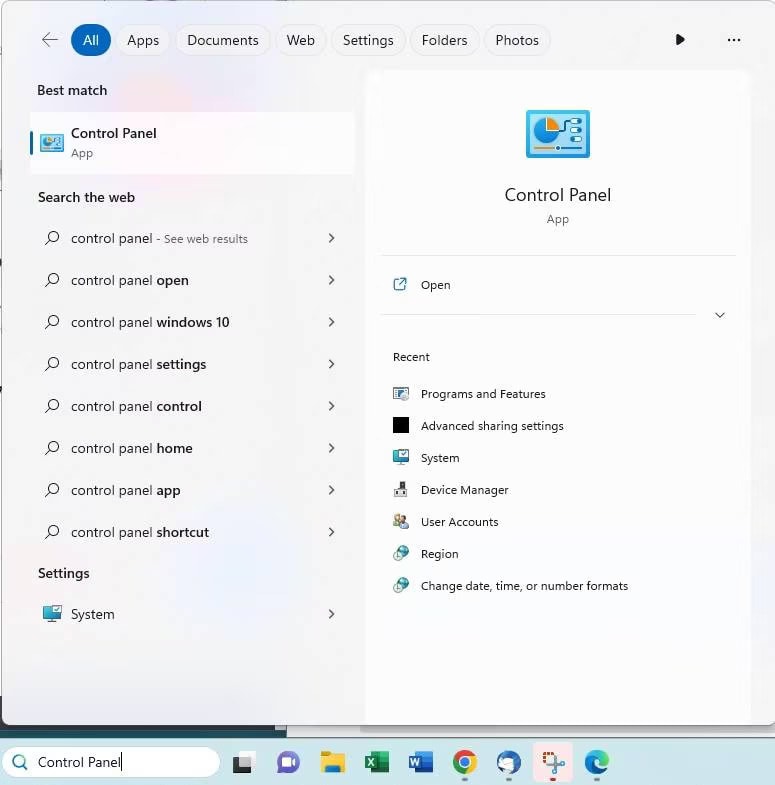
Type Control Panel in the search bar and click on the option once it appears in the result pages.
Under the System and Security option, choose Backup and Restore.
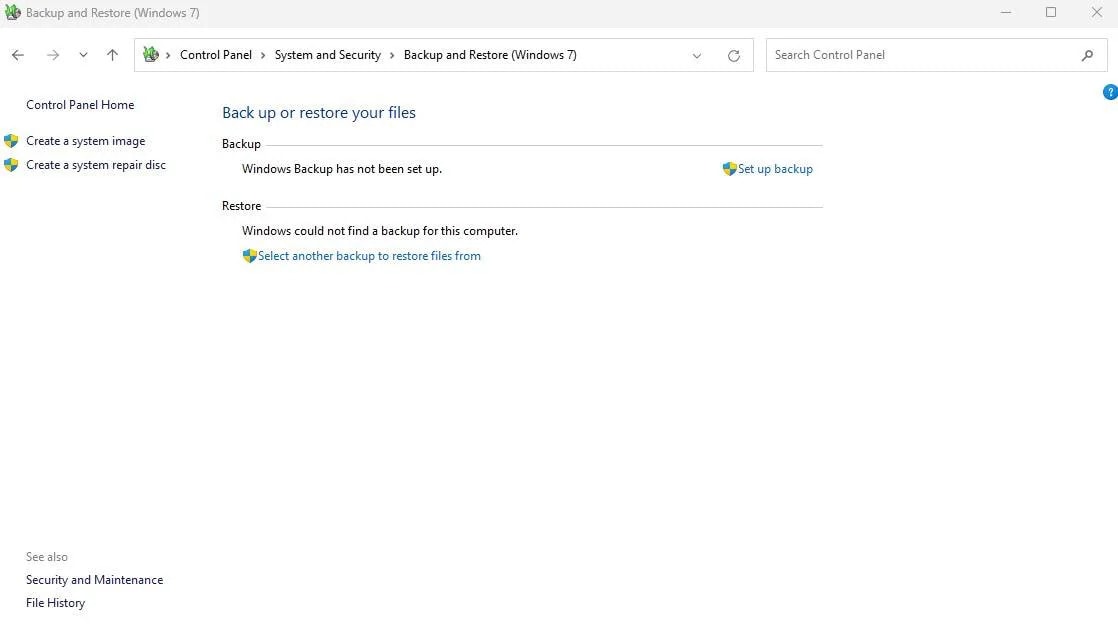
Step 2: Set the Backup
On the right side of the screen, you will get the Set up backup option. Click on it.
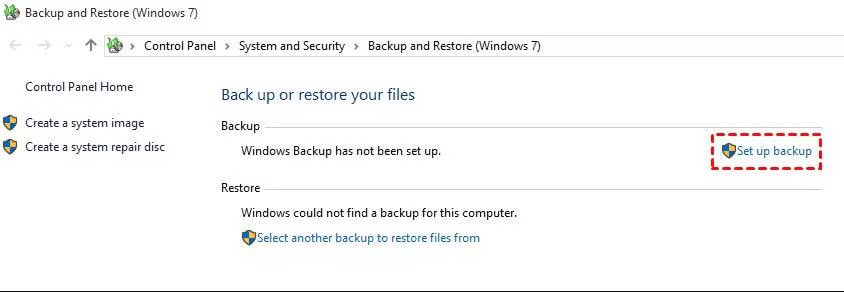
Step 3: Choose the network
You need to select the drive letter mapped to NAS and click on Next. If the data is not saved, choose Save a Network.
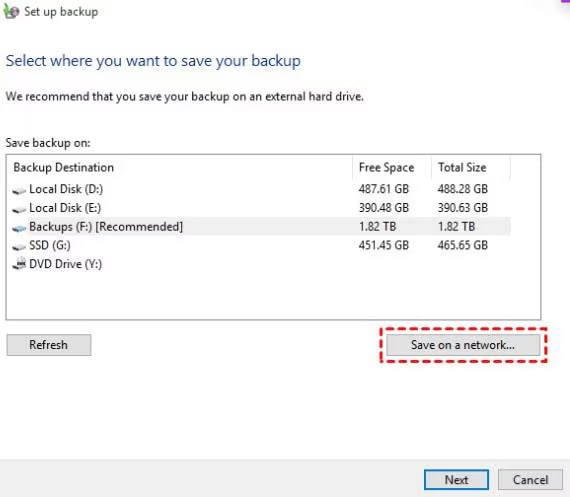
Step 4: Specify the location
Here, you will have to manually specify the location in the Select a Network window. Once you have selected the network, enter your username and password and click on OK.
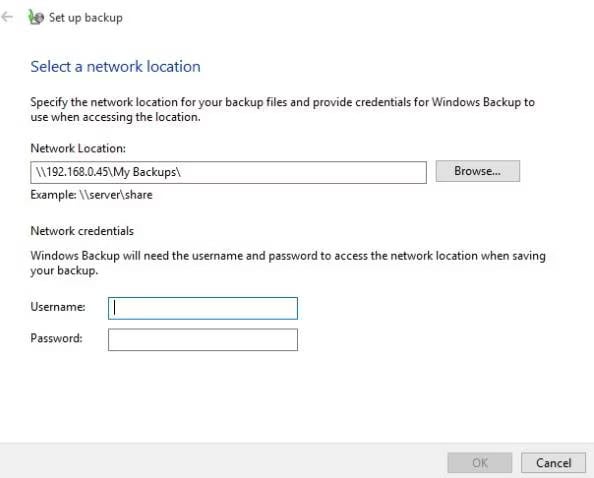
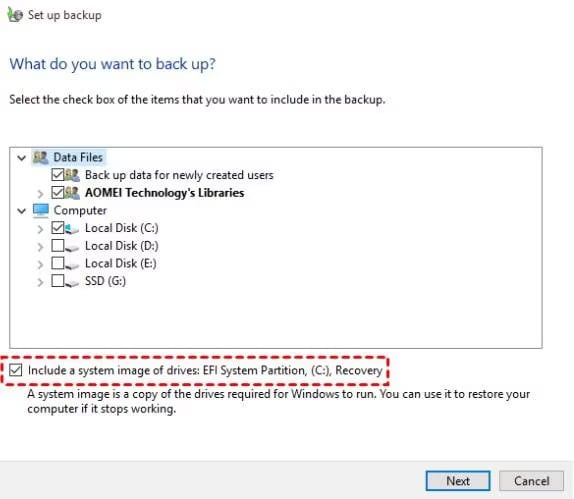
Step 5: Select the options for backup
Go through all the details on Windows to back up the files to NAS. Check the boxes in front of them. Now, tick the box to include a system image of drives.
Step 6: Create the backup schedule
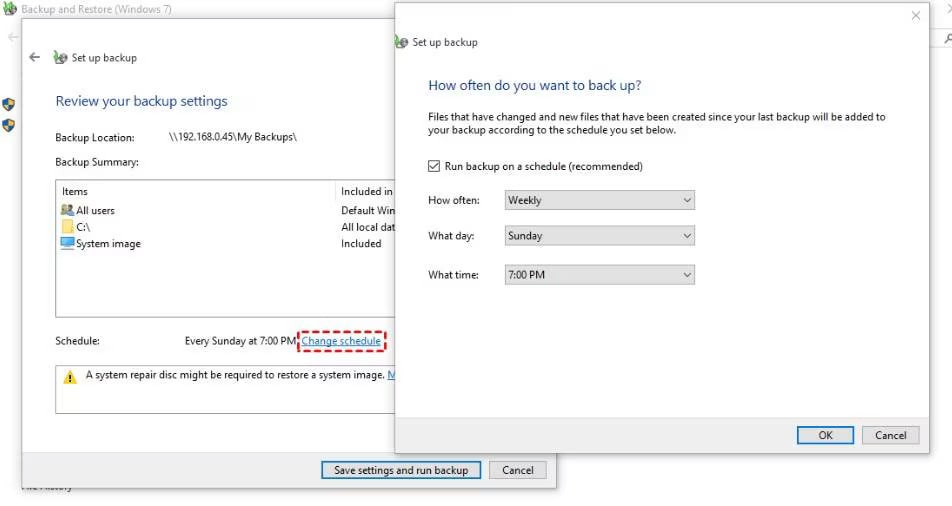
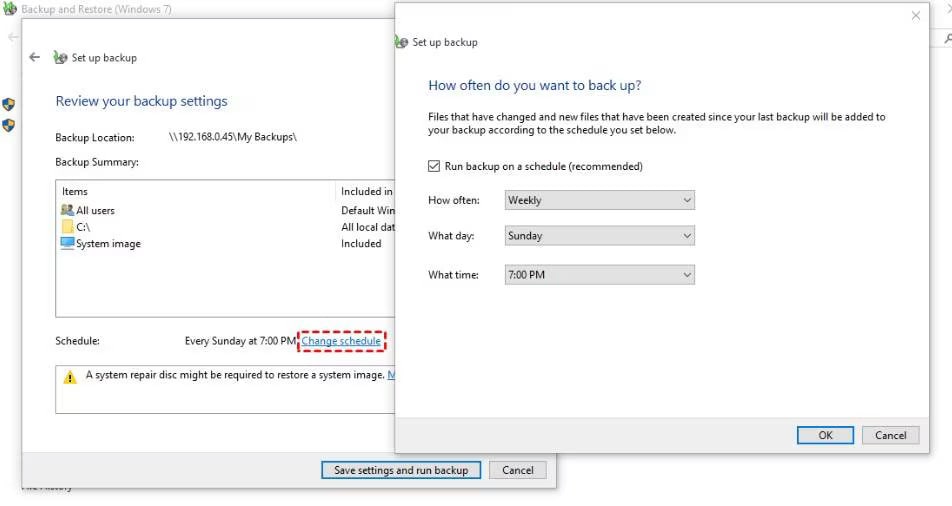
The tool now offers you the option to automate the backup to NAS. Choose the Change Schedule option and configure all the options. Click on Save Settings and initiate the backup process.
Step 7: Have a system repair disc
This is the optional step. You can create a system repair disc using the USB thumb drive.
Way 3. Using File History
File History is one of the most efficient systems for storing and backing up all the folders. With this, you can create a backup of NAS as well. This process, however, does not create image files or take a backup of the entire system.
You can follow the steps given below to sync files to synology nas using the File History feature:
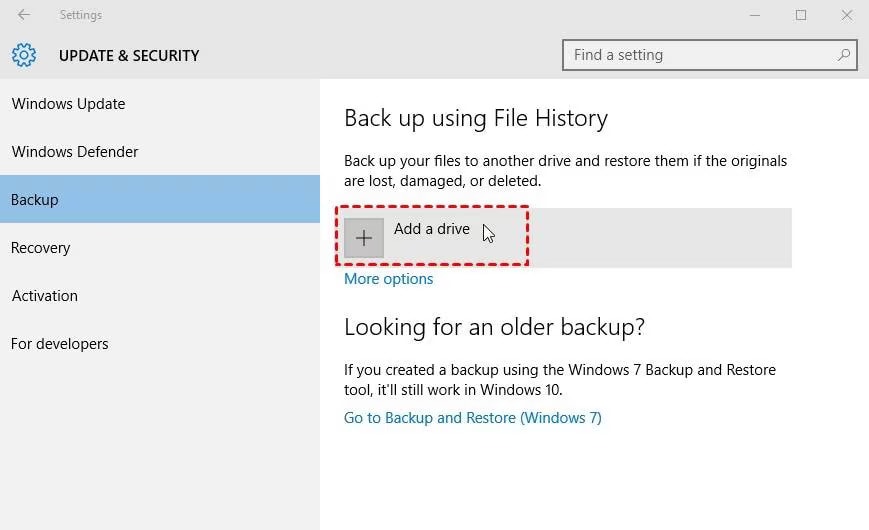
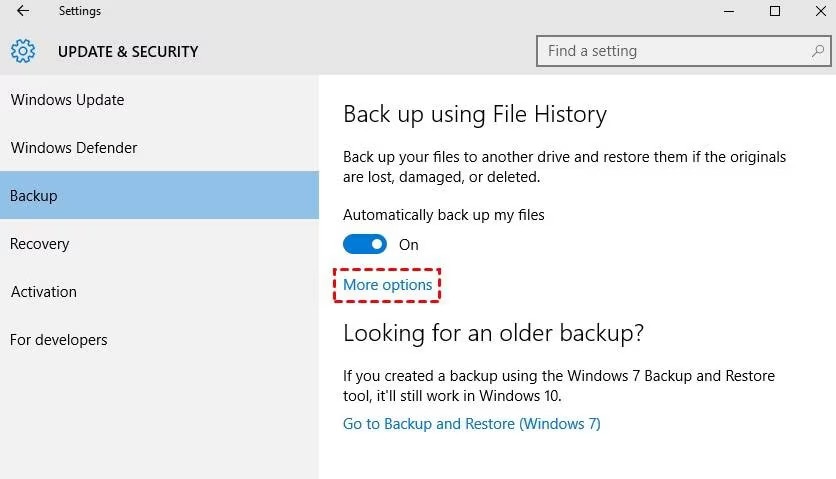
Step 1: Click Start Panel > Control Panel > System & Security > File History. Under the Back up using File History, select Add a drive option. Select the mapped NAS drive.
Step 2: Once the drive is selected, you can customize the backup options. If you are looking for more options, click on More. Select the users for whom you want to back up the folders. You can also choose the versions you want to save and how frequently you wish to save file history.
Way 4. Local Folders to Synology NAS via Synology Drive
Using Synology Drive, you will have the option to sync files between Synology NAS and PC. It comes with a wide range of advanced features. Follow the steps given below to backup local folders to Synology NAS using Synology Drive a prominent file sync software:
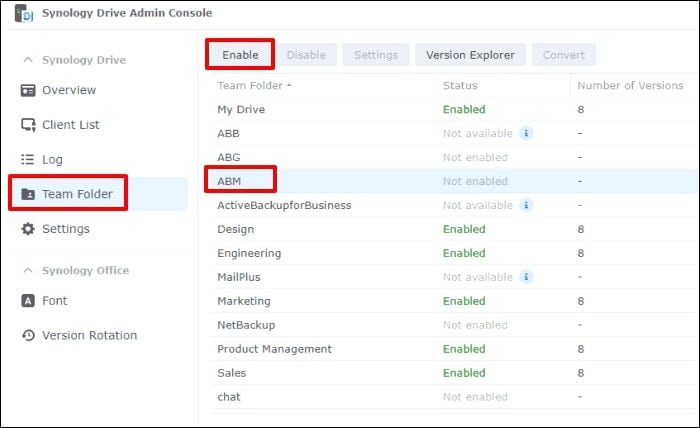
Step 1: Enter the main menu of the Synology account by signing into it. In the search bar, type Synology Drive Admin Console.
Step 2: Open the Team Folder and choose the shared folder to be synced. Click on the Enable option.
Step 3: Under the Settings screen, choose Versioning and Security. Make changes and click on OK.
Step 4: Now, open the Control Panel and visit the Shared Folders section. Enable the permissions.
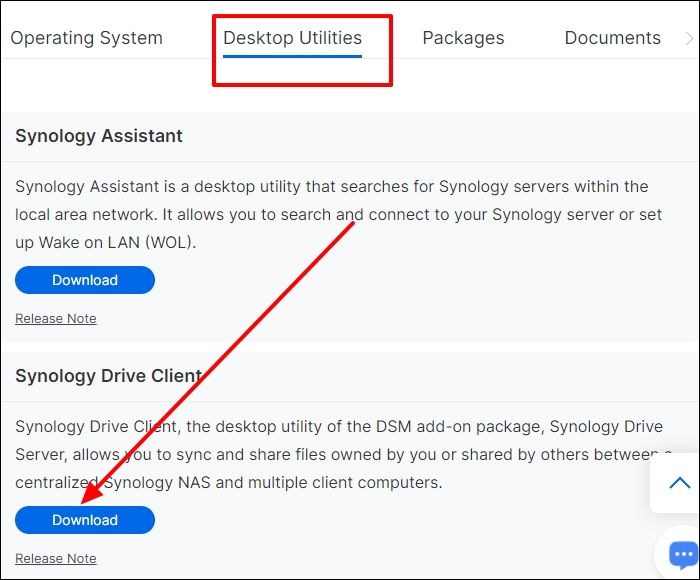
Step 5: Visit the Synology Download Center and select NAS as the product. Now, click on the Disk Utilities tab. Hit the Download button under Synology Drive Client.
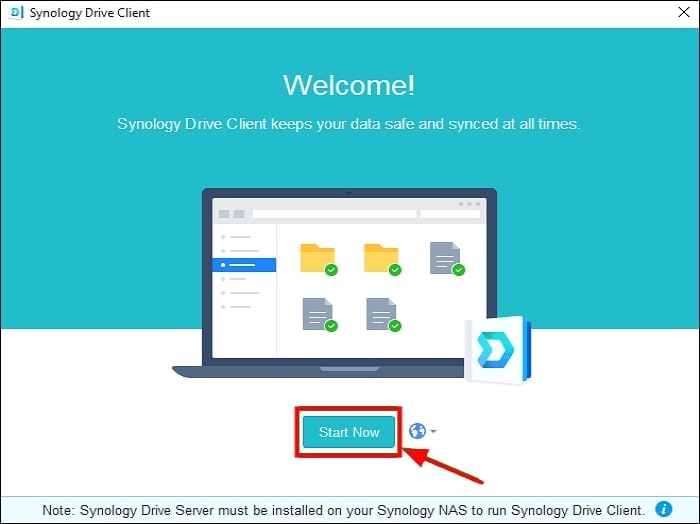
Step 6: Download and install the application. Now, click on the Start Now option.
Step 7: Enter the domain name. In the given sections, enter the username and password for your Synology NAS account. Click on Next.
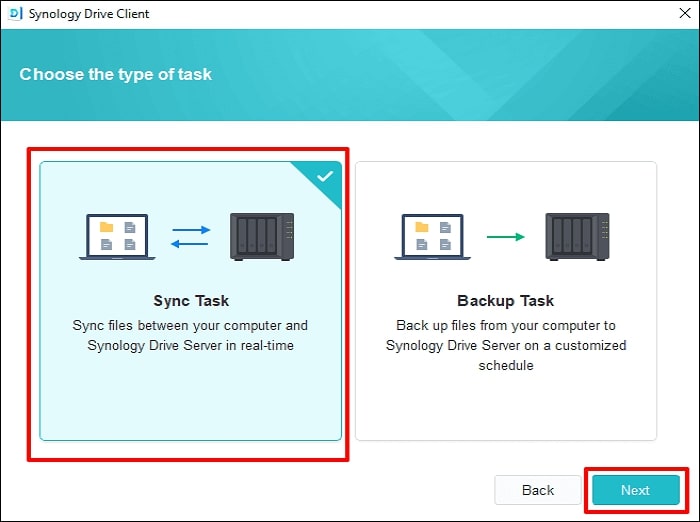
Step 8: Navigate to Choose the type of task screen and click on Sync Task. Now, hit the Next button.
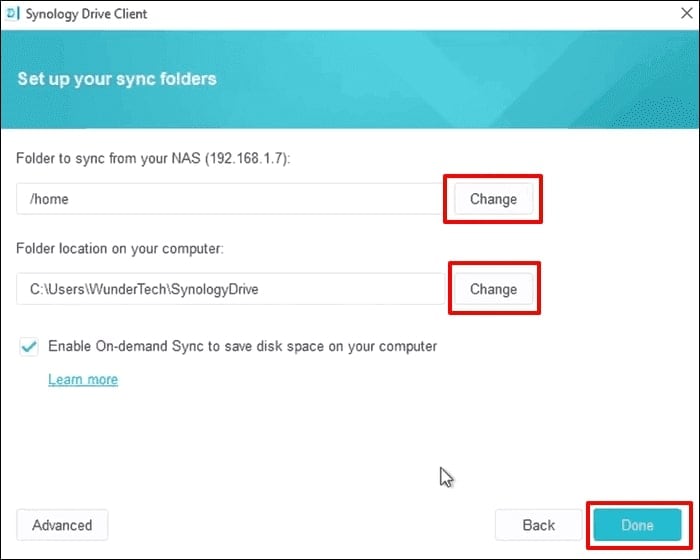
Step 9: Select the folder from NAS and computer. Initiate the syncing process by clicking on Done. The syncing process will eventually be initiated.
Way 5. Syncing Files with Windows File Explorer
If you want file synchronization with Windows File Explorer, you must use Google Drive. You can sign in to your Google Drive account and initiate the process. This can turn out to be a reliable windows file sync software.
Follow the steps given below for syncing files with Windows File Explorer using Google Drive:
Step 1: Visit Google Drive on the browser and sign in to it using your Google account.
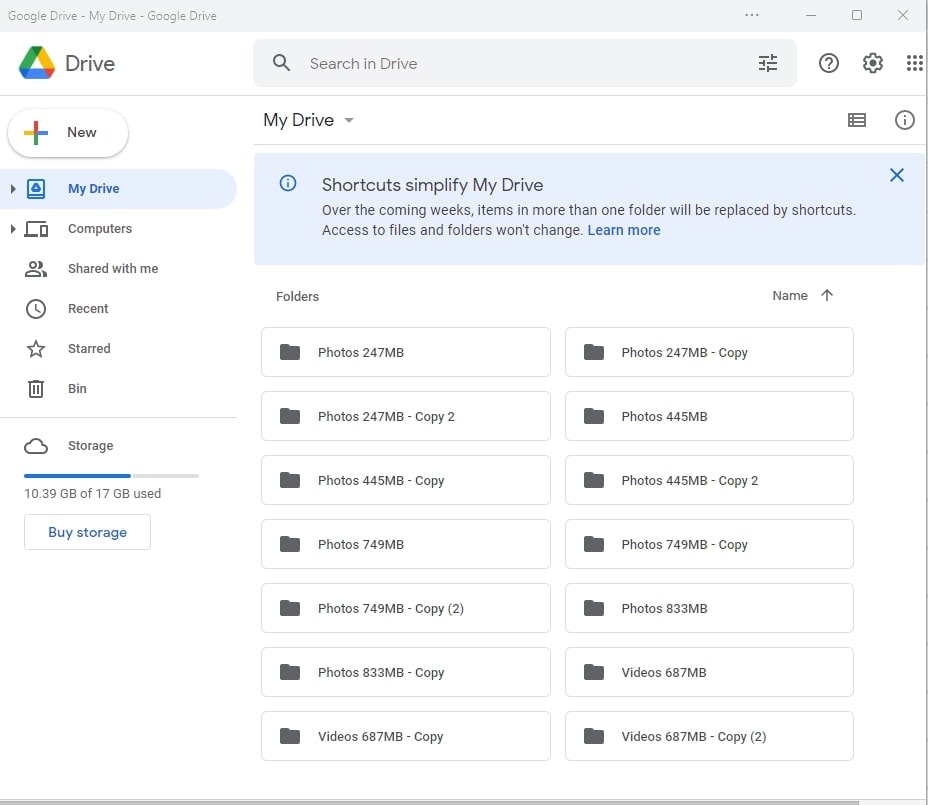
Step 2: Open Drive and choose the folders or files that you want to sync to set the preferences. Select Windows File Explorer as the location.
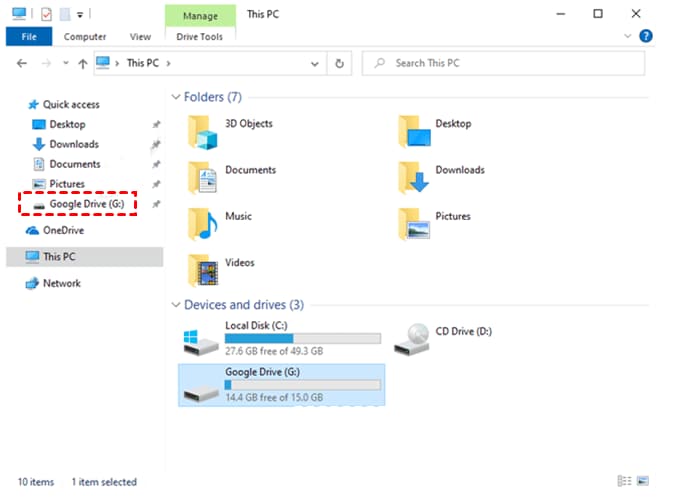
Step 3: The synced files will appear in the Google Drive folder in Windows File Explorer.
Recover Your Lost Files with Wondershare Recoverit
During syncing the files, there is a chance that you may lose the data. Therefore, you must identify the reasons for this, and once the files are lost, you can work towards fixing them. Wondershare Recoverit is an efficient tool that allows you to recover lost files.
You must download and install Wondershare Recoverit in your system so that you can initiate the data recovery process. Once you have installed Wondershare Recoverit in your system, you may follow the steps given below:
Step 1: You must launch Wondershare Recoverit in your system. From the Hard Drives and Location option, select the drive from which you want to recover the files.

Step 2: Now, from the new window, you will have to select all the folders that you must scan. As soon as the folders are selected, click on the Scan button.

Step 3: The scan will be completed after a few minutes. You can track it using the progress button. Preview all the recovered files and select the ones that you want to recover. Choose the location in which you want to save the files. Save the files in the designated location and click on OK. The files will be saved in the chosen location.

Advantages of Backing up Windows Files to NAS Instead of Local Drives
While local drives are very useful, it is important to note that there are numerous benefits of backing up Windows files to NAS. Some of the key advantages of file sync synology are as follows:
- NAS offers centralized data storage, which protects the files from the risk of theft or accidental deletion.
- With the help of NAS devices, you can get a common option of data recovery, which can help to overcome time-sensitive outages.
- NAS devices offer flexibility when it comes to file sharing.
- It is easier to back up across NAS devices using a file sync tool than it is with local drives.
- Compared to local drives and other options, NAS provides cost-effective solutions. Therefore, small and medium-sized businesses can easily opt for NAS devices.
- All the NAS devices come with built-in storage operating systems. This will support a wide range of features, such as printer streaming, native media streaming and remote access.
- The local drives offer fewer application varieties than NAS devices.
- With the help of NAS devices, you can easily schedule a wide range of backups.
- Backing up multiple computers is simpler and easier with NAS devices.
Conclusion
As Synology NAS files are becoming so popular, you will have the option to back up Windows files to NAS easily. Adopting the above-mentioned different methods can play an important role in helping you sync files to synology NAS. However, if any mistake happens and you accidentally lose the data, you can also use a data recovery tool. Each of these methods is extremely useful and can assist you in not only backing up the data but also recovering the data in case of loss.
FAQs
1. What software do you use to sync files between your Synology and your Mac?
You can easily use the UBackit to sync files between Synology and Mac. It is advisable to have a shared folder to prevent the backup from failing.2. How do I sync files from my computer to my Synology NAS?
You may use a Synology Drive Client to sync files from My Computer to My Synology NAS.3. Why is my Synology Drive sync not syncing all files?
Sometimes, My Synology Drive Sync may not sync to your files for a wide range of reasons. Some of the most common reasons include storage space, Image name issues, improper sync settings, file size or even restricted files.4. What is your setup to sync NAS files with PCs locally?
The setup to sync NAS files with PCs locally can vary depending on different factors. It is advisable to use a Cloud Station or Synology Drive Client to access the setup and sync NAS files with the PCs.


 ChatGPT
 Perplexity
 Google AI Mode
 Grok
Grok


