Have you noticed your computer getting slower over time, even when you're not using many programs? Or maybe you've seen your available memory decrease for no clear reason, making your system slow? If so, you might be dealing with a memory leak issue. This annoying problem can affect both Windows 11 and Windows 10 users, leading to poor performance and even potential data loss.
But don't worry - in this detailed guide, we'll explain what a memory leak is, why it happens, and most importantly, how to Fix Memory Leak in Windows 11/10.
Memory leaks can be hard to spot and fix, but with the right information and tools, you can handle this problem effectively. Whether you're a casual user or someone who loves technology, knowing how to deal with a computer memory leak is important for keeping your system healthy and running well. So, let's get started and learn about the solutions that will help keep your Windows 11/10 running smoothly.
In this article
Part 1: What is the Memory Leak Problem?
A memory leak happens when a program or app doesn't free up memory it doesn't need anymore. Think of your computer's memory like a bucket of water. Every time you open a program, it adds some water to the bucket. Usually, when you close the program, it takes its water out of the bucket.
But with a memory leak, the program leaves some or all of its water in the bucket, even after you close it.
Over time, this leftover memory builds up, filling your computer's memory and making it slower. This is the main issue that many Windows 11/10 users experience.
Part 2: What Causes a Computer Memory Leak?
Here are the top reasons for a computer memory leak:
- Poorly written software: Programs with coding errors may fail to properly manage memory allocation and deallocation.
- Outdated drivers: Old or incompatible drivers can cause memory management issues.
- System file corruption: Damaged system files can lead to memory leaks.
- Malware infections: Some malicious software can intentionally cause memory leaks.
- Hardware problems: Faulty RAM or other hardware components can contribute to memory leaks.
- Windows updates: Occasionally, Windows updates may introduce bugs that cause memory leaks.
- Too many background processes: Running numerous programs in the background can exhaust available memory.
- Registry issues: Corrupted registry entries can affect memory management.
Part 3: Lost Data on PC?
While memory leaks primarily affect system performance, in severe cases, they can lead to system crashes and potential data loss. If you've experienced data loss due to a memory leak problem or any other reason, don't panic. Recoverit is a powerful data recovery tool that can help you retrieve your lost files.
Try Wondershare Recoverit to Recover Data

Recoverit offers a user-friendly interface and advanced recovery algorithms to restore various types of data, including documents, photos, videos, and more. It can recover data from different storage devices and supports recovery from formatted drives or system crashes.
Related Video >>: How to Recover Data From Windows PC?
Detailed Steps to use Recoverit to recover lost data:
Step 1: Install the Recoverit software from the official website. Launch Recoverit and select the drive where you lost your data. Click "Start".
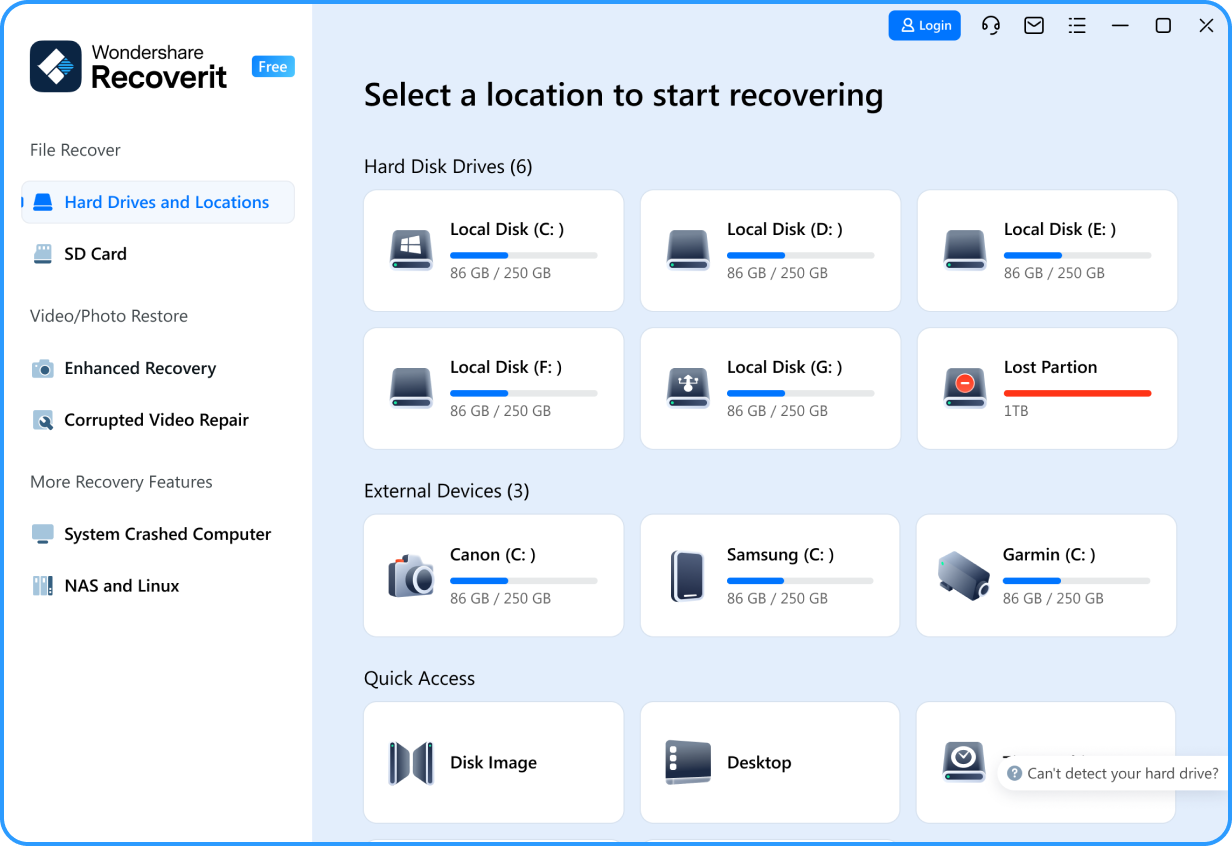
Step 2: Wait for the scanning process.

Step 3: Preview and select the files you want to recover. Click "Recover" to save your files to a safe location.

Remember, it's crucial to act quickly when you've lost data. The sooner you use a recovery tool like Recoverit, the higher your chances of successful data retrieval.
Part 4: How to Fix Memory Leak in Windows 11/10
Now, let's dive into the heart of our topic: how to fix memory leak in Windows 11/10. We'll explore several effective methods to address this issue, explaining why each fix works and providing step-by-step instructions.
Fix 1: Close the Problematic App & Restart PC
Often, a single misbehaving application is the culprit behind a memory leak. By identifying and closing this app, you can free up the memory it's hoarding. Restarting your PC then allows Windows to start fresh, clearing out any lingering memory issues.
Steps:
Step 1: Press Ctrl + Shift + Esc to open Task Manager. Click on the "Processes" tab.
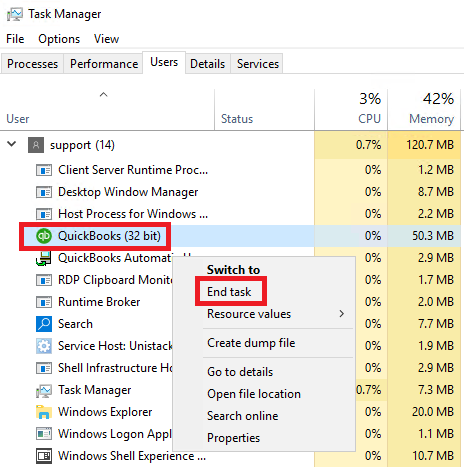
Step 2: Look for any apps using an unusually high amount of memory. Right-click on the problematic app and select "End task".
Restart your computer to completely clear the memory.
Fix 2: Disable Startup Programs
Many programs automatically start when you boot your PC, consuming memory right from the get-go. Disabling unnecessary startup programs can free up memory and prevent potential memory leaks from these apps.
Steps:
Step 1: Open Task Manager (Ctrl + Shift + Esc). Click on the "Startup" tab. Review the list of startup programs.
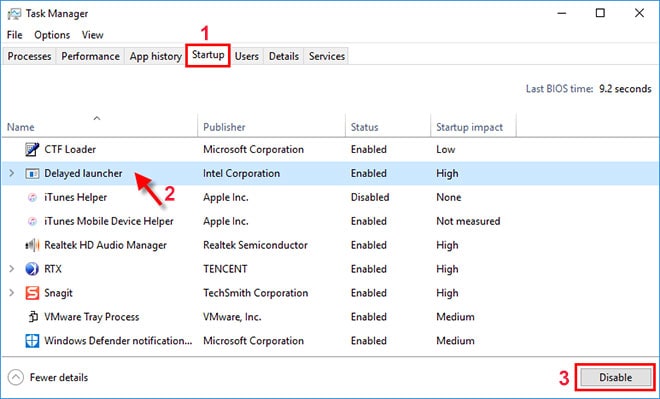
Step 2: Right-click on programs you don't need to start automatically and select "Disable". Restart your computer to apply the changes.
Fix 3: Use Memory Diagnostic Tools
Here comes another Windows 11/10 memory leak fix. Windows has built-in tools to check for memory problems. These can help identify if your memory leak is due to hardware issues or software conflicts.
Steps:
Step 1: Press Windows key + R to open the Run dialog. Type "mdsched.exe" and press Enter.
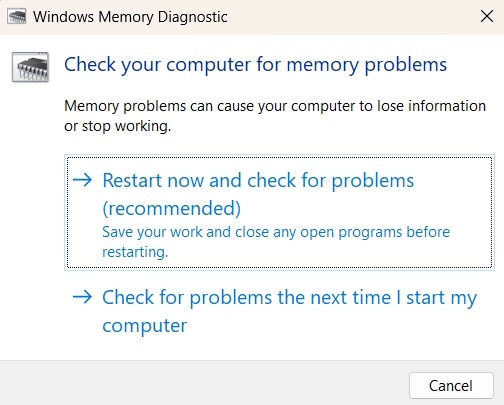
Step 2: Choose whether to restart and check for problems now or check the next time you restart. Let the diagnostic tool run (it may take several minutes).
If issues are found, consider replacing your RAM or seeking professional help.
Fix 4: Use "Adjust for Best Performance"
Windows uses various visual effects that can consume memory. Adjusting these settings can free up memory and potentially reduce the risk of memory leaks.
Steps:
Step 1: Open the Control Panel. In the Control Panel, search for "Performance" and click on "Adjust the appearance and performance of Windows". In the Performance Options window, go to the "Visual Effects" tab.
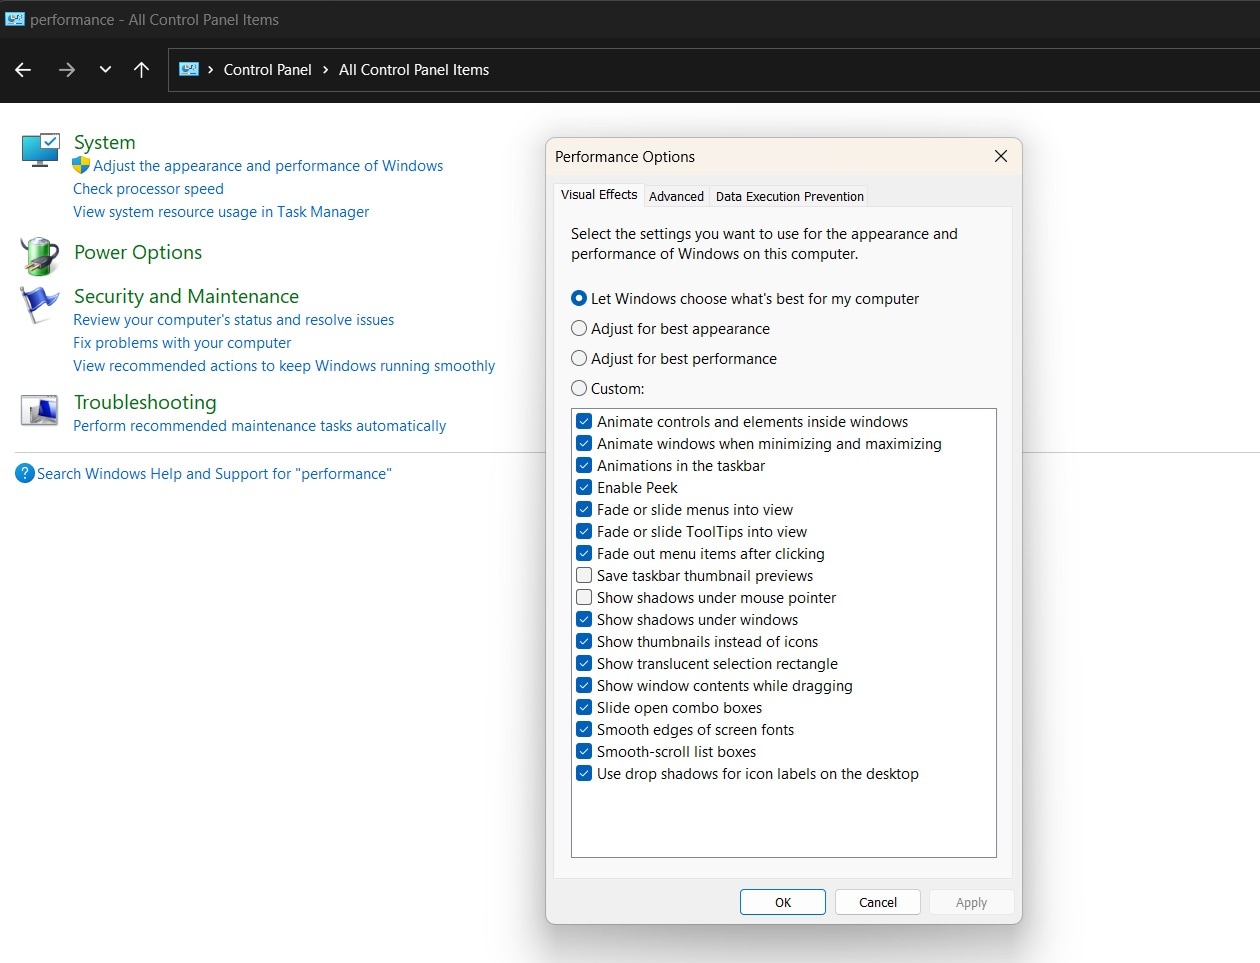
Step 2: Select "Adjust for best performance" to disable all visual effects. Click "Apply" and then "OK" to save the changes. Restart your computer to apply the new settings fully.
Fix 5: Defrag Hard Drives
Fragmented hard drives can lead to inefficient memory use. Defragmenting reorganizes your files for better performance and potentially reduces memory leaks.
Steps:
Step 1: Open File Explorer and right-click on your hard drive. Select "Properties". Go to the "Tools" tab and click "Optimize" under "Optimize and defragment drive".
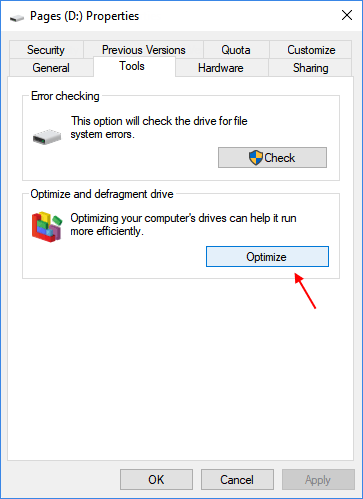
Step 2: Select your drive and click "Optimize". Wait for the process to complete (it may take several hours for large drives).
Fix 6: Update Drivers
Outdated or corrupted drivers can cause memory management issues. Updating your drivers ensures better compatibility and can resolve memory leak problems.
Steps:
Step 1: Press Windows key + X and select "Device Manager". Expand each category and right-click on your devices. Select "Update driver".
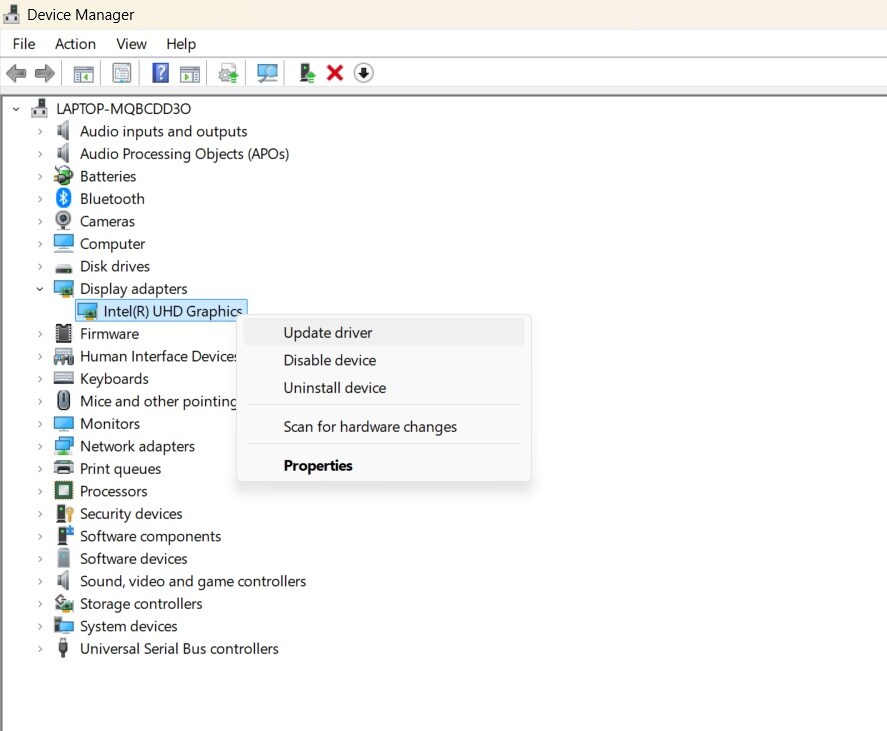
Step 2: Choose "Search automatically for updated driver software".
Repeat for all important devices (graphics card, network adapters, etc.). Restart your computer after updating drivers.
Part 5: Tips to Avoid Computer Memory Leak Issue
Preventing memory leaks is often easier than fixing them. Here are some tips to help you avoid computer memory leak issues:
- Be selective with installed programs: Only install software from trusted sources and uninstall programs you no longer use.
- Use antivirus software: Keep your antivirus up-to-date and run regular scans to prevent malware that could cause memory leaks.
- Monitor your system: Regularly check Task Manager to spot any unusual memory usage patterns.
- Restart regularly: Restarting your computer periodically can clear out accumulated memory issues.
- Limit background processes: Close applications you're not actively using to free up memory.
- Manage browser tabs: Too many open browser tabs can consume a lot of memory. Use bookmark managers or tab suspenders to keep your browser's memory usage in check.
- Check for hardware issues: Regularly test your RAM and other hardware components to catch potential problems early.
- Be cautious with Windows updates: While updates are important, wait a few days before installing major updates to avoid potential bugs that could cause memory leaks.
- Use memory cleaning tools sparingly: While tempting, memory cleaning tools often provide only temporary relief and can sometimes cause more harm than good.
Conclusion
Memory leaks can be a frustrating problem for Windows 11/10 users, but with the right knowledge and tools, you can effectively address and prevent them. By understanding what causes memory leaks and following the fixes we've outlined, you can keep your system running smoothly and avoid the performance issues associated with memory leaks.
Remember, maintaining your computer's health is an ongoing process. Regularly implementing the tips we've discussed can help you avoid memory leak problems in the future. If you do encounter issues, don't hesitate to use the step-by-step fixes provided in this guide to resolve them quickly and efficiently.
FAQs
-
What is a memory leak and how does it affect my computer?
A memory leak occurs when a program fails to release memory it no longer needs, gradually consuming more and more of your computer's available memory. This can slow down your system, cause applications to crash, and in severe cases, lead to system instability. Memory leaks affect your computer by reducing the amount of memory available for other programs and processes, resulting in sluggish performance and potential data loss if the system becomes unstable. -
How can I tell if my Windows 11/10 PC has a memory leak?
Signs of a memory leak in Windows 11/10 include unexplained slowdowns, programs taking longer to load or respond, frequent freezes or crashes, and high memory usage even when few programs are running. You can check for memory leaks by monitoring your system's memory usage in Task Manager over time. If you notice memory usage steadily increasing without opening new programs, or if it doesn't decrease after closing programs, you may be experiencing a memory leak. -
Are memory leaks permanent, or can they be fixed without reinstalling Windows?
Memory leaks are not permanent and can often be fixed without reinstalling Windows. Most memory leaks are caused by software issues that can be resolved by updating or reinstalling the problematic program, updating drivers, or using Windows' built-in tools. The fixes we've outlined in this article, such as closing problematic apps, disabling startup programs, and updating drivers, can often resolve memory leaks without the need for a full Windows reinstallation. However, if the issue persists after trying these solutions, a clean Windows installation might be necessary as a last resort.


 ChatGPT
 Perplexity
 Google AI Mode
 Grok
Grok


