


 TL;DR:
To write, modify, or delete files on Windows-formatted NTFS drives using macOS, you must install third-party software like the open-source NTFS-3G for command-line users or premium alternatives like Paragon NTFS for fast, seamless auto-mounting.
● Free tools like NTFS-3G, FUSE for macOS, and Mounty for NTFS are suited for occasional use but require complex Terminal setups via MacFUSE, suffer from slower transfer speeds, and carry risks of data corruption under heavy transfer loads.
● Paid alternatives including Tuxera NTFS, Paragon NTFS, and UUBYTE NTFSGeeker provide faster transfer speeds and stable auto-mounting for Apple Silicon and macOS 15 Sequoia, provided you grant system extension approvals in Mac settings.
● Implementing free NTFS drivers often requires bypassing built-in macOS security features like System Integrity Protection (SIP), making natively supported file systems like exFAT or FAT32 a much safer alternative for frequent cross-platform data transfers.
Ask AI for a summary
 ChatGPT
 Perplexity
 Gemini
 Claude
 Grok
Grok
Microsoft established the NTFS file system, which is the default file system on Windows. If you have decided to transfer your data files from Windows to a macOS system, you might be faced with the limitation of Apple’s compatibility. It cannot write to and access NTFS-formatted drives on a Mac without any third-party software, as Microsoft does not license it. Therefore, using a free ntfs software for mac can solve your problems and allow full functionality to NTFS volumes.
This article will deal with such issues and provide reasons why Mac doesn’t support NTFS. Aside from that, users can explore the best NTFS software that can help users and tech-savvy individuals set up their Windows files on macOS. Without changing the system files, get the best performance, enhance the overall security, and manage storage by reading this article till the end.
Try Recoverit to Perform Mac Data Recovery
 Security Verified. 3,591,664 people have downloaded it.
In this article

Part 1. What Are the Free NTFS Drivers for Mac? Why Mac Doesn't Support NTFS Natively!
Some of the best and free Microsoft ntfs for mac are NTFS-3G, Mounty for NTFS, and SL-NTFS. These drivers are useful to manage files between Windows and Mac systems without needing to reformat drives. Moreover, they are compatible with Intel and Apple Silicon Macs and usually require the installation of helper software. They involve using a complex setup, command-line usage, and are best suited for users who need occasional write access to NTFS.
The following are the various limitations on why macOS does not natively support NTFS and needs a third-party tool to access the Windows system:
- Security Concerns: If you allow full write access to NTFS on Mac, it can introduce bugs into the system, requiring more resources to secure them.
- Read-Only Designs: You can only see the read-only copy files of an NTFS and cannot add, change, or delete them without software.
- File System Options: NTFS support would require Apple to maintain code, and still, it can’t get full control access, which risks performance and stability.
- Technology Control: The OS focuses on its systems for better performance, security, and system integration, as Microsoft technology doesn’t allow it full access.
- Better Alternative: Apple recommends using different file systems, like exFAT or FAT32, because those are fully supported for reading and writing between Windows and Mac.
Part 2. 7 Free NTFS Software for Mac For You to Find the Best One
Some of the best free ntfs software for mac is provided in the following, with their step-by-step guides for you to choose which is more efficient:
1. NTFS-3G
With this open-source NTFS software, Mac users can create, modify, rename, and even delete files on NTFS drives. It allows you to write to NTFS-formatted drives, which your Mac might not support. Moreover, it can handle large files and can manage NTFS partitions without requiring modifications to the macOS core. This software has a GPL license and supports Apple Silicon Macs and Intel in various versions.
Stepwise Guide on How to Use NTFS-3G on Your Mac
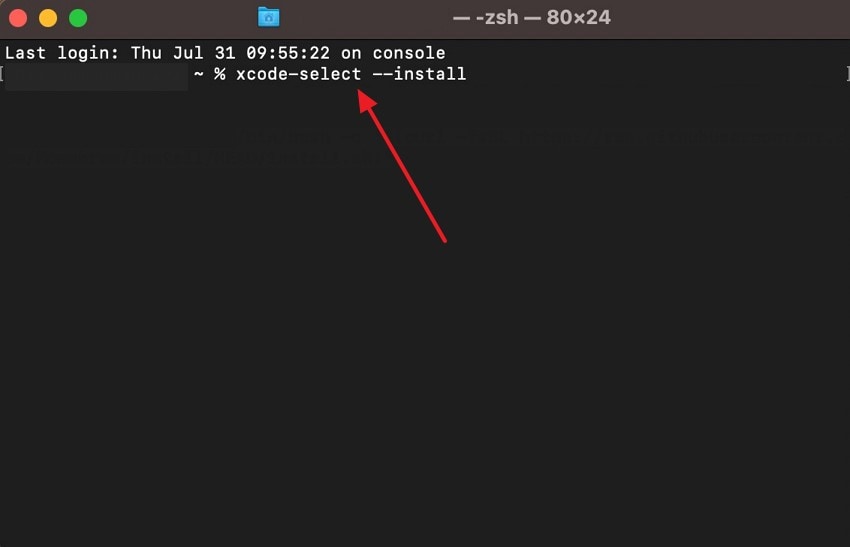
Step 1. Head to the “Application” app in the “Finder” app and access the “Terminal” option from the “Utilities” subfolder. After that, write “xcode-select-- install” and hit the “Enter” button to proceed.
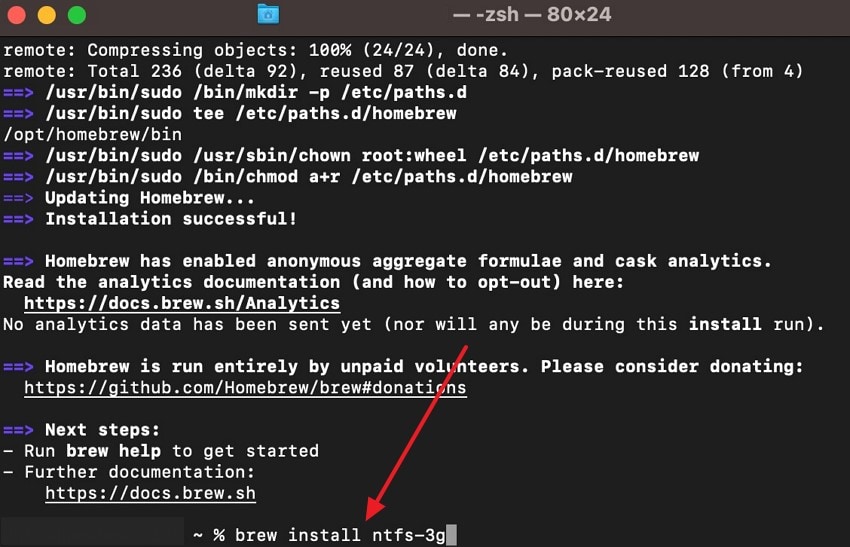
Step 2. Type “brew tap gromgit/homebrew-fuse” if you want to install a macOS-compatible Homebrew. Once that’s done, write the “brew install --cask macfuse” and press “Enter” to begin the installation process.

Step 3. After both the software is installed, finally write the “brew install ftfs-3g” code, and hit “Enter.” Now, you can access different disks on your macOS by typing “diskuti list” and begin the mounting or other NTFS writing processes.
Key Features
- This software supports features like hard links, symbolic links, and junction points.
- It operates without needing kernel-level changes, which significantly enhances portability.
- You can recover and mount NTFS volumes even after experiencing unexpected system failures.
Limitations
- Users need to go through a complicated installation of MacFUSE.
- For beginners, it is not a seamless process as it operates on the command line.
2. SL-NTFS
SL-NTFS is another ntfs mac freeware that has straightforward mounting and writing options for the different available external NTFS volumes. It is designed for macOS Snow Leopard 10.6 and later versions, where you can write to NTFS easily. You can enable or disable write permissions to different NTFS volumes without any issue. Whenever the NTFS is mounted, a prompt will notify you that writing can begin.
Walkthrough Steps on How to Utilize SL-NTFS on macOS
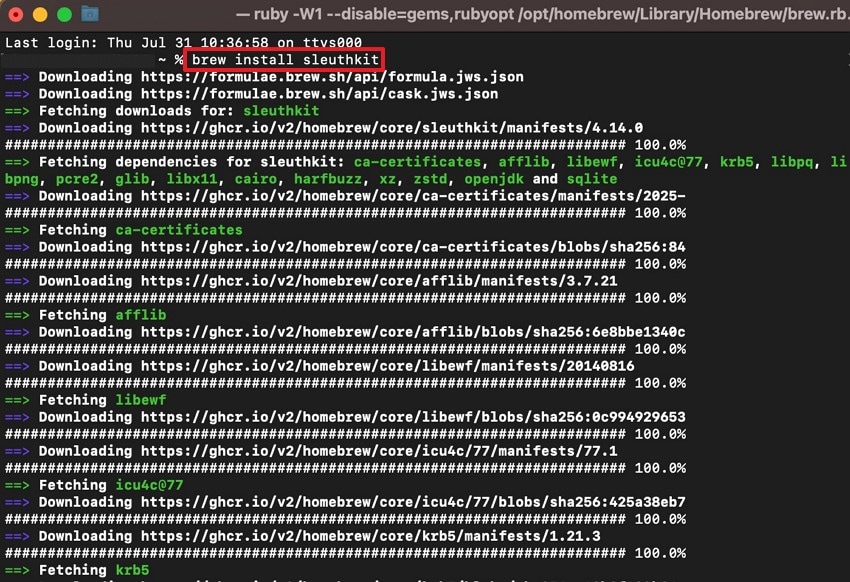
Step 1. On the “Terminal” window, enter “brew install sleuthkit” and press the “Enter” key to begin installing SL-NTFS on your Mac.
Step 2. Moving forward, head to the “System Settings” and open the “SL-NTFS” option at the end. Now, you can choose and mount different available drives under the “General” tab.
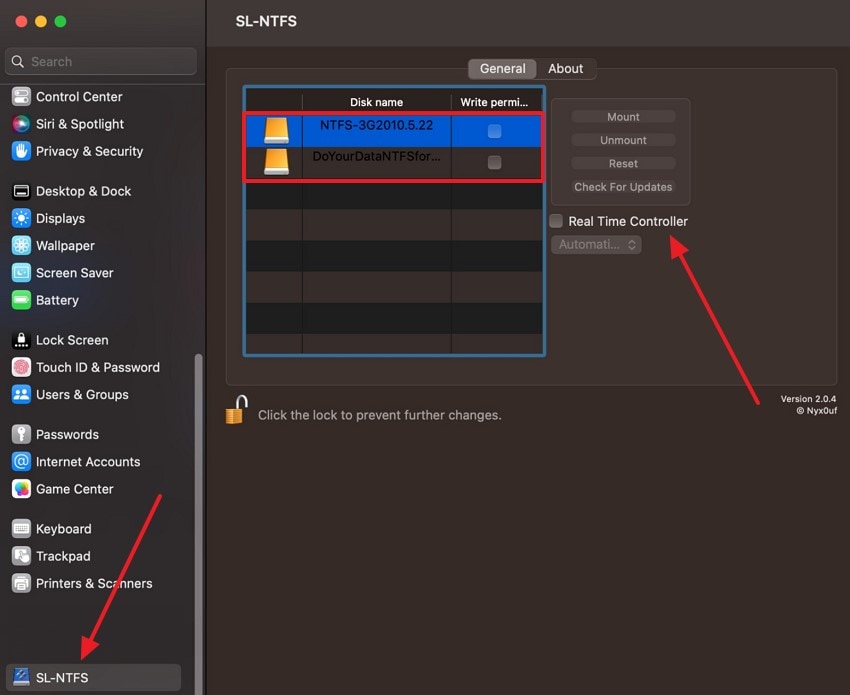
Key Features
- It displays all the mounted NTFS volumes on the software with their writing statuses.
- You can enable auto-prompt to enable writing during the mounting process.
- Thai software is only 1.4MB in size and is compatible with Apple M1, M2, and M3 chips.
Limitations
- SL-NTFS does not support large files and volumes within the Mac device.
- It was not updated for years and lacks technical and writing features.
3. Tuxera NTFS
One of the most efficient and free ntfs software for mac is Tuxera NTFS, which simplifies sharing data between Windows and Mac. Its smart caching technology offers sustainable and speedy file transferring, which merely takes a few minutes. Also, it can automatically translate file names and let you create NTFS volumes and disk images. You can seamlessly exchange data during the dual-booting of Windows and Mac.
Easy Steps on How to Try the Tuxera NTFS Software on Mac
Step 1. Open the “Install Microsoft NTFS by Tuxera 2024” installation screen, complete all the steps in the left panel, and press “Continue” to proceed.

Step 2. Double-click the “Tuxera Disk Manager” from the “Applications” tab and access all the disks and drivers of your macOS.
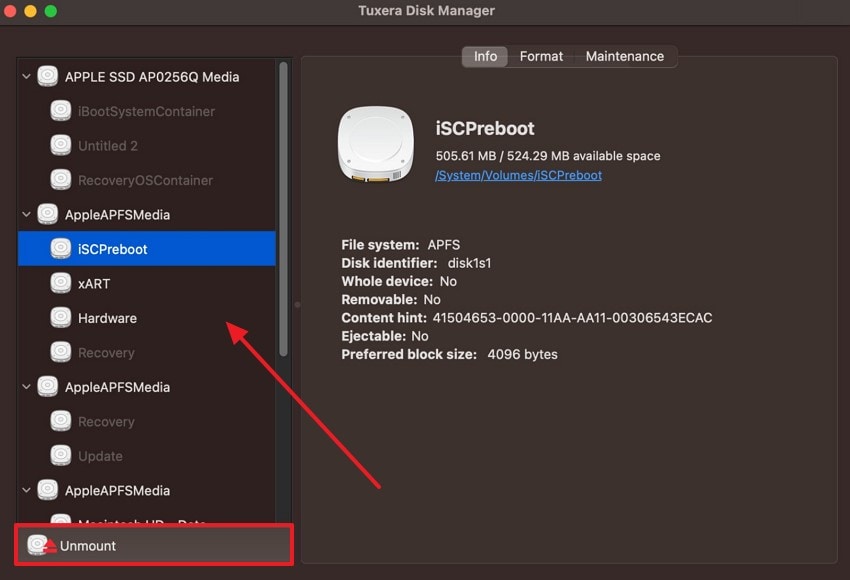
Key Features
- The NTFS of Tuxera stores and preserves your videos, pictures, and important documents.
- With the Tuxera Disk Manager app, you can easily check, format, and repair NTFS drives.
- It can handle different sizes of files when running Windows through a virtual machine.
Limitations
- Users can only use a Tuxera Mac personal license on 3 Macs for 15 days.
- This software has a slower data transfer rate with an even slower NTFS driver update.
4. FUSE for macOS
Users are allowed to extend OS X’s native file-handling abilities using FUSE for macOS, extending native access to storage formats. It supports the development of new file systems using multiple APIs, with language flexibility. You can access file systems, such as NTFS and SSHFS, that macOS does not support by default. With microsoft ntfs for mac, you can customize settings and configure them according to your needs.
Comprehensive Steps on How to Utilize FUSE for macOS
Step 1. When the “Install macFUSE” window screen opens, execute the installation steps and hit the “Continue” button.
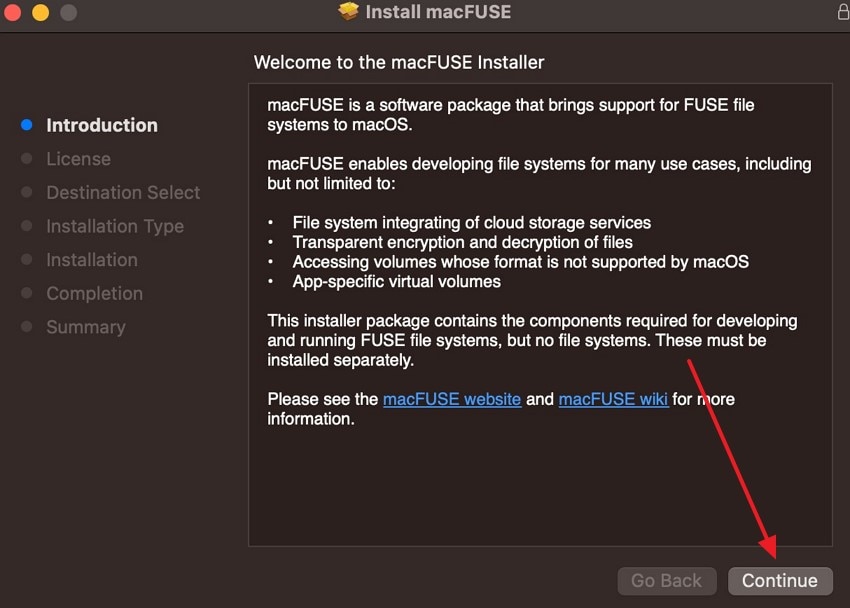
Step 2. After that, open “Settings,” head to the bottom “macFUSE” tab, and press the “Check for Updates” button before mounting or reading different disks.

Key Features
- It consists of a kernel extension and user-space libraries that act as a bridge between file systems and run them normally.
- This tool offers users a quicker and safer way to implement file systems, as user-space code avoids kernel instability risks.
- You can access local disks, network sources, and cloud storage options by running file systems in user space.
Limitations
- This software cannot safely mount different NTFS partitions in read-write mode.
- You cannot auto-mount NTFS partitions with this software.
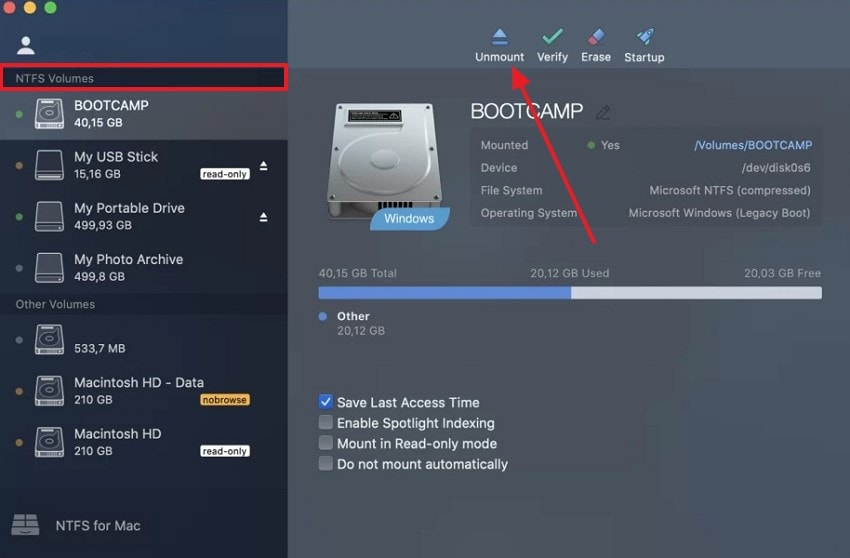
5. Paragon NTFS for Mac
If you want a seamless and unlimited read/write NTFS software, try Paragon NTFS for Mac, which offers various operations like mount, unmount, and verify. You can also control advanced mounting options, such as accessing your sensitive data in read-only mode or manually controlling volume accessibility. Additionally, it can handle all the alphabets, which makes it easy for users to name their files.
Understanding the Simple Steps of Paragon NTFS for Mac
Step 1. When you open the Paragon Software installation screen, tick the “I Accept the…” option, and hit the “Next” button to move forward.

Step 2. On the new screen, follow the on-screen steps, and press the “Open Settings” to permit this tool’s Kernel extensions.
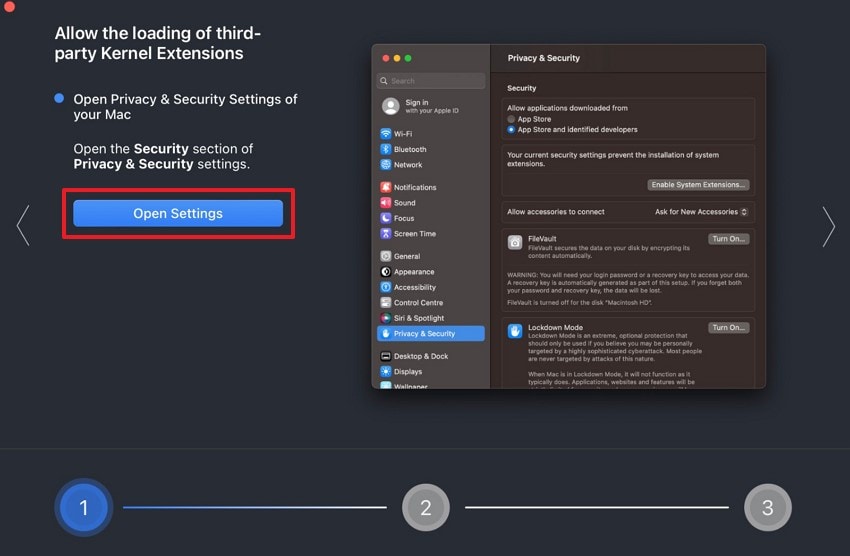
Step 3. Within the “Privacy & Security” setting tab, hit the “Enable System Extensions” button, and click “Shut Down” to shut the Mac. After that, start the device again to access the software and drives.
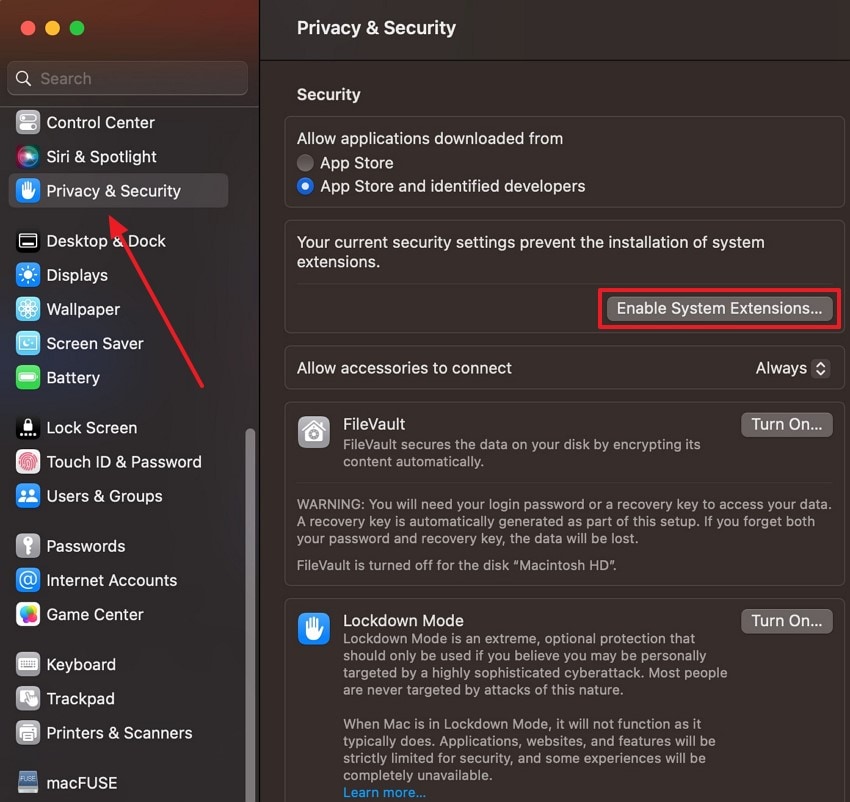
Step 4. After the Mac starts, find the Paragon software, and from its main interface, choose any “NTFS Volume” to begin mounting, erasing, and more.
Key Features
- When a volume is mounted, you can make desired modifications, like deleting, renaming, and more.
- Paragon Software mounts supported volumes automatically at startup.
- This tool safeguards the integrity and security of data during the file transfer or mounting process.
Limitations
- This software is very expensive compared to other NTFS tools on the internet.
- It comes with closed-source code, which makes it less flexible for users.
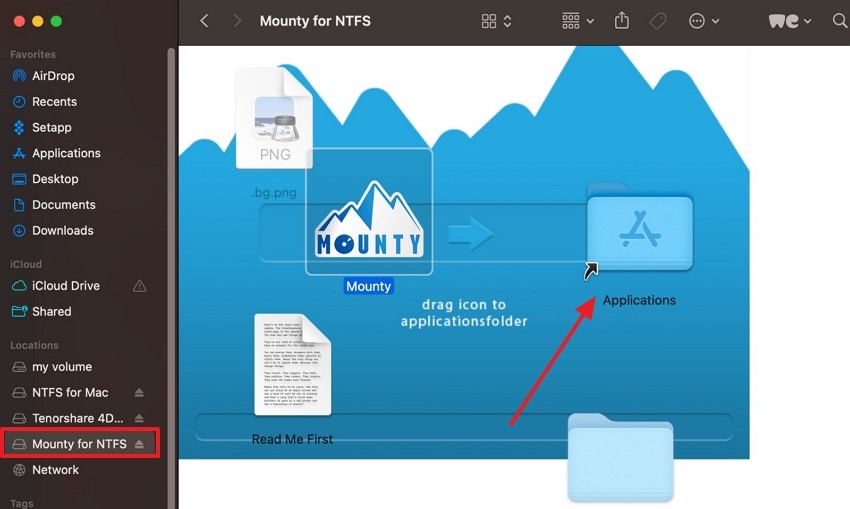
6. Mounty for NTFS
It is a free ntfs software for mac, which is used to remount different volumes in read-write mode. This lightweight software leverages Apple's hidden native NTFS and is integrated with open-source software, like NTFS-3G and macFUSE. Furthermore, it does not alter the system files or compromise system stability during mounting. It supports Intel and Apple Silicon Macs, versions 10.9 and later.
Easy Instructions on Initiating Mounty for NTFS Software
Instructions. After you have installed the Mounty NTFS software on your Mac, go to the “Finder” app, and access it under the “Locations” section. Next, choose and drag the NTFS tool over to the “Applications” folder to access its functionality.
Key Features
- This software offers auto-mounting, which eliminates the need for an extra third-party installation.
- It allows users to share files and important data between Windows and Mac without hassle.
- With its seamless drag-and-drop, you can perform normal file operations on NTFS drives.
Limitations
- Due to its unstable nature, it can turn NTFS drives into read-only mode.
- There is a risk of data corruption and loss of files due to heavy use during transfer.
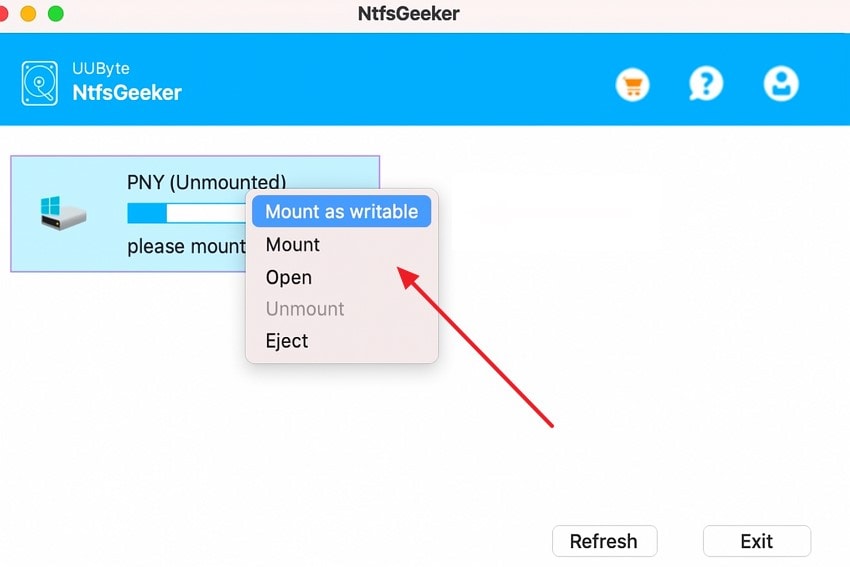
7. UUBYTE NTFSGeeker
One of the best ntfs data recovery software is UUBYTE NTFSGeeker, which allows users to read and write on Intel and Apple Silicon M1. This tool also easily detects external NTFS drives attached to the Mac, where you can copy files from the NTFS drive to the Mac. Additionally, it supports multiple formatted drives and storage, like USB Flash Drive, SSDs, and memory sticks.
Instructional Manual on How to Use the UUBYTE NTFSGeeker on macOS
Step 1. Once the NTFSGeeker software is installed, go to the “Applications” tab and press the “NTFS Geeker” option to open the main interface.
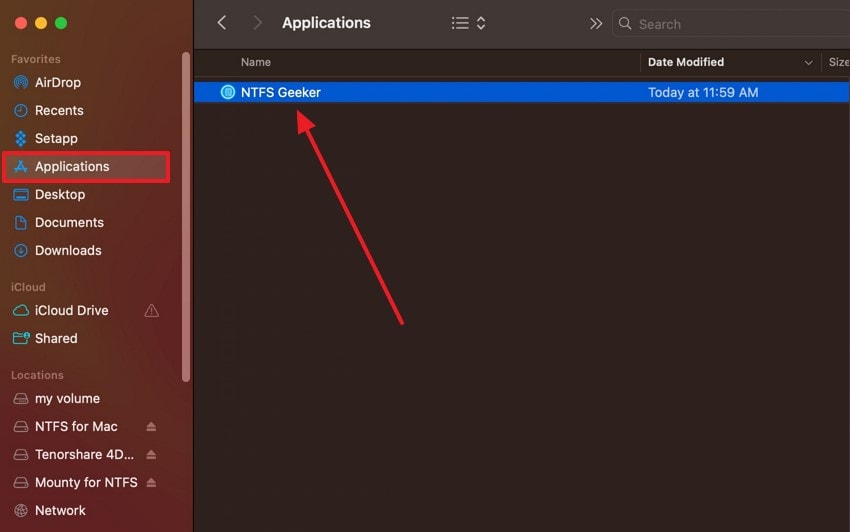
Step 2. The software will display the available drives, which you can right-click on and choose to mount, write, eject, and more.
Key Features
- This tool has an advanced safe mechanism for data transfer, which is powered by a reinforced algorithm.
- The smart AI engine makes file transfer 3 times faster, which you can optimize with a caching mechanism.
- You can grant users permissions to access, write, and manage files on Mac and connected external drives.
Limitations
- UUBYTE NTFSGeeker runs different background processes, which makes it use extra system resources.
- You can face random system conflicts with drive accessibility if it is not installed properly.
Part 3. A Detailed Comparison Table of All 7 Microsoft NTFS Software for Mac
Here is a comprehensive breakdown of all the ntfs software for mac free downloads, so that you can decide which one has the best features:
| Tools | Mac Compatibility | Auto-Mount | Transferring Speeds | Easy to Use | Data Security | Pricing Plans |
|---|---|---|---|---|---|---|
| NTFS-3G | macOS 15 Sequoia to OS X 10.9 Mavericks | ❌ | Slow | Complex | Basic security | Free |
| SL-NTFS | macOS X 10.5, may work up to 10.11 (El Capitan) | ✅ | Moderate | Moderate | Moderate | Free |
| Tuxera NTFS | macOS 15 Sequoia to macOS X 10.4 Tiger | ✅ | Fast | Easy | Strong data integrity and security | Personal License: $15 per license Business: Varies according to users Education: Varies according to users |
| FUSE for macOS | macOS 15 Sequoia - OS X 10.9 Mavericks | ❌ | Slow | Complex | Basic relies on the underlying NTFS-3G | Free |
| Paragon NTFS for Mac | macOS 15 Sequoia - 10.12 Sierra | ✅ | Very Fast | Very easy | High security and stable driver | For Business Use: $49.95 |
| Mounty for NTFS | macOS 15 Sequoia - OS X 10.9 Mavericks | ✅ | Moderate | Easy | Basic | Free |
| UUBYTE NTFSGeeker | macOS latest, including macOS Sonoma, Intel & Apple Silicon | ✅ | Fast | Very easy | Good security with system extension approval | 1-Year Plan: $19.95 Lifetime Plan: $29.95 Family Plan: $59.95 |
Part 4. Bonus Part: How To Recover Lost Data on Your Mac With Ease: Recoverit
In addition to looking at microsoft ntfs for mac, when moving files between Windows and Mac, you may lose important files and documents and this would be problematic. Thus, to recover data that is deleted or lost by accident, use Wondershare Recoverit, which recovers 99.5% data. Furthermore, this software supports recovering more than 1000 different file types across multiple storage media in just 3 clicks.
There are limitations to the file size and time limit you want to restore, as with this recovery tool, you can conveniently recover them. With over 35 patented technologies, Recoverit even repairs corrupted data and documents with extreme precision. You can even pause and stop during the scanning process once you’ve spotted your files. It is compatible with all OS devices and supports macOS 10.13 - macOS 15 (Sequoia).
Key Features
- Advanced Recovery Process: The advanced recovery and scanning process quickly searches every corner of your selected drive and retrieves lost data within seconds.
- Filter Options: You can narrow down the search by adding data filters, like file name, file type, status, and more, to get quick search results.
- Review Mode: Users can preview all the recovered files in the preview window and download them on their Mac device.
Comprehensive Step Guide on How to Recover Lost Data on Your Mac
The following is the easy-to-understand instructional guide that will help you learn how this seamless file recovery tool can retrieve your files:
Step 1. Launch Software and Select a Location to Begin the Scanning Process
Once the main interface opens, press the “Hard Drives and Locations” tab on the left panel, and choose one of the drives to get started.

Step 2. Add Filters During the Deep Scanning Procedure
Next, during the scanning, click the “Filter” option at the top, and change the “File Type,” “File Size,” and more to quicken the scanning.
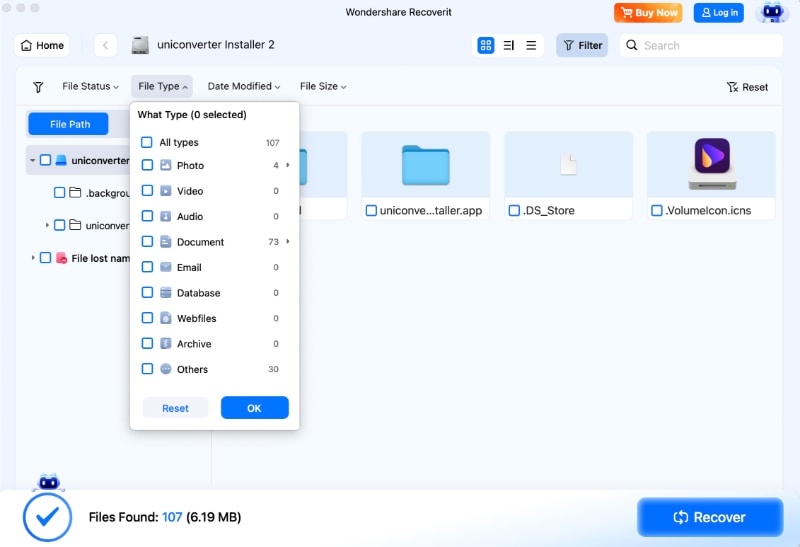
Step 3. Preview the Recovered Files before Downloading
Afterward, “Preview” the desired recovered files on the opened data and hit “Recover” once satisfied with the contents.

Conclusion
In the end, NTFS is a reliable system that helps your computer store and protect files on a Mac. While it can’t write on Mac, this article provided you with the best 7 free ntfs software for mac that you can use to read, write, and store files. In case your files get lost due to the NTFS software, you can turn to Recoverit to retrieve them.
FAQ
-
1. How safe is it to use free NTFS drivers?
Most of the free ntfs software for mac drivers provides basic data security, but you might encounter risks, like slower speeds, potential instabilities, and more. Moreover, in rare cases, it can lead to data corruption because these tools rely on open-source and have no official implementations. -
2. Do free NTFS drivers support all Mac versions and hardware?
The free NTFS software, like NTFS-3G, works on macOS 10.9 up to macOS 15, but can be slower and less stable on Apple Silicon Macs. Therefore, you should always check the specific driver’s compatibility before you install and use it on your macOS. -
3. Can I use macOS Terminal tricks to enable NTFS write without drivers?
While it is possible for users to perform or enable NTFS write support on macOS using Terminal commands, it is not recommended. You can write on the device via editing /etc/fstab, but it is quite unstable and might corrupt your data. -
4. Does using a free NTFS driver require disabling Mac security features?
Some free drivers, like NTFS-3G and Mounty for macOS, require disabling the SIP option on your Mac to work properly. This action lowers the system's security, but these tools involve replacing a built-in Apple tool with a third-party binary, which SIP usually prevents.


