


 TL;DR:
Windows users can repair logical hard drive errors and attempt data recovery from bad sectors using the built-in CHKDSK utility via Command Prompt, Windows Disk Checker, or a bootable installation drive.
● Execute `chkdsk /f` to fix structural file system errors, use `chkdsk /r` to locate and recover readable information from bad sectors, or add `/x` to force an in-use drive to dismount before the repair begins.
● Limit the use of the `/r` command on modern Solid State Drives (SSDs) because they automatically manage bad sectors via Wear Leveling, and instead use manufacturer diagnostic tools for significant SSD errors.
● Do not run CHKDSK on a drive experiencing physical failure, such as making clicking sounds; prioritize extracting files with data recovery software like Wondershare Recoverit before attempting any disk repairs.
Ask AI for a summary
 ChatGPT
 Perplexity
 Gemini
 Claude
 Grok
Grok
Are you facing hard drive problems on Windows? Is it a bad sector in your hard drive that is not letting you save data? Or are you constantly met with storage space issues on hard drives despite having sufficient space available? Are you unable to find a way out of a hard drive issue on Windows? Any of these situations can be highly frustrating. Thankfully, if you are a Windows PC user, then you can easily address them all with one built-in utility, CHKDSK.
Don't know check disk and repair command? Do not worry, we have compiled a list of all the possible ways to run the CHKDSK fix utility to check disk errors. In the article, you can also learn about the CHKDSK utility and its functionality, along with different commands that you can use to run CHKDSK to perform hard drive disk check and fix hard drives.
Try Wondershare Recoverit to Perform Data Recovery
 Security Verified. Over 7,302,189 people have downloaded it.
In this article

Part 1: What is CHKDSK Utility in Windows Computer
CHKDSK, often known as Check Disk, is a system tool or utility in Windows that checks your hard drive for file system issues or bad sectors. A bad sector is a region of the hard drive that cannot store data. This tool is intended to analyze, check, and fix storage drives, which can include hard drives, solid-state drives, and removable media.
It allows you to check and correct logical errors in storage devices while also monitoring the state of the hard drive in real-time. Additionally, run the check disk program regularly to keep your system data organized.
To run CHKDSK, you must first open CMD with administrator access and understand the functioning of the commands and their possible combinations to complete the task. Running CHKDSK, on the other hand, may not directly speed up your PC, but it does free up space, which often has the same impact. When CHKDSK is not available for raw drive, check this article: How to Fix CHKDSK is not available for RAW drives/USB/SD card.
| Drive Symptom | Recommended Command | Data Risk Level |
| Slow file loading / Small glitches | chkdsk /f |
Low - Fixes file system metadata. |
| "Drive is Unreadable" / Clicking sounds | DO NOT RUN CHKDSK | High - Physical failure. Use Recoverit first. |
| Blue Screen of Death (BSOD) | chkdsk /r |
Medium - Attempts to recover data from bad sectors. |
| Drive is "In Use" or Locked | chkdsk /x |
Low - Forces a dismount to start repair. |
Part 2: What Are Different Disk Check Commands
After knowing the CHKDSK utility and its functionality, it is important to understand each disk check command function regarding scan and repair storage disk issues. Although you might not find the need to use all the disk check commands, for the most part, basic CHKDSK commands can help resolve the most common errors. In addition, if you are using CHKDSK to repair external hard drive, you can use the same CHKDSK repair command to scan and repair. However, you might need to use additional check disk commands if the storage drive has deeper issues that require additional attention.
Here is a brief overview of all CHKDSK commands with their functionality:
| Goal | Command Syntax | What it Does |
| Standard Fix | chkdsk C: /f |
Fixes errors on the disk without scanning for bad sectors. |
| Deep Repair | chkdsk C: /f /r |
Locates bad sectors and recovers readable information. |
| Quick Scan | chkdsk C: /scan |
Scans the drive while it is still online (Windows 10/11). |
| Force Repair | chkdsk C: /f /x |
Forces the drive to dismount so the repair can start immediately. |
Related Video >>: How to Run CHKDSK to Repair Bad Sectors?
Part 3: How to Fix Hard Drive Problems with CHKDSK in Windows
If you are wondering, how do I run CHKDSK and fix errors, you can do it in a couple of ways. Windows offers multiple ways to run CHKDSK on your system, from the command line interface to the graphics user interface. However, you can choose the right way depending on your preference and technical knowledge.
Here are different ways you can check and fix disk errors with CHKDSK on your Windows computer:
#1: Using Windows Disk Checker
Here are the steps for how to check a disk for errors using CHKDSK from Windows Disk Checker:
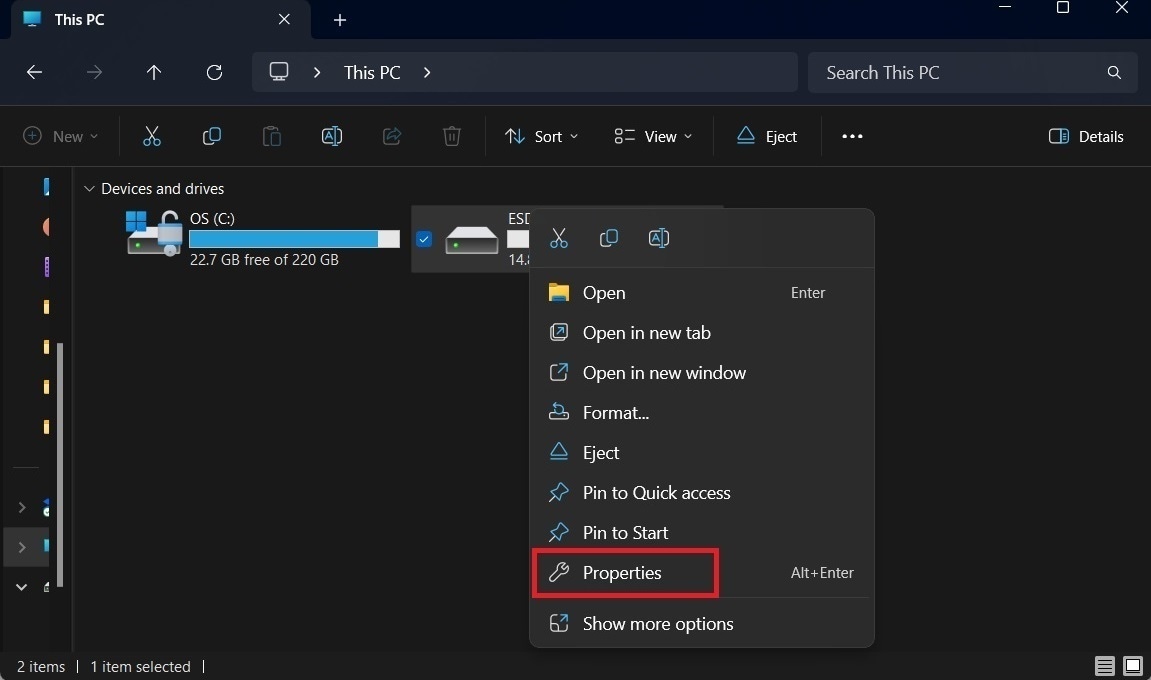
Step 1: Launch the "File Explorer" from the "Start" menu on your computer. Select the "This PC" option from the left panel.
Step 2: Select the hard drive you want to run chkdsk to fix hard drive and right-click on it to select the "Properties" option from the context menu.
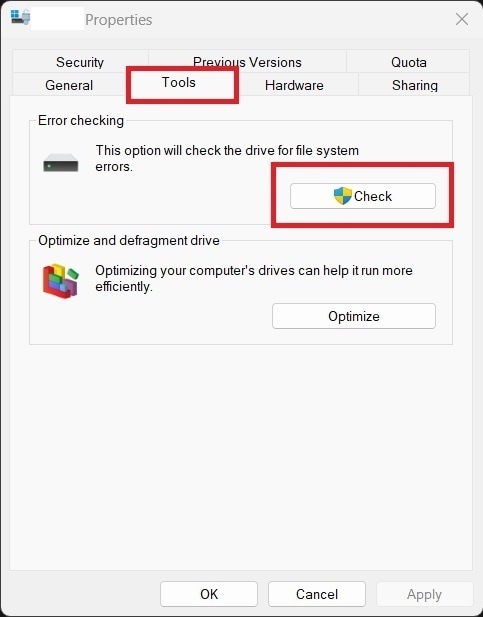
Step 3: Next, on the Properties window, select the "Tools" tab at the top and click on the "Check" button under the "Error checking" section.
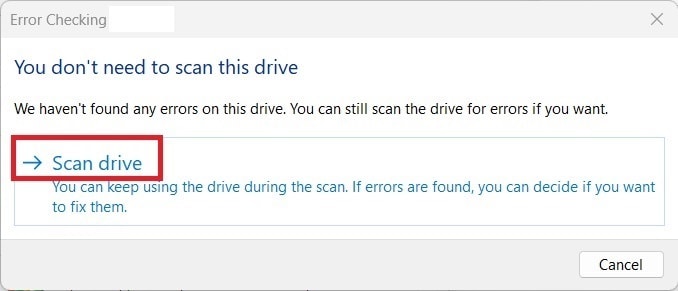
Step 4: In case no errors were found during automatic scheduled scans, you will be prompted with a "You don’t need to scan this drive" message. However, if you want to scan the drive, click on the "Scan drive" option.
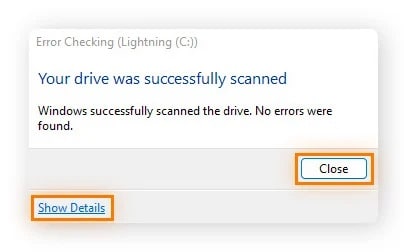
Step 5: Wait for the scan to complete and display the "Your drive was successfully scanned" message. Click on the "Show Details" option to view any errors or information regarding repair details. If you do not want to view details, click on the "Close" button.
The Error Checking or Disk Check feature on Windows is the user interface version for the CHKDSK utility. It shows how to perform the check disk command from a window rather than entering individual CHKDSK commands into Command Prompt.
#2: Using Command Prompt
While you can easily run the CHKDSK utility from the File Explorer, the Command Prompt method gives you more functionality with the CHKDSK repair command to scan and repair hard drives. You can also mix and match different paraments to customize the command action to check and fix disk errors with chkdsk
Here are the steps to check disk errors and run chkdsk to fix hard drive using Command Prompt:
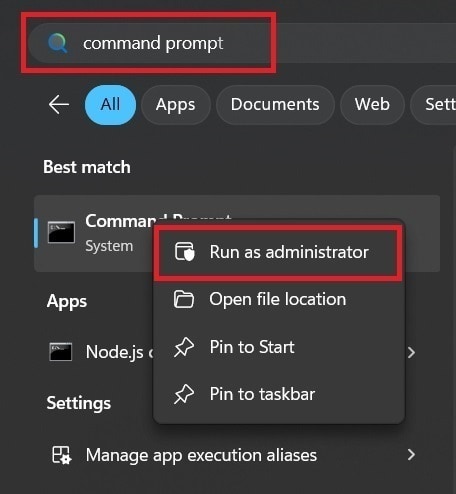
Step 1: Search for "command prompt" from the search box in the "Start" menu.
Step 2: Right-click on the "Command Prompt" search result and select the "Run as Administrator" option.
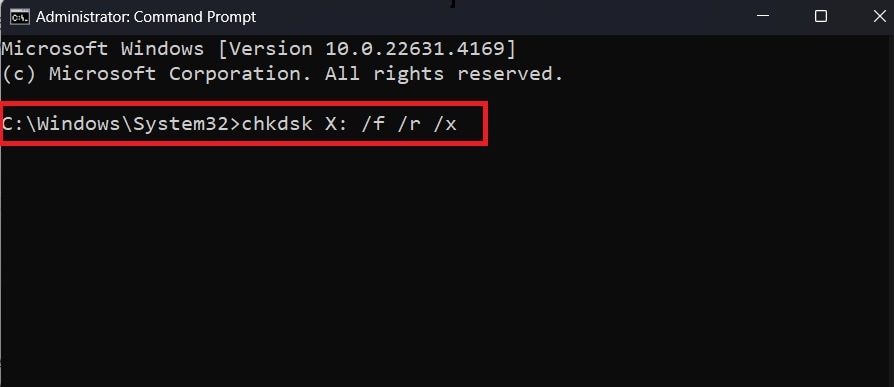
Step 3: On the command prompt window, enter "chkdsk X: /f /r /x" and press the "Enter" key. Make sure to replace the "X" letter with the external hard drive letter.
#3: Using Boot Drive
You can also run the CHKDSK utility even when your computer fails to boot or displays the "Blue Screen of Death" error. To achieve this, you can run CHKDSK from an external drive such as a bootable USB drive or other installation media containing your version of Windows OS. This will scan for errors and attempt to correct them before your Windows version boots up for installation.
You can also use this method as a backup if the CHKDSK utility fails to execute because the drive is in use or if you keep receiving the "access denied" warning message.
Follow the below steps to run CHKDSK to fix hard drive using a Windows boot drive:
Step 1: First, connect your bootable Windows installation drive to your computer and restart it.
Step 2: During the booting process, keep pressing the F8 key on your keyboard until the Windows logo appears.
Step 3: Select the "Repair your computer" option when it prompts for the booting option.
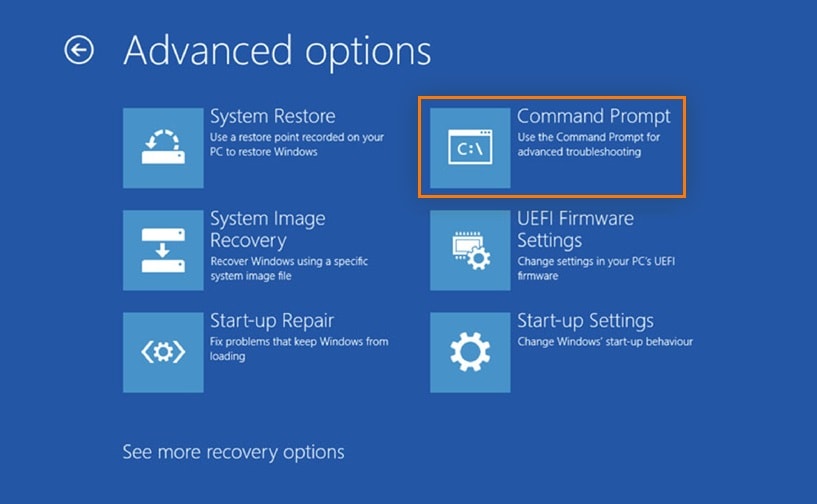
Step 4: Click on the "Troubleshoot" and then "Advanced options".
Step 5: On the next screen, select the "Command Prompt" option from the list.
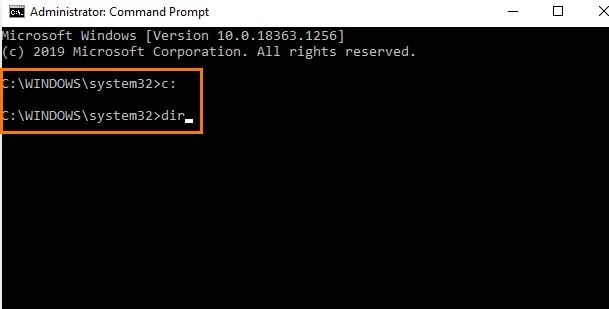
Step 6: Once the command prompt launches, you need to make sure it is in your home drive. If you do not know on which drive the Windows OS is installed on your computer, which is usually the C drive. Enter "C:" and press "Enter". Then enter the "dir" command and press "Enter". Now check if the displayed directory contains Windows OS folders and files. If not, then change the drive name to "D:" and repeat the process, until you determine which is OS drive.
Step 7: Next, enter your preferred CHKDSK commands to fix the hard drive, for example, you can first enter "chkdsk C: /f /r /x" to scan and fix any errors.
Step 8: After the process is over when prompted to perform CHKDSK the next time your system reboots, type Y and press Enter.
#4: Using CHKDSK in older Windows versions
Similar to the newer Windows versions, such as Windows 11 and 10, you can run CHKDSK on the older Windows versions 8 and 7. Error Checking can be conducted via File Explorer or using the CHKDSK commands in Command Prompt. Also, all CHKDSK repair commands are the same. However, there might be difference in how you launch the Command Prompt in older Windows version compared to the newer.
Here are the steps to launch Command Prompt in older Windows versions:
- On Windows 8: Press the "Windows + C" keys together to open the "Charms Bar", select the "Search" option, and enter "cmd" to open Command Prompt.
- On Windows 7: Click on the "Start" menu and enter "cmd" on the search option to launch Command Prompt.
- On Windows Vista: Select the "Start" menu, search for "cmd" and open Command Prompt from the results.
- On Windows XP: Open the "Start" menu and select the "Run" option. Enter the "cmd" into the dialog box and press "Enter" to launch Command Prompt.
Part 4: How to Recover Deleted Data From Hard Driver
Now that you know how to fix errors and issues on your hard drive using the CHKDSK utility, you might also want to recover any lost or deleted data from the hard drive. To achieve this, you need reliable data recovery software such as Recoverit - Data Recovery. The app is a comprehensive data recovery solution with an easy-to-use interface to recover lost data from all types of storage drives.
Here are the key features of the Recoverit - Data Recovery application:
- It can recover fragmented or deleted files, photographs, audio, music, and emails from any storage device in an effective, safe, and complete.
- The app supports data recovery from any memory card, CF card, SD card, recycle bin, hard disk, flash drive, digital camera, or camcorder.
- You can perform data recovery from sudden deletion, formatting, hard drive corruption, virus attacks, and system crashes in any number of conditions.
- It allows you to preview recoverable files before saving them, enabling customized recovery.
- The application is available for cross-platform operating systems, including Windows and Mac OS.
Follow the below steps to recover missing files from hard drive using Recoverit:
Step 1: Download and Install Recoverit
Download and install the Recoverit Data Recovery tool on your computer. Make sure to install the application on a different drive than the location where files are deleted.
Step 2: Select Hard Drive to Scan
Click on the "Hard Drives and Locations" option from the left side panel and select your hard drive option under the "Hard Disk Drives" section.
Later, click on the "Start" button to begin the scan and recovery process.

Step 3: Scanning Process
The app will scan your hard drive to detect and retrieve all lost or deleted files. Wait for the process to complete. It might take time, depending on the number of files and size.

Step 4: Preview and Recover Files
After the scanning process is over, the recoverable files will be displayed with file types on your hard drive. You can preview the recoverable files to check if it is correct or not. If it is the right file, click on the "Recover" button to save the file in the location of your preference.

| Scenario | Primary Tool | Success Rate |
| Logical File Errors | Windows Disk Checker (GUI) | High |
| System Won't Boot | CHKDSK via Boot Drive | Medium |
| Files Disappeared | Wondershare Recoverit | Very High |
| Physical Drive Noises | Professional Hardware Repair | Expert Needed |
Conclusion
If you are a Windows PC user, then you must be well aware of the CHKDSK utility and its various functionality advantages. It is one of the primary and reliable tools used by many users to check hard disk and repair with CHKDSK command. However, not many know what are the various ways to run CHKDSK to fix hard drives. Now you know how to use CHKDSK fix to check disk errors, including from the Windows boot menu. But while you are repairing your hard drive using CHKDSK, you should also use the Recoverit - Data Recovery tool to recover all your lost data.
Try Wondershare Recoverit to Perform Data Recovery
Security Verified. Over 7,302,189 people have downloaded it.
FAQ
-
1. How do I repair my hard drive with CHKDSK?
You can repair your hard drive with CHKDSK in a couple of ways, depending on your preference. If you prefer a GUI interface, then check and fix disk errors with CHKDSK from the File Explorer using the Windows Disk Check utility. Or, you can enter the CHKDSK repair command in Command Prompt to check disk errors and repair. -
2. Which is better, CHKDSK r or f?
The chkdsk /f corrects any structural issues with the file system and directory, including conflicts between the two. But chkdsk /r searches for corrupted areas of the physical hard disk while also executing chkdsk /f functions and attempting to recover the data so that it can be moved to a non-corrupted part of the drive. Choose the right one depending on your needs. -
3. Does CHKDSK fix all drives?
Yes, the CHKDSK utility can scan and fix almost all drive types, including hard disk, external hard disk, and SD cards. However, it is not a data recovery tool. You should use Recoverit - Data Recovery to recover your data from any type of storage drive.


