


 TL;DR:
To safely diagnose hard drive bad sectors, you can utilize Windows Command Prompt utilities or visual tools like HDDScan, but you must secure your data using Wondershare Recoverit first if the drive exhibits mechanical clicking to prevent total hardware failure during intensive scans.
● Run Command Prompt as an administrator and type wmic diskdrive get status for a fast SMART check that returns an OK if your drive's hardware self-monitoring system detects no critical failures.
● Execute the chkdsk C: /f /r command to perform a deep scan that isolates bad sectors and attempts to recover readable information, though this process takes several hours and puts high physical stress on already failing mechanical parts.
● Modern SSDs automatically replace worn-out flash cells with spare blocks, meaning that if a visual diagnosis in HDDScan shows a sudden increase in the Reallocated Sectors Count, the drive has exhausted its replacements and is reaching its end-of-life limit.
Ask AI for a summary
 ChatGPT
 Perplexity
 Gemini
 Claude
 Grok
Grok
Having bad sectors on your hard drive sounds scary, right? You don't have to be a techy person to know that a healthy hard drive is vital for the proper functioning of your computer. However, you're now seeing symptoms that indicate a terrifying truth - your HDD sectors have gone bad.
Before you panic, let's check if that is true. In this article, we'll show you how to perform an HDD bad sector scan in three different ways and recover your data, should you lose any.
What Are Bad Sectors on an HDD?
A hard drive's main function is to provide storage for data and files. The smallest storage unit in a hard drive is called a sector. Sectors can be found in hard disk drives (HDDs) and solid-state drives (SDDs), as well as USB drives and other internal or external storage drives.
When you have a bad sector in your HDD, it means that this part of your hard drive is damaged. Healthy sectors can write and read files on HDD. Bad sectors can't do that.
There are two types of bad sectors - physical and logical bad sectors. Physical bad sectors point to physical damage, while logical bad sectors refer to other types of malfunction. In either case, a bad sector implies permanent data loss.
However, unlike logical bad sectors, you can't repair physical bad sectors on an HDD.
2026 Technical Shift: HDD vs. SSD "Bad Sectors"
In 2026, it is vital to know whether you are scanning an old-school HDD or a modern SSD, as the "Bad Sector" concept has evolved.
| Feature | Traditional HDD | Modern SSD (NVMe/SATA) |
| Cause | Physical platter scratches/head crash | Flash cell wear-out (limited P/E cycles) |
| The "Sound" | Clicking or grinding noises | Completely silent; sudden "Read-Only" mode |
| Repairability | Logical fixes only; physical is impossible | "Spare blocks" are used automatically until exhausted |
| Scanning Impact | High stress on mechanical parts | Low impact on hardware life |
Why Check a Hard Drive for Bad Sectors
You can't have a bad sector and not notice it. Sooner rather than later, this kind of damage will cause your computer to malfunction. Some common symptoms of a bad sector are:
- Your computer freezes for no apparent reason;
- You keep seeing the Blue Screen of Death (BSOD);
- Your application software keeps randomly crashing;
- The system won't boot up, and you can't access it;
- You're getting errors when you try to access files;
- You can hear abnormal noises from your computer;
- Your computer is heating up more than it should.
If you're experiencing any of these warning signs, it's time to test your hard disk for bad sectors.
Bad Sector Symptom Severity Scale
| Symptom | Severity | Immediate Action |
| Occasional Freezing | Low | Run CHKDSK scan during off-hours. |
| Files disappearing/corrupting | Medium | Stop writing new data. Use Recoverit immediately. |
| Blue Screen of Death (BSOD) | High | Check SMART status; prepare for drive replacement. |
| Clicking/Grinding Noises | Critical | Shut down immediately. Software cannot fix mechanical failure. |
How To Check a Hard Drive for Bad Sectors

The easy way to identify bad sectors is to open the computer manually and check the HDD, but if doing that makes you nervous, don't worry. There's a way around that. Right now, we will show you how to check a hard drive for bad sectors without performing a physical inspection.
Method 1: Check Hard Drive Bad Sectors With Chkdsk
CHKDSK stands for Check Disk, a special utility on Windows computers that allows you to, well, check your disk. If there are any errors or defects, such as bad sectors, CHKDSK will detect them and create a report. CHKDSK can also repair bad sectors if you type in special parameters.
There are three ways to check bad sectors with CHDSK on Windows computers:
- From File Explorer (or My Computer in earlier versions of Windows);
- Using Command Prompt - it's the same for all versions of Windows;
- From installation media - useful if your computer refuses to boot up.
Check Hard Drive Bad Sectors with Chkdsk from File Explorer
Here's how to run CHDSK from File Explorer on Windows 10 and Windows 11:
- Open your File Explorer and select This PC from the sidebar.
- Find the drive you want to check under Devices and drives.
- Right-click on it to reveal a drop-down menu. Pick Properties.

- Find the Tools section and click on Check under Error Checking.
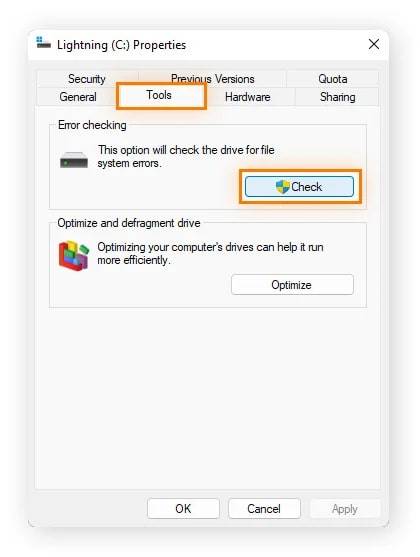
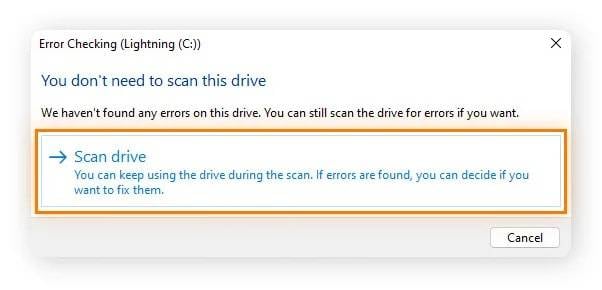
If the prompt says: You don't need to scan this drive, but you want to test it for bad sectors anyway, select the Scan drive option and click Show Details to preview the error report.
The process is virtually the same for Windows XP, Vista, 8, and 7 - only instead of looking for your hard drive in File Explorer, you should go to My Computer and locate it there.
Check Hard Drive Bad Sectors with Chkdsk in Command Prompt
Now, let's test bad sectors on an HDD with CHDKS from the Command Prompt:
- Go to Start and search for Command Prompt.
- Click Run as administrator to access the app.
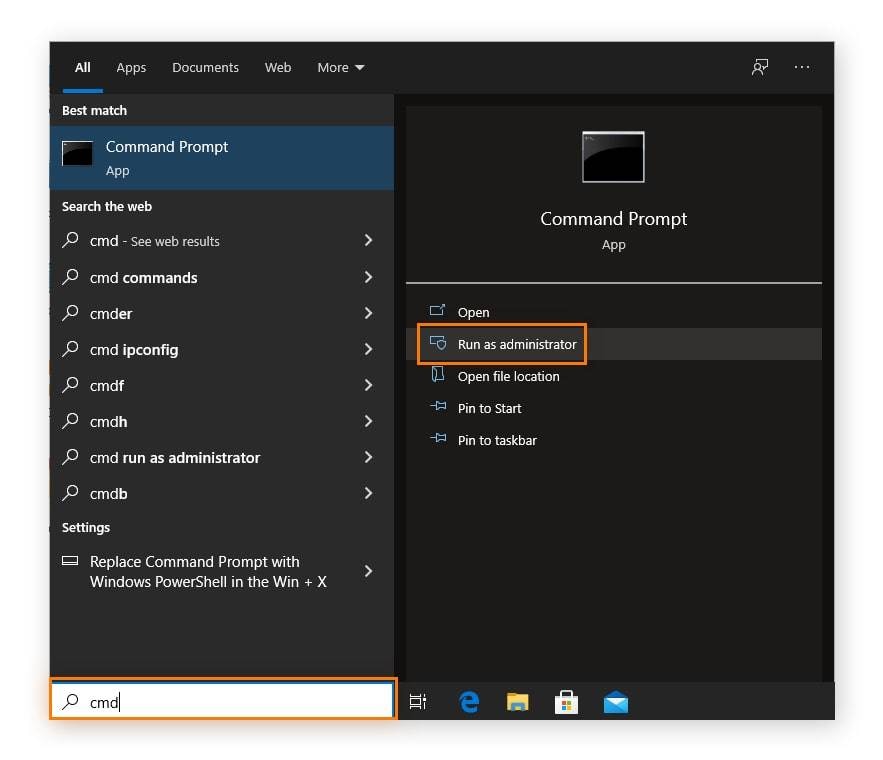
- When you're in, type chkdsk and hit Enter.
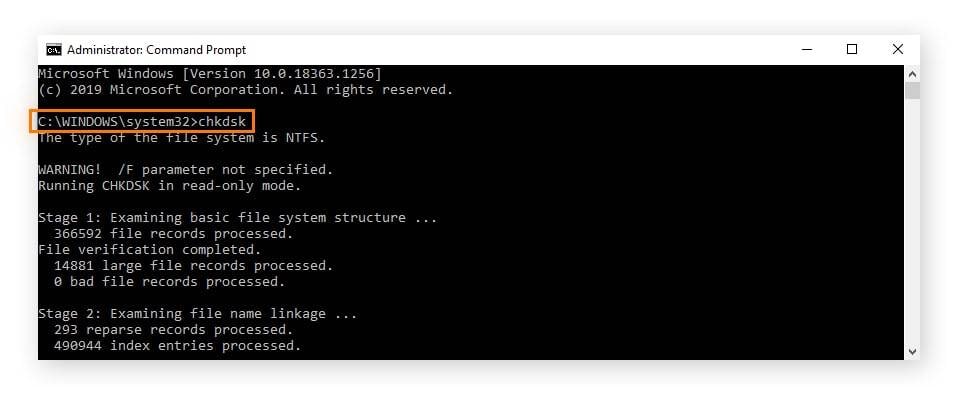
Why bother with Command Prompt commands when you have a more user-friendly alternative in a File Explorer? The answer is that Command Prompt gives you more control over the disk testing process. For example, you can deep-scan a malfunctioning drive, run an online scan, etc.
CHDSK commands and their functions are identical for all versions of Windows. If you have Windows 8, you can find Command Prompt by pressing the Windows icon + C and typing cmd into a Charms Bar. In all other Windows versions, Command Prompt can be found from Start.
Check Hard Drive Bad Sectors with Chkdsk on an Unbootable PC
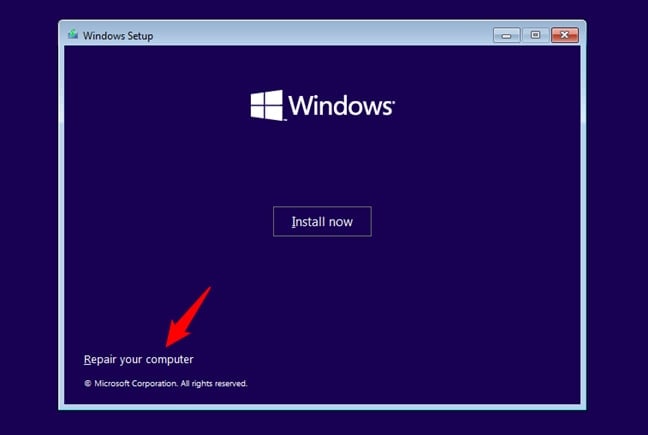
You can also use CHDSK to identify bad sectors when you can't boot up your system. For this to work, you'll need a bootable media (like a USB drive) with your version of Windows.
- Insert bootable media into your computer and restart it.
- Boot the computer from the bootable media and click Next.
- Click on Repair your computer in the bottom left corner.
- At the Choose an option screen, opt for Troubleshoot.
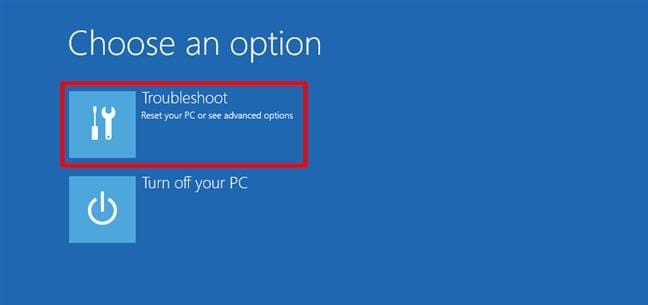
- Pick Advanced options and select Command Prompt.
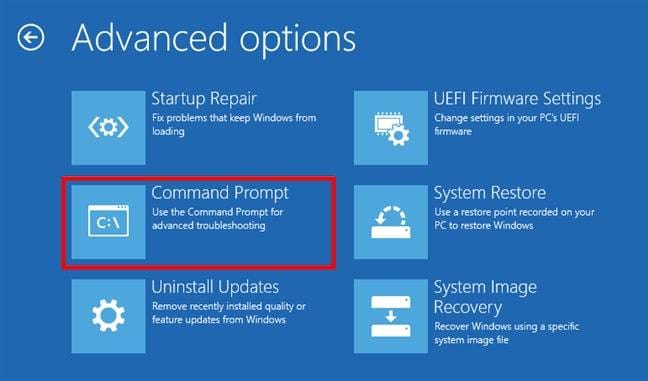
- Type in chkdsk C: and hit Enter in the Command Prompt.
The letter C in chkdsk refers to the C: drive, which is usually the main partition and the main hard drive with the Windows operating system. If you use a different partition for this purpose or need to test a different disk, type in the letter of the drive you want to check.
These steps are almost the same for all Windows PCs, regardless of the OS version. The chkdsk C: line will work on every Windows version. The only difference is how you access the BIOS boot menu and find the Command Prompt, but the steps are intuitive and easy to follow.
Method 2: Perform a SMART Test
SMART stands for Self-Monitoring, Analysis, and Reporting Technology. It was designed to monitor the health status of a hard drive and notify you, the user, of any red flags that could lead to damage. A SMART test can help you detect physical and logical bad sectors.
The SMART system registers two types of red flags. The first are so-called predictable failures, such as breakdowns caused by wear and tear, physical damages, and faulty disk mechanics. The second type is suddenly caused by non-predictable failures, which correspond to logical bad sectors.
How do you perform a SMART test on your computer? While there isn't a built-in utility, this method is still a bit easier - and less risky - than running CHKDSK commands.
Some specialized apps can read SMART data, many of which are free to download and use.
Some of the best apps to read SMART attributes for HDDs are:
If you don't want to get a third-party app for this, you can run a quick HDD SMART test using the Command Prompt. You will not get a detailed report, only confirmation that your hard drive is OK. Follow the steps below if you decide to try this method:
- Go to Start and search for Command Prompt.
- Select Run as administrator to access the app.
- Type in wmic diskdrive get model, status and hit Enter.
- Look under the Status column for SMART results.
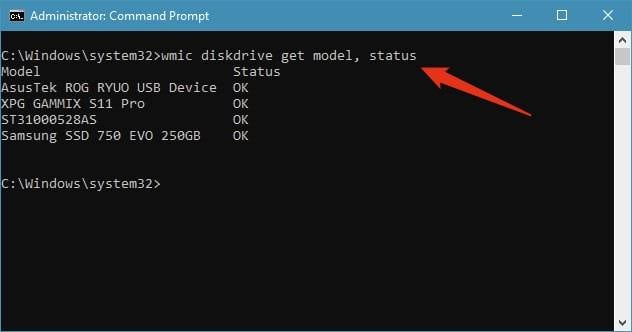
If the Command Prompt gets back to you with an OK, that's great news. It means that your hard drive is healthy. If there are reasons for concern, the status response will be BAD, CAUTION, or UNKNOWN.
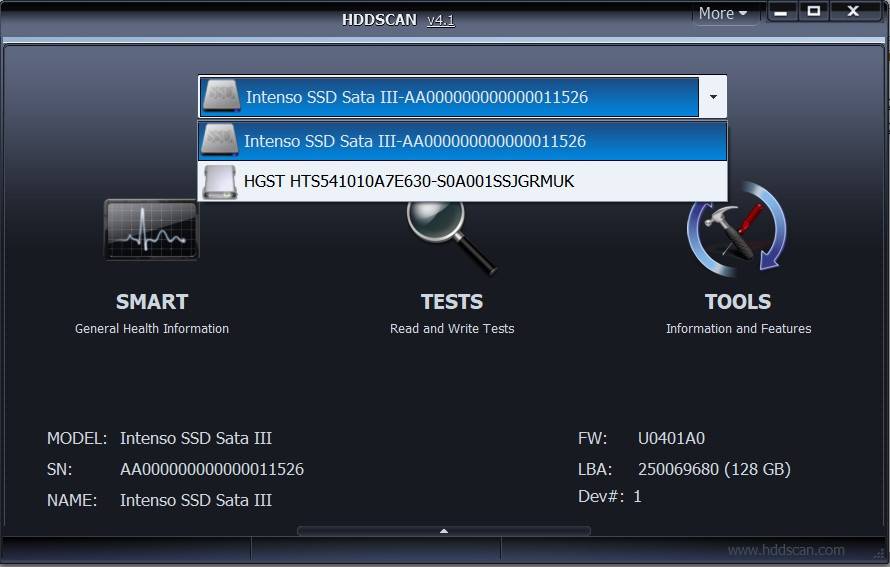
Method 3: Use HDDScan for Windows
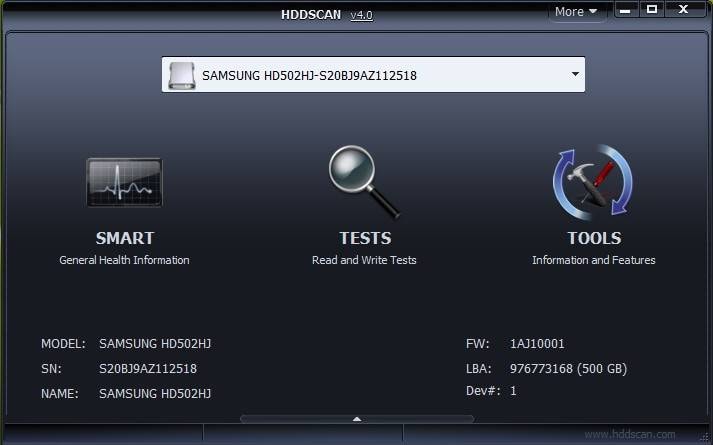
The third way to check your HDD for bad sectors is by using a portable hard drive testing program like HDDScan. Portable means that you don't have to install it on your computer after downloading it; you only need to unzip it using the Windows built-in extractor or an extractor like 7-Zip.
HDDScan has many HDD testing features, including a SMART data reader. Here's what you need to do to check your hard drive for bad sectors using HDDScan:
- First, select your hard drive from the drop-down menu at the top.
- Select TESTS and choose VERIFY.
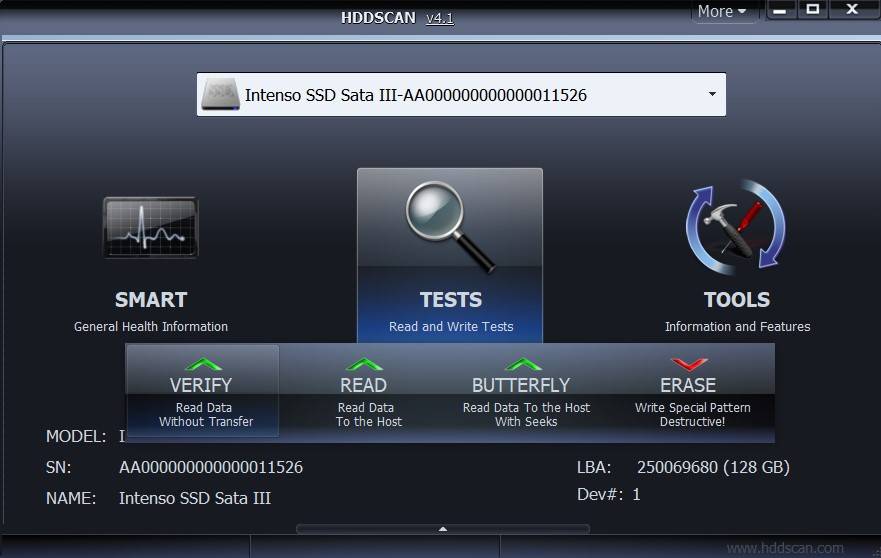
- Click the right arrow to continue.
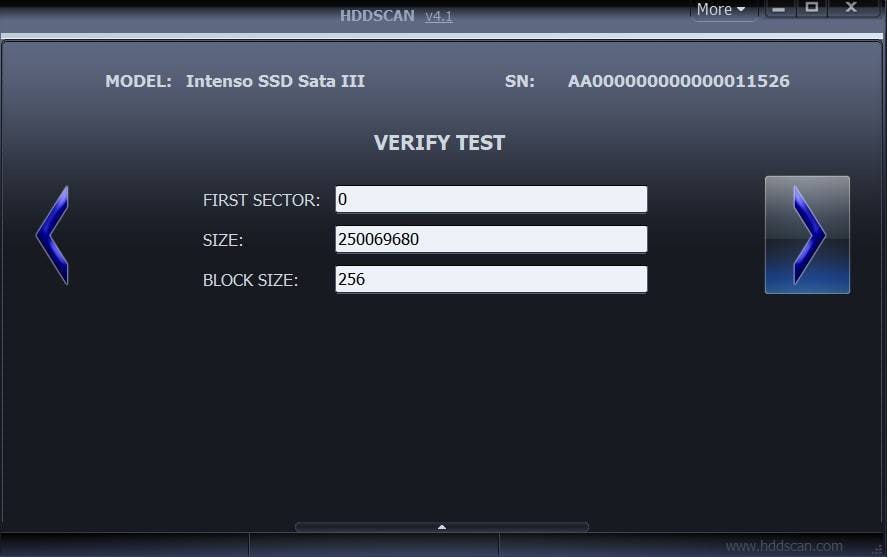
- Watch the progress status at the bottom and wait until it's 100%.
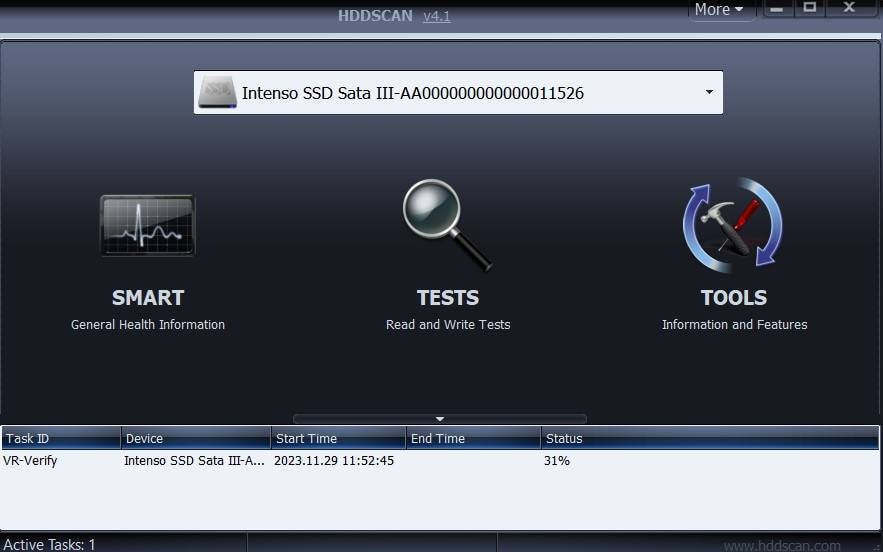
- Click on the task and select Show Details.

The legend on the right will help you read the Map results. An all-white Map means that your hard drive is perfectly healthy. The darker the color of the squares, the slower the response time and the more damaged the sector. HDDScan will mark slow and bad sectors below.

It's arguably the easiest way to spot a bad sector. You can pick your own tests and reconfigure scanning parameters without the need to type in commands, even though HDDScan provides command-line support. Also, SMART reports can be exported in a TXT or MHT file.
How To Recover Data From a Drive With Bad Sectors
While testing for bad sectors is a necessary pre-step for the repair process, it's still far from data recovery. If you're dealing with physical bad sectors, you won't be able to restore their health or your files without a lot of luck and an outstanding data recovery professional.
Fortunately, logical bad sectors are fixable, and you can rescue lost data from bad parts of your hard drive. You need a powerful data recovery tool for this, like Wondershare Recoverit.
Recovering data from a hard drive with bad sectors using this app is a simple three-step process:
- Download, install, and launch Wondershare Recoverit on your computer. To initiate data recovery, select the hard drive with bad sectors from Hard Drives and Locations.

- Wondershare Recoverit will run a comprehensive hard drive scan, including the bad sectors. All recoverable files will be shown on the screen. You can pause or stop the scanning process if you see the file you need. If there is a lot of lost data, this could take a few hours.

- When the scan is complete, use filters to narrow down the results by keyword, file type, size, etc. You can also preview the files you want to keep before you download them to your computer. To do that, click Recover and choose where to save the recovered files.

With a success rate of over 99.5%, Wondershare Recoverit is one of the most reliable data recovery tools available today. In addition to being effective and easy to use, it's also very versatile - it can help you recover 1000+ file formats from 2000+ storage devices in over 500+ data loss scenarios.
Easily recover deleted or lost files from 2000+ storage devices like HDDs, SSDs, external drivs, USB drives, memory cards, and more. The software confidently retrieves all data types, regardless of how they went missing.
Final Scannable Summary: Hard Drive Health Checklist
- Listen: Any clicking? If yes, back up data manually and replace the drive.
- SMART Check: Use the wmic command for a 5-second health report.
- Rescue Files: Use Wondershare Recoverit if you see "File not found" or "Cyclic Redundancy Check" errors.
- Deep Scan: Run chkdsk /f /r overnight to isolate logical bad sectors.
- Monitor Trends: If the number of bad sectors grows every week, the drive is failing physically. Replace it immediately.
Conclusion
The easiest way to identify bad sectors on a hard drive is the method that you are most comfortable with. If you don't mind using the Command Prompt, CHKDSK commands will give you a lot of actions that other methods don't have - including the option to run a quick SMART scan.
Many users prefer having a specialized app to navigate them through this process. If this is you, we advise checking for bad sectors with HDDScan and recovering data with Recoverit.
FAQs
-
What is the fastest way to check my hard drive health in 2026?
The quickest method is using the Command Prompt. Simply type wmic diskdrive get status and hit Enter. If the result is "OK", your drive’s hardware self-monitoring system (SMART) currently detects no critical failures. For a more detailed health report, specialized tools like HDDScan are recommended. -
Can I repair physical bad sectors using software?
No, physical bad sectors (Hard Bad Sectors) are caused by physical damage to the drive's surface or flash memory and cannot be repaired by any software. However, Logical bad sectors (Soft Bad Sectors) can often be fixed by Windows utilities like CHKDSK which mark these sectors as unusable or refresh the data blocks. -
Is it safe to run a "Deep Scan" on a failing hard drive?
Not entirely. Intensive scanning (like chkdsk /r) puts high stress on the drive's mechanical parts or flash controller. If your drive is already showing severe symptoms like clicking noises or disappearing files, you should recover your data first using Wondershare Recoverit before attempting a deep repair scan. -
How do "Bad Sectors" differ on an SSD compared to an HDD?
On an HDD, bad sectors are usually physical scratches on the spinning disk. On an SSD, they are "worn-out" flash cells that have reached their write limit. Modern SSDs automatically replace these with "spare blocks," but once the spare blocks are exhausted, the drive may suddenly become "Read-Only" to protect your data. -
What should I do if CHKDSK gets stuck at 10% or 100%?
If CHKDSK hangs for several hours, it usually indicates a severe physical defect that the software is struggling to bypass. Do not force a restart immediately as it may corrupt the file system. If it remains stuck, it is a clear sign that the drive is failing and you should immediately migrate your data to a healthy drive. -
Does formatting a drive remove bad sectors?
A "Full Format" can resolve logical bad sectors by checking each sector and re-indexing the file system. However, a "Quick Format" does not scan for bad sectors. Note that formatting will delete all data on the drive, so ensure you have a backup or have used Recoverit to rescue your files beforehand.


