
![[2026 Guide]How to Initialize an SSD in Windows 10/8/7](https://images.wondershare.com/recoverit/article/initialize-ssd-windows-10.jpg)

 TL;DR:
To initialize an SSD in Windows 10, 8, or 7, open Disk Management with administrative privileges, bring the offline disk online, and select either the GPT or MBR partition style.
● Choose GPT for modern UEFI systems, drives larger than 2TB, and NVMe M.2 SSDs (which also require your BIOS to be set to AHCI mode), while MBR should only be used for legacy BIOS setups and drives under 2TB.
● If the "Initialize Disk" option is unavailable because the SSD already contains partitions, open Command Prompt and use the Diskpart utility's "clean" command to erase the previous formatting before converting the drive.
● Initializing a previously used SSD creates a new partition table that renders existing data invisible, requiring you to back up files beforehand or use specialized software like Wondershare Recoverit to restore original partition headers if done accidentally.
Ask AI for a summary
 ChatGPT
 Perplexity
 Gemini
 Claude
 Grok
Grok
Ready to boost your computer's performance? You've come to the right place! In this user-friendly guide on how to initialize an SSD in Windows 10/8/7, we'll explore three simple methods to unlock your solid-state drive's potential. Whether upgrading an existing system or starting fresh with new hardware, this guide will help you get your SSD running smoothly and efficiently in no time. Let's get started and elevate your computing experience together!
Preparing to Initialize an SSD
Initializing an SSD is a series of steps that prepare your solid-state drive for data storage and usage within your operating system. This includes setting up the drive's file structure and partitions, ensuring it functions optimally, and making it recognizable by your Windows environment. Think of it as configuring the SSD to efficiently store and retrieve data, delivering the swift performance that SSDs are known for.
To successfully initialize your SSD in Windows 10, there are a few key prerequisites you'll need to meet. Make sure you have the following in place before proceeding:
- Windows 10, 8, or 7: Ensure you're running one of these Windows operating systems. The steps for SSD initialization may vary slightly between them, but the core concepts remain consistent.
- Uninitialized SSD: You'll need an SSD that has not been previously initialized or contains no critical data you wish to retain, as initializing may lead to data loss.
- Administrative Privileges: To initialize an SSD, you must have administrative privileges on your Windows system. This ensures you have the necessary permissions to make system-level changes and configurations.
Note for 2026: NVMe M.2 SSDs
If you are installing a modern NVMe M.2 SSD and it doesn't appear in Disk Management, ensure your BIOS/UEFI is set to AHCI mode instead of RAID. Additionally, NVMe drives require GPT for optimal performance. If the drive is missing entirely, check the "Storage Controllers" section in Device Manager to ensure the NVMe Controller driver is properly installed.
How to Initialize SSD in Windows 10 & 8/7? 3 Methods.
You have several methods when initializing an SSD in Windows 10 and Windows 8 and 7. Each method serves a specific purpose and accommodates various user preferences and scenarios. Let's see the step-by-step below.
Method 1: Using Disk Management
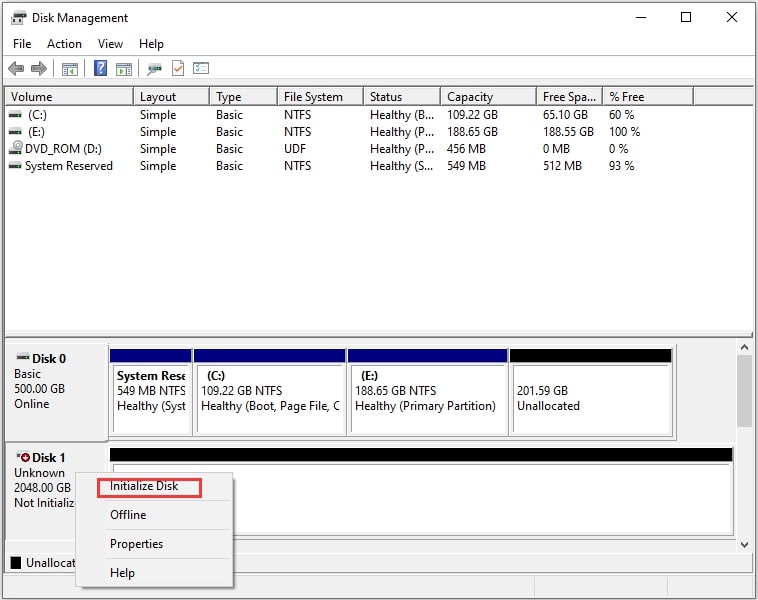
The most straightforward way to initialize an SSD in Windows 10 environment involves using the Disk Management utility. This method allows you to initialize your SSD with just a few clicks. When you introduce a new SSD and access the Disk Management tool, the "Initialize Disk" window will automatically appear, alerting you that the disk must be initialized when Logical Disk Manager can interact.
If, for any reason, this window does not appear as expected, you can follow the steps below to complete the operation:
Windows 10
Step 1: Open the Start menu and access Disk Management by pressing Windows + X.
Step 2: Locate your intended SSD, right-click on it, and select the Initialize Disk option.
Note: If the disk status is displayed as "Offline," you should right-click and choose the "Online" option to make it accessible.
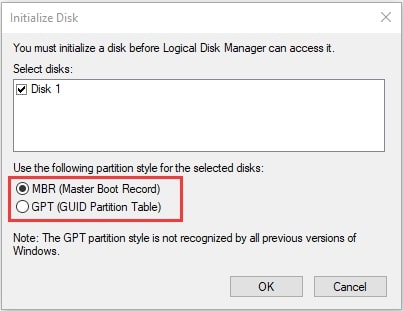
Step 3: In the subsequent window that appears, you can select either MBR (Master Boot Record) or GPT (GUID Partition Table) for your SSD. Confirm your selection by clicking OK.
| Feature | GPT (GUID Partition Table) | MBR (Master Boot Record) |
| Drive Size | Supports more than 2TB | Limited to 2TB |
| Partition Limit | Up to 128 partitions | Up to 4 primary partitions |
| System Type | Modern (UEFI) - Required for Win 11 | Legacy (BIOS) |
| Recommendation | Best for 2026 SSDs | Only for old legacy systems |
Windows 8/7
You can also employ Disk Management to initialize your SSD/HDD, and the procedure is outlined as follows:
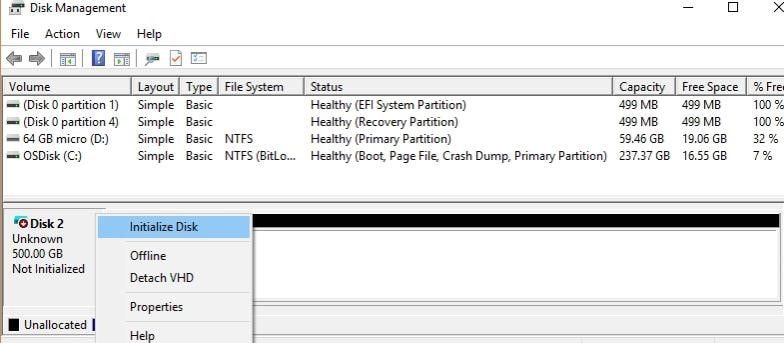
Step 1: Begin by opening Disk Management with administrator privileges. You can achieve this by typing "disk management" in the search bar, right-clicking Disk Management, and then selecting Run as administrator.
Step 2: Once you can access Disk Management, locate the disk you intend to initialize and right-click on it. Suppose the disk is indicated as "offline," switch it to an "online" status.
Note: Certain disks require the addition of a drive letter for formatting.
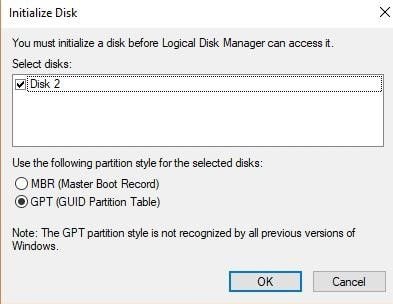
Step 3: Confirm that you have chosen the correct disk in the Initialize Disk dialog box. If you've confirmed the correct selection, click OK to accept the default partition style. If you wish to transition from a GPT format to an MBR format or vice versa, navigate to the About Partition Style and make the desired switch.
Step 4: As the initialization process commences, your selected disk will transition from its previous status to disk initializing before ultimately displaying an Online status.
Method 2: Using Diskpart (Command Prompt)
Diskpart, an essential Windows utility, offers advanced control over your partitions and disks through command-line operations. It surpasses the capabilities of Disk Management, granting you the ability to perform tasks that might be beyond the reach of the latter utility.
The first step involves cleaning the disk using Diskpart command lines to initialize a previously used SSD. Follow these instructions:
Windows 10
Step 1: Press the Windows and R options to open the Run dialog.
Step 2: Type cmd in the provided field and click OK to launch Command Prompt.
Step 3: In the Command Prompt console, input diskpart and press Enter.
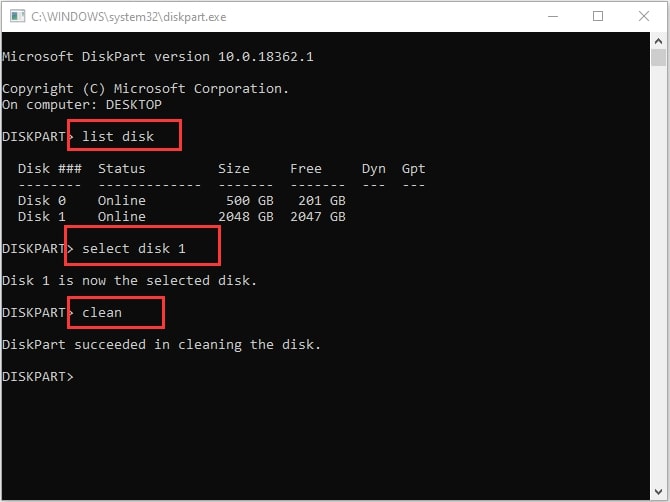
Step 4: Proceed by entering the following command lines one by one, ensuring to press Enter after each one:
- List disk: This command lists all the installed disks on your computer.
- Select disk: Replace " " with the appropriate disk number you wish to initialize.
- Clean: This command removes all partition or volume formatting from the selected disk.
By executing the "Clean" command on the SSD, the initial 1MB and final 1MB of the disk will be set to zero, erasing any previously applied disk formatting.
Subsequently, in Disk Management, the SSD will appear as Unknown and not initialized, resembling a new, unformatted disk. The Initialize Disk option for the SSD will be available, and you can proceed with the initialization process.
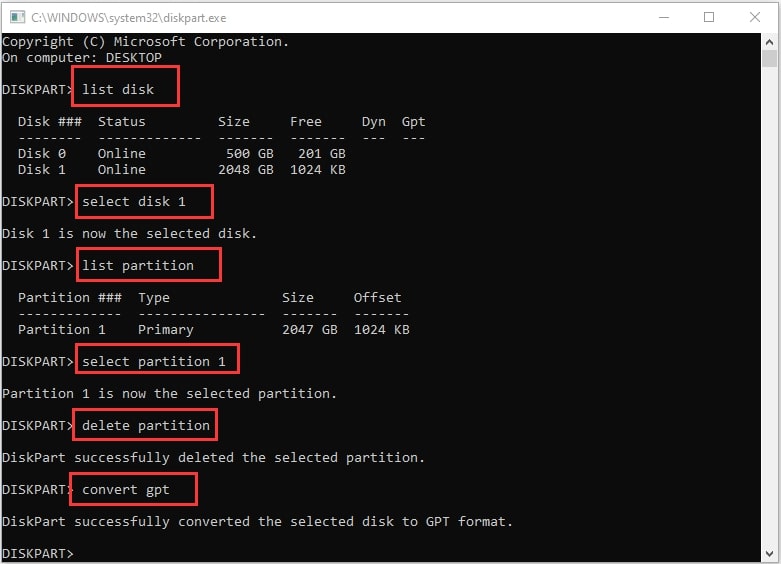
In Disk Management, delete all the existing partitions on the disk by right-clicking them and selecting Delete Volume. Then, right-click the disk and tap Convert to MBR or GPT Disk as needed. In Diskpart, simply use these commands:
- List disk
- Select disk
- List partition
- Select partition # (replace "#" with the partition number)
- Delete partition
- Convert gpt (or "convert mbr" if you are converting a GPT disk)
If there are multiple partitions to delete, you should repeat the select partition and delete partition commands for each one you wish to remove.
Windows 8/7
Step 1: Initiate the process by holding the WIN + R keys. This action opens the Run prompt. Within this prompt, type cmd and press Enter. Upon launching the Command Prompt, input the command diskpart and hit Enter.
Proceed with the following commands one after the other:
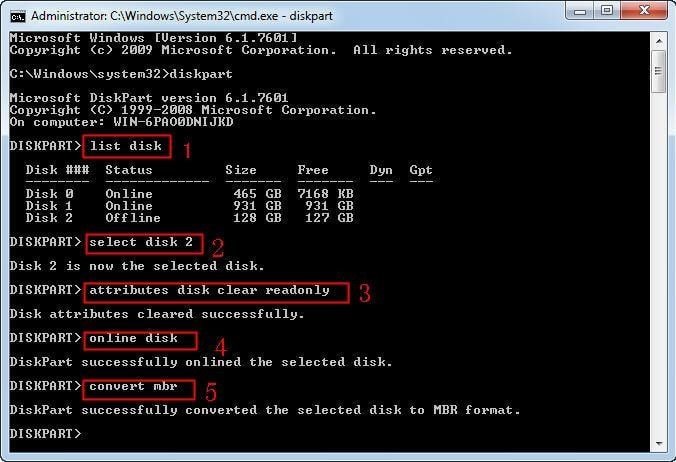
- Utilize the List disk command to display all the disks within your Windows system.
- Select disk is used to designate the specific disk you intend to initialize.
- Efface any existing attributes to facilitate progress.
- If the disk displays an "offline" status, employ the relevant command to bring it "online."
- Opt for Convert to modify the disk to the MBR or GPT format based on your specific requirements.
Upon completing this process, your chosen disk will be converted into your preferred MBR or GPT format, rendering it ready for use.
Method 3: Use Third-party Partition Software to initialize SSD Windows 10/8/7
1. Acronis Disk Director 12
One of the defining features of Acronis Disk Director is its versatility. It boasts many advanced features you won’t think you’ll need. Apart from the essentials of any disk management software, it offers more. It allows users to convert partitions and clone schemes. Most importantly, it’s also highly compatible with many operating systems.
2. AOMEI Partition Assistant
AOMEI is a household name when it comes to partition management software. I’m fully equipped with the features you would expect any disk management software to have. With AOMEI, you can copy, create, delete, resize, and rename partitions with ease. The software’s interface is highly commendable for its clean and crisp design. It’s easy to navigate while keeping things professional-looking.
Use Third-Party Software In Case You Encounter Issues During Or After The Initialization Process
Mistakenly Initialized a Disk with Data?
Initializing a used SSD creates a new partition table, making your old data invisible. Wondershare Recoverit specializes in "Lost Partition Recovery." Even if you have already initialized the disk to GPT or MBR, Recoverit can perform a deep scan to locate the original partition headers and restore your files before you write any new data to the drive.
Unexpected issues can sometimes arise during or after the process. In such situations, third-party software can be your lifeline. These specialized tools offer a safety net for troubleshooting and resolving problems that may not have straightforward solutions with built-in Windows utilities.
Whether you're facing issues like data loss, Wondershare Recoverit can address complications swiftly and efficiently, ensuring that your SSD initialization process is a smooth and successful experience.
Wondershare Recoverit is a comprehensive data recovery and disk management tool that goes beyond simple initialization. Its friendly interface makes it ideal for those who prefer a more straightforward approach. Some of its key features include:
- Recovers data from all external SSD brands, including Crucial, WD, LaCie, Samsung, SanDisk, etc.
- Manages over 500 data loss situations, such as deletion, formatting, and disk corruption.
- The user-friendly interface allows you to recover data in just a few clicks.

Additional Tips and Considerations for Initializing SSD Windows 10
Now you know how to initialize SSD in Windows 10/8/7, there are several additional tips for you to keep in mind:
💾 Backup Your Data
- Before proceeding with SSD initialization, always create a complete data backup. This precaution ensures that your important files are safe in case of any unexpected issues or data loss during the process.
📌 Double-Check Drive Selection:
- It's imperative to verify that you are working on the correct drive. Selecting the wrong drive for initialization can lead to irreversible data loss.
💻 Verify Compatibility
- Ensure that your SSD is fully compatible with your Windows 10 system. Check for any specific manufacturer requirements or driver updates to optimize performance.
🌟 Firmware Updates
- Regularly check and apply firmware updates for your SSD. These updates can enhance stability, performance, and security.
📏 Alignment and Cluster Size
- When initializing, ensure that your SSD is aligned properly, and consider the optimal cluster size for your specific usage. These settings can impact the drive's performance.
📎 Consider the Partition Style
- Select the appropriate partition style (MBR or GPT) based on your needs. MBR suits most home systems, while GPT offers advantages for larger drives and systems with UEFI firmware.
📊 Data Security
- Before initialization, be mindful of sensitive data. Securely erase or dispose of SSDs that contain sensitive information to protect your privacy.
📂 Recovery Options
- Be aware of data recovery options, such as specialized recovery software or professional services, if you encounter issues during or after the initialization process.
Conclusion
In conclusion, learning how to initialize an SSD in Windows 10/8/7 is a crucial skill for any computer user looking to upgrade their storage or set up a new system. With the three methods we've discussed in this guide - using Disk Management, Diskpart (Command Prompt), and third-party partition software - you now have a comprehensive understanding of the initialization process.
Remember, if you encounter any issues during or after the initialization, you can always rely on third-party software to help resolve the problem. By following these steps, you'll be well on your way to enjoying the full benefits of your SSD, including faster boot times, improved performance, and a smoother overall computing experience.
FAQ
-
Should I initialize my SSD as MBR or GPT?
If your computer uses UEFI, it is best to use GPT. In general, this layout has many advantages with regard to security and has practically no technical limitations with regard to partition management. On the other hand, if your computer does not support the GPT layout, you should use MBR as it is compatible with practically any computer. -
Where do you want to install Windows SSD not showing up?
This problem is usually caused by the computer not having updated drivers. Download the most updated drivers for your motherboard from the manufacturer's page and, in the same installation window where the device should be, you will find an option that will allow you to load drivers from an external storage medium. -
Why won't Windows install on my SSD?
As long as the health of the device is favorable, you shouldn't have any problem installing Windows on an SSD. If the partition table management layout is not correct, an error will be displayed on the screen. However, this can be easily fixed by toggling between MBR and GPT with the help of the "Diskpart" tool via the portable version of the Command prompt (by pressing Shift + f10) -
Is reinstalling Windows bad for SSD?
No. You can reinstall Windows on an SSD device as many times as you want. Although SSD lifespan is shortened by the number of write cycles they have done, these devices are designed to work for many years without you noticing any problems. On the other hand, remember to keep backup copies since formatting a device erases all the content that is used to store.


