

 TL;DR:
You can format a bootable USB drive on Windows 10/11 using four main methods: Command Prompt (Diskpart), Disk Management, File Explorer, or the third-party AOMEI Partition Assistant tool.
● Use Command Prompt (Diskpart) for advanced or problematic drives by executing `diskpart`, selecting the disk, running `clean`, creating a primary partition, and formatting with `fs=fat32 quick` or `fs=ntfs quick`.
● Use Disk Management or File Explorer for a standard, graphical interface approach by right-clicking the USB drive and selecting the "Format" option.
● Choose FAT32 for broader device compatibility, or NTFS for handling larger file sizes and advanced security features.
● If you need to recover lost files after formatting, third-party software like Wondershare Recoverit can scan and restore data from the formatted drive.
Ask AI for a summary
 ChatGPT
 Perplexity
 Gemini
 Claude
 Grok
Grok
A bootable USB flash drive serves as a gateway to the WinPE or Linux environment, facilitating tasks such as deploying Windows Server essentials. However, as needs evolve or issues arise, you might find yourself seeking to format the flash drive. Whether it's for erasing data, changing the file system, or eliminating viruses or malware, this guide will walk you through the process of how to format a USB step by step. Let's get started.
Try Wondershare Recoverit to Perform USB Data Recovery
 Security Verified. Over 7,302,189 people have downloaded it.
In this article

Method 1: Format a Bootable USB With CMD
The Command Prompt, often abbreviated as CMD, is a powerful text-based interface that allows you to interact with your computer's operating system through a series of typed commands. Specifically, Diskpart is a valuable utility that operates within the Command Prompt to manage disks and partitions. It provides a direct way to execute various tasks, from simple operations like navigating folders to more advanced tasks like system configuration. When it comes to formatting a bootable USB, this tool comes in handy.
Steps for Using CMD to Format a Bootable Flash Drive
To format a bootable USB on Win 10/11 using Diskpart, follow the instructions below:
- Press Windows + R at the same time to launch the Run.
- Enter diskpart in the search box and press Enter.
- Type list disk and hit Enter. Now, type select disk X (X is the disk number of your bootable USB drive).
- Type Clean and press Enter to continue. It takes a couple of minutes to wipe all your Bios boot files on the USB drive.

- Type create partition primary into your Window and press Enter to create a partition on the bootable USB drive.
- Write format fs=fat32 quick or format fs=ntfs quick, depending on the file system of your preference. Hit the Enter key to continue.

- Type Exit, and it's done.
Video Tutorial on How to Format a Drive Using CMD
Method 2: Format a Bootable USB With Disk Management
Besides the command prompt, you can also initiate a bootable USB format using Windows built-in tools, such as Disk Management. Disk Management is a valuable tool that enables users to manage their computer's storage effectively. It provides a graphical interface to perform various tasks related to disk and partition management. To be more specific, this tool allows you to create new drives, extend volumes, shrink partitions, assign drive letters, and yes, format drives, including your bootable USB.
Steps to Format a Bootable USB Drive Using Disk Management
Now, let's proceed with a comprehensive step-by-step guide on formatting a USB drive for Windows 10/11 using Disk Management:
- Press Windows + R to open the Run window and type diskmgmt.msc into the search box. Press Enter, and Disk Management will appear on the screen.
- Locate the bootable USB drive and right-click on it. Select Format.

- Choose the correct file system and click Default for the allocation unit size. Press Ok to complete the process.
Method 3: Format a Bootable USB With File Explorer
While utilizing the Disk Management utility for formatting a USB drive on Windows 10/11 is generally efficient, there are instances where it might not yield the expected results. For example, Disk Management might not handle some USB drives seamlessly due to complex file systems, unusual partitions, or unique configurations.
At this point, File Explorer steps in as a more versatile method for formatting bootable USB drives on Windows 10/11. Its familiarity and broader compatibility often make it a dependable alternative.
Steps to Format a Bootable USB Drive with File Explorer
- Open File Explorer using Windows + E hotkey. Go to This PC and locate the bootable USB flash drive.
- Right-click the bootable USB flash drive and select Format.
- Select the file system of your preference between NTFS and FAT32 and choose the allocation size. The users can also restore the device's default settings by tapping Restore Device Defaults.
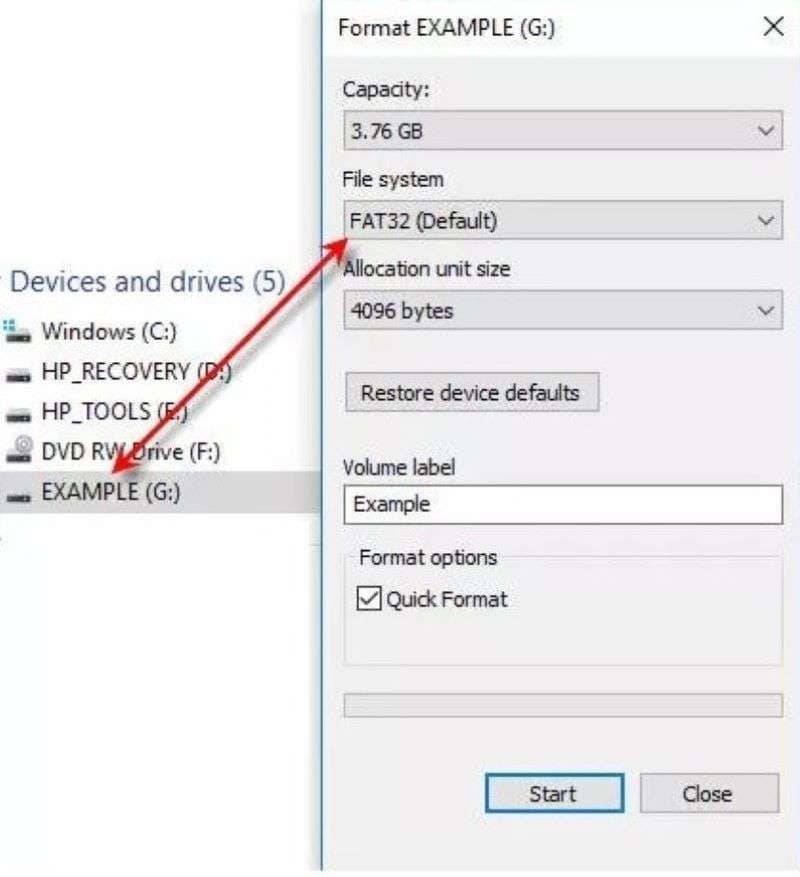
- Press Start to format your bootable USB.
Method 4: Format a Bootable USB With AOMEI Partition Assistant
Now that you are well acquainted with the command prompt and Windows built-in tools to format the bootable USB flash drive, what if you want a more user-friendly interface and more flexibility to step back in the process? AOMEI Partition Assistant, a third-party software, can be your best bet.
It is a reliable and well-known disk partition manager that enables you to format a bootable USB in Windows Vista, XP, 7, 8, 8.1, 10, and 11. In addition, the tool lets you choose among different options, including NTFS, FAT32, Ext3, Ext 2, and more.
Steps to Format a Bootable USB Drive Using AOMEI Partition Assistant
Stick to the stepwise instructions below and initiate Windows 10/11 USB format with AOMEI Partition Assistant.
- Install and launch AOMEI Partition Assistant on your Windows PC. Plug in the bootable USB drive.
- Right-click the bootable flash drive and select Format Partition.

- Choose file system from the drop-down menu and tap OK.

- Click Apply to format your bootable USB and complete the process.
[Bonus] How to Recover Your Data After Formatting a Bootable USB?
Although these aforementioned solutions can help format the USB flash drive in seconds, they won't cover data losses. What should you do if you want your data back after formatting? Is it possible to retrieve the content on the USB drive? Thankfully yes, you can recover your lost files using Recoverit.
Wondershare Recoverit stands out among loads of data recovery tools with its robust capabilities. With support for over 1000 file types and formats, this software offers comprehensive data rescue solutions. Moreover, it caters to over 2000 types of storage devices, spanning a wide spectrum of scenarios.
Are you ready to recover your files from your formatted bootable USB? Follow the step-by-step guide below:
- Connect your formatted USB drive to your PC and launch Wondershare Recoverit. Choose the USB drive as the recovery target.

- Clicking Start to trigger Recoverit to conduct a thorough scan of your formatted USB drive. Progress can be tracked on-screen, with options to pause or stop. Expect a brief wait as the tool inspects your drive's data.

- After scanning, preview the recovered files. Click Recover and choose a storage location for retrieval. Take charge of data selection and recovery destination.

Conclusion
That's all about the guide to format bootable USB on Windows 10/11. Simply put, formatting a bootable USB drive on Windows 10/11 is easy with multiple methods. While Command Prompt and Windows built-in tools are reliable for formatting the bootable flash drive, you can also turn to third-party software for added convenience. Don't worry if you want your data back after formatting the USB, as Recoverit will make it in three simple steps.
FAQ
-
Q1. What precautions should I take before formatting a bootable USB?
1.Back up all important data from the USB drive to prevent data loss. 2. Double-check the drive letter to avoid formatting the wrong drive. 3. Make sure you have a clear understanding of the formatting process before proceeding. -
Q2. Which file system should I choose while formatting the bootable USB, FAT 32 or NFTS?
NTFS offers better security, supports larger file sizes and partitions, provides more efficient storage utilization, and includes advanced features like encryption and access control. FAT32, on the other hand, is more compatible with older systems and devices and has a simpler structure. You can make a choice based on their different features. For more information, click here. -
Q3. Is it possible to undo a bootable USB drive format?
Unfortunately, formatting is a data-destructive process, and once completed, it's challenging to recover the previous data. Regular data backups can prevent data loss. -
Q4. Why use Diskpart over Disk Management?
Diskpart offers deeper control for corrupted or complex partitions.


