
If you were a user of the Windows 10 version, then the ‘Virtual desktop’ concept is nothing new to you. Whenever you have a new project, you can create a separate desktop and compartmentalize your work. Just like you’d shift tabs on your Google Chrome website, you can move from one desktop to another to not end up confusing your work. This will improve work efficiency and also help you function in an organized manner.
While there are many changes in Windows 11, some important features are left undisturbed. The Virtual Desktop is one such marvel. Now, we refer to it as ‘Desktops’ on Windows 11. Then how do we manage desktops on windows 11? Are the steps the same? We can say that they are more or less the same. People who are aware of the process of creating Virtual Desktops on Windows 10 will find it very easy to navigate their way through the desktops on Windows 11. If you haven’t dealt with Virtual Desktops before, well, there is nothing to worry about! We will teach you everything about it.
Read on to find out the easy steps to manage desktops on Windows 11.
Part 1: How To Create Desktops On Windows 11?
A specialized desktop for your task is going to ensure that you have all the work dedicated to one space. This will make it easier to follow up on your work and make any changes/additions to your projects. In Windows 11, much like Windows 10, you can make as many desktops as you want. It is a simple two-step process and you’ll have to repeat the same steps every time you want a new desktop. You can switch between desktops easily, so you can multi-task and get all your work done in no time.
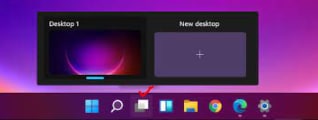
You will have to search for the task view button initially.
Step 1: You will find the task view button that has a black square intermerged with a white square. You can hover over the task view to get the view.
As an alternative, you can also go with the keyboard shortcut - Windows + Tab.

Step 2: On the right side, you will see a ‘New Desktop’ option that is represented by a ‘plus/+’ sign. Click on that and your desktop will be formed.

If you want to create more desktops, you simply have to repeat the steps mentioned above. It is that easy to manage desktops on Windows 11. Let us go further and see how you can utilize these desktops to increase your work efficiency.
Part 2: How To Navigate Your Desktop On Windows 11
Once your desktops are ready, the next thing to focus on is navigation. Or you can simply put that as - knowing what you can do with the marvels that you have created in simple two steps. We’ve already told you that you can shift between desktops and multi-task. Another advantage is that you can move apps from one desktop to the other. Moreover, you can replicate a window for a specific app on all the desktops that you’ve created. Here is how you can shift between desktops, move the apps or replicate windows.
1. Jump to a Different Desktop on Windows 11
Managing desktops on Windows 11 is a great skill for those who often have different projects to juggle with. You can use these steps to juggle between different customized desktops.
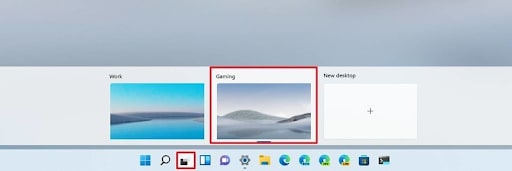
Step 1: Start by clicking on the task view button that is present on the taskbar. You simply have to hover over it. Alternate method - Windows + Tab.
Step 2: Now you will see all the desktops that have been successfully created. Choose the one that you want to shift to.
2. Move Apps to Different Desktop
If you are in need of a specific app on a specific desktop, then this is how you can move it.
Step 1: Hover over the task view button on the taskbar - just like you’ve done previously.
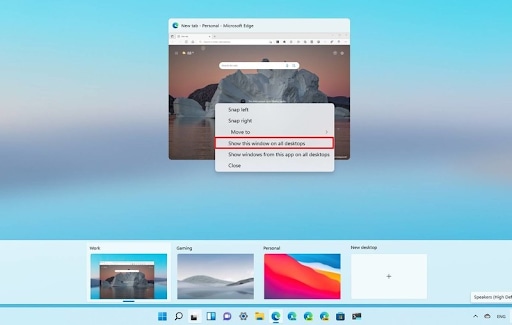
Step 2: Right-click on the specific app and choose the ‘Move to’ option from the drop=down list.
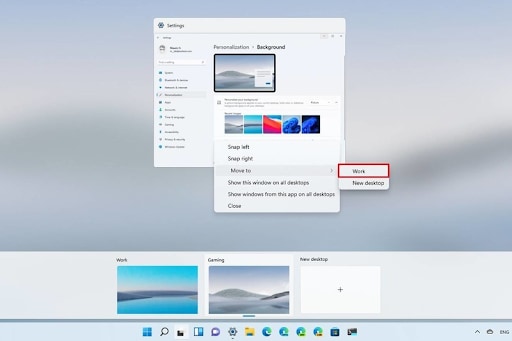
Step 3: From the list of desktops that appear, choose the one where you want the app/
3. Replicate the same app on all desktops
When you want a specific app on all the desktops, then this is how you can make it happen.
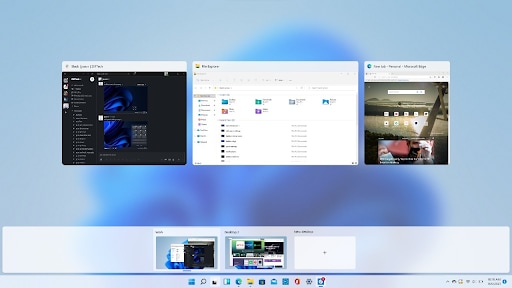
Step 1: Hover over the task view button.
Step 2: Right-click on the specific app that you want and click on the ‘Show this window on all Desktops’ option.
Using these quick navigation steps, you can organize and create desktops that will eventually help you in your work. To manage desktops on windows 11, you only need to know some simple steps and that’s going to save your day. In the next section, we will see how to customize the desktops that we’ve made.
Part 3: How To Customize Your Desktop On Windows 11
You can customize your windows 11 desktops in four different ways and we’ve discussed all of them for you below.
1. Change the Name
Step 1: Hover over your Task view
Step 2: Right-click on the specific desktop and choose ‘Rename’ Option

Step 3: Enter the new name of choice and proceed.
3. Tweak the Background
Step 1: Go to the task view using keyboard shortcut - Windows + Tab
Step 2: Right-click on the specific desktop and choose ‘Change Background’.
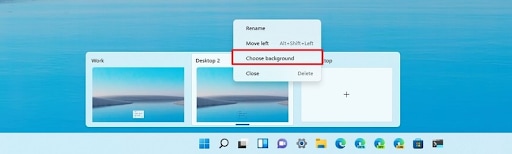
Step 3: The Background page will open. Go with the ‘Personalise your Desktop’ option. From the drop-down menu, you can choose ‘Picture’ for using the picture as your Background.

From the diverse options of pictures that will appear on the page, you can choose anyone as your desktop background.
3. Organize Desktops
Step 1: Open Task view using the button.
Step 2: Right-click on any of your desktop options and choose ‘Move to Left’ or ‘Move to Right’ from the drop-down menu.

Want a simpler option? You can simply drag your desktops to any position that you like.
You may also like: How to format a hard drive on Windows 11
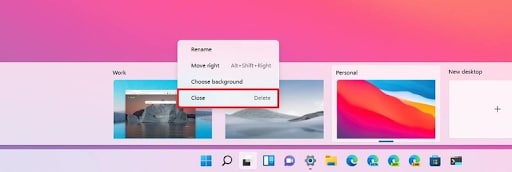
Part 4: How To Close Desktop On Windows 11
Once the project is done and dusted, you’d simply close the desktops and give them a rest. Here’s how you can do it.
Step 1: Click on the task view button
Step 2: Right-click on the desktop of choice and choose the ‘Close’ option.
You can repeat steps 1 and 2 for all those websites that you want to close.
But what if you accidentally close the desktop that you are still working on? What will happen to files on it? - They will be deleted or worse, get corrupted. If that is the case, we have a very useful option for you to recover your lost data. Move ahead to the next section.
Bonus: How to Recover Lost Data from Desktop on Windows 11?
Now that you understood how to manage desktops on windows 11, we will see how to recover data in case of unfortunate events.
Wondershare Recoverit is a marvelous application that lets you recover data in its initial glory. In other words, the advanced recovery options will try to restore the initial status of your files and can work with more than 1000+ formats. They can create a difference on your desktop files too. This is how to use the application.
To begin with, download the Wondershare Recoverit application from the Wondershare official website and launch it on your PC.
Step 1: Select a Location - To recover your data, you need to tell the software about the location where it should make a search. In our case, we’d choose the desktop and the specific drive that has the file.

Step 2: Scanning the Location - The software will then scan the location that you’ve specified and try to spot the file that you are searching for. Depending on the size of the file and the number of files left to search, it can take about minutes to an hour.

Step 3: Preview the files - Once the software spots your files, it will preview them to you. If it is what you are searching for, then you can proceed.

Step 4: Now, at the bottom right corner of the window, you will find the ‘Recover’ option. You can click on it and the recovery process will start immediately. Once the process is done, you will be notified about the same.

That is how convenient and easy it is to use Wondershare Recoverit. You can further save the files within the same hard drive or choose a specific location to save them. It is one of the most trusted third-party applications for data recovery.
The Bottom Line
Windows 11 might not seem like a PC lover’s best option but there are certain features that make life easier. virtual desktops are one among those useful inclusions. Once you get a hang of how to manage desktops on windows 11, you’ll see a drastic change in the way you work on PCs. All that it offers has been discussed in this article. Even in the worst-case scenario when you lose your files, you can easily recover them using the Wondershare Recoverit application. So, do not delay and try to use the Windows 11 desktops to increase your work efficiency.

