
Connecting your devices to a wireless network to access the internet is pretty straightforward with Windows 11. However, making the connection is only simple if you have the correct methods, tools, and know-how to use them.
If you're setting up a new network and want to discover the most effective methods to connect numerous devices, then look no further.
Windows 11 offers a variety of methods, including the Taskbar, Settings, Control Panel, and Command Prompt, to create the wireless connection.
This article will walk you through these four solutions to connect to a Wi-Fi network on Windows 11.
Connection Scenario |
Recommended Method |
Why Choose This? |
| Standard Home/Office | Taskbar / Quick Settings | The fastest way via Win + A shortcut. |
| Hidden Network (SSID) | Control Panel / Manual Setup | Best for manual entry of security & encryption types. |
| System UI Frozen | Command Prompt (CMD) | Bypasses graphical glitches to force connection. |
| Advanced Management | Windows Settings App | Full control over "Metered Connection" & IP settings. |
Solution 1: Using Taskbar to Connect Wi-Fi on Windows 11
The first method you can use is the Taskbar method. Follow these simple steps to connect to a Wi-Fi network by using Windows 11 Taskbar:
Step 1: Head to the desktop, and you'll see the Network symbol in the bottom-right corner. It will show you that you are disconnected. Click it to enter Quick Settings.
Important Note:To launch the settings instantly, press the Windows key + A keyboard shortcut.
Step 2: Next to the Wi-Fi icon, press the caret (>) button as shown below.

Step 3: Select your Wi-Fi connection.
Important Note: If your region has wireless service, it will show you all the connections in the router's range.

Step 4: Tick the option to connect automatically (Optional).
Privacy Tip: Using Random Hardware Addresses To prevent advertisers and hackers from tracking your device across different Wi-Fi networks, Windows 11 includes a Random Hardware Addresses feature. You can enable this in the connection properties to change your MAC address daily, making your PC harder to track in public spaces like airports or coffee shops.
Step 5: Join the network by pressing the Connect button.

Step 6: Windows 11 prompts you to "Enter the network security key" as soon as you hit Connect. To put it another way, you must input the Wi-Fi password to connect to it.
Press Next when you've done so.

Step 7: Confirm if the device is showing "Connection Secured."
The device will join the network through the wireless connection in Windows 11 once you've completed the above steps.
Solution 2: Using Settings to Connect Wi-Fi on Windows 11
You may also use Settings to connect Wi-Fi on Windows 11. The device will automatically connect when the network is in reach or the SSID (Service Set Identifier) is hidden.
These are the steps involved:
Step 1: To get started, open Settings. You can do this by clicking on the Start > Settings.
Handy shortcut: Windows + I is the keyboard shortcut

Step 2: Select Network & internet on the left side of the page, and then click on Wi-Fi on the right.
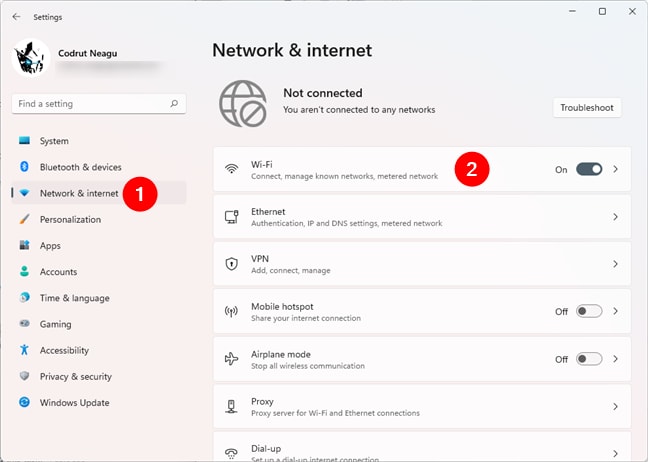
Step 3: Before continuing, make sure the Wi-Fi toggle is set to 'On.'
Select the Show Available Networks option in the Wi-Fi menu.
Step 4: Several Wi-Fi networks surrounding your location will appear. Select the preferred connection, then click Next after entering the password or network security key.

Note: If the Wi-Fi network has WPS enabled, you may just hit the WPS button on the router without the need to enter the Wi-Fi password.
Pause for a moment while Windows 11 completes the "Verifying and connecting" process to the Wi-Fi network.
You will then be connected to the Wi-Fi network you selected if everything goes well.
Tip: Check 12 Must-Have Software for Windows 11 to enjoy a better work experience.
2026 Tech Note: Selecting the Right Band (2.4GHz vs 5GHz vs 6GHz)
When using the Settings menu to view available networks, you may notice different bands. For the best experience on Windows 11:
1. 2.4 GHz: Best for long distances and moving through walls, but slower.
2. 5 GHz: Best for high-speed streaming and gaming at medium range.
3. 6 GHz (Wi-Fi 6E/7): The "Express Lane" for 2026 devices. Use this for the lowest latency and zero interference if your router and Windows 11 PC support it. Ensure your wireless drivers are updated to see 6GHz broadcasts.
Solution 3: Using Control Panel to Connect Wi-Fi on Windows 11
You can also connect Wi-Fi on Windows 11 manually by using Control Panel.
Follow these steps to do so:
Step 1: Go to the taskbar, press the Search button, and type Control Panel into the search box.
The control panel may be accessed by clicking the app name on the left, just below the best match area, or by selecting the Open option just below the app icon on the right.

Step 2: Go to Network and Internet in the Control Panel menu.

Step 3: On the Network and Internet menu, select Network and Sharing Center as shown below.

Step 4: On the 'Network and Sharing Center' menu, click on Set up a new connection or network below the 'Change your networking settings options' area as shown below.

Step 5: In the pop-up window, select Manually connect to a wireless network. After that, just click on Next to proceed.

Note:You'll be required to enter the network name of the device you want to join, as well as the access key or password, security type, and encryption type of the network, if necessary.
Step 6: After you've provided all of the relevant details, check the box below 'Security Key', which says Start this connection automatically.
This way, at the end of the procedure, you'll be automatically connected to this network. After that, click the Next button.

Step 7: The list will now include the new wireless connection. In the following pop-up, click on Change connection settings to proceed.

Step 8: A Wireless Network Properties drop down will appear on the screen, displaying the information for the newly added wireless network.
The Connect automatically when this network is in range option will be chosen by default because this network is set to start automatically. To proceed, click on OK, as shown below.

Step 9: Simply tap the Wi-Fi button to turn it back on if it is turned off. It will now be automatically linked to the wireless network that you manually added.

The system will immediately join the Wi-Fi network once you've completed the steps.
Solution 4: Using Command Prompt to Connect Wi-Fi on Windows 11
The last method you can use to connect Wi-Fi on Windows 11 is by using the command prompt. There are three steps involved:
Step 1: Open Start, click on the Search icon in the taskbar and type Command Prompt in the search box.
Click on Run as Administrator underneath the command prompt app icon on the right.

In the pop-up asking if you want this application to make changes to your computer, select Yes.
Step 2: To view the available Wi-Fi networks, type netsh wlan show profiles and then hit the Enter key.

Step 3: From the list of Network User Profiles, choose the wireless connection you wish to connect to, then type the User Account name of that network after 'name=' in the following command: netsh wlan connect name=<user profile name>

Note: You must additionally include the adapter name in the command if your device has multiple adapters, like this:
Netsh wlan connect ssid=YOUR-WIFI-SSID name=PROFILE-NAME interface=Wi-Fi
In a flash, you'll be connected to the network of your choice. Pre-connection is a disadvantage of this method. To appear in the All User Profiles area, you must have connected to the wireless network(s) at least once.
Video Tutorial on How to Fix Wi-Fi Not Working or Missing on Windows 11/10?
Error Message |
Probable Root Cause |
Expert Quick Fix |
| "Can't connect to this network" | Driver Glitch / IP Conflict | Toggle Airplane Mode or restart the Router. |
| "No Internet, Secured" | DNS Cache / ISP Issue | Run ipconfig /flushdns in Command Prompt. |
| "Action Needed" | Captive Portal (Hotel/Cafe) | Open browser to trigger the Wi-Fi login page. |
| Signal not appearing | Band Incompatibility (6GHz) | Update Wi-Fi drivers or enable 2.4GHz on router. |
People Also Ask Questions
These are the frequently asked questions about Windows 11's new updates:
Q1: Is my computer good enough to run Windows 11?
Customers who have purchased Windows 10 will receive a free update, but there are certain limitations. You may use this free tool to see if your computer is ready for Windows 11. Although it is temporarily unavailable due to various difficulties, Microsoft's official PC health check software will tell you if your PC is capable of running Windows 11.
To use Windows 11, you'll need a TMP security chip and an Intel CPU from the 8th generation or above, to mention a few prerequisites. A Ryzen 2500 or later CPU from AMD is required.
Q2: Is it true that upgrading to Windows 11 wipes out all prior data?
There will be no data loss if you update to Windows 11. The activation key, as well as all of your files, apps, and in-app actions, will be stored. The installation of the Windows 11 insider is comparable to that of an update, and it will save your data.
Nevertheless, because it is still in beta and being tested, expect unexpected behaviour. As everyone has said, it is advisable to back up your data.
Q3: What is the purpose of TPM in Windows 11?
TPM stands for Trusted Platform Module, and it is a hardware encryption chip that stores all of your passwords, secret credentials, encryption keys, and other sensitive data.
Because of the heightened risk of attacks on PC motherboards, Microsoft wants to secure these vital and private keys from malicious hackers. A TPM is usually incorporated into the motherboard or attached to the CPU manually.
Q4: Is it possible to go back to Windows 10 if I don't like Windows 11?
Yes, it is possible! You may restore to Windows 10 with all of your files and apps if you don't like Windows 11. This task must be completed within ten days of upgrading to Windows 11.
You must manually install Windows 10 after the 10-day trial period has expired. Also, create a backup of everything you own because a clean install will wipe the C drive clean.
The Bottom Line
The internet users who have just updated to Windows 11 now know how to connect to Wi-Fi on it in multiple ways. As you can see, it's a simple procedure that everyone can handle. Solution 1 is the fastest one in which you will be using the taskbar to connect Wi-Fi on Windows 11.
That concludes our discussion. These are the four simple methods for connecting to Wi-Fi on a Windows 11 computer or laptop. To access the internet on your device, you can use any of the solutions listed above.


