NTFS has been Microsoft's primary file system for storing vital operating system files since Windows NT 3.1. It's fast, secure, reliable, and provides extensive control and easy logging, making it an obvious choice.
However, NTFS is far from perfect and not immune to data loss, as there are countless instances of Windows users losing valuable data they've stored on the C drive.
Fear not if that's happened to you, as today, we'll dive deep into the NTFS file system and how to recover lost data from NTFS hard drive. We'll explore everything that can be done for NTFS data recovery and show you multiple ways to recover deleted files from NTFS drive.
Table of Content
-
- Recover Data From NTFS Drive/Partition Using Wondershare Recoverit
- Recover Deleted Files From an NTFS Drive Using the Command Prompt
- Undelete NTFS Files Using the Windows File Recovery Tool
- Get Data Back From NTFS Hard Drive Using File History
- Recover Deleted Files From NTFS Hard Drive Using Windows Backup
What Is the NTFS File System
Microsoft developed the NTFS file system in the 1990s, and it has since been the OS maker's primary choice for storing its Windows operating system, with Windows XP making it worldwide famous in 2001.
It stands for New Technology File System and represents an evolutionary step forward from Microsoft's previous file systems - File Allocation Table (FAT/FAT32) and, later, High-Performance File System (HPFS).
While it's undoubtedly newer and better than FAT32, NTFS also has disadvantages. This file format is limited to Windows operating systems and appears read-only on Linux or macOS. It's also incompatible with many external devices, such as Android phones, digital cameras, smart TVs, etc.
However, NTFS also has many advantages over FAT32 or HPFS. It's faster due to its file compression algorithms, gives users more control over their storage space, and supports encryption, providing users with increased security.
NTFS is also highly reliable, as even in the event of system failure or data loss, the file system maintains its consistency and uses an MFT mirror file to restore data.
How To Get Data Back From NTFS Drive
Now that we know more about the NTFS file system, let's jump straight into the methods for regaining your data from such a drive. Below are some of the most effective ways to recover deleted files from an NTFS partition.
Way 1. Recover Data From NTFS Drive/Partition Using Wondershare Recoverit
The simplest way to recover data from an NTFS drive or any other partition type is with a professional data recovery tool. Wondershare Recoverit is a prime example of such an application, and the tool can help you in all kinds of data loss situations, including NTFS formatting, failed transfers, virus attacks, accidental deletion, and more.
Using this software will only take a few minutes as the app's advanced search and recovery algorithms can swiftly locate your missing data and safely retrieve it to a safe location on your PC.
All of this can be done in just a few simple steps, and here's how:
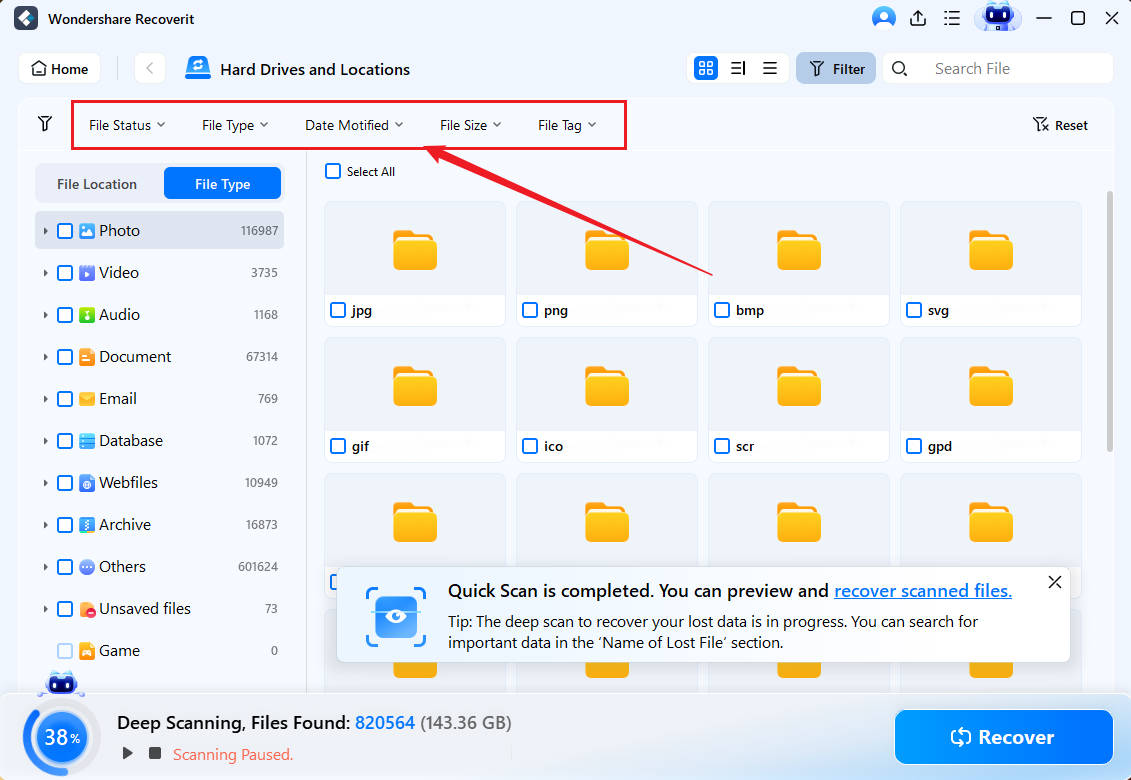
- Open the Wondershare Recoverit app on your computer, select Hard Drives and Locations in the top left corner, and select an NTFS drive whose data you want to recover.

- The app will immediately launch an all-around deep scan on the selected NTFS drive.

- You can then adjust various file filters and add keywords to point the scan in the right direction.

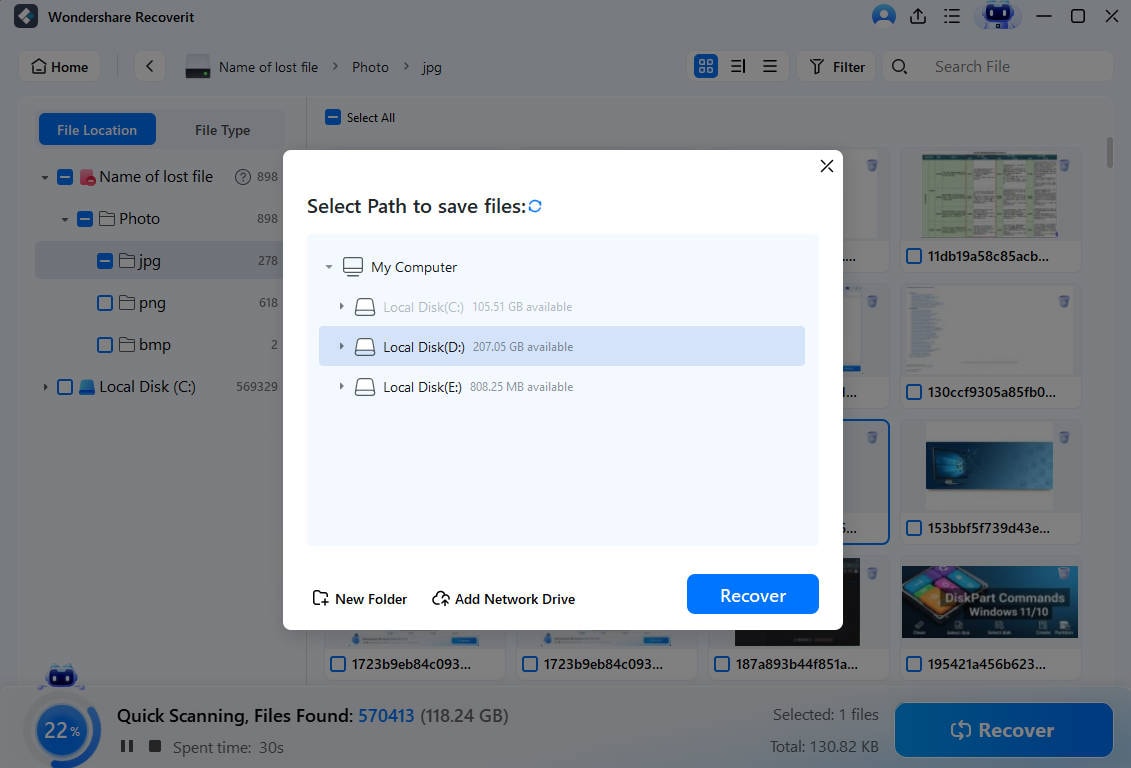
- Once it discovers files you've lost, the app will let you preview them so you can verify their integrity and ensure those are the files you're looking for.

- If you're satisfied with the previews, hit the Recover button to save the file to your PC. You can also pause or stop the scan at any moment if the app has already found the files you were looking for.

- Recovers data from 2000+ storage media, including HDDs, SSDs, USB drives, SD cards, etc.
- Enables recovery of data lost due to sudden deletion, formatting, disk corruption, virus attack, and more.
- Works with all popular file systems, such as NTFS, FAT, HFS+, and APFS, among others.

Way 2. Recover Deleted Files From an NTFS Drive Using the Command Prompt
Another excellent method for recovering deleted data from NTFS uses the built-in Command Prompt tool and its powerful CHKDSK feature. While it's undoubtedly more advanced than employing a professional recovery tool, it's far less challenging than it seems, and you can follow our steps below for guidance.
- Tap the Windows key, search for CMD, right-click the tool, and choose Run as Administrator.
- Type in the following command and tap Enter:
chkdsk C: /f. This will run the CHKDSK command on drive C, and " /f" indicates a full check. If your NTFS partition is another drive, swap "C" with your drive's letter. - Then, type in these two commands and press Enter after each:
C: attrib -h -r -s /s /d C:*.*.

These letters indicate a series of CHKDSK commands that will scan your NTFS drive and attempt to recover what was deleted. There's a chance that CMD will ask you to schedule the CHKDSK command if the NTFS drive (C drive in most cases) is in use. Hit "Y" and Enter and restart your PC in that case.
Way 3. Undelete NTFS Files Using the Windows File Recovery Tool
Users unfamiliar with the Command Prompt and would benefit from some help with this tool can also use the Windows File Recovery app, which is available on the Microsoft Store. This CMD-based Windows app is a decent option for NTFS data recovery and has similar steps to our previous method.
- Open the Microsoft Store, search for Windows File Recovery, and download and install the app.

- Launch the freshly installed Windows File Recovery app and look into how you're supposed to use it.

- Use the
Regularmode if your NTFS files were deleted recently and theExtensivemode if the files were deleted a while ago or if you're dealing with a corrupted or formatted NTFS drive. - You can enter the following command to undelete NTFS files from drive C and recover data to drive D. Hit Enter after the command, then type in "
y," and hit Enter again:winfr C: D:\Recover /extensive - This command will use the
Extensivemode and attempt to recover everything from the C drive and save it in a folder called "Recover" on the D drive.

The tool provides various examples and teaches you what each part of your command does, so you can use the commands as they are or alter them to your needs, depending on what types of data you're trying to recover.
Way 4. Get Data Back From NTFS Hard Drive Using File History
Windows has a decent built-in backup feature called File History, which occasionally saves copies of your files, depending on how you've set it up. However, you must have set up this tool before data loss happened for it to be effective, and if that's the case, you can follow these steps to use it and recover data from an NTFS hard drive:
- Navigate to Control Panel > System and Security > File History.
- Tap the Restore personal files option in the top left corner.

- Select the files you want to get back and tap the round green button called "Restore to original location" at the bottom of the File History screen.
Remember that this recovery method is only viable if you've previously set up the File History tool. Otherwise, you won't have copies of your files and can't use this method.
Way 5. Recover Deleted Files From NTFS Hard Drive Using Windows Backup
Windows Backup is another fantastic built-in tool on Windows operating systems, and you can use it to revert your entire operating system to a state before data loss has happened. Here's how:
- Tap the Windows key, look for Control Panel, and open it.
- Head to System and Security > Backup and Restore (Windows 7).

- Choose the "Restore my files" option and follow the steps to recover your deleted NTFS files.
Like the File History method above, the Windows Backup method is only effective if you've previously set up the Backup and Restore feature on your Windows computer. If you haven't done that, you won't be able to recover deleted files from an NTFS drive with this method.
How To Prevent NTFS File Loss in the Future
While NTFS is a fault-tolerant file system with multiple ways to recover data from an NTFS hard drive, preventing file loss is better than going through the necessary steps for NTFS file recovery. Therefore, we've included a few tips that can help you prevent data loss situations in the future, and they include the following:
- Invest in high-quality storage devices from reliable manufacturers;
- Create regular backups of your vital files to multiple locations;
- Keep your operating system up-to-date to prevent system crashes;
- Use a reliable antivirus tool to avoid virus and malware infections;
- Monitor the health of your NTFS partitions and other drives to prevent corruption;
- Practice safe ejection when removing your external HDDs, SSDs, and USBs.
With these tips at your disposal, the chances of file loss in the future will significantly decrease, and you won't have to go through the trouble of recovering your data as often.
Conclusion
NTFS is the primary file system for installing the Windows OS, and Microsoft has used it since the 1990s due to its speed, reliability, and security. However, NTFS drives aren't immune to corruption and file loss, and in such cases, you'll have to rely on one of the few methods for NTFS data recovery.
We've covered five ways to recover deleted files from an NTFS drive, including the Command Prompt and the Windows File Recovery tool, as well as Windows built-in tools like File History and Windows Backup, which require previous setup to be effective in data loss situations.
Wondershare Recoverit is also a great option, as it's the most effective and straightforward way toward NTFS file recovery in just a few steps.
FAQ
-
Can we recover data from the NTFS drive?
Absolutely! Not only is NTFS data recovery possible, but it might also be more straightforward than with FAT32 or exFAT drives due to NTFS's extended reliability. NTFS is a fault-tolerant system because it has MFT mirror files, which can be used to quickly restore files in case of system failure or drive errors if the primary MFS gets corrupted. -
How do I recover a corrupted NTFS file?
While NTFS drives are more reliable, they're not immune to file corruption. In case of corrupted NTFS files, you'll need to repair the drive through Command Prompt's CHKDSK feature and then use a data recovery tool like Wondershare Recoverit to retrieve the corrupted files from the NTFS drive. -
Can I get data back from a formatted NTFS drive?
Yes, it's possible to retrieve files even if you've formatted an NTFS drive. However, your chances of getting data back are significantly better if you've used the Quick Format option during the formatting process, and that's often the default option. In that case, a professional recovery tool like Wondershare Recoverit can locate the deleted files and recover them to a safe location on your PC.


 ChatGPT
 Perplexity
 Google AI Mode
 Grok
Grok


