

 TL;DR:
Deleting the Windows 11/10 recovery partition is a safe way to free up disk space, but it permanently disables the built-in Windows Recovery Environment (WinRE) and factory reset capabilities, making the creation of a USB recovery drive a strict prerequisite.
● Because Windows Disk Management blocks the removal of protected partitions, IT professionals must use the `delete partition override` command via DiskPart, while novices can bypass this restriction using GUI software like AOMEI Partition Assistant Standard.
● The freed storage becomes unallocated space that must be formatted via Disk Management to create a new simple volume, and it can only be used to extend an existing partition if the unallocated space sits immediately to the right of that target partition.
● If a recovery partition is accidentally deleted and no USB recovery drive exists, restoring the lost partition requires using specialized data recovery tools like Wondershare Recoverit or performing a full system reinstall via installation media.
Ask AI for a summary
 ChatGPT
 Perplexity
 Gemini
 Claude
 Grok
Grok
When problems arise, the Windows recovery partition (healthy recovery partition) allows you to boot into the Windows recovery environment and restore the system. On the other hand, Windows Recovery Environment can repair common problems associated with unbootable operating systems.
Users may choose to delete the recovery partition to free up disk space. Whether you want to merge partitions or save space, this article explains the steps below to show you how to delete the recovery partition on Windows 11/10.
Here are many user cases related to the topic of how to delete recovery partition Windows:

Before Windows Recovery Partition Deletion
1. What Is a Recovery Partition on Windows 11/10?
The recovery partition is a special section of the system hard drive dedicated to system recovery. The recovery partition allows the Windows operating system to restore itself to factory settings in the event of a critical system failure, saving you from having to reinstall the entire system. In Windows 10, you can have a Windows recovery partition or an OEM factory recovery partition from a computer manufacturer on your Windows disk.
If something goes wrong with your computer, you can boot into the Windows Recovery Environment (WinRE) using the Windows Recovery Partition. The OEM recovery partition allows you to restore your computer to factory default settings by pressing a specific key (usually F9 for HP and F12 for Dell).
You may also want to read: How Much Recovery Partition is Needed for Windows 11?
2. Is It Safe to Delete a Recovery Partition in Windows?
Deleting the recovery partition in Windows is RISKY, but it is safe. Yes, users can freely remove the recovery partition. However, if it is done, Windows RE and the factory default settings will become inaccessible. To remove the recovery partition in Windows 11/10, you must first create a recovery disk with your USB drive in case you need it after deleting the recovery partition.
3. Which Recovery Partition Can You Delete?
If you upgrade your system to Windows 10, the factory default recovery partition will no longer function normally. In that case, delete this recovery partition to free up disk space.
To use Windows recovery options to repair your system, you only need one Windows recovery partition. When you upgrade to the next version of Windows, Windows may create a new recovery partition. In that case, keep only the current recovery partition and delete the others.
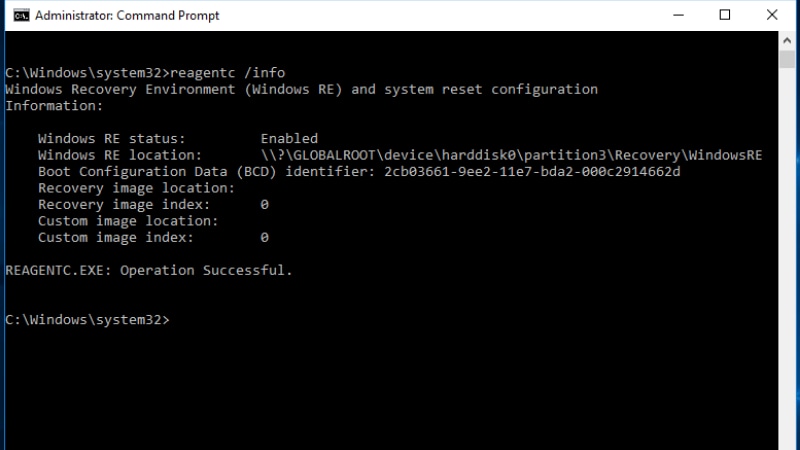
In an elevated command prompt, type this command to find this Windows recovery partition:
reagentc /info
On another command prompt, enter the following commands:
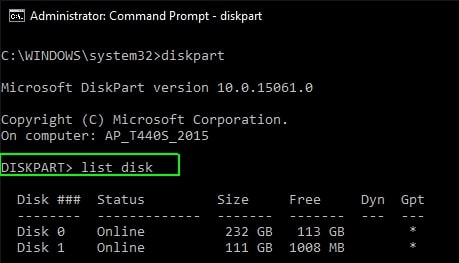
Diskpart
list disk
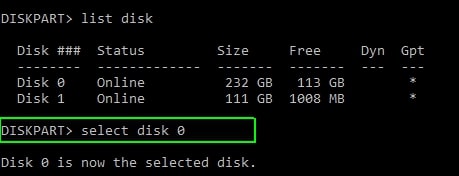
select disk 0
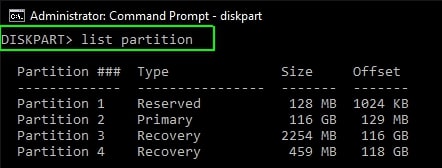
list partition
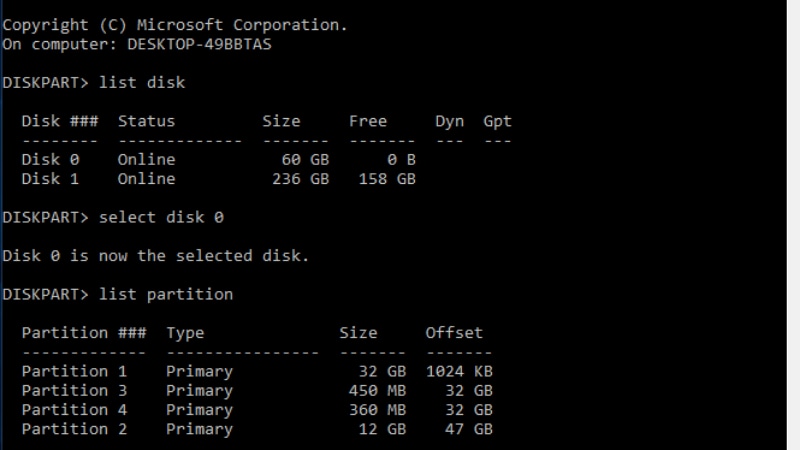
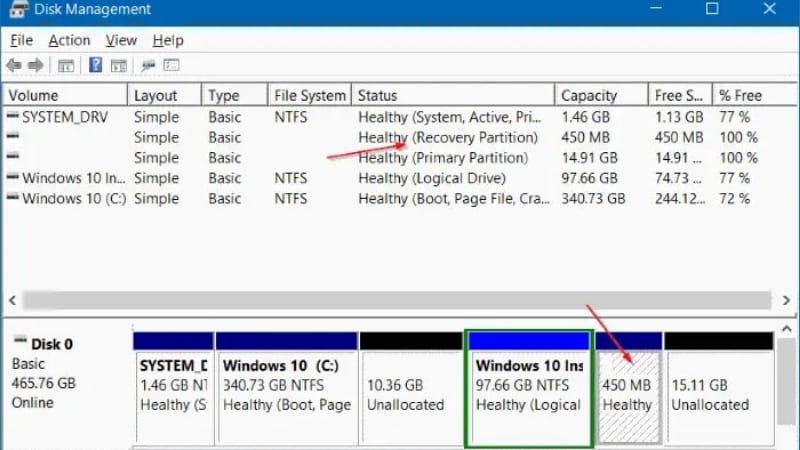
The second partition is the existing Windows recovery partition, which needs to be kept if you intend to use the recovery options. The process is simple once you've settled which recovery partition to delete.
If you are certain to delete the partition on your Windows, here are some valuable tips to safely delete a recovery partition:
Tip 1: Make a system image backup using Windows backup and recovery software. The recovery partition has an advantage over a system image backup. Restoring the operating system via the recovery partition will erase all of your computer's data, programs, and settings. It will reset your computer to factory settings, while the system image backup contains all of the items you've backed up, including the operating system.
Tip 2: Use the Delete command in Windows Disk Management to delete a protected partition.
How To Remove a Recovery Partition on Windows 11/10?
Since recovery partitions are protected, removing them differs from deleting a regular partition. Follow the steps below to remove a recovery partition on Windows 11/10.
Method 1: Delete Recovery Partition With DiskPart
You are not permitted to delete the recovery partition in Windows Disk Management, but you can delete partitions from the command prompt using Diskpart.exe. This method is for IT professionals; if you lack the courage to input commands at Diskpart, consider the Method 2 with GUI interface.
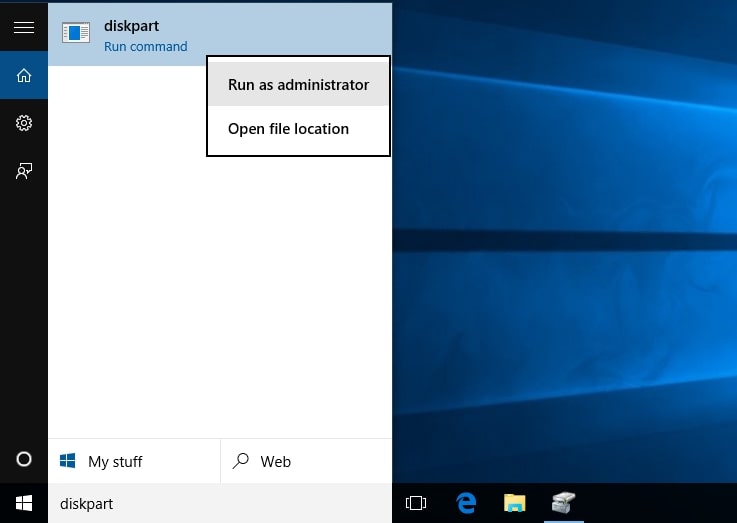
- Enter diskpart.exe into the search box, then right-click on Diskpart and click Run as administrator.
- To display all disks, type list disk at a Diskpart prompt. A disk number will be assigned to each disk on your computer.
- Type the select disk command and the disk number to specify the disk that contains the recovery partition. Number 0 is the first (or only) disk. Press Enter.
- Enter list volume to see a list of all the partitions on the selected disk, along with their labels, so you can figure out which one is the recovery partition to be deleted. Instead, use the list partition command to see the partition type.
- Type the select partition command and the recovery partition number you want to delete.
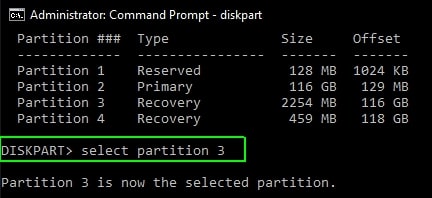
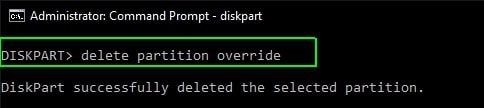
- Enter the delete partition override command. Then, Diskpart will start deleting the recovery partition. Once the process is completed, you will see the message “Diskpart successfully deleted the selected partition.”
There is it.
Method 2: Delete a Recovery Partition With Third-party Software
Here's an effective third-party tool with GUI interface if you are just a novice in deleting a recovery partition. With the help of the free software, AOMEI Partition Assistant Standard, you can easily remove the recovery partition and recover your storage space. Let's see how AOMEI Partition Assistant Standard removes the recovery partition.
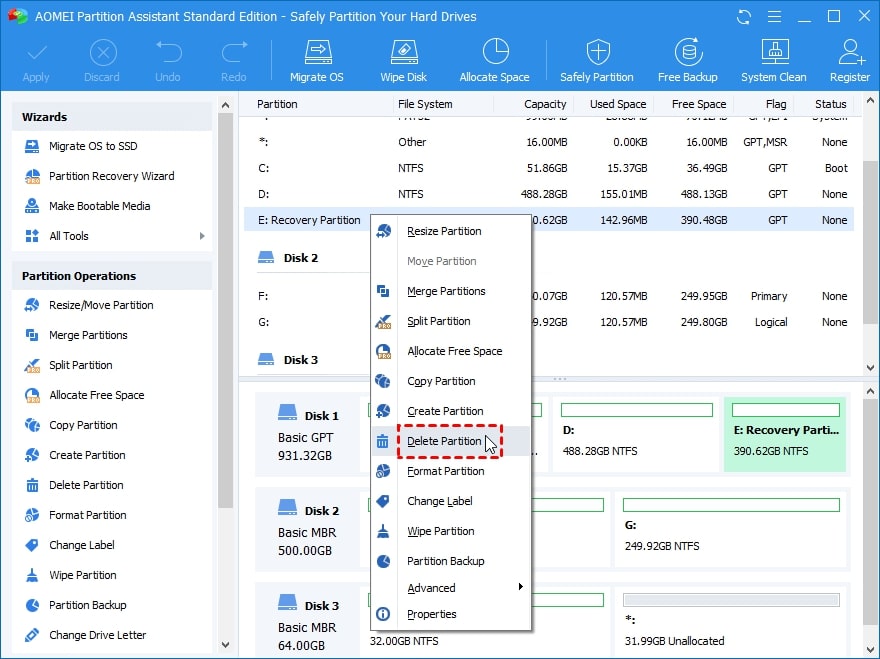
- Download and install AOMEI Partition Assistant Standard. Select Delete Partition when you want to delete the recovery partition, then click OK.
- Tap OK after selecting the method to delete the recovery partition.

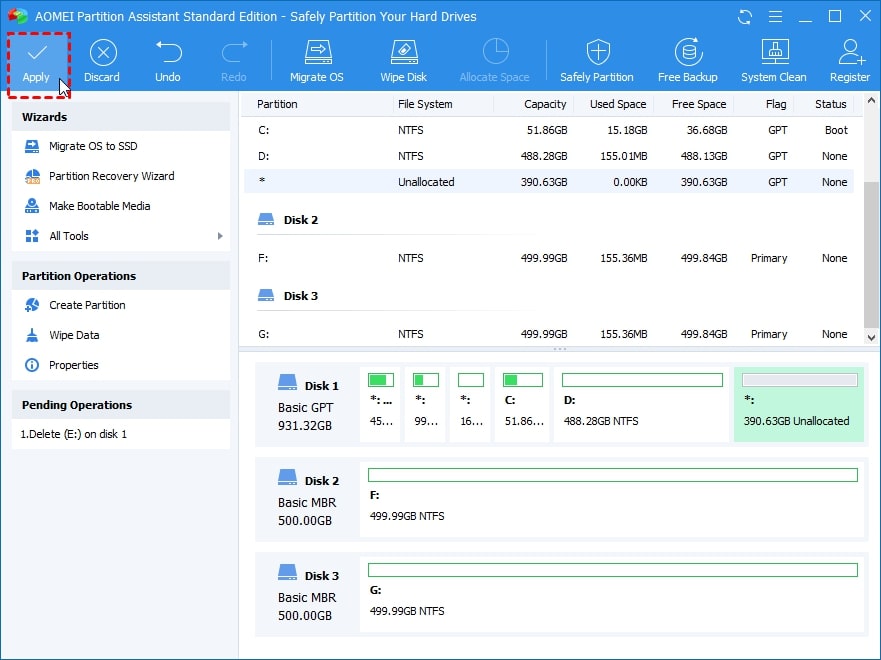
- The recovery partition will be seen as an unallocated space. Ensure that it is the partition you wish to delete before clicking Apply to start the process.
How to Use the Unallocated Partition?
After deleting a recovery partition, the system will create an unallocated space on your hard drive. To use the unallocated space, you must format it firstly. Then, you have two options:
- Set up a new partition with the unallocated space if you need a new location to save data. This can be made during the formatting process.
- Expand an existing partition if your drive or other data partitions run out of disk space.
Format the Unallocated Partition in Disk Management
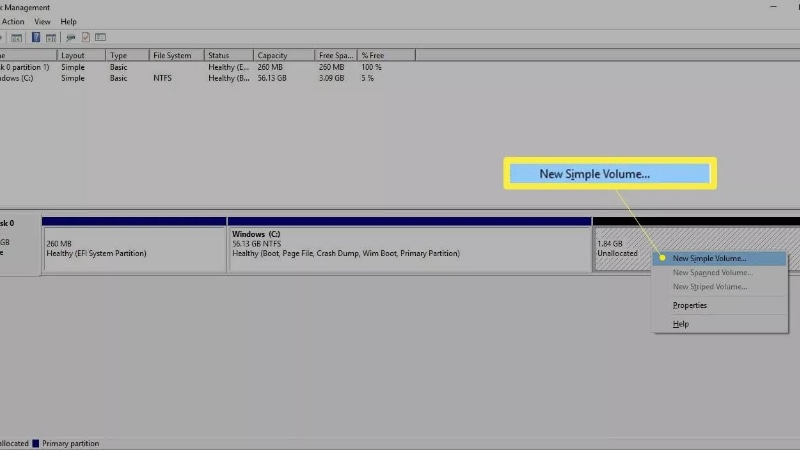
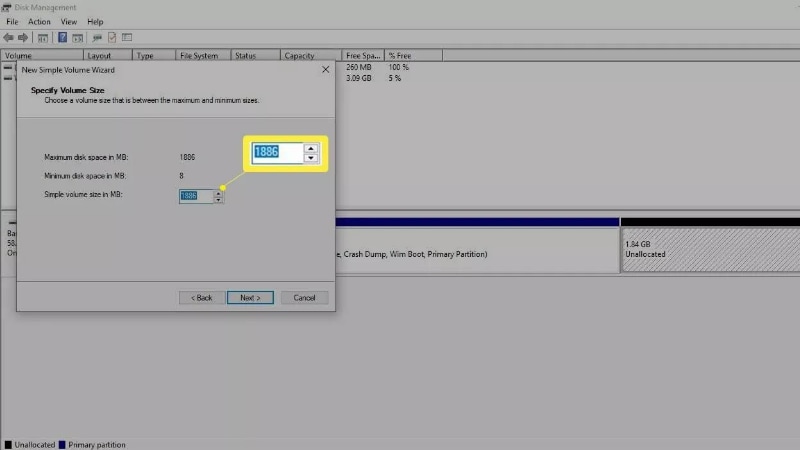
- Right-click the Start menu and choose Disk Management. You'll notice several partitions, including one labeled Unallocated, alongside the disk number for your hard drive. Right-click the Unallocated partition and choose New Simple Volume.
- Click Next to proceed. Enter the amount of data the new partition should use from the unallocated space, then click Next.
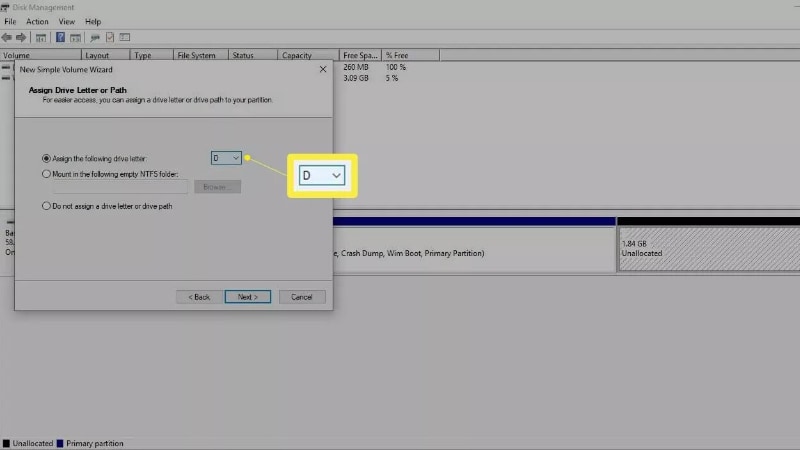
- Select Next after selecting a letter from the drop-down menu to assign to the partition.
- Name the partition in the Volume label field and tap Enter.
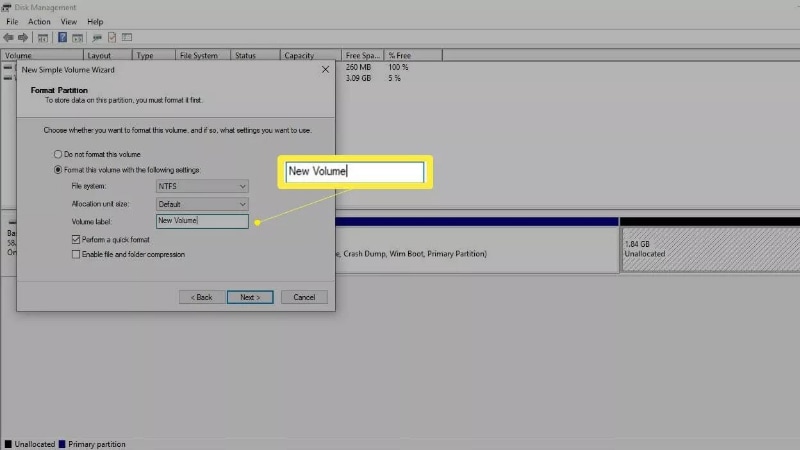
After the process, exit the disk management.
Expand a Partition to Use the Formatted Unallocated Space
If you intend to use the additional space to expand another partition, the unallocated space must show up to the immediate right of that partition in the Disk Management tool. Follow the steps below to expand a partition:
- Right-click the partition you would like to expand and choose Extend Volume. To proceed, select Next.

- Put the amount of unallocated space you want to use, then press Next.
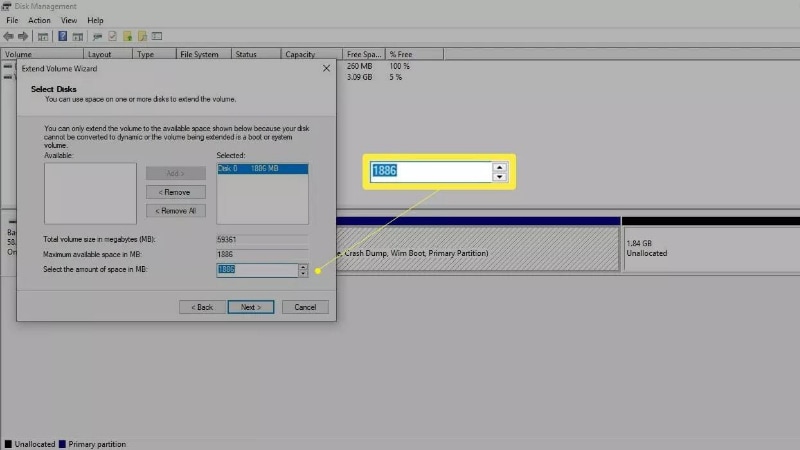
After the process, the Windows partition will be resized to accommodate the extra space.
How To Restore Deleted Recovery Partition on Windows 11/10?
As said above, deleting a recovery partition is risky. If you wrongly removed a recovery partition, it is advisable to have a tool that has improved the scanning and recovering process for deleted partition. Wondershare Recoverit is a powerful and secure partition recovery software that can help you recover deleted or lost recovery partition in a few simple steps.
You may also like:
How to Resize Recovery Partition in Windows 10?
How To Recover an Unallocated Partition For PC
Conclusion
Deleting the recovery partition on Windows 11/10 may seem difficult initially, but with the clear step-by-step instructions provided in this article, you won't have to worry. If you have concerns backing up your essential files and data, use Wondershare Recoverit, which has easy steps to scan and recover deleted or lost recovery partition.
FAQ
-
Can I delete Windows recovery partition?
Yes, you can delete it, but doing so will remove your ability to use built-in recovery options to restore or repair your system. -
How do I delete a recovery partition in Windows?
To delete a recovery partition: 1.Open Disk Management (press Windows + R, type diskmgmt.msc, and press Enter). 2.Locate the recovery partition. 3.Right-click the partition and select Delete Volume. 4.Confirm the action if prompted. -
Will deleting the recovery partition affect my Windows installation?
Deleting the recovery partition will not affect your current Windows installation, but it will remove the ability to use recovery tools provided by the partition. Ensure you have a backup or recovery media before deleting it. -
How can I create a recovery drive before deleting the recovery partition?
To create a recovery drive: 1.Connect a USB drive (16GB or larger). 2.Search for Create a recovery drive in the Windows search bar and open it. 3.Follow the on-screen instructions to back up the recovery partition to the USB drive. -
What should I do if I accidentally delete the recovery partition?
If you accidentally delete the recovery partition, you can: 1.Use a previously created recovery drive to restore your system. 2.Reinstall Windows using installation media (USB or DVD). 3.Contact your device manufacturer for recovery options. 4.Use a data recovery tool like Wondershare Recoverit.


