

You must come across the term RAW photo file while you look for ways to improve the quality of your photos. This is mainly mentioned in camera settings or editing tutorials, but users are often unaware of what it is and how it differs from other file formats.
Hence, in this article, we’ll explore everything you need to know about this, along with a comparison to other photo file formats. Moreover, in case you have lost a RAW file on your computer, we’ll introduce you to a tool to recover it.
Try Recoverit to Perform RAW Photo Data Recovery
 Security Verified. 3,591,664 people have downloaded it.
In this article

Part 1. A Basic Understanding of the RAW Photo File Format
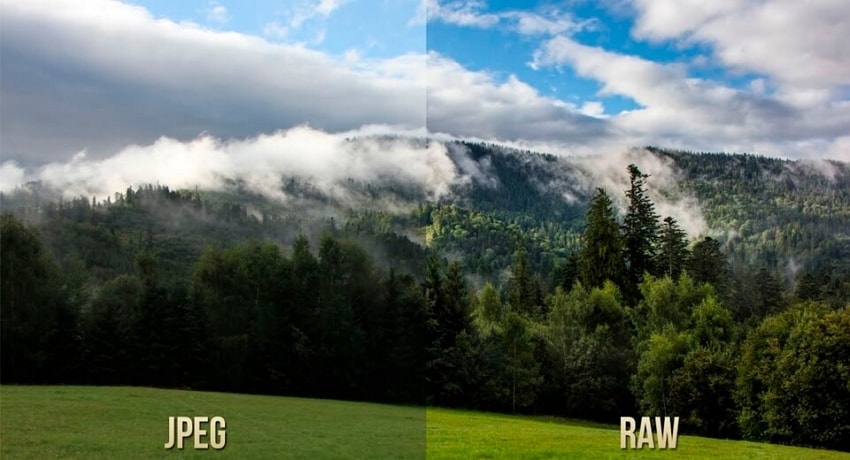
RAW refers to a file photo which contains uncompressed data that has not been processed in any way before it reaches the camera sensors. Meaning that, no adjustment on the camera setting including the light, the color and the tone has changed any of the image details. RAW format is an excellent option to use among professional photographers who want full control over editing and post-processing.

Speaking of the extensions, it is dependent on the brand of the camera. Like the Canon cameras tend to use .cr2 or .cr3. Nikon and Sony on the other hand save as. NEF and .ARW. Moreover, the .DNG file format is the universal RAW file format used by Adobe. In most cases, one requires special software to open and edit such files.
Part 2. An In-Depth Comparison of RAW with JPEG and PNG
When you compare the RAW photo file with JPEG and PNG, the primary differences are in image quality, file size, and edit-ability. Sensor data with finer details is preserved in the RAW files without compression. In contrast, JPEG files compress data for smaller-sized files, resulting in data loss, while PNG also doesn’t support the full range of photographic data. Let's compare these formats to highlight major differences between them below:
| Features | RAW | JPEG | PNG |
|---|---|---|---|
| Compression | Mostly none | Compression with quality loss | Compression without quality loss |
| Image-quality | Highest quality with full sensor data | Moderate quality with processed data | High quality for graphics |
| File Size | Very Large | Relatively small to medium | Medium to Large |
| Color Depth | 12 to 14 bits per channel | 8 bits per channel | 8 or 24 bits |
| Edit-ability | Extensive post-processing flexibility | Limited flexibility; quality loss while editing | Limited; not suitable for photo edits |
| Use Cases | Professional and high-end photography | Everyday photography with quick sharing and multi-platform use | Web images, icons, and graphics with transparency |
| In-camera Processing | No | Yes | No |
| Software Needed | Special RAW editors like Lightroom | Compatible with most devices | Graphic Editors like Photoshop |
Part 3. Potential Advantages and Disadvantages of Shooting in RAW Format
To know more about the RAW format, this section will cover pros and cons of this format to help you understand whether it suits your photography needs.
Key Advantages of Shooting in RAW Format
- Greater Editing Flexibility: Unprocessed raw sensor data can be considered a blank canvas, and the adjustments can be made like fine-tuning of exposure, contrast, and recovery of the shadows. During this process, the quality of the image is not affected, unlike the format, which is compressed in JPEG.
- High Dynamic Range: The color range can be captured in 12-14 bits, which enables capturing of huge amounts of brightness. This range helps users in recovering lost details while editing, mainly in dark shadow areas.
- Improved Color Accuracy: The color information is also concentrated inside the RAW files more than in the JPEG, which only contains a bit depth of color that is 8 bits. This brings an easier transition of colors, and the tones are more accurate during an editing process.
- Non-Destructive Editing: The RAW files editing process is not written over the original data, but as sidecar metadata. Therefore, one can reprocess the file multiple times and test different appearances without compromising the quality of photos.
- Customizable White Balance: During post-processing, the RAW files can have color temperature and tint controls to correct inaccurate white balance. This is because the data is not permanently captured in these images when the fault is brought in by artificial or mixed lighting.
Potential Drawbacks of Shooting in RAW Format
- Bigger-Sized Files: RAW photo file contains uncompressed image data, and it has a file size of 20-100 MB per image. This makes the storage requirements higher and the memory cards faster to fill up during shoots.
- Reduced Workflow: These files must be imported, edited, and exported, which requires special software that creates extra interventions to the process. This can cause a time lag in time-related projects like events and journalism-based things in comparison to already available formats.
- Lack of Immediacy: They are not easily accessible, and cannot be shared, printed and uploaded without a conversion to standard formats. This inconvenience complicates its application where immediate delivery is needed, such as in press photography.
- Requirement of Dedicated Software: They require dedicated software such as Adobe Lightroom to be opened and edited since most image viewers do not support them. Some cameras also use a proprietary RAW format that must be continuously updated or have a specific codec to be compatible.
- Slower Shooting Speed: Due to the huge size and the complex data, these files require more time to be recorded on memory cards, hence decreasing the buffer capacity of the camera. This restricts the ongoing framing ability of rapid photography, such as sports or wildlife photography.
Part 4. Should I Use RAW Format for Capturing Photos?
It largely depends on what you want to achieve in photography and the degree of control you require over what will be in your final pictures. If you require photos of high quality, which can be adapted to retrieve the details in the highlights and shadow regions, then the RAW format is the one that best suits you. It is also useful in situations where the lighting is not predictable.

Besides, you may consider utilizing the RAW format, in case you have to edit photos on a regular basis on a professional and commercial level. However, the RAW format might not be the best in case you desire easy and rapid delivery and would also like to be efficient in terms of storage.
Part 5. Enabling RAW Format in Cameras: A Quick Guide
Manually activating this format in camera settings will give you an unprocessed file that is equivalent to the film negative. This is possible in most cameras in their menu options, with the default format normally being JPEG. With the following steps, enable it on your Nikon or Canon device to your RAW format file:
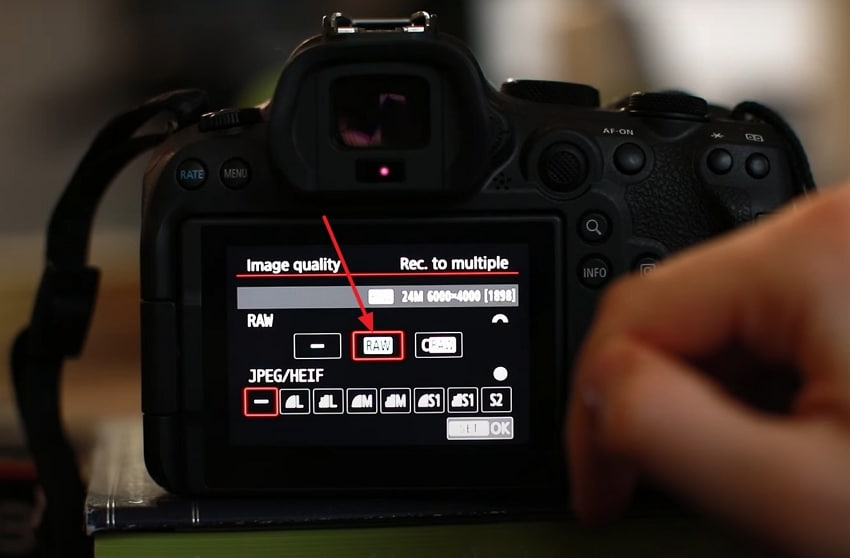
For Canon
Step 1. Go to the photo mode and select "Menu" and press the "Camera" icon. After that, find the "Image Quality" option from the menu.
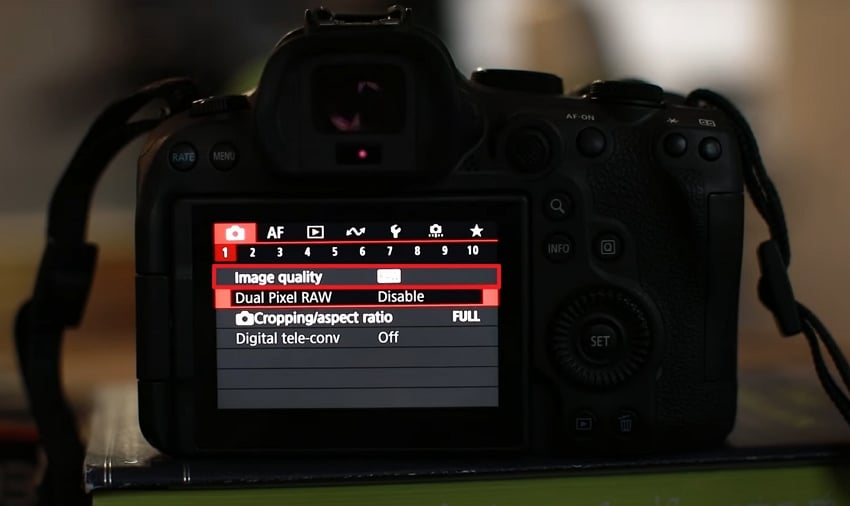
Step 2. Choose the "RAW" option for uncompressed RAW format in your files.
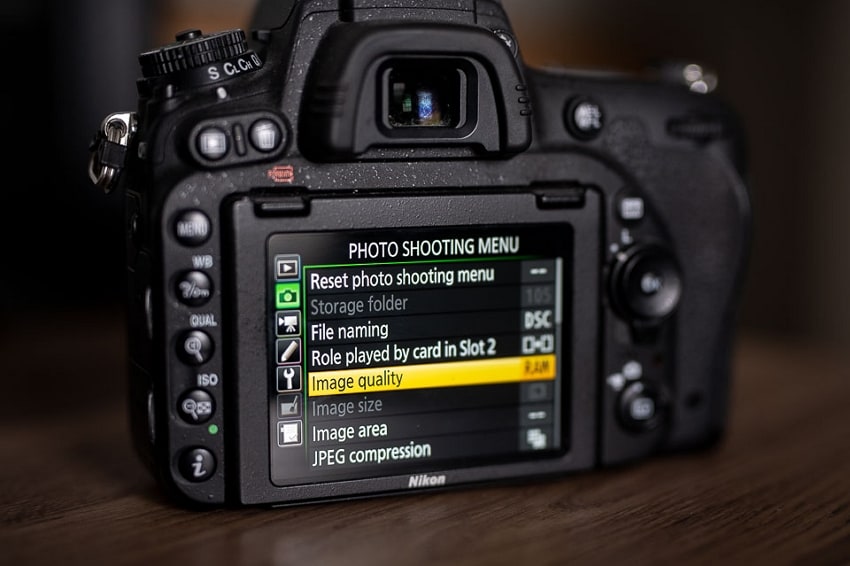
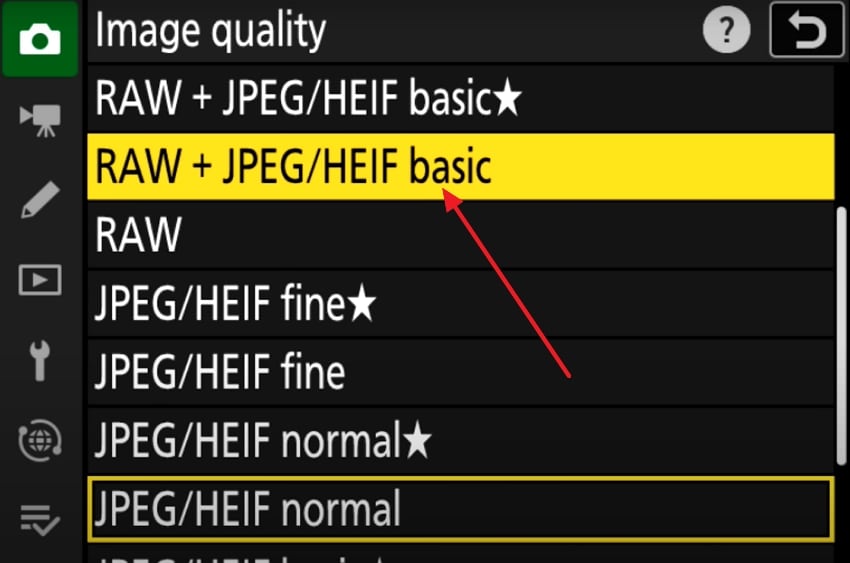
For Nikon
Instructions. On your Nikon camera, press the "Menu" button and navigate to find the "Photo Shooting Menu." Now, find "Image Quality" and then choose the "RAW + JPEG/HEIF Basic" and press the "OK" button.
For Fujifilm:How to Recover RAF Files From a Fujifilm Camera
Part 6. Top Options to Open and Edit a RAW Photo File
Here are the top 5 software options that you can use to open and edit your RAW format files:
| Software | Key Features |
|---|---|
| Adobe Lightroom | Non-destructive editing, presets, and batch processing availability with cloud sync |
| Capture One | High-end color grading and tethered shooting |
| Nikon NX Studio | Exclusive for Nikon cameras with full NEF support and built-in editing tools |
| darktable | Open source and free with customizable workflow and non-destructive editing |
| Canon Digital Photo Professional | Canon RAW format optimization, along with accurate color handling |
Part 7. Lost Your RAW Photo File on Computer While Transferring? Find Out How to Recover!
While you’re transferring the RAW files for post-processing, they can accidentally get deleted. For that, you can use a recovery tool like Wondershare Recoverit with a wide range of format support, including photos, to recover RAW file. This tool is perfect for use on various platforms as it supports both Mac and Windows devices. You can recover files lost due to anything from hardware failures to accidental deletions.
Recoverit will restore the files where the format and layout need to be maintained perfectly. Additionally, this program allows you to recover your files in batches. The storage devices supported by this software exceed 2000 in number, including memory cards, which makes data recovery easier. Apart from this, the software claims data security along with being 100% free of viruses.
Key Features
- Preview Availability: A preview option is available to ensure that all necessary files are recovered.
- Deep Scanning: The tool features an advanced deep scanning algorithm that searches every corner of your computer.
- Filter Option: Narrow down the file search by applying filters such as file type.
A Guide To Use Recoverit and Retrieve Deleted RAW Format
When you plan on using this tool for your RAW photo recovery, follow the given instructions:
Step 1. Specify the Location for Data Recovery
Once the program has been introduced, on the tab of "Hard Drives and Locations" select a position in "Hard Disk Drives" menu. Alternatively, tap the "Desktop", under the section of "Quick Access" to start the deep scan.

Step 2. Apply Filters to Pinpoint the Search
As the scan is proceeding, it is possible to limit the search by choosing the filter to find the files more quickly using the "File Type" or "Time."

Step 3. Preview the Recovered Files and Save
When your desired files are recovered, preview them and hit "Recover" to restore them.

Conclusion
To sum up, the RAW photo file provides unmatched flexibility for greater post-processing control. In this article, we have explored various aspects of this format, along with a comparison to other file types, such as JPEG and PNG. If you have lost a RAW file, we recommend using the recovery tool, Recoverit, to retrieve it.
FAQ
-
1. Can I shoot in RAW on my smartphone?
Yes, the RAW format is available for shooting on many smartphones nowadays, including iPhone, Pixel, and Samsung Galaxy. They are not as good as DSLRs, but they give more editing options on highlights and shadows than JPEGs. -
2. How does dual RAW+JPEG shooting work?
When you enable dual-format shooting in your camera settings, it saves both versions of images. This provides a quick preview for instant sharing while retaining RAW files for later editing. -
3. What is the best way to manage large RAW files and storage issues?
Recommended ways for managing larger RAW files include using cloud backup, an external hard drive, or converting final RAW images to JPEG format. Adobe Lightroom and other programs could be used for organizing and batch-processing large photo libraries. -
4. What is the difference between RAW and TIFF?
TIFF is processed, whereas a RAW file is unprocessed and needs conversion. TIFFs are used for print-ready images and offer less editing control than RAW.
 ChatGPT
 Perplexity
 Google AI Mode
 Grok
Grok


