

Auto-capitalization in Microsoft Word is useful but not always necessary. It might interfere with the intended formatting, especially while drafting a document on codes, leading users to control it. Manually managing capitalization ensures accuracy and maintains the integrity of your content. When you disable this feature, you get great control over the text.
It helps prevent mistakes when working with many contributors on shared documents. Moreover, users get to customize their writing experience based on their specific requirements. This guide will walk you through the simple steps to help you learn how to turn off auto-capitalization in Word.
Try Recoverit to Perform Microsoft Word Data Recovery
 Security Verified. 3,591,664 people have downloaded it.
In this article

Part 1. Simplified Guide to Turn Off Auto Capitalization in Word
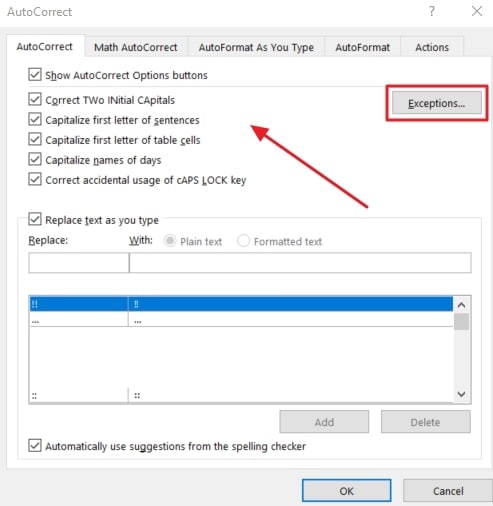
Auto-capitalization in Word improves writing efficiency for automatic capitalization of the first words. Disabling this feature allows users to control the text to prevent unnecessary corrections and ensure the document appears as per their requirements. You can choose which of the capitalization features you want turned off. The steps below will help you learn how to turn off auto caps and maintain accuracy without manual correction:
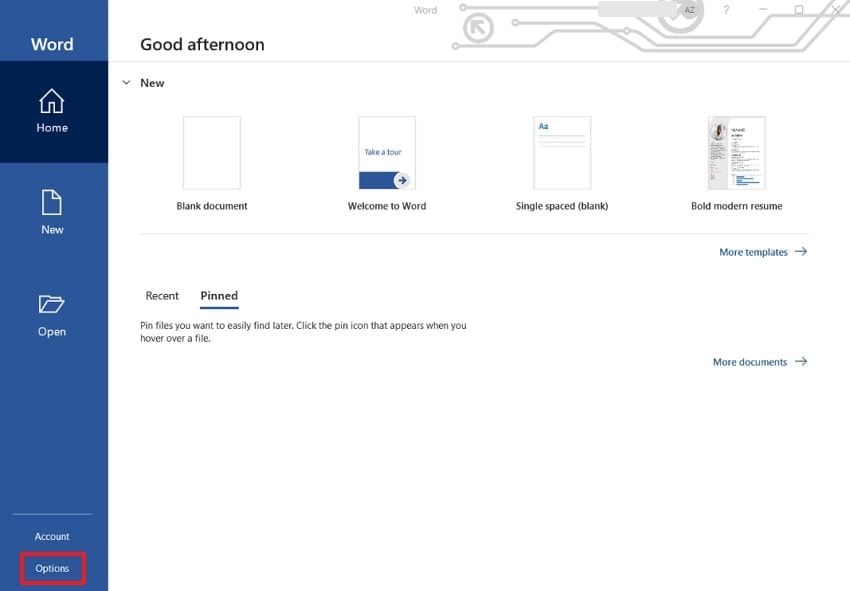
Step 1. Launch the Microsoft Word application on your desktop and select the "Options" tab from the left-side navigation bar.
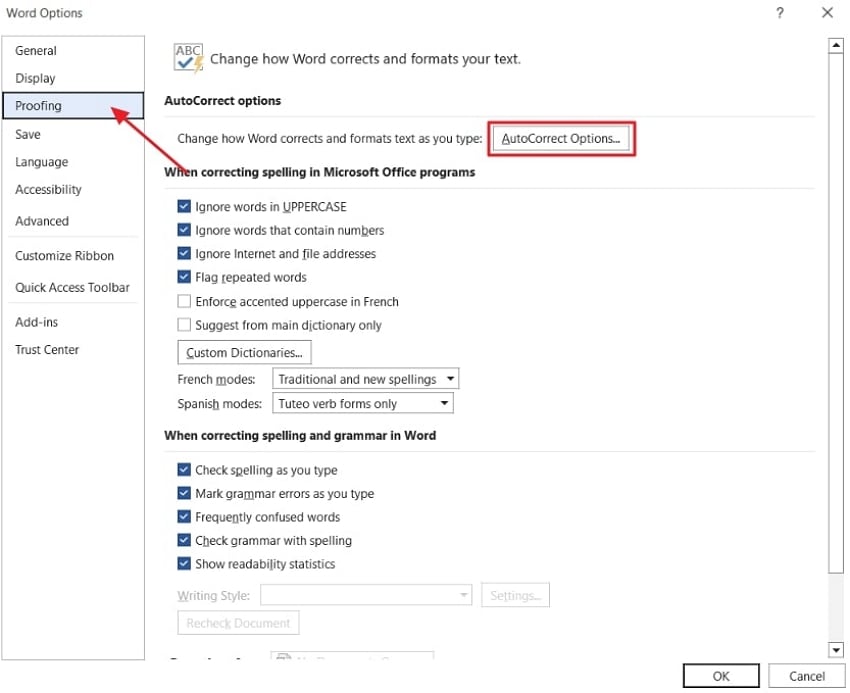
Step 2. Now, you need to locate the "Proofing" section from the left list of options. Next, hit the "AutoCorrect Options" button and move to the next step.
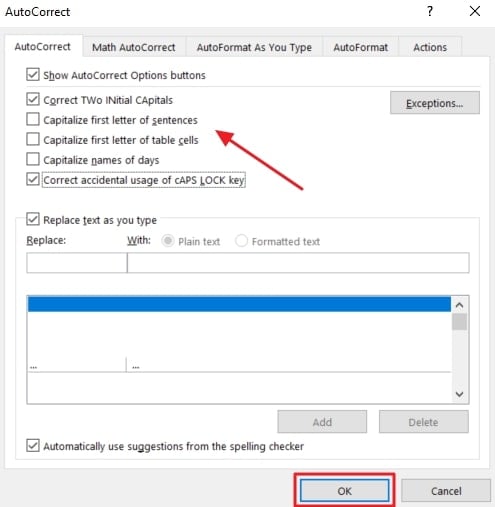
Step 3. Following that, "Untick" all the checkboxes you think are unnecessary for your document when it comes to auto-capitalizing. To save the settings, hit the "OK" button at the bottom of the box.
Find out how to fix the issue and learn simple methods to recover corrupted Word files.

Part 2. How To Set Up Exceptions in Auto-Capitalization Rules Across Word?
If you need to keep auto-capitalization enabled but with flexibility, you can adjust the exceptions. Microsoft Word's feature ensures that specific words remain in their intended lowercase format. It will help the users maintain consistency in their writing without turning off the entire auto-capitalization function.
This is especially helpful in collaborative work environments, where standardized formatting is crucial. Customizing these rules reduces the need for manual corrections to save time. This also ensures that documents follow the preferred style guidelines. Read into the steps below to get a better understanding of how to turn auto caps on but set exceptions:
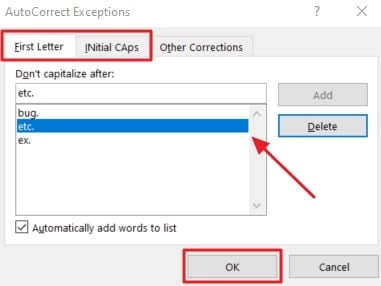
Step 1. To get started with setting your exceptions, access the "AutoCorrect" dialog box again. This time, keep the functions checkboxes enabled and hit the "Exceptions" button to move to the next step.
Step 2. Finally, you can now set the "First Letter" or the "INitial CAps" settings based on your requirements. Hit the "OK" button to save the settings and ensure that your documents follow the rules and expectations you have set.
Part 3. Additional Considerations When Word Stop Auto-Capitalization
Apart from the above discussion, here are some of the considerations you need to keep in mind as you figure out how to turn off auto-capitalization:
- Impact on New vs. Existing Documents: Once you turn off capitalization, the change applies to all new documents you create in Word. Yet, existing documents will keep their original formatting unless you make manual edits.
- Turn On Auto-Capitalization: You can re-enable the auto-capitalization function through Word's Proofing settings. Navigate to the Proofing section to locate the AutoCorrect Options and check the relevant boxes.
- Compatibility Across Devices: As users make changes to auto-capitalization settings, they are applied to one device. When you work on multiple devices, you may need to adjust the separate settings on each one.
- Effect on Collaborative Work: While working on shared documents, your personal settings won't affect how others see or edit the file. Each user's Word stop auto capitalization settings dictate how its functions work on their system.
- Grammar and Spell Check Considerations: Disabling auto-capitalization doesn't turn off grammar and spell check features in Word. If you still want capitalization suggestions, you can rely on Word's spell check to highlight potential errors.
Bonus Part. Word Malfunctioning Due To Lost System Files? Recover Immediately!
Due to accidental deletion, one can lose their system files, which can cause Microsoft Word to malfunction. It can disrupt your workflow as you are trying to understand how to turn auto caps off. Users can opt for a reliable third-party recovery tool like Wondershare Recoverit. This tool will help them restore the lost files and recover the damaged Word files with ease.
Moreover, it is a powerful tool that has a high recovery success rate due to its easy-to-use interface. The software offers both a quick scan for deleted files and a deep scan mode to locate long-lost or buried system files. You can recover files instead of restoring everything at once with the help of the preview feature.
Key Features
- Supports Many Devices: Recoverit can retrieve lost files from a wide range of over 2000 storage devices. It provides a reliable solution for all scenarios, like accidental deletion, system failures, or after you turn off auto-capitalization on Word.
- System Recovery: It offers a Windows system recovery feature to fix boot failures and restore files. This helps users repair their OS and regain access to their data without reinstalling Windows.
- Support Diverse File Formats: The software supports over 1000 file formats, including Word documents, images, videos, and audio files. This ensures that users can recover important files regardless of their format or original storage location.
Detailed Guide For Recovering Lost System Files with Wondershare Recoverit
Here is a manual that you can follow to learn how to use Recoverit to make sure the device's systems work in an accurate manner:
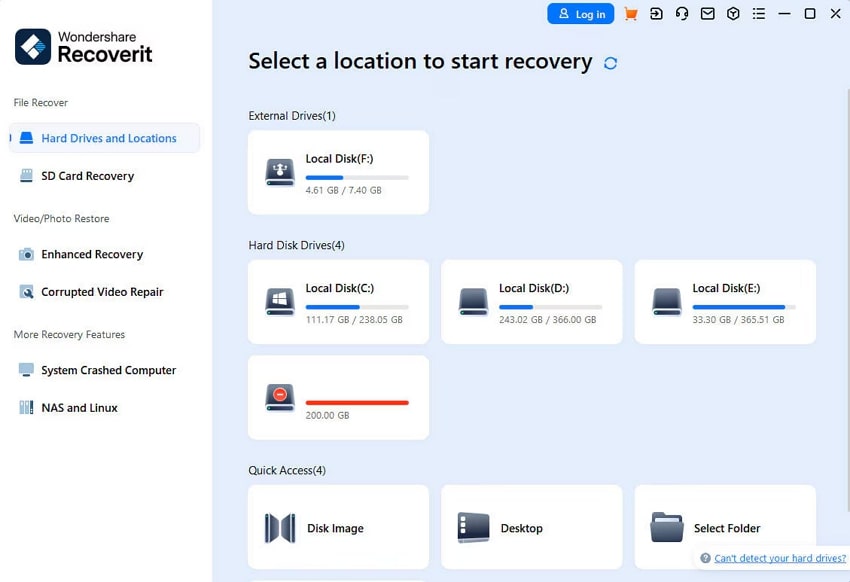
Step 1. Download Wondershare Recoverit and Choose the Location
Initiate the procedure by downloading Recoverit to your desktop device. Once you launch the tool, move to the "Hard Drives and Locations" section and choose your location.
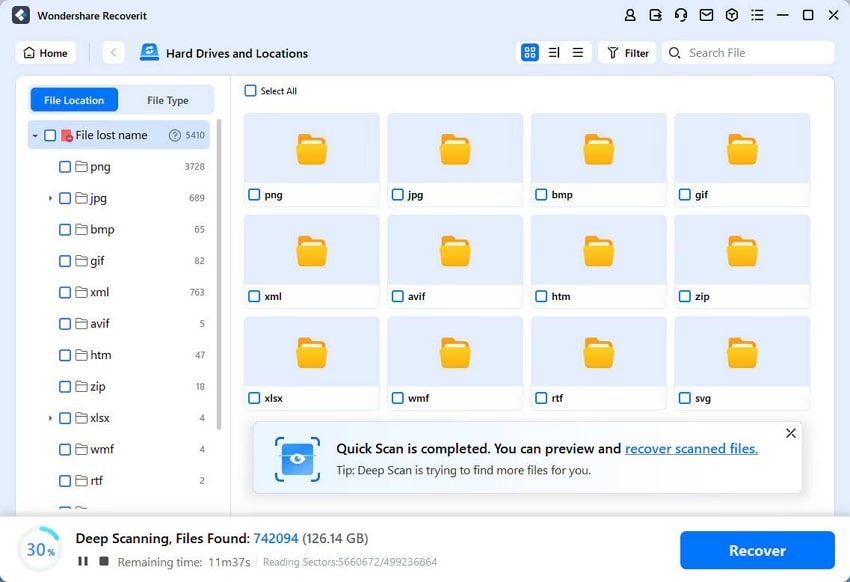
Step 2. Start the Deep Scan and Hit Recover
Upon choosing that, filter out the specific location through the "File Location" and "File Type" properties. After completing the scan, hit the "Recover" button and move to the final step.
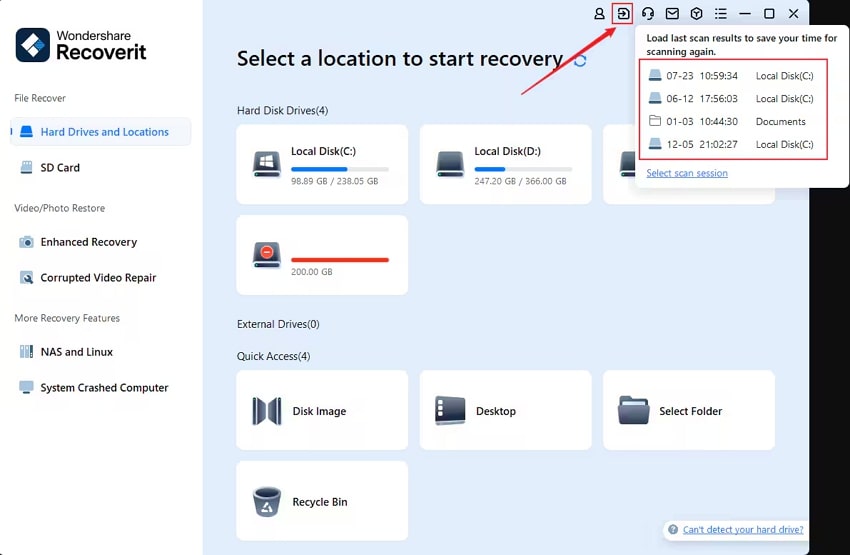
Step 3. Save the Scan Result to View Later
Finally, as the scan procedure is complete, you can hit the "Save" icon at the top right corner of the main interface. This will save the recovered files to its software, which you can refer back to later on.
Conclusion
To conclude, we have looked into the methods for how to turn off auto-capitalization in Word. With the help of the easy-to-follow steps, you can gain control over your document. Furthermore, we discussed how Wondershare Recoverit can help you restore lost system files. Download Recoverit to smooth out your workflow by avoiding any data loss.
FAQ
-
1. Shortcut to disable auto-capitalization on Word?
There is no specific shortcut that will help you turn the auto-capitalization feature on or off. You need to follow the basic steps to learn how to turn off auto caps by accessing Word. Users can then uncheck the relevant boxes under the Autocorrect tab. -
2. Will my changes affect documents shared with others?
Turning off auto-capitalization only affects how Word behaves on your device. If you share a document, the other users' capitalization settings will remain unchanged. They will be able to see their text in its original form. -
3. Does turning off auto-capitalization affect the grammar check feature of Word?
It does not turn off the grammar check when you disable the auto-capitalization. Word app will still underline the capitalization errors, and you can accept or ignore the changes.
 ChatGPT
 Perplexity
 Google AI Mode
 Grok
Grok


