
![How to Format USB Flash Drive to FAT32 [32GB/64GB/128GB]](https://images.wondershare.com/recoverit/article/erase-usb-drive.jpg)

 TL;DR:
You can natively format USB drives up to 32GB to FAT32 using Windows File Explorer or Disk Management, but drives 64GB and larger require Command Prompt, PowerShell, or third-party software like AOMEI Partition Assistant Standard.
● FAT32 has a strict individual file size limit of 4GB; you must use NTFS or exFAT instead if you plan to transfer a single file larger than this threshold.
● To natively format drives larger than 32GB, run PowerShell or Command Prompt as an administrator and execute the command `format /FS:FAT32 #:` (replacing # with your drive letter), though this process can take several hours to complete.
● AOMEI Partition Assistant Standard provides a significantly faster graphical interface alternative for formatting 64GB+ or RAW USB drives to FAT32, but regardless of the method used, formatting erases all existing data.
Ask AI for a summary
 ChatGPT
 Perplexity
 Gemini
 Claude
 Grok
Grok
For external devices, particularly portable USB flash drives and SD memory cards, FAT32 is the standard file system. It is the file system that works best with the majority of popular hardware and operating systems, including Windows and macOS. Portability is a benefit of utilizing the FAT32 file system.
Formatting a 32GB USB flash drive or less to FAT32 is pretty straightforward. However, you can only rely on CMD (often Diskpart and Powershell) and a third-party FAT32 format tool if you wish to format 64GB/128GB/256GB USB to FAT32.
| USB Drive Sizes | Recommended Solutions |
| 32GB or smaller | Via File Explorer |
| 64GB or larger | Use Disk Management |
| Use PowerShell | |
| for any size | Use Command Prompt |
Use AOMEI FAT32 Format Tool |
Part 1. Before Formatting USB Drive to FAT32
- Don't forget to back up important files on the USB drive. Either simply copy and paste them into the computer, or use a data backup software.
- FAT32 also has certain drawbacks or, to put it another way, constraints. First and foremost, you must convert FAT32 to NTFS or exFAT if you utilize a single file larger than 4GB. In addition, FAT32 can only be used to format drives between 2GB and 32GB in size according to the manufacturer's standards, which is why native Windows programs have the same restriction. There is no "FAT32" option when changing a USB disk larger than 32GB in Windows Explorer.
Part 2. How To Format 32GB or Smaller USB to FAT32?
There are typically different ways for users to format USB to FAT32 on Windows 10/11, which has the most excellent compatibility compared to other file systems.
Method 1: Via File Explorer (for 32GB or Smaller)
This approach can only be used to change a USB disk in FAT32 format if it is less than 32GB. Remember that the USB drive's prior data will be deleted during the formatting procedure.
- Connect the USB drive or the desired external hard drive to the Windows 10 computer.
- Press the Start button and select This PC to open the File Explorer.

- Right-click on the USB drive that you want to format to FAT32 and select Format in the menu.
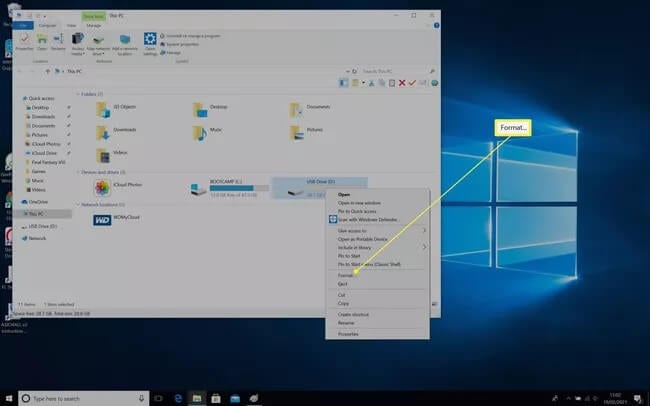
- Click the File system drop-down menu and choose FAT32 if it isn't already mentioned. Then, click the Start button.

- A warning reminds you that all data on the USB flash drive will be deleted with the formatting process. Click OK to start changing your USB flash drive to FAT32.

- Once the drive has finished formatting, click OK to complete the procedure.
Method 2: Use Disk Management (for drives > 64GB)
Your USB drive could not appear in File Explorer if Windows didn't give it a letter for some reason or if its file system was damaged. Fortunately, formatting it from the Disk Management software is simple.
- Use the shortcut Win+X to open Windows' administrative quick menu.
- Select "Disk Management." You may also find and launch it from the Start menu by hitting the Win key and entering the utility's name.
- You will get a list of all storage devices and their partitions while using Disk Management. You should see one or more partitions listed within your disk if it functions correctly. They may each be formatted separately. Alternatively, you can click on each one and choose "Remove Volume" until none are left if you'd rather get rid of them and utilize the whole space on your disk as one continuous block.
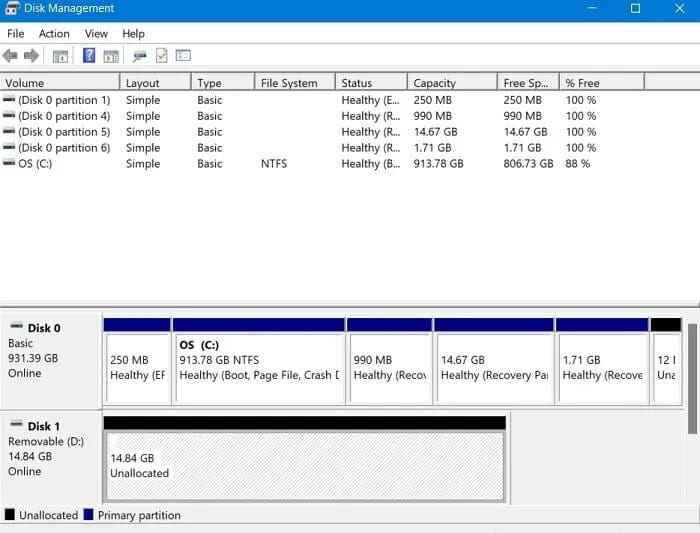
- If the space on your USB drive seems empty, right-click on it and choose "New Simple Volume."

- To create a partition, use the "New Simple Volume Wizard" and then format it.

- You may use a lesser volume size if you wish to divide your USB drive into more than one. By doing this, you'll free up space on your disk so that you may subsequently add additional partitions.

- Directly from this wizard, you will be able to give a drive letter to the partition you are creating. Alternatively, you may map it to an empty NTFS folder without providing a drive letter.

- You may select a file system and allocation unit size, input a volume label, and choose whether to use a fast format, much like when formatting from File Explorer.

- The wizard will offer an overview of your options before starting to format. To accept them and format your USB device, click "Finish."

Method 3: Use PowerShell (for drives > 64GB)
You can format USB drives larger than 32 GB to the FAT32 file system using Windows PowerShell. However, formatting makes the procedure less effective and more likely to take longer. For example, if you want to format 64GB USB to FAT32, do the following:
- Press "Win + X" on your keyboard to open the Start menu. Then, locate and choose the "Windows PowerShell (Admin)" option from the menu to launch PowerShell as the administrator.

- Type the command "format /FS: FAT32 #:" in the PowerShell window and hit Enter to execute it. (Instead of using #, use your Drive letter.)

- Your 64 GB USB Drive will begin to format to the FAT32 file system as soon as the command is provided. The procedure could take many hours to finish, but if you want to do it quickly, you can utilize several third-party programs to do it more effectively.
Method 4: Use Command Prompt (for any size)
Apart from PowerShell, the built-in Command Prompt in Windows can also be used as a FAT32 format tool.
- First, connect the USB memory stick to your computer and wait for it to be recognized.
- Go through Start > Accessories > Command Prompt or Start > Run > type "cmd" > Enter to launch Command Prompt.

- Enter the following command at the Command Prompt if your USB device has been given the letter "F":: format F: /fs:FAT32

- When asked whether you want to continue or stop formatting, hit Y (for Yes) or N (for no).
Ultimate Method: Use AOMEI FAT32 Format Tool (for any size)
What should you do if your USB flash drive has more than 32GB and you wish to change it to FAT32 quickly? The solution is to use a free FAT32 format program from a third party, such as AOMEI Partition Assistant Standard, which makes it simple and practical to format USB flash drives larger than 64GB and RAW USB drives as FAT32.
Additionally, it enables you to move your operating system from an MBR drive to an MBR disk and convert from NTFS to FAT32 without losing any data. It works with various Windows versions, including Windows 11/10/8.1/8/7, XP, and Vista. For example, if you want to format 128GB USB to FAT32, do the following steps:
- Run AOMEI FAT32 Format Tool after installing it. Then, Right-click the USB flash drive partition in the main panel and choose Format Partition.
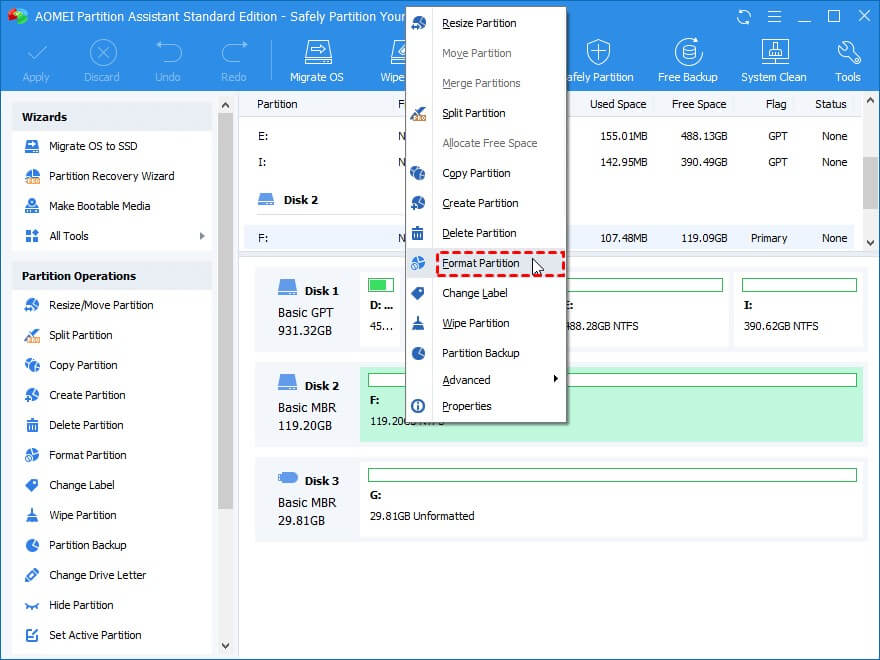
- Select FAT32 from the list of file systems and press the OK button to format USB to FAT32.

- To format USB to FAT32, click Apply and Proceed.

Part 5: How to Recover Lost Data after Formatting a USB Drive to FAT32?
The formatting USB drive is an easy task. But before formatting, some might be worried about the files or data in the USB drive. There may be irrelevant as well as very important files that can’t be replaced in a USB drive. But what to do if the drive is a corrupt one or malfunctioning in some ways?
You need not worry as there are varieties of applications available in the market for recovering such files. An application like Recoverit helps you to recover almost all data, ranging from documents to big size videos from a USB drive even after formatting to FAT32.
Step 1: Select the USB Drive
To recover deleted or lost files from a USB drive, it needs to be selected as the target location for data searching and scanning.
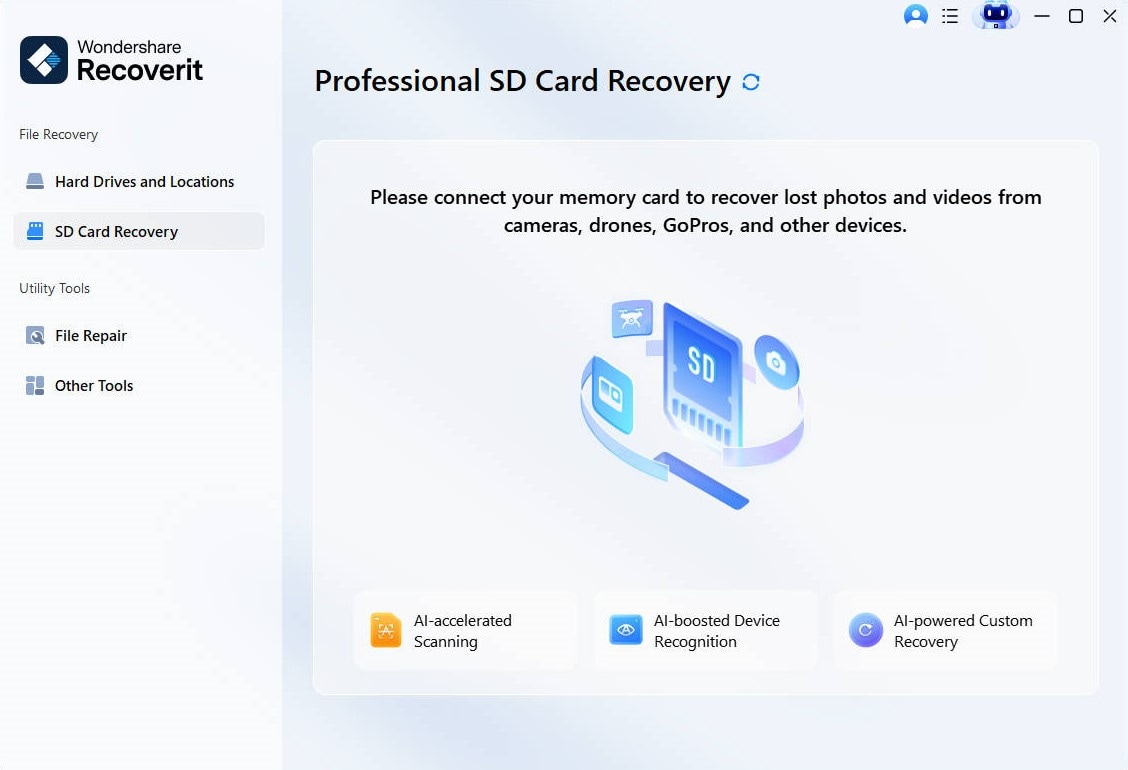
Step 2: Scan the removable media
A complete scanning will be initiated once you click Scan. The scanning usually takes some time depending on the size of the USB drive in between the process, the desired files can be located and filtered.
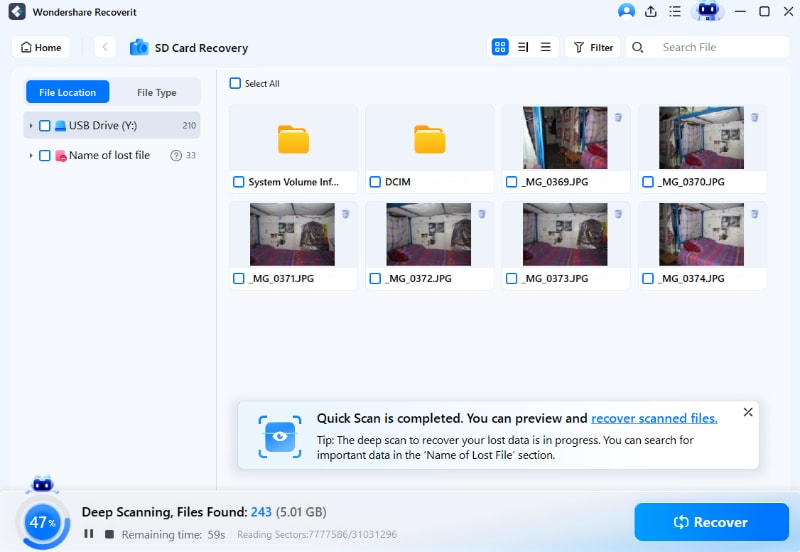
Step 3: Preview of files and recovery
After the whole scanning process, Recoverit allows the user to preview the located files. All the files including photos, videos, documents, videos, audios, etc. can be previewed.
Then, select the files that you need to recover and tap the Recover bar.

All the files will be recovered and saved for your use.
Final Thoughts
This article found all possible ways to format USB to FAT32. You may format your USB flash drive with FAT32 using Disk Management or Diskaprt if it is less than 32GB in size. There are still several methods to format a bigger USB Drive, such as a 128 GB USB Drive to the FAT32 file system, albeit the procedure is a bit challenging. If PowerShell proves ineffective in formatting a 128 GB USB drive to the FAT32 file system, you may try a FAT32 format tool. Applying AOMEI Partition Assistant Standard is recommended when formatting a USB flash device to FAT32.
FAQ
-
Why would I want to format my usb drive to fat32?
Formatting a USB drive to FAT32 is beneficial in several scenarios. FAT32 is a widely supported file system that allows compatibility with various devices, including older gaming consoles, media players, and certain car stereos. It is also compatible with both Windows and macOS operating systems, making it convenient for file sharing between different platforms. -
How do I format a USB drive to FAT32?
To format a USB drive to FAT32, you can use the built-in formatting tools on your operating system. Here's a general outline of the steps:On Windows: Connect the USB drive, open File Explorer, right-click on the USB drive, select "Format," choose FAT32 as the file system, and click "Start" to begin the formatting process.
On macOS: Connect the USB drive, open Disk Utility, select the USB drive from the sidebar, click on the "Erase" tab, choose MS-DOS (FAT) or exFAT as the format, and click "Erase" to start the formatting process.
-
Will formatting the USB drive to FAT32 erase all the data?
Yes, formatting a USB drive to FAT32 will erase all existing data on it. It is essential to make a backup of any important files on the USB drive before proceeding with the formatting process.


