
 TL;DR:
To unlock a BitLocker drive without the password or recovery key, you must either format the drive—which permanently deletes all encrypted data—or attempt to extract the key using specialized physical hardware methods or third-party cracking software.
● Before resorting to data destruction, verify you cannot locate the `BitLocker recovery key.txt` file on your local system, your linked Microsoft account, a physical USB flash drive, or printed backup documents created during the initial setup.
● If the key is unrecoverable and you accept complete data loss, you can regain access to the hardware's storage capacity by formatting it via Windows File Explorer, the `diskpart` command in CMD, or the Erase function in Mac's Disk Utility.
● If preserving the encrypted data is mandatory, your only remaining alternatives are utilizing third-party cracking tools like Passware Kit and Elcomsoft Forensic Disk Decryptor, or physically extracting the key directly from the target computer's TPM chip.
Ask AI for a summary
 ChatGPT
 Perplexity
 Gemini
 Claude
 Grok
Grok
Imagine you forgot your BitLocker password or, worse yet, your Recovery Key into your drive. What would you do? In this tutorial, you will learn how to unlock BitLocker without a password and recovery key so that you know what to do when faced with such a predicament.
Part 1. How to Unlock BitLocker Without Password and Recovery Key?
If you don't want to lose the data stored on the encrypted drive, your only option is to retrieve your password or BitLocker recovery key. Alternatively, if you are willing to unlock the drive by formatting it, you can proceed to Part 2 for a swift unlocking of the BitLocker-encrypted drive.
More related: Where Are Passwords Stored in Windows 10/11? A Complete Security Guide
Method 1. Find the BitLocker Recovery Key
If you forget the BitLocker password as well as the Recovery key, don't give up, you still can try to get the Recovery key back. When you setup BitLocker, it will give you several options to back up the Recovery Key, including “save to your Microsoft account”, “save to a USB flash drive”, “save to a file”, and “print the Recovery Key”. You can turn to the guide on finding BitLocker recovery key for assistance to retrieve the key.
Method 2. Search for the BitLocker Recovery Key
When encrypting your Windows drive, a text file is given to you containing a code called Recovery Key that you saved on your system. Keeping this file is a necessary step in encrypting the drive so that you can find this file with a simple search on the system later.
If you forgot the password to the locked drive, you could use this code to gain access to the drive as follows:
- Double-click the drive to bring up the password window, or right-click on it and select Unlock Drive.

- Click More Options.
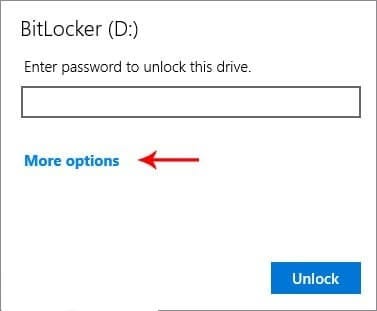
- In the opened box, you will see two options. Click Enter Recovery Key.
Fewer options: Opens and closes the options in the window as a collapse.
Enter Recovery Key: You can enter your recovery code in this field.

- To unlock BitLocker, copy the code you previously saved to a text file and enter it as the recovery key.

When you forget the BitLocker password, you must have access to your recovery key to be able to unlock the BitLocker drive. This recovery code was saved to your system as a text file as the drive was encrypted. - Finally, click the Unlock The windows drive will be unlocked, and you can access it now.

Points to bear in mind when trying to unlock BitLocker with Recovery Key:
- You must have access to the file containing the recovery key.
- If you do not have this code, you can search for a file called BitLocker recovery key.txt.
- After decryption, the drive is unlocked and will no longer ask you for a password when you log in. If you need to upgrade the security level after decryption, it is recommended to set another password. This time try to remember it, though.
Method 3. Use BitLocker Cracking Tools
There are many third-party BitLocker Cracking Tools that can help you unlock your BitLocker without password and recovery key, like, Passware Kit, Elcomsoft Forensic, Disk Decryptor, or BitCracker.
Method 4. Use the New Hacking Method
The new method of hacking involves gaining physical access to a BitLocker-encrypted drive and extracting the recovery key from the Trusted Platform Module (TPM) chip of the target computer by directly connecting the motherboard to a field programming gate array.
To learn more about retrieving BitLocker recovery key using TPM, click the link below:
https://pulsesecurity.co.nz/articles/TPM-sniffing
Part 2. How to Remove Bitlocker Encryption Without Password and Recovery Key?
If the methods introduced above don't work, and you're okay with the data loss, you can solve the problem directly by formatting the BitLocker-encrypted drive.
1. Format a Hard Drive or USB Flash Drive to Unlock BitLocker
In Windows, to format a drive, you need first to connect the storage device to the system. Make sure the USB cable or USB port is not damaged, and then go through the following steps:
- Wait for Windows to detect the drive.
- Press and hold Win + E to launch File Explorer.
- Click on This PC in the sidebar.
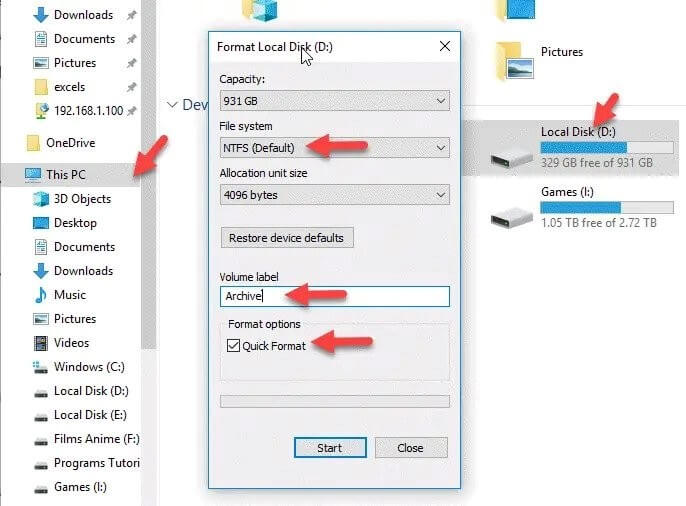
- Right-click on the drive and select Format.
- You can select the disk format from the File system drop-down menu in the popped window.
- In Volume label, type the name of the drive.
- Check the Quick Format option to format the drive quickly.
- Finally, click the Start
2. Format USB Flash Drive Using CMD to Unlock BitLocker
Formatting a USB flash drive will take some time, depending on the drive's capacity and volume of information stored on it. To format a USB flash drive using CMD, you need to follow these steps:
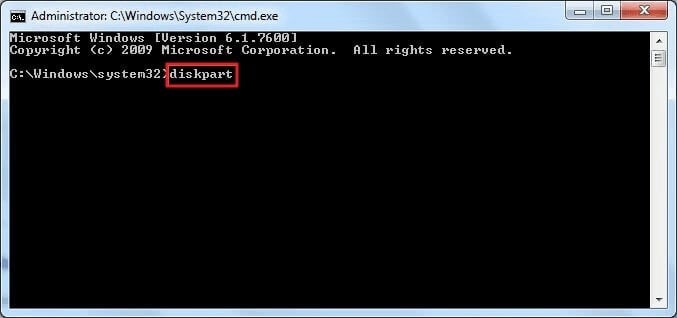
- Run Command Prompt as Run as administrator.
- After running Command Prompt, type in diskpart command and press enter.
(Note that the prompt shape will change automatically after entering this command and pressing enter.)
- Now enter listdisk command to display a list of drives in your system.
(Make sure you have the USB flash drive connected to the system.)
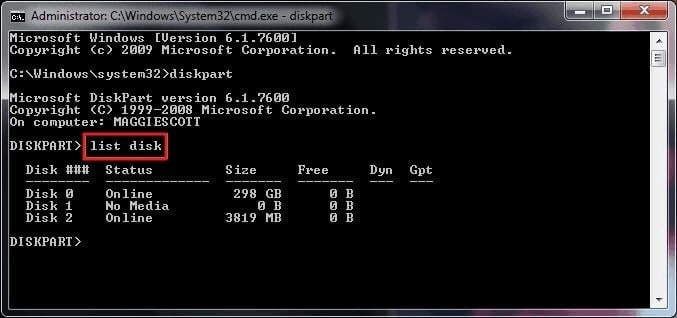
- Check which number is related to your USB flash drive.
(For example, here, number 2 is the USB flash drive. Then you have to enter the selectdisk 2 command.)
Identify the disk number of your USB flash drive from the list and enter it.

- Type in clean command and wait for everything in the drive to be deleted.
- When you use this command for a drive or disk, any partition or volume on the disk will be formatted. This is how using a simple word in Diskpart completely deletes all partitions on a disk and formats it.
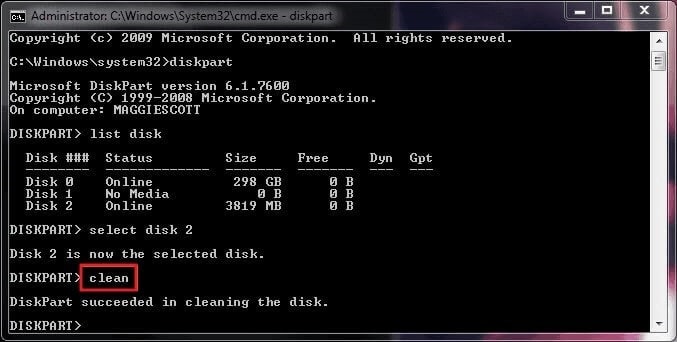
- Once you see the message Succeeded in cleaning the disk at the bottom line of this command, it means that the flash drive data has been completely deleted and the drive formatted.
- Now enter create partition primary command and press enter.

- After diskpart successfully creates the specified partition, type in format fs = ntfs and press enter.
- This process may take a few minutes, depending on your USB flash drive capacity, as this will be done in normal format and not in Quick format. If you want this to be done faster, use the format fs = ntfs quick command instead of the format fs = ntfs

- Now you need to assign a drive letter to the partition that you have created and then formatted.
- To do this, type in assign command and enter.

- Following the above commands, you can format a computer hard drive, external hard drive, or any other storage device, as well as USB flash drives.
Learn more: How to Recover Data from Corrupted Flash Drive
3. Unlock a BitLocker Drive Without Password and Recovery Key on Mac
Here's how to format and unlock a BitLocker drive if you use a Mac:
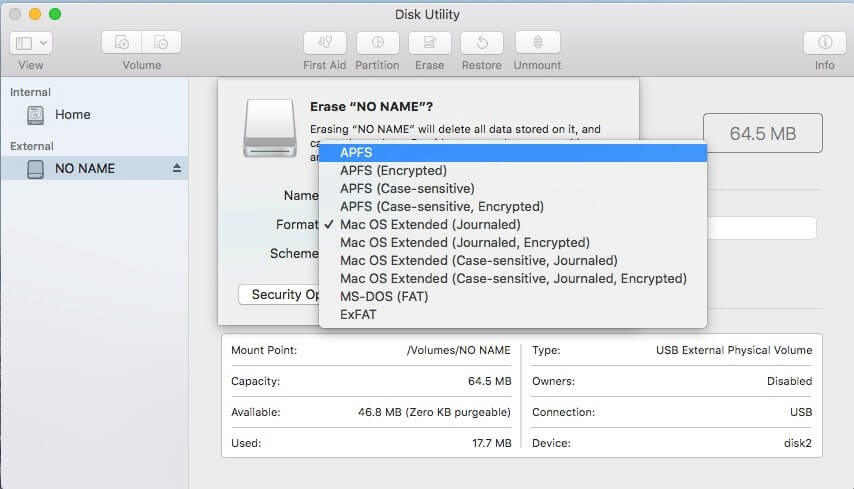
- Run Disk Utility. Go to Applications->Utilities, or press Command + Space and type Disk Utility.
- After opening Disk Utility, you will see a list of the available drives on the left. Select the drive you need to format. Note that formatting your drive will erase all its content.

- From the four options in the main window, click Erase.
Disk Utility will automatically select the format for you. This format may be APFS or, depending on the current drive format, and whether you are using macOS High Sierra or an older version of the operating system, it may be Mac OS Extended (Journaled). If you want to use another format, click Formatting to open the popup window. Depending on how you plan to use the formatted drive, select the format that suits your needs.
- The next step is to name the drive. This name can be anything you like, but as a best practice, try to choose a specific name that describes the contents of the drive.
- Click on Security Options. This will open another window that lets you choose how you want the drive to be formatted, with a slider from Fastest to Most Secure. This is an important step if you want to ensure that all of the current files on the drive will be deleted.
- Fastest clears the drive data by removing the extra data, but the original files remain intact, although they will stay hidden. This means that you or someone else can easily recover the files using data recovery software, which is not necessarily a good idea. Move the slider to the second option, where it says This option writes a single pass of zeros over the entire disk. This option will overwrite the entire drive.
- For added security, keep moving the slider to the right. The next step gives you the option to rewrite the drive three times. Move the slider to the bottom of the slider to Most Secure, which will overwrite the drive seven times. But you will have to wait for a long time (depending on the size of the drive) for it to be available for reuse.

- Click Erase and wait for the drive's contents to be cleared and the drive ready to use. A progress bar shows where your drive's formatting is and how long it will take to complete the process.

How to Remove the BitLocker Encryption?
If you don’t want to unlock BitLocker without password and recovery key by formatting the drive, another method you can try is to disable the BitLocker encryption feature. By following this way, you also can change a different encryption method. Here are the steps:
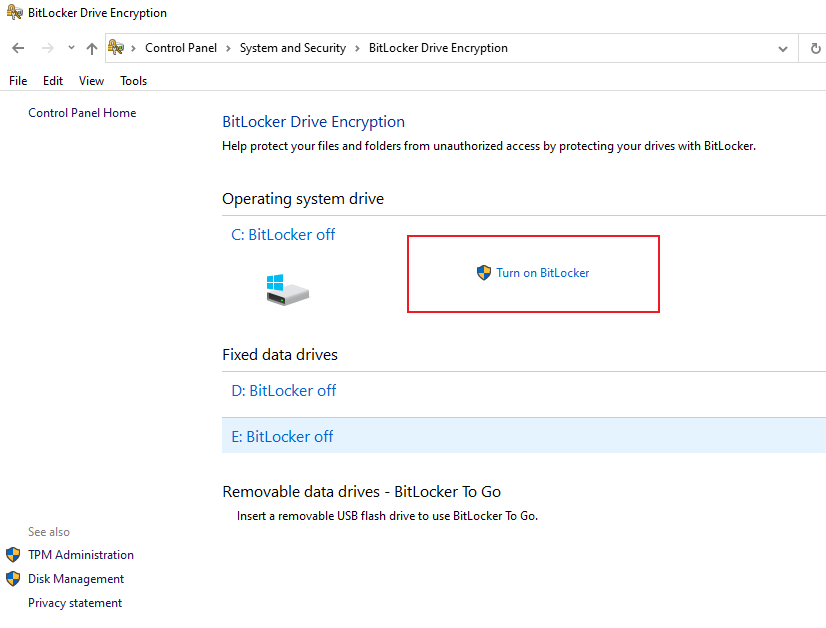
- Type and search Control Panel in the search box next to the Start menu, and open it.
- Find and click System and Security->BitLocker Drive Encryption.
- Select the drive that you want to turn the encryption off, and click Turn Off BitLocker.
- After that, you will receive a message asking you to confirm the decryption process. Click Decrypt and wait for the process to complete.
Find more ways to remove BitLocker Encryption.
Final Word
Not knowing how to unlock BitLocker without a password and recovery key can be quite challenging. The good news is that you can unlock your BitLocker drive using a recovery key in case you have forgotten the password. The bad news is that if you do not have access to the recovery key, the only other solution would be to format the whole drive simply.
FAQ
-
Can I unlock a BitLocker-encrypted drive on a different computer?
Yes, it is possible to unlock a BitLocker-encrypted drive on a different computer. But you need to have the BitLocker recovery key or the password used to encrypt the drive. -
Can I unlock bitlocker without password and recovery key?
If you don’t have the BitLocker password and recovery key, you may need to format the drive to remove the encryption, or use the third-party tools, such as Passware Kit, Elcomsoft Forensic Disk Decryptor, and Elcomsoft Distributed Password Recovery. -
Where can I retrieve the BitLocker Recovery Key?
When you set up the BitLocker, it will give you 4 options to back up the BitLocker recovery key:
1. Save to Microsoft account.
2. Save to a USB flash drive.
3. Save to a file.
4. Print the Recovery key.
You can try to find your key according to the option you choose when you make BitLocker setup. If you need the steps to follow up, read this guide: how to find BitLocker recovery key. -
What happens if I enter the wrong BitLocker recovery key multiple times?
If you repeatedly enter the wrong BitLocker recovery key, the drive will eventually enter a "suspended" state, locking you out. In this situation, you'll need to contact your organization's IT department or use a data recovery service, as the data on the drive may become permanently inaccessible.


