

 TL;DR:
Sometimes. Stop using the formatted drive, check Time Machine or cloud backups, and determine whether macOS still detects the drive in Disk Utility. If no backup exists and the drive is detected, use recovery software and save results elsewhere. If the drive is an SSD, TRIM may have cleared deleted blocks. If it is not detected, physically damaged, or contains critical data, stop repeated attempts and contact a professional recovery service.
- Stop writing to the formatted drive.
- Check Time Machine, iCloud, Dropbox, Google Drive, or another backup.
- Confirm the drive appears in Disk Utility.
- Scan the source only when it is stable and save results to another device.
- Do not use Erase, Secure Erase, First Aid, or repair commands before protecting important data.
Ask AI for a summary
 ChatGPT
 Perplexity
 Gemini
 Claude
 Grok
Grok
If you accidentally formatted a Mac hard drive and lost important files, stop using the affected drive immediately. Do not download files, install applications, copy new data, run repeated repairs, or format it again.
Recovery may be possible when the old data has not been overwritten, but the result depends on the drive type and the formatting process. TRIM on SSDs, Secure Erase, encryption, and new writes can make some or all files unrecoverable.

This guide covers internal and external Mac drives, including recovery software, Time Machine, cloud backups, Terminal checks, and professional recovery services.
Part 1: Common Causes of Mac Hard Drive Data Loss
Understanding the cause helps you choose a safer recovery path.
| Cause | Typical Example | Recovery Priority |
| Accidental deletion | Files are deleted and Trash is emptied | Check Trash and backups, then stop writing |
| Accidental formatting | Disk Utility Erase is confirmed on the wrong volume | Do not format again; recover to another device |
| Hardware failure | Drive slows down, clicks, overheats, or disappears | Stop repeated scans and consider professional recovery |
| macOS crash or update problem | Files or a volume disappear after a restart | Check backups and volume detection before repair |
| File-system corruption | APFS or HFS+ volume will not mount | Recover data before First Aid or erase |
| Malware or ransomware | Files are encrypted, renamed, or inaccessible | Disconnect safely and preserve evidence where needed |
| Power interruption or unsafe ejection | External drive becomes unreadable after transfer | Test the connection once and avoid new writes |
Part 2: Can You Recover Files from a Formatted Mac Hard Drive?
Recovery is possible in some cases, but it is not guaranteed. A quick format generally removes or recreates file-system metadata, while some of the old content may remain until overwritten. A full or secure erase, SSD TRIM, encryption, and subsequent writes can greatly reduce or eliminate recovery chances.
| Situation | Recovery Outlook | Safest Action |
| Recently formatted HDD and no new data written | Possible, depending on the format and condition | Stop using it and scan from a separate system |
| Formatted SSD with TRIM active | Often more limited than HDD recovery | Stop using it immediately and check backups |
| Secure Erase or overwriting completed | Usually very low or impossible | Check backups or consult a specialist |
| FileVault-encrypted Mac drive | Requires the password or recovery key | Keep credentials available; do not erase again |
| Drive is not detected or is physically failing | Software may not access it | Stop repeated power cycles and seek professional help |
Do not assume that every file remains intact after formatting. The sooner you stop using the source and choose a safe recovery path, the better the chance of preserving remaining data.
What to Do Immediately After Formatting a Mac Drive
- Stop using the formatted drive and disconnect it safely if possible.
- Do not install recovery software, download files, or save recovered data to the source.
- Check Time Machine, iCloud, Dropbox, Google Drive, clones, and other backups.
- Open Disk Utility only to confirm whether macOS detects the drive.
- Do not click Erase, initialize, Secure Erase, or run repair commands before data is protected.
- If the drive clicks, overheats, repeatedly disconnects, or is absent from Disk Utility, stop testing it.
Part 3: Methods to Recover Files from a Formatted Hard Drive on Mac
Choose a method based on whether a backup exists, whether the drive is detected, and whether it is an HDD or SSD. Start with backups, then use recovery software for a stable detected drive. Avoid repair or erase operations until important data is safe.
- Use Recoverit or another recovery tool when the source drive is detected.
- Restore from Time Machine.
- Restore synced files from iCloud or another cloud service.
- Use Terminal only to identify and inspect the disk, not as a guaranteed file recovery method.
- Contact a professional service for physical failure, encryption issues, or critical data.
Method 1: Use Recoverit Data Recovery for macOS
If the formatted drive is still detected by macOS, Wondershare Recoverit can scan it for files that remain recoverable. The result depends on the format, drive type, TRIM, encryption, and whether new data has overwritten the old content.
- Formatted-drive scanning: Searches available storage for recoverable file data.
- Broad file-type support: Can search for documents, photos, videos, audio, archives, and other formats.
- Preview: Lets you review supported files before saving them.
- Separate destination: Saves recovered data to another healthy storage device.
Steps to Recover Files with Recoverit
- Install safely: Install Recoverit on the Mac or another healthy volume, not on the formatted source when possible.
- Select the source: Open Hard Drives and Locations and choose the detected formatted drive.
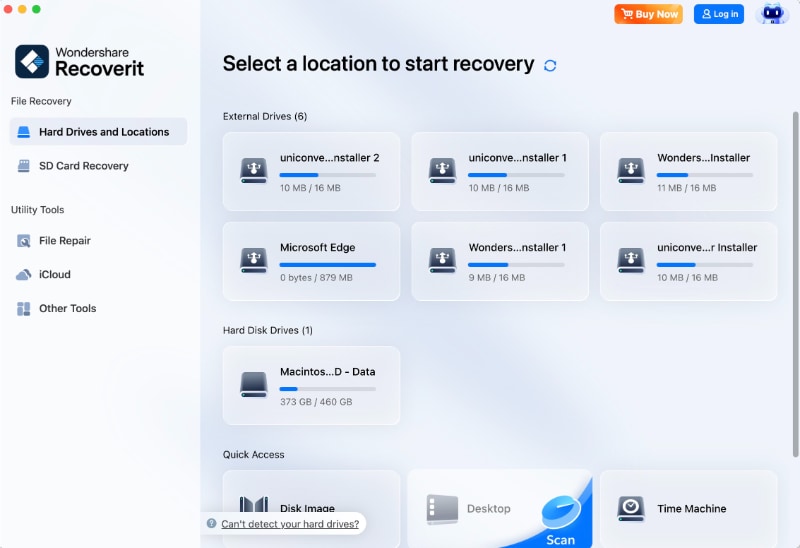
- Scan: Start the scan and avoid disconnecting the drive.

- Filter and preview: Search by file type, name, or path and preview supported results.

- Recover elsewhere: Click Recover and select a different healthy destination.
- Verify: Open several recovered files before making changes to the source drive.
Video Tutorial on How to Recover Deleted Files From SD Card on Mac (2026)

Method 2: Restore from a Time Machine Backup
Time Machine helps only when it was enabled and a backup from before formatting is available. It is usually safer than scanning the formatted source because it restores a prior copy.
- Connect the Time Machine backup disk if needed.
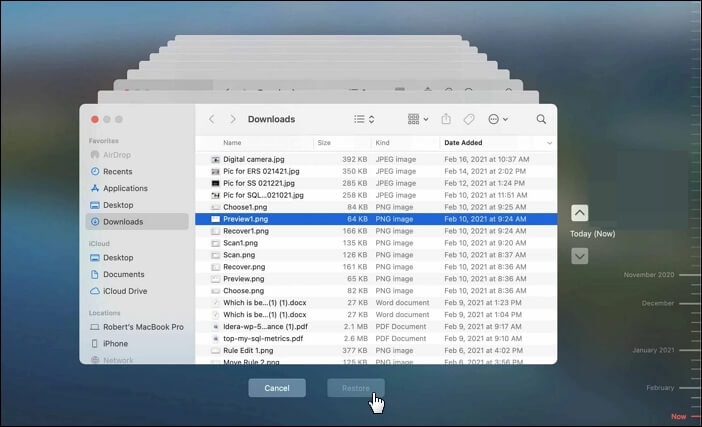
- Open the folder where the missing files were stored in Finder.
- Open Time Machine and use the timeline or arrows to locate a version from before formatting.
- Select the file or folder and click Restore.
Method 3: Restore from iCloud or Another Cloud Backup
Cloud services may retain copies, version history, or recently deleted files if synchronization or backup was enabled before formatting.
- Open iCloud Drive, Dropbox, Google Drive, or the relevant service.
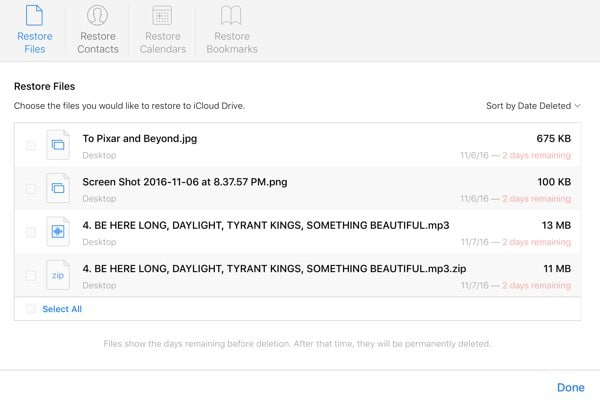
- Sign in to the correct account and check the original folder, trash, and version history.
- Download recovered files to a safe location that is not the formatted source drive.
Method 4: Use Terminal to Identify the Disk, Not as a Guaranteed Recovery Tool
Terminal can help identify a detected disk and inspect its status, but commands such as diskutil and fsck are not general deleted-file recovery tools. Repair commands may modify the file system, so use them only after important data is protected.
- Open Applications > Utilities > Terminal.
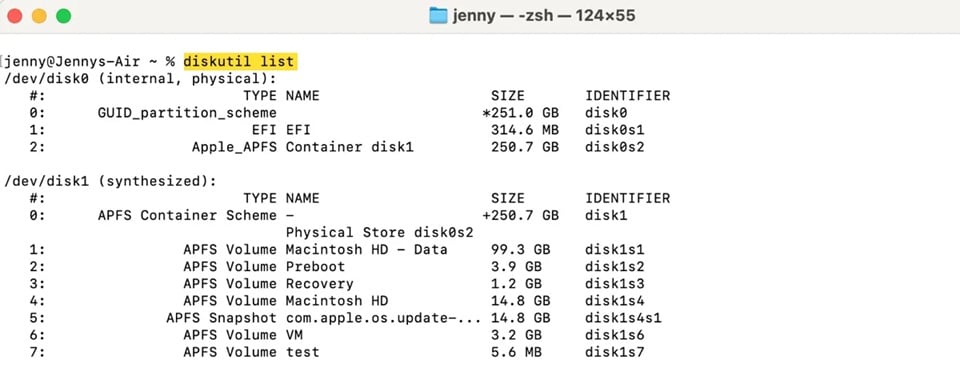
- Run
diskutil listto identify the external or internal disk identifier. - Run
diskutil info diskXonly after replacingdiskXwith the correct identifier. - Do not run erase, partition, or repair commands on the source until recovery is complete.
- Use a file-system-specific repair command only when you understand the format and have a backup or disk image.
fsck_hfs is for HFS+ checks and is not a universal command for APFS or other file systems. Do not substitute it for data recovery.Method 5: Seek Professional Data Recovery Services
Professional help is appropriate when the drive is not detected, has physical failure signs, contains critical data, is encrypted without an available key, or cannot be safely scanned with software.
- Stop repeated power cycles, scans, and repair attempts.
- Tell the provider whether the source is an HDD, SSD, internal drive, or external drive.
- Provide details about formatting, encryption, symptoms, and any backups.
- Choose a provider experienced with APFS, HFS+, FileVault, and Mac hardware.
Professional recovery can be expensive and success is not guaranteed, but it is safer than opening the device or continuing to write to a failing source.
Part 4: Pro Tips to Improve Formatted Drive Recovery
- Stop using the source: Avoid new files, installations, updates, and downloads on the formatted drive.
- Check backups first: Time Machine and cloud copies are safer than scanning the source.
- Use a trusted recovery tool: Confirm current macOS and drive compatibility.
- Use a deep scan when appropriate: Large formatted drives may take time to scan.
- Recover to another location: Never save results to the formatted source.
- Preview before saving: Verify file integrity where preview is supported.
- Do not run repair commands first: First Aid, fsck, erase, and partition commands may change the source.
- Use professional help for critical data: Stop DIY attempts when the drive is unstable or undetected.
Conclusion
Recovering files from a formatted hard drive on Mac may be possible when the old data has not been overwritten, but the outcome depends on the drive type, format, TRIM, encryption, and subsequent use. Start with Time Machine or cloud backups, then use recovery software only when the source is detected and stable.
Stop writing to the formatted drive, save recovered files elsewhere, and avoid erase or repair commands until important data is protected. For a physically damaged, undetected, encrypted, or critical drive, professional recovery is the safer option.
FAQ About Formatted Mac Hard Drive Recovery
-
What should I do first after formatting the wrong Mac drive?
Stop using it immediately, disconnect it safely, check backups, and do not save new data to the drive. -
Can I recover files without formatting the drive again?
Yes. Do not format it again. A recovery tool can scan the detected source, while a backup can restore files without changing the source. -
Where should I save recovered files?
Save them to a different healthy Mac volume or external drive. Never save them back to the formatted source. -
What if the formatted drive is not visible in Disk Utility?
Test one known-good cable, port, power source, and compatible Mac. If it remains undetected or shows physical failure signs, stop testing and seek professional recovery. -
Is an SSD harder to recover after formatting than an HDD?
Often, yes. TRIM and garbage collection can clear deleted blocks, so SSD recovery may be limited even when the device still appears in macOS. -
Can I recover a FileVault-encrypted formatted drive?
Access generally requires the correct password or recovery key. Keep encryption credentials available and do not erase the volume again.


