
 TL;DR:
You can instantly start communicating on a Windows 11 PC using the built-in Chat app located in the Taskbar, which serves as a simplified, ready-to-use version of Microsoft Teams for quick text and video conversations.
● To initialize the Chat app, you must log in and sync your existing contacts directly from an active Skype or Outlook account before starting new chats.
● While the Chat app handles basic messaging and webcam video links via the Meet button, you must use the full Microsoft Teams app to access professional features like the Calendar and complete activity history.
● If accidental data deletion occurs while upgrading your operating system to Windows 11, you will need a dedicated third-party tool like Wondershare Recoverit to scan your internal or external drives to restore lost files.
Ask AI for a summary
 ChatGPT
 Perplexity
 Gemini
 Claude
 Grok
Grok
Are you facing difficulty while communicating with a third-party app on your Windows 11 PC? Do you need a quick chat app to chat with your colleagues and closed ones on a PC? Well, Microsoft has integrated a new Chat app with their newly introduced Windows 11 PC.

The integrated Chat app on Windows 11 offers you an all-new environment to chat with your friends and teams. To help you get started with this app, here we have prepared a detailed tutorial to guide you on how to get started with the Chat app on Windows 11 PC.
Part 1: Steps to Setup Chat on Windows 11
The Microsoft Teams-powered Chat app is a multi-purpose app designed to suit your communication-related needs. Let’s see how to set up chat on Windows 11 PC.
Step 1: The Chat app is a built-in app on Windows 11. It is located in the Taskbar menu, just go to the Taskbar and select the icon of the Chat app. You can also launch the app from the Start Menu.

Step 2: The Chat app’s mobile-friendly user interface makes it more user-friendly for everyone. Once the app is launched, click the Get started button.
Step 3: You can sync your contacts from Skype or Outlook’s account. Just enter the username to login into your account. Fill in the form by entering your name, phone, and email address.

Step 4: At last, click the Let’s go button, the Chat app will fetch the contacts from your email address or skype account or outlook account. It may take several seconds, once done, you can start chatting with the contacts present on your screen.

This is how you can set up the Chat app on Windows 11 PC. Being a default chat app, you need not do much homework to get started with it. It is a ready-to-use app and anyone can easily start using it.
Part 2: Steps to Use Chat on Windows 11
There are multiple ways with which you can chat or communicate with the team members or friends or the contacts available on the Chat app. You can make one-to-one chat, one-to-many chat, or group video call using this app right from your Windows PC.
After setting up the Chat app, the next thing you need to learn is how to use the app and its communication features for a quick chat and video calls. The following step-by-step guidelines will help you to do so.
Type 1: One-to-One Text Chat
To start a one-to-one text chat on the Chat app, you need to follow the below-given steps.
Step 1: Go to the Taskbar and launch the Chat app.
Step 2: Select the Chat option given on the front page of the app. (See below-given image)

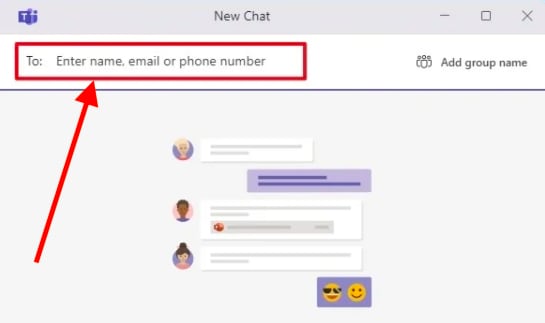
Step 3: The New Chat window will be presented on your screen. In the “To” field, you need to type in the email address or the contact number of the person with whom you want to start the one-to-one text conversation, click the Enter button after that.
Step 4: The Text Account will be presented on your screen with the Text Box to write up your message. You can use different tools including emojis and gifs to modify your text within the Text box.

Note: You can also attach notes or files to your message using the Attach button given below the text box. Likewise, you can use all the other basic tools presented under the text box.
Step 5: Once you are done with your message, just click the Send button.
That’s how you can start one-to-one text chat on the Chat app on a Windows 11 PC. You can also react to the messages within the Chat Account with that particular contact by sending emojis or smileys just like the mobile phone and other chatting apps.
Type 2: One-to-Many Text Chat
You can also start group chats on the Chat app on your Windows 11 PC. Just follow the below-given steps to start the one-to-many or group chat on the Chat app.
Step 1: Open the Taskbar and click the Chat icon to launch the Chat app.
Step 2: Select the Chat option from the front page to open the New Chat window.
Step 3: The New Chat Window features the “To” field, where you need to enter the email address or the contact number of the recipient.

Step 4: After adding the first contact, click the enter button. Follow the same process to add multiple contacts for a group chat.
Step 5: At the right side of the same field, you can see Add group name, click that option to give a suitable name to a newly created group.

Step 6: The Text Box allows you to type in your message. You can make use of the basic tools, emojis, and more here as well. At last, click the Send button to send your message within the group.
Type 3: Group Video Call:
Just like other popular messaging apps, the Chat app on Windows 11 allows you to start a group video call. This feature uses your PC’s built-in webcam. The following steps will help you to set up the group video call on the Chat app.
Step 1: Open the Taskbar and click the Chat icon to launch the Chat app on your Windows PC.
Step 2: From the front page, click the Meet button.

Step 3: As soon as you select the Meet button, the black-screen with Microphone and Webcam’s toggle button will be presented. Make sure to enable the toggle button for the microphone and webcam.
Note: This feature is fully customized allowing you to customize your chat as per your needs.
Step 4: Once done, click the Join button.

Step 5: This page allows you to invite people to join your video chat. You can select the first option i.e. Copy the meeting link and share it.

This is how you can start a group video call on the Chat app. This feature gives you the same feeling as using the original Teams app.
The Chat app’s home page will show you the list of the contacts with whom you have communicated before. You can select the Video Call option or the Chat option to start the video call or chat with that person in the future.
Though chatting app is very essential for PC Usage, there are also a series of other powerful software which can largely improve your efficiency of work.
Part 3: How to Use Microsoft Teams on Windows 11?
Unlike the Chat app, Microsoft’s original Teams app allows you to have the standard Teams app-like experience to use it for professional use. Let’s see how to use it.
Step 1: Open the Start menu and then search for the Microsoft Teams app by entering its name.
Step 2: You could see the Activity option at the left sidebar of the Window right from the homepage of the Teams app.

Note: The activity tab lets you view the conversations that you made on the Chat app.
Step 3: You would be presented with the Chat window within the Teams app to see the contacts.

Step 4: Select the contact to open up the previous Chat history. The same window lets you make a video call, voice calls, send a text message,s and other activities with more options than the Chat app.
Step 5: From the left sidebar, click the Calendar option to view the upcoming events.
Note: Just like the Chat app, the Microsoft Teams app is also customizable. You can make appropriate changes to this app as per your needs.
More related: How to Fix Microsoft Teams not Working on Mac?
Bonus: What If You Lost Data During the Update Process?
While upgrading your Windows system to a new Windows 11 edition, or while installing the third-party app, if your computer’s important data is accidentally deleted, then you can recover it using the popular recovery tool called Wondershare Recoverit. Let’s see how this tool helps you to recover deleted and lost files.
Step 1: Select a Location
The Recoverit Software is available for both Windows and Mac systems. Go to its official page and download the setup file to install the software on your system. Once the software is installed, launch it on your computer system by selecting its icon.

The front page will show you the available storage drive which you can select for scanning. You can also select the External drive to scan the pen drive or any other flash drive you want to check.
Step 2: Scan the Location
After selecting the drive or the external drive, the next thing you need to do is scan. In this process, the software will scan the entire drive selected by you to fetch the files and documents which can be recovered. This process might take several minutes.

Step 3: Recover Your Deleted Files
You could see the list of files that can be recovered on the same page. To preview the file, select it and press the Space button. From the given list, you can check to mark the files that you want to recover.

Just select the appropriate files and documents from the presented list after the scanning process. Once you select the files, click the Recover button given at the bottom right corner of the page.
The selected files will be recovered in the preferred location by you. This is how you can use the Recoverit Data Recovery Tool for recovering deleted or lost files quickly.
Conclusion:
Unlike the original Teams app, the Chat app on Windows 11 is quite user-friendly. The app serves an easy-to-use interface that makes you feel like using the mobile-chat app on a computer system.
The above tutorial explains how you can get started with the Chat app on Windows 11 PC. Since Windows 11 is a new OS version, many people don’t know how to use it. The above-given steps will clear all their doubts. The Chat app comes integrated with the Teams app, you can use it within the Teams app as well!


