


 TL;DR:
You can resolve an unrecognized external SSD on a Mac by manually mounting it in Disk Utility, adjusting Finder preferences to display external disks, or running First Aid to repair minor file system errors.
● Reformatting the drive or using Terminal commands will erase your data, requiring a preliminary extraction using a recovery tool like Wondershare Recoverit before proceeding.
● The Terminal fsck_hfs repair command is strictly limited to HFS+ file systems and will not work if your SSD is formatted as APFS, exFAT, or FAT32.
● Hardware mismatches can prevent mounting even if the drive's light is on, such as using a standard USB-C data-sync cable instead of a required Thunderbolt cable for a Thunderbolt 3/4 SSD.
Ask AI for a summary
 ChatGPT
 Perplexity
 Gemini
 Claude
 Grok
Grok
External SSDs for Mac are excellent devices to store valuable data. You can find various models and types suitable for your needs. They are currently the most versatile tools, providing the necessary storage and security.
However, they can become problematic and not appear on your Mac. Such scenarios can be stressful and frustrating, but you shouldn't worry. There's a way to keep your troubles away and fix an external SSD not showing up on a Mac. Check out the most reliable, effective solutions below.
| Method | Best For... | Risk Level |
Wondershare Recoverit  |
Drives with critical data that won't mount. | Zero Risk (Read-only) |
| First Aid (Disk Utility) | Minor file system errors. | Low Risk |
| Manual Mounting | SSD recognized by hardware but not Finder. | No Risk |
| Terminal (diskutil) | Advanced users / Frozen mounting processes. | High Risk (Command errors) |
External SSD Not Showing Up on Mac - Is It a Big Problem?
You might instantly think all is lost once you notice that your external SSD isn't showing up on your device. Although it may seem like an enormous problem, the truth is that, in most cases, it isn't that big of a deal. You can quickly fix the issue with the help of a few handy tools.
Of course, there are exceptions. If your external SSD has suffered extensive physical damage, the problem may be more severe. Talking to professionals to fix your SSD would be best in such cases.
What Causes an SSD Drive Not to Show Up on Mac
Mac devices have a specific way of recognizing SSD devices. First, you connect your SSD with an appropriate cable according to the drive's type (usually USB-C, USB-A, or Thunderbolt cables). Then, the Mac's operating system will automatically detect that you have connected an external device.
Hardware & Cable Compatibility
| Connection Type | Required Cable | Likely Symptom if Wrong |
| Thunderbolt 3/4 SSD | Thunderbolt ⚡ Symbol Cable | SSD is powered but won't mount. |
| USB-C 3.2 Gen 2 | High-speed USB-C (10Gbps) | Slow speeds or frequent disconnects. |
| USB-A to USB-C | Data-sync USB Cable | "Disk Not Ejected Properly" errors. |
| High-Power NVMe | Short OEM Cable | Drive beeps or LED flashes rapidly. |
After recognizing the presence of the SSD, the operating system will automatically start mounting and formatting the drive to make it accessible and usable. Mac devices use APFS, HFS+, or NTFS file formats for their drivers. After your device finishes this process, it will make your SSD visible on your screen. Now, you can access your drive and start your journey.
However, several reasons may lead to your SSD becoming unreadable and unrecognizable. Here are the most prevalent causes and solutions for each.
| Causes | Explanation | Solutions |
| Finder Preferences Settings | Finder Preferences control which devices and drives are displayed on Desktop and Finder. If the settings are not configured to display external disks, your external SSD might not show up in Finder. | Edit your preferences |
| Improper connection | Using the wrong cables, incompatible with your devices, will make your drive undetectable. Your Mac will not be able to recognize your SSD. | Check the cables and ensure sufficient power for the SSD |
| File system incompatibility | Using incompatible file system formats will make your SSD undetectable by your operating system. You should only use APFS, HFS+, exFAT, or FAT32 systems to avoid this problem. | |
| Formatting Errors | A sudden interruption during the formatting process can cause the SSD file system to become corrupted and undetectable by your macOS. | (Re)format the SSD |
| SSD Corruption | When the structure of your SSD becomes damaged, it will lead to corruption. Once your SSD becomes corrupt, your operating system won't be able to recognize and read your SSD. | |
| Virus and malware | Once they infect your SSD, they will start "eating away" everything on the drive. This includes the drive's formats, making it unrecognizable by your OS. | |
| Physical damage | Physical damage will affect everything you have on your drive. You won't be able to connect it to the PC, let alone access the content. Physical damage will be visible, and none of the software solutions will work. | Contact professionals |
How To Recover Data From an External SSD Not Showing Up in Mac Disk Utility
We should note that most solutions below will lead to data loss. If you have been using the SSD you want to repair to store your favorite memories, you should first recover data from the SSD on Mac and then proceed with the solutions. That will save all your valuable data, and your future self will be grateful.
You will need a third-party SSD recovery software solution. Wondershare Recoverit is highly recommended by G2 users as the most reliable SSD data recovery software for Mac. This powerful tool can help you recover lost or deleted files from a variety of storage devices, including internal and external SSDs that are not recognized by your Mac.
- Recovers data from all external SSD brands, including Crucial, WD, LaCie, Samsung, SanDisk, etc.
- Manages over 500 data loss situations, such as deletion, formatting, and disk corruption.
- The user-friendly interface allows you to recover data in just a few clicks.

This tool is entirely secure and won't expose your valuable data. Here's what to do to recover your SSD data on macOS with this solution:
- Download Wondershare Recoverit to your Mac and run the program.
- Head to Hard Drives and Locations and select your external SSD.

- The program will start scanning the SSD drive, and you can pause this process anytime.

- Once the scanning is complete, you can preview your files and select those you want to retrieve. Click Recover.

- Choose where to save your data.
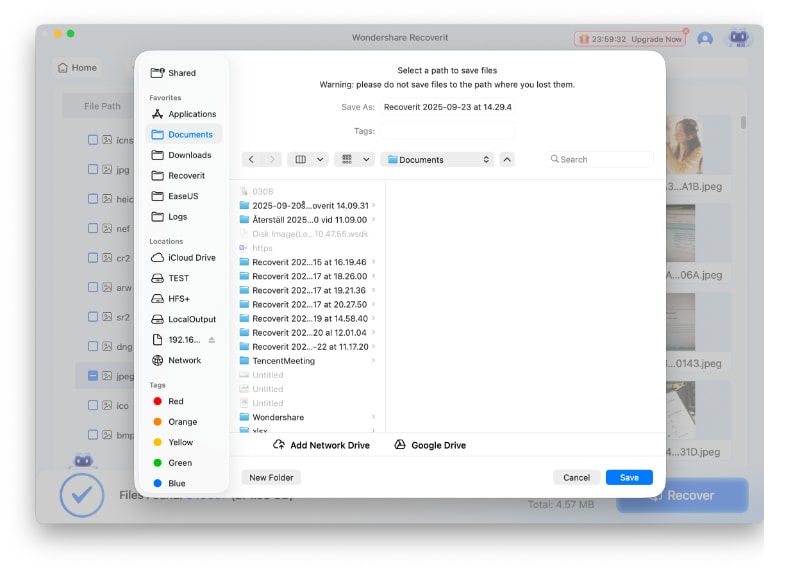
Recovering your data will only take a few minutes, but you will save all your valuable memories from potential data loss.
Top 8 Fixes You Can Try for a Mac SSD Not Showing Up in Disk Utility
Below are some of the most reliable and successful solutions you can try if your SSD isn't showing up on your Mac device.
Way 1: Edit Your Preferences to Show the Mounted Drive
Sometimes, your Mac may not recognize your drive due to the preferences you have adjusted. You can fix this issue by allowing your Mac to show external devices. Here's how to do it:
- Head to Finder > Preferences > General.
- Tick the External Disks checkbox.

- Go to the Sidebar and tick External Disks under Locations.

If you are using a Mac with an M1, M2, or M3 chip, macOS may block your external SSD for security reasons. Go to System Settings > Privacy & Security. Scroll down to the "Allow accessories to connect" section. Ensure it is set to "Ask for New Accessories" or "Automatically When Unlocked." If your SSD still won't appear, unplug it, unlock your Mac, and plug it back in to trigger the "Allow" pop-up.
You can try another solution if your Mac device still doesn't detect the external SSD.
Way 2: Check the Cable
Every external SSD comes with its original cable, which suits your SSD's model and power needs. Thus, if you use the wrong one, your external device may not have the power to run correctly, making it not detected on your Mac computer.
Before trying more complicated fixes, check for these minor issues. Get a cable with a suitable power output and connectors compatible with your SSD.
Way 3: Format the New SSD
If you have purchased a new SSD and wonder why your Mac device isn't recognizing it, the cause might lie in the formatting. Usually, you will need to format an SSD after purchase to make it compatible with your macOS. Here's how to format a new SSD on Mac:
- Connect the external SSD to your Mac using the appropriate interface (e.g., USB, Thunderbolt, or USB-C).
- Ensure you have edited the Preferences to display external disks, as demonstrated in Fix 1.
- Go to Finder > Applications > Utilities > Disk Utility to Open Disk Utility.

- In Disk Utility, you'll see a list of drives on the left side of the window. Click on the external SSD you want to format. It might appear as an unformatted or uninitialized drive.
- Click Erase in the action pane.

- Configure format settings:
- Enter a name for the formatted SSD.
- Format: When formatting the drive for the first time, you need to choose Mac OS Extended (Journaled), also known as HFS+. Afterward, you can repeat the formatting process to change the format to other options such as APFS, exFAT, FAT32, and more. (Learn more about the best format for external hard drive on Mac)
- Scheme: If available, select GUID Partition Map for Intel-based Macs or Apple Partition Map for older, PowerPC-based Macs.
- Click the Erase button to start the formatting process. Disk Utility will format the portable SSD and create a new partition with the chosen file system.

Wait for the process to complete: The formatting process may take a few minutes, depending on the size and speed of the SSD. Once the process is complete, Disk Utility will display the newly formatted SSD in the drive list.
Way 4: Reformat Your SSD to a Format Compatible With macOS
Your Mac device won't recognize your external SSD if it has an incompatible file system, such as EXT4. Thus, you must reformat your drive to make it recognizable.
Choose a format that best fits your needs. Here are all file systems compatible with macOS:
| Format | Description |
| APFS | Apple's default format is feature-packed and offers numerous tools for better SSD management. You can use this file system with a Mac device with High Sierra or newer operating systems. The APFS is among the most reliable and performance-boosting formats available. |
| HFS+ | Choose the HFS+ format if you want to enjoy similar benefits to the APFS but have an older macOS version. Although there aren't as many features as you will find on the APFS, the HFS+ is still among the best macOS formats. |
| exFAT | Microsoft developed this file system, ensuring the best cross-platform experience. Thus, exFAT might be the ideal choice if you need to use your external SSD with different operating systems. You can also use it for high-capacity storage devices. |
| FAT32 | Like the exFAT, the FAT32 is an excellent option if you use your SSD across multiple platforms. It is an older exFAT version, meaning you won't enjoy as many benefits. There's also a limitation to the SSD's capacity (around 2 TB of memory and 4 GB file sizes). |
Choose one of the compatible file systems before reformatting your drive. After you pick the format, return to the steps from the method above to format your SSD. Since reformatting your SSD will delete all the data from your drive, you should have a backup plan. In this case, you can use Wondershare Recoverit to retrieve your valuable data.
However, be aware of different types of formats and levels of deletion. You can choose from four security levels, including:
- Secure Option 1 (Fastest) - Quickly format your drive, making the data recoverable.
- Secure Option 2 - Overwrite your SSD with zeros and ones twice, making data recovery more complicated.
- Secure Option 3 - Overwrite your drive three times. Data recovery isn't possible.
- Secure Option 4 (Most Secure) - Although the process may take some time, you will completely wipe your SSD's content, making all data recovery attempts impossible.
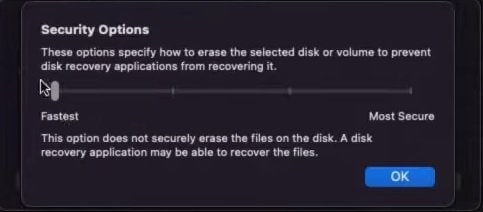
Thus, if you've stored valuable data on the SSD, choose the first option to ensure you retrieve your data.
Way 5: Use Disk Utility to Mount the SSD
When an external SSD is connected to a Mac but not mounted, the operating system may not recognize or display it in Finder or on the desktop. Mounting the SSD allows macOS to recognize the drive and provides access to its contents.
Sometimes, an external SSD might not mount automatically due to connection issues, such as a loose cable, a faulty USB port, or an incompatible interface. Manually mounting the SSD can help identify and resolve these issues. In some cases, an SSD might be connected and recognized by Disk Utility but not visible in Finder. Mounting the SSD ensures that it appears in Finder, allowing you to access and manage its contents.
Thus, follow the guide below to mount the external SSD to your Mac:
- Go to Finder > Applications > Utilities > Disk Utility.

- In Disk Utility, you'll see a list of drives on the left side of the window. Find the external SSD that you want to mount. If the SSD is recognized by Disk Utility but not mounted, it will typically appear as a grayed-out drive.

- Click the Mount button located at the top of the Disk Utility window. This action will instruct macOS to mount the drive and make it accessible.
Your SSD should be ready for use after a few moments.
Way 6: Use First Aid to Fix Errors
Mac First Aid, a feature within the Disk Utility application, can diagnose and repair various disk-related issues on macOS. It checks the connected drives for errors, such as file system inconsistencies, corrupted data, or invalid permissions. First Aid can also repair certain problems like fixing an unmountable disk or a drive that has trouble booting.
You can run First Aid to fix a portable SSD not showing up in Mac Finder or Desktop:
- Open Disk Utility.
- Select the external SSD you want to repair.
- Click First Aid in the action pane.

- The program will ask you to confirm that you wish to run First Aid. Click Run to continue.

- Disk Utility will notify you that you can't use your computer while running First Aid. Click Continue.

- After First Aid finishes scanning, you can view the problems and fixes by clicking Show Details.

- Click Done to complete the process.

First Aid is an excellent tool to help you make your SSD appear on your Mac device.
Way 7: Use the Terminal to Repair Your SSD Drive
Terminal is one of the most powerful tools for fixing any issues you may experience with your Mac. If none of the methods above work, you should try Terminal. However, the process may be complex, so we suggest trying a different one if you haven't used the app before. Here's how to use Terminal:
- Go to Finder > Applications > Utilities > Terminal to launch Terminal
- Type the
diskutil listcommand and press Enter.
- Find the SSD you want to repair and remember the name.
- Restart your Mac to enter single-user mode.
- Type the
/sbin/fsck_hfs -fy /dev/[partition number]command and press Enter. Remember to replace [partition number] with your SSD's information. - The Terminal will scan and display all issues. If the command reports that the disk has been repaired, you can close Terminal and check if your SSD is now recognized by your Mac.

Way 8: Reach Out to the Local Repair Show
If none of the methods above work, consult professionals. As mentioned at the beginning of this article, the damage may be physical. In such cases, none of these fixes will be able to resolve the issue and make your SSD recognizable.
Therefore, visit your local repair shop or return your SSD to the provider. They can fix physical damage and make your device as good as new. Remember to ask them to extract any data from the drive before fixing it.
Final Words
SSDs are the best storage units available. You can store anything you wish on them. However, issues might occur with your external device, such as the external SSD not showing up in Disk utility. Fear not, as this problem usually isn't significant, and you can fix it yourself with the help of your Mac.
Try the most reliable solutions above to make your SSD recognizable again. If none of the methods work, find a professional and explain the situation. However, before trying any fixes, recover data from your drive SSD using trusted third-party software like Wondershare Recoverit.
FAQs
-
What do I do if my external SSD is not showing up in Disk Utility?
If an external SSD is not showing up in Disk Utility at all, it often indicates a physical connection issue. Try a different USB-C/Thunderbolt cable and port. If possible, test the SSD on another computer. This will help determine if the problem is with the SSD, the cable, or your Mac's port. -
My Samsung Portable SSD T5 is not showing up on my Mac after a macOS update. How can I fix it?
This is a common issue. Often, the driver software for the SSD needs to be updated to be compatible with the new macOS version. Visit the official Samsung support website and download the latest software for your T5. For a samsung portable ssd t5 not showing up on mac, an updated driver usually solves the problem. -
My external SSD light is on but it's still not showing up. What does this mean?
The light indicates the SSD is receiving power, but not necessarily that it has established a data connection. This could be due to a faulty data cable, incorrect formatting, or a driver issue. An external ssd not showing up on mac despite being powered on points towards a data communication problem. -
Will I lose data if I have to reformat my external SSD?
Yes, reformatting will erase all data on the SSD. This should be your absolute last resort. Most of the troubleshooting steps, such as checking cables, changing Finder preferences, or using Disk Utility's "First Aid" feature, will not cause data loss.


