


 TL;DR:
Mac users running macOS 10.13 High Sierra or later can safely switch their external drives to the APFS format without data loss using the native Disk Utility application.
● If your external drive is currently in the Mac-native HFS+ format, you can use the "Convert to APFS" button or add a separate APFS container via the "Partition" tab to keep your existing data intact.
● Drives formatted in Windows-centric systems like NTFS or exFAT lack the direct conversion option and must be fully erased and reformatted to APFS using the GUID Partition Map scheme.
● When a drive must be erased for reformatting, the deleted files remain retrievable using data recovery software like Wondershare Recoverit, provided you do not overwrite the disk with new data.
Ask AI for a summary
 ChatGPT
 Perplexity
 Gemini
 Claude
 Grok
Grok
External drives are portable hard drives that can be used for storing data that you want to keep on hand during your travels. Most of the external drives especially the WD ones available in the market are either formatted in NTFS or HFS+ format. The NTFS format is for Windows while HFS+ is for Macs.
However, the new Macs are shipped with the latest Mac OS version, macOS High Sierra or later which supports the Apple File System (APFS). If your external drive isn't in this new format, you won't be able to use it if your Mac has been updated to the latest macOS version. In such cases, you need to simply convert your external drive to APFS format.
Table of Content
Understanding the APFS File System and Its Benefits for Mac Users
Apple released its new proprietary file system, APFS (Apple File System), in 2017, making it the default format on macOS 10.13 (High Sierra) and iOS 10.3 devices (and all subsequent versions). That replaced the Mac OS Extended or HFS+ (Hierarchical File System Plus), which reigned supreme since 1998.
Is the APFS better than the old format? By a wide margin. Here's why you should choose the APFS for an external HDD and SSD:
| Features | Description |
| Speed | The APFS has a 64-bit architecture, making copying, moving, and deleting files significantly faster. |
| Reliability | This format ensures data integrity and fewer crashes than its older HFS+ cousin, reducing the risk of file corruption. |
| Dynamic storage distribution | The new and improved file system stores files in containers and lets you create multiple partitions and volumes on one disk. It allows the latter to share space, allocating it depending on how much each requires. |
| Encryption | You can encrypt APFS external drives (and their internal counterparts) and add password protection. Some HFS+ formats offered encryption, but Apple removed them upon introducing the APFS. |
| Lower risk of fragmentation | The file system's space-sharing containers and copy-on-write features help reduce data fragmentation. That makes choosing the APFS for external SSDs a no-brainer. |
These advantages are excellent reasons to choose the APFS for an external drive—besides making it compatible with macOS and iOS devices (if it has a Windows-exclusive format). Here's what to do before converting the file system.
You may also be interested in:
Precautions Before Converting an External Hard Drive to the APFS Format
Take the following steps before converting your hard drive's file system to create an APFS external hard drive:
- Check system compatibility – The APFS became available with macOS 10.13 (High Sierra), meaning you can't use it on macOS 10.12 (Sierra) and older versions. Therefore, update your Mac to the latest macOS if necessary.
- Create a data backup – Converting your HDD file system to the APFS format won't cause data loss, but it's better to be safe than sorry. However, you'll need macOS 11.7 (Big Sur) or newer to leverage a Time Machine backup.
Once you finish the preparations, pick one of the methods below to convert your external drive to the APFS.
How To Convert an External Drive to the APFS
Whether you wish to convert, partition, or reformat an external drive to the APFS, the methods below will help you avoid data loss while making your disk compatible with macOS.
Method 1. Convert an External Drive to the APFS in Disk Utility
Disk Utility is your go-to tool for managing internal and external disks. Here's how to use it to convert an external hard drive to the APFS:
- Connect your external HDD to your Mac.
- Go to Applications > Utilities > Disk Utility.

- Go to View > Show All Devices to see all containers within the storage structure.

- Select the correct volume in the left sidebar, click Convert to APFS, and confirm your choice by clicking Convert.

Disk Utility will create your APFS external drive within minutes. The process for converting an external SSD to the APFS is identical.
Method 2. Convert an External Drive to the APFS by Repartitioning
You already know the APFS format lets you create multiple partitions on a disk. However, those separate containers don't need a matching file system.
For instance, you can add an APFS partition while keeping the existing one in the HFS+ format, thus eliminating the need to reformat the entire disk. That means your HFS+ data stays safe.
Here's how to partition your external drive in Disk Utility to add an APFS container:
- Connect your external HDD to your Mac.
- Go to Applications > Utilities > Disk Utility.
- Select your external drive at the top level in the storage structure and click Partition.

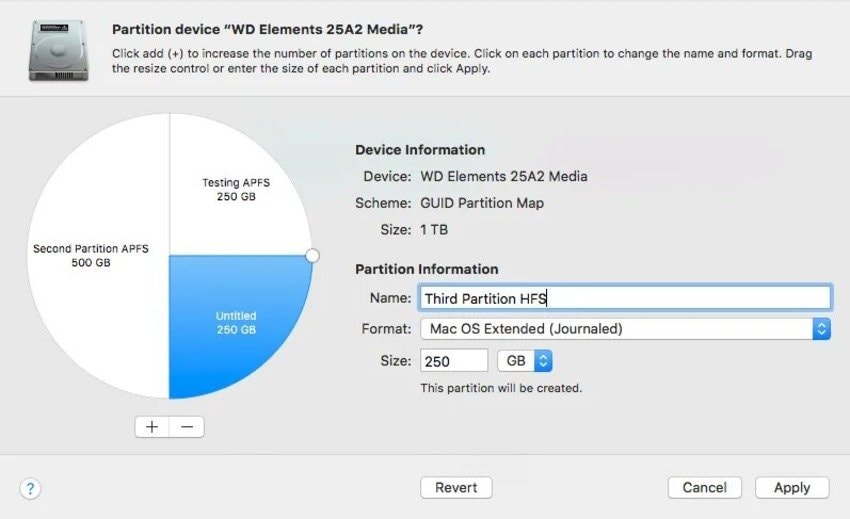
- Click the + button below the pie chart representing your HDD to add a partition and confirm your choice in the dialog box. Name it, select the APFS format, and specify the desired size in the corresponding field. You can also drag the round resize-control button on the pie chart. Ensure the device's scheme is GUID Partition Map before clicking Apply.

- Disk Utility will inform you that partitioning your external hard drive won't erase partitions but resize the existing one and add a new one. Click Partition.

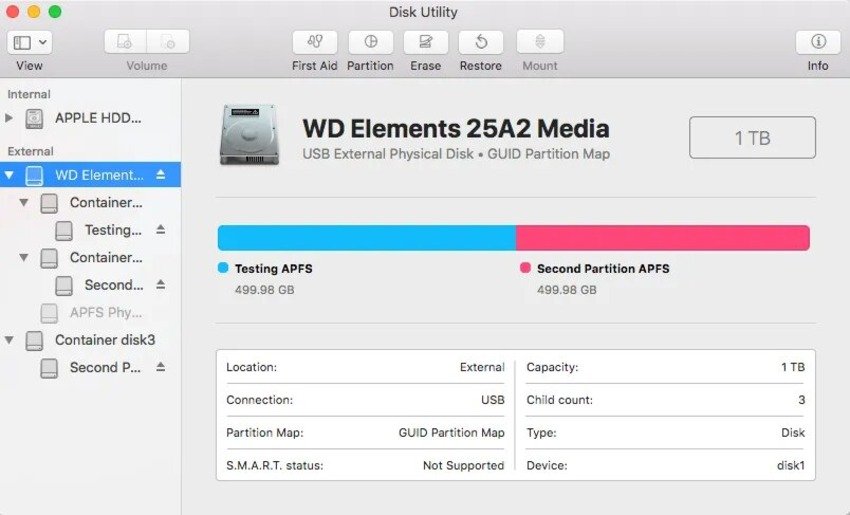
Here's how both containers will appear in Disk Utility:
Here's how adding an HFS+ partition would look, which is excellent to have on an HDD since the APFS is optimized for SSDs):
Method 3. Format an External Drive to the APFS
What if you don't want to partition your external HDD or SSD? What if you don't have the Convert to APFS option in Disk Utility? The tool might gray it out if your hard drive doesn't have the HFS+ format. That's problematic if you wish to convert your NTFS or exFAT drive to the APFS.
Don't worry; you can still format the external hard drive for Mac to the APFS. However, your only option is to erase the disk to reformat it.
Still, formatting doesn't mean losing data forever. It stays safe if you don't overwrite it with new data. You'll hopefully create a backup beforehand, but you can also recover it afterward (perfect if you're forgettable or can't access your external hard drive).
Here's how to reformat your external drive to APFS:
- Go to Applications > Utilities > Disk Utility after connecting your external drive to your Mac.
- Select your hard drive in the left sidebar and click Erase.

- Name your external hard drive, select the APFS format, set the GUID Partition Map as the scheme, and click Erase.

Disk Utility will create your APFS external HDD or SSD in a minute. Once it does, use reliable data recovery software to recover the erased files from the formatted drive. In this tutorial, we decide to use Wondershare Recoverit. Wondershare Recoverit is a highly recommended software for recovering files from formatted hard drives. It is a powerful and user-friendly data recovery tool that supports various file systems, including APFS, NTFS, HFS+, FAT32, and exFAT. With its advanced scanning algorithms, Wondershare Recoverit can quickly and effectively retrieve lost or deleted files from formatted, corrupted, and damaged drives.
Here's what to do once you download and install the program on your Mac and connect your external drive:
- Click Hard Drives and Locations and select your formatted HDD or SSD under External Devices.

- The program will start scanning your APFS-formatted external hard drive for lost data. Use type, size, tag, status, and time filters to expedite the process (if you wish to retrieve specific files). You can also pause or stop the scan anytime.

- Click Preview in the right-hand sidebar to check the retrieved files' quality. Click Select All or choose specific files and hit Recover.

Read More: Full Guide on APFS Data Recovery
Conclusion
The APFS for an external hard drive is an excellent choice for Mac users. It's faster and more reliable than the HFS+, offers encryption and dynamic storage distribution, and reduces fragmentation in SSDs.
Therefore, reformat, partition, or convert your external drive to the APFS, but create a data backup beforehand. However, you can recover lost files due to formatting with a trusted tool like Wondershare Recoverit.
FAQs About APFS for External Drive
-
Why should I choose the APFS format for an external hard drive?
The APFS is faster and more reliable than its older HFS+ cousin. It ensures data integrity, reduces the risk of file corruption and fragmentation, offers dynamic storage distribution and encryption, and has been the default format for Time Machine backups since macOS Big Sur. Moreover, macOS High Sierra and newer versions don't support the HFS+. -
Can I convert an external drive to the APFS without losing data?
Converting an external drive to the APFS doesn't mean losing data. The built-in Disk Utility lets you change the file system without data loss. You can also add a new APFS partition, which doesn't delete the existing containers. -
Can I recover data after reformatting an external drive to the APFS?
Yes. Formatting an external drive doesn't cause permanent data loss. Your files are safe until you overwrite them, so use reliable data recovery software like Wondershare Recoverit to retrieve lost data after reformatting your HDD to the APFS.


