Good news: it is possible to recover deleted notes on Mac. In fact, there are a few ways to do it. Below, we have laid out 5 methods for successful Mac Notes recovery. They cover the most common scenarios, from moving files to Trash by accident to permanent deletion.
In this article
Best Ways to Recover Deleted Notes on Mac
Let's get down to business. Here's how to recover deleted notes on a Mac:
Method 1. Recover Recently Deleted Notes from the Trash Bin
Even if you can't remember deleting or dragging Notes to the Trash can, it's still worth looking there. If you don't find your missing Notes there, they've likely been permanently deleted. MacOS keeps deleted files in the Trash can for up to 30 days, so that's always a possibility.
If you want to learn how to undo deleted Notes on a Mac, follow these steps:
- First, open the Trash can. You can find it in the Dock on your desktop.

- Find the Notes you want to recover and drag and drop them to the desktop.
- Another way to recover deleted notes on a Mac is to right-click the icon and select Put Back. That will restore your Notes to their original location.

You may also be interested in: How to Recover Deleted Notes in Outlook 365?
Method 2. Get Back Deleted Notes on Mac From iCloud
What can you do if you can't find recently deleted Notes on a Mac? As you probably know, Mac users can access Apple's iCloud storage for backup. Presuming you have enabled iCloud syncing before the Notes disappeared from your Mac, you should be able to get them back.
Follow these steps if you don't know how to recover Notes in Mac from iCloud:
- First, you need to turn off iCloud syncing to ensure the Notes don't get deleted from there, too. You can do this from System Preferences. Find iCloud in the left sidebar and disable Notes syncing.

- Go to iCloud and log in using your Apple ID.
- Look under Notes in the left sidebar - your Notes might still be there. If you can't find them, return to the left sidebar and open the Recently Deleted folder.

- Locate the Notes you want back and click Recover to restore them safely.

Method 3. Restore Deleted Mac Notes Using Time Machine
Can you still recover deleted Notes on Mac even if you don't find them in the Trash can or iCloud? Fortunately, the answer is yes. You can try recovering accidentally deleted Notes on a Mac using the Time Machine backup - under the condition that this option was enabled before.
We'll now show you how to recover deleted Notes on a Mac using Time Machine:
- Launch Time Machine from Spotlight or find it in System Preferences.

- In the left sidebar, select a location to narrow down your search, and use the arrows to find permanently deleted files by date.

- When you find your deleted Notes, click the icon to preview the file.
- Select all the Notes you want to recover and click the Restore button.

Still can't find your notes? If the 'Recently Deleted' folder is empty and you have no Time Machine backup, the database file itself might be corrupted or deleted. In this case, a raw disk scan is your last resort. Wondershare Recoverit can scan the deep sectors of your Mac's drive to find the NoteStore fragments
Method 4. Recover Mac Notes from All Lost Scenarios Using Recoverit
Although MacOS offers several backup and restore utilities, there are situations where deleted files can't be restored using native tools. In these cases, the best Mac Notes restore option is third-party data recovery software like Wondershare Recoverit.
With a 99.5% success rate, Wondershare Recoverit can help you retrieve lost data from an emptied Trash Bin, Time Machine, accidental or permanent deletion, formatting, computer corruption, or any other causes, allowing you to recover unlimited files from macOS X to macOS 14 Sonoma in just three simple steps.
Recoverit can also automatically identify and repair corrupt pictures and document files, and provide you with the repaired results while previewing them.
Here's how this works:
- Download, install, and launch Wondershare Recoverit for Mac.
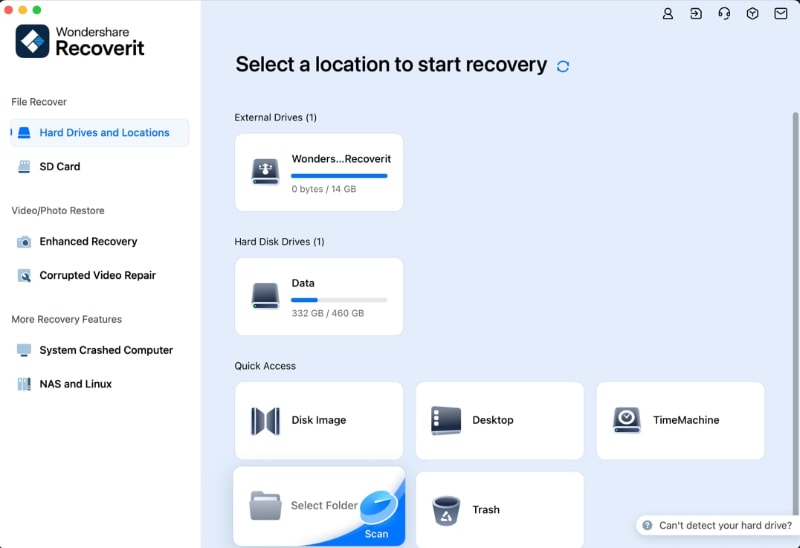
- Select a location to start recovery. If you're confident your Notes were deleted, scroll down to the Quick Access locations and choose Trash.

- Recoverit will initiate a quick scan mode that will take a few minutes to complete. You can track the progress and see files being located from your computer's deep storage in real-time.

- If none of your missing Notes show up, click the Deep Recovery button to start an all-around scan of your computer. This time, Recoverit will dig deeper.
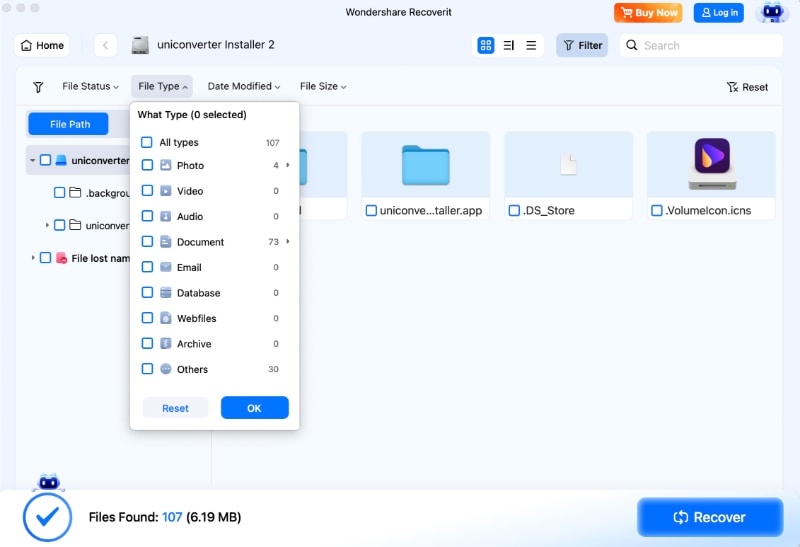
- When the scan is completed, you can search for deleted Notes by File Type, Time, and File Size. Alternatively, you can use the search bar to look for a specific keyword.

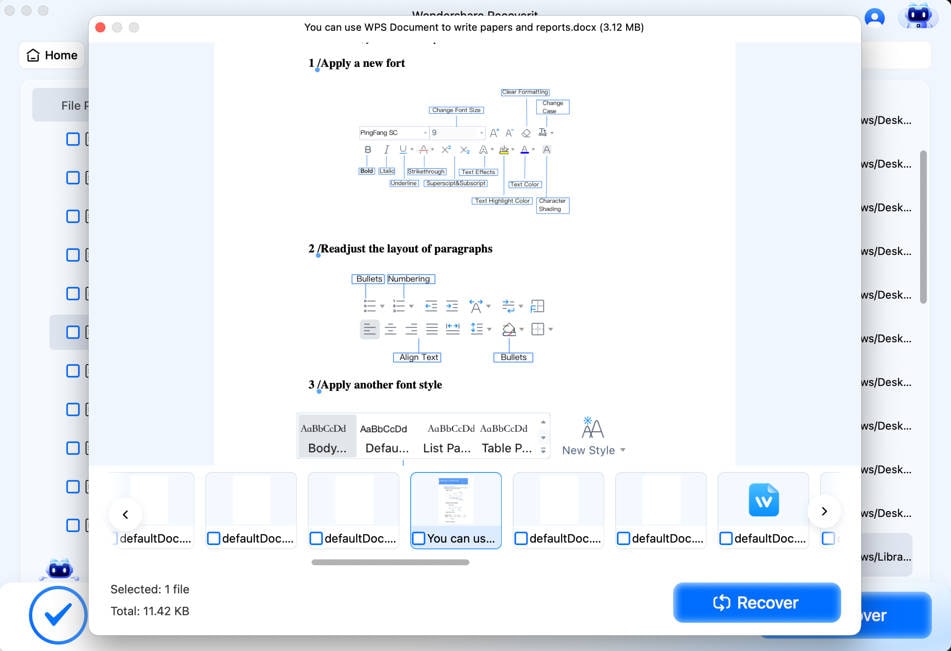
- Once you find your Notes, double-click on each file to preview it.

- Select all the Notes you want to save and click the Recover button.

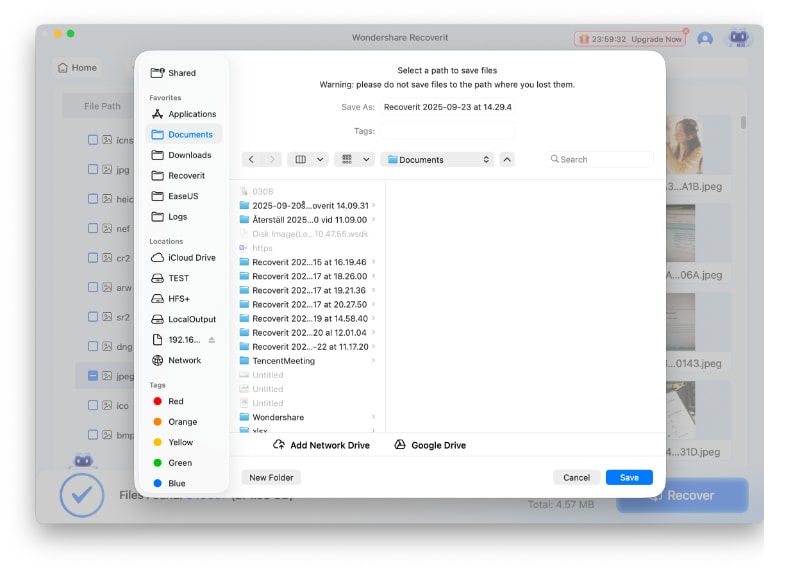
- Choose a safe location to store recovered Notes and click on Save.

- If you don't want to proceed with the recovery right now, click on the icon at the top right corner and save the scan results for another time.

Method 5. Use Temporary Data to Recover Deleted Mac Notes
Most people don't know how to get back deleted Notes on a Mac from so-called .storedata files or what .storedata files are in the first place. Simply explained, these are the temporary files that Mac keeps in the background while a program is running or the file is being modified.
If you haven't had luck so far, your missing Notes might be in the following folder:
- Open Finder > Go and select Go to Folder.

- For macOS Ventura and Sonoma users, the path has changed slightly. Try navigating to: ~/Library/Group Containers/group.com.apple.notes/. Look for a file named NoteStore.sqlite. While you cannot open this directly, opening it with a Text Editor may reveal raw text fragments of your lost notes. .

- Your Mac will open the Temporary Data folder with Notes on the right. Select these Notes and copy them to any location.

- Now, change the extension of copied Notes files from .storedata to .html and open them in your web browser. You will see the text written in every Note. While you can't restore the entire Notes files, you can copy the textual content and save it from permanent deletion.
Where Does Mac Store My Notes?
The easiest way to access Notes on a Mac is by opening the Notes App. But what if you need to find raw Notes? If you want to copy, back up, or recover your Notes, you need access to a location folder containing raw files. So, where should you look for your Notes on a Mac?
By default, MacOS stores Notes in the folder Group Containers in the Finder. The exact location folder varies depending on the type of Notes: for example, text-based Notes are kept in a separate folder from graphic Notes and media-rich Notes. Follow these steps to find them:
- Open Finder.
- In the top menu bar, click on Go > Go to Folder…
- Enter the following path into the search bar: ~/Library/Group Containers/group.com.apple.notes/
Locating the destination folder is another good way to restore missing Notes on a Mac, presuming they weren't permanently erased or deleted. In this location, you'll find both Notes that have been cached locally and Notes that have been synced to your iCloud account.
Conclusion
When it comes to data backup and recovery, MacOS takes good care of its users. That makes data loss accidents, such as deleted Notes, less stressful. When important Notes disappear from your Mac, you can find them in Trash, iCloud, Time Machine, or temporary files.
However, native Mac Notes recovery isn't always possible. If you can't locate your notes in any of these locations, you need a more capable solution. Professional data recovery software such as Wondershare Recoverit can find long-lost and permanently erased Notes.
FAQ
-
How to recover deleted stickies on a Mac without Time Machine?
If all Notes on your Mac have disappeared, they've likely been erased. An easy way to recover deleted or lost files on a Mac is from Time Machine, but that's only possible if Time Machine was enabled at the time of file loss.
If your Time Machine was disabled, you can look for your missing Notes in the Trash Bin, iCloud, or temporary files. A simpler, safer, and more successful alternative is to use professional data recovery software like Wondershare Recoverit. -
How to check deleted notes on Mac?
You can access deleted Mac Notes for a limited period before they get permanently erased. To do this, you must open the Notes App on your Mac and click on Recently Deleted in the left sidebar. This option lets you recover, remove, or permanently delete a recently deleted note.


 ChatGPT
 Perplexity
 Google AI Mode
 Grok
Grok


