
Are you wondering what Win PE is and how to boot Win PE on Windows 7 & 8 operating systems? Windows Preinstallation Environment (WinPE) is a bootable environment that can deploy Windows images on a large scale and run troubleshooting and recovery diagnostics before the actual installation.
Creating a bootable Win PE drive is one of the most essential things to know for both beginners and advanced users. However, booting Win PE on Windows 7 & 8 can be challenging.
In this article, we’ll explore how to boot Win PE on Windows 7 & 8 in a detailed and step-by-step guide to help you perform the whole process successfully.
In this article
Part 1. What is Win PE
Win PE (Windows Preinstallation Environment) is a lightweight version of Windows that can be used for troubleshooting, repairing, deploying, and recovering Windows systems. System administrators and IT professionals often use it to boot a Windows system from a CD, USB drive, or network.
WinPE or Windows boot disk allows for a richer and more versatile operating environment than what is found on legacy DOS boot disks. For instance, it can support features like 32-bit or 64-bit device drivers, NTFS, and networking through TCP/IP, depending on the version.
WinPE is an add-on to the Windows ADK Kit and can be downloaded from the Microsoft website.
Where is PE Applied
Here’re some of the tasks you can perform with Win PE:
- Store Windows images and deploy them when needed.
- Configure your PC hard drive before installing Windows.
- Make changes to Windows OS while it is not running.
- Configure auto recovery tools on your PC.
- Retrieve your data from unbootable devices.
- Use scripts or apps to install Windows from a local drive or a network.
- Add a custom GUI or shell to automate such tasks.
Part 2. Windows PE Functions and Features
WinPE includes tools that can be used to troubleshoot, repair a PC, and boot up a PC from a USB drive or network connection.
Windows PE includes several features that can be used to manage and troubleshoot a PC. These features include:
Installation: The Windows 7 and 8 installation process uses graphical tools to collect system information during the setup phase. These tools run within Windows PE, which is a scaled-down version of the Windows operating system.
Deployment: When a new computer starts up, the PXE client can connect to a Windows Deployment Services (WDS) server. The server then sends across a Windows PE image, which the computer uses to run deployment scripts.
Troubleshooting: Starting Windows PE can help you troubleshoot or run diagnostics if your Windows 7 or 8 has problems that can't be diagnosed any other way.
Recovery: Windows PE is a great way to access the Startup Repair tool if Windows 7 or 8 fails to start because of a corrupted system file. This can be a lifesaver for anyone who needs to get their computer up and running quickly.
Part 3. Existed Versions of Win PE
Before we learn how to boot Win PE on Windows 7 and Windows 8 in the later parts of this article, we should know that there are versions of Win PE serving for different Windows systems. Following are the versions of Win PE that have existed to date:
- Windows PE 1.0: It is the first version built from Microsoft Windows 5.2.
- Windows PE 1.1: Comes with Service Pack 1 (SP1) and is built from Windows XP Professional.
- Windows PE 1.2: It is built from Windows Server 2003.
- Windows PE 2004 (1.5): It comes with Service Pac 2 and is built from Windows XP Professional.
- Windows PE 2005 (1.6): Includes Service Pack 2 and is built from Windows Server 2003.
- Windows PE 2.0: This version is different from the others because it doesn't need the disc to load all the files and is built from the first edition of Windows Vista.
- Windows PE 2.1: Uses the Windows Vista SP1 code base and is built from Windows Server 2008.
- Windows PE 2.2 is the same code base as Windows Vista SP2 and is built from Windows Server 2008.
- Windows PE 3.0: Comes with WAIK 2.0 and is built from Windows 7 code base.
Other versions for the WinPE deployment engine are 3.x, 4.x, and 5.x and depend on the tasks performed.
Target OS |
WinPE Version |
Required Toolset |
Architecture |
| Windows 7 | WinPE 3.x | Windows AIK | x86 / amd64 |
| Windows 8 | WinPE 4.0 | Windows ADK (Win 8) | x86 / amd64 |
| Windows 8.1 | WinPE 5.0 | Windows ADK (Win 8.1) | x86 / amd64 |
| Windows 10/11 | WinPE 10.x | ADK + WinPE Add-on | x86 / amd64 / ARM64 |
Part 4. How to Boot Win PE of Win 7
If you're planning on using WinPE to deploy Windows 7, you'll need to download the WinPE 3.0 files from the Microsoft website. You will find the files for both 32-bit and 64-bit versions of Windows 7.
Before booting Windows 7 PE, make sure you have at least 2GB or larger USB, and install 7 Zip.
Here’s the step-by-step process of booting Win PE Windows 7:
Setting Up the Environment
Critical Prep: Matching Your Boot Mode
Before you create your WinPE media, identify if your Windows 7 or 8 system uses Legacy BIOS or UEFI.
For Legacy BIOS: Ensure your USB is formatted as NTFS and the partition is marked as Active.
For UEFI: Your USB must be formatted as FAT32 for the motherboard to recognize the boot files. Windows 7 64-bit supports UEFI, but 32-bit versions generally require Legacy/CSM mode enabled in your BIOS settings.
Step 1: On your PC, download the Windows Automated Installation Kit (AIK) ISO from the Microsoft Store, create a folder, and name it “AIK.”
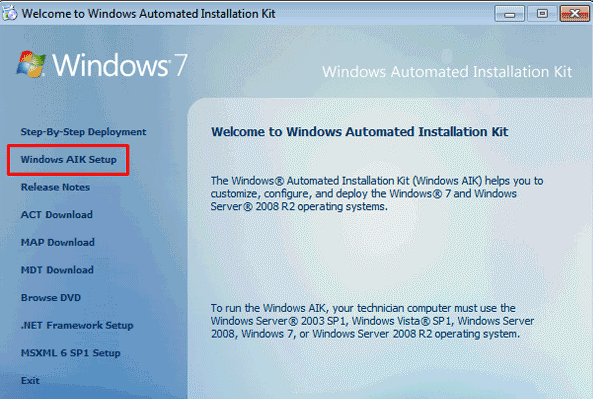
Step 2: Right-click the downloaded Windows Installation Kit ISO and extract its file to the folder you’ve created in step 2. Afterward, find the StartCD.exe file in the folder and double-click it, and now the set up for “Windows Automated Installation Kit” will appear.
Go to the Windows AIK Setup menu, don’t change the default settings, and click “Next” to install the kit.
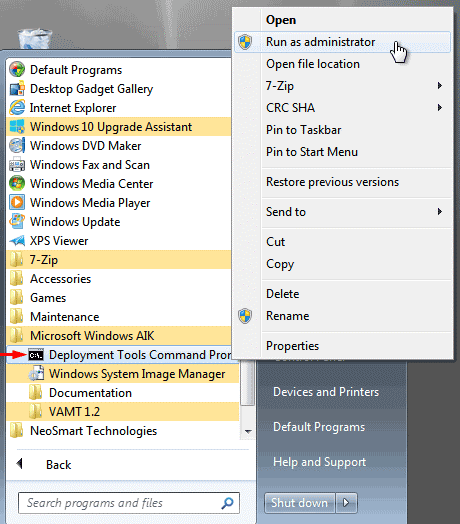
Step 3: Next, click “Start” > “All Programs” and open the “Deployment Tools Command prompt” available in the “Microsoft Windows AIK” folder. Right-click it and select “Run as Administrator.”
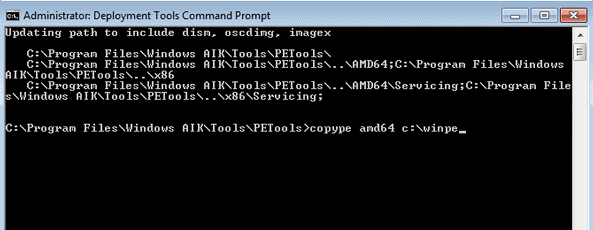
Step 4: Copy following command line for Win 7 64-bit and paste it.
copype amd64 c:\winpe
Use the following command for Win 7 32-bit:
copype amdx86 c:\winpe
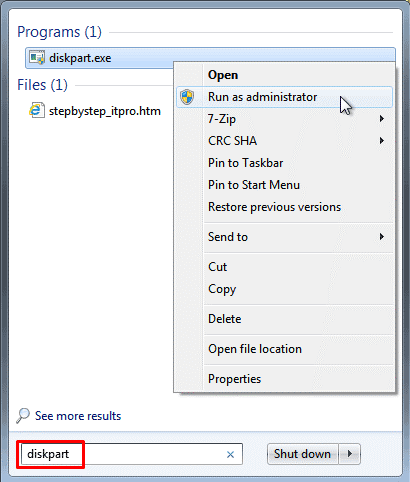
Step 5: Now, insert a USB into your computer. Click Start, search for “diskpart,” and run it as administrator.
Prepare and Create a Bootable USB
To prepare and create a bootable USB, do the following steps:
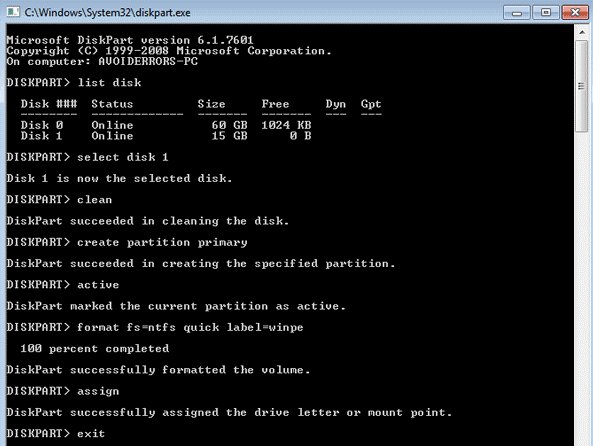
Step 1: Type the List Disk in the diskpart command and hit the Enter key. Now, type select disk X and press the Enter key. Next, type “Clean > Enter Key > Active > Enter Key > format fs=ntfs quick label=winpe > Enter Key > Assign > Enter Key > Assign > Enter key”. Finally, type Exit and hit the Enter key.
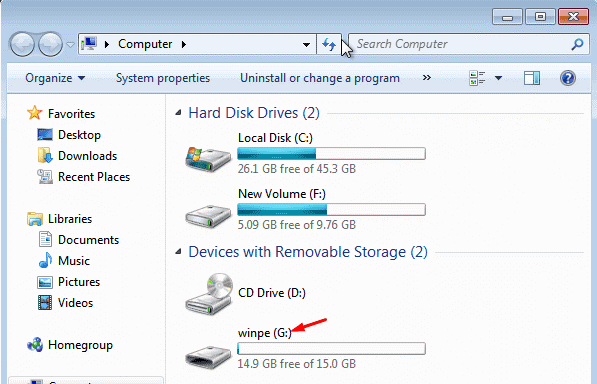
Step 2: Verify your USB drive letter (H, G) from My Computer. Now, run the Command Prompt as administrator and enter the following command lines to create a bootable USB Drive.
xcopy C:\winpe\iso\*.* G:\ /e
More Related: How to Format Windows 7 Effectively
Part 5. Win PE of Win 8
Windows 8 uses the Win 5.0 of Windows Assessment and Deployment Kit (Windows ADK), which is a collection of tools and technologies that help you assess, deploy, and manage Windows operating systems.
To boot Window 8.1 PE, do the following steps:
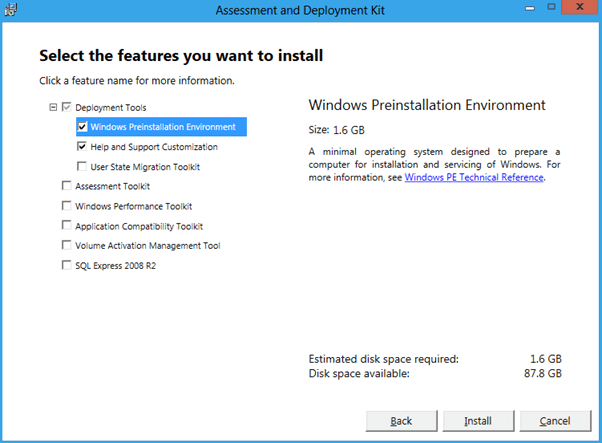
Step 1: Install the ADK file on your PC. Make sure to select only these two features: Deployment Tools and Windows Preinstallation Environment.
Step 2: Open the Deployment Tools and Imaging Environment, create a folder, and name it “c:\winpe.” Use the following command to copy the Windows PE boot image (boot.wim) and the boot files to folder c:\winpe\media.
copype.cmd amd64 c:\winpe x86
Step 3: Mount the Windows boot image before adding any third-party apps or drives.
dism /mount-image /imagefile:c:\winpe\media\sources\boot.wim /index:1 /mountdir:c:\winpe\mount
Step 4: Now, add any storage drivers or RAID to let the Win 8 PE boot disk recognize your hard drive. To do this, collect and extract raw .sys and .inf driver files.
dism /image:c:\winpe\mount /add-driver:"c:/storage/iaStor.inf"
Pro Tip: Increasing WinPE Scratch Space By default, WinPE allocates 32MB of writeable memory (Scratch Space). If you plan to run data recovery tools or heavy scripts, this may not be enough. You can increase this to 512MB using this DISM command before unmounting: dism /image:c:\winpe\mount /set-scratchspace:512
This ensures your troubleshooting apps have enough "breathing room" to operate without crashing the environment.
Step 5: Next, you have to unmount the image and revert the changes to the WinPE boot.wim file.
dism /unmount-image /mountdir:c:\winpe\mount /commit
Step 6: Run the following command to create the bootable WinPE ISO image:
oscdimg -b"c:\winpe\fwfiles\etfsboot.com" -n c:\winpe\media c:\winpe\winpe.iso
Step 7: Afterward, burn the ISO image (winpe.iso) onto a CD or USB drive using Rufus, ISO2Disc, or Imgburn.
Part 6. Tips for Working with Windows PE
When you are working with Windows Preinstallation Environment, also known as Windows PE, there are some things you should keep in mind to have a successful experience.
First, make sure that you have the proper equipment. You'll need a PC or laptop that meets the minimum system requirements and a blank CD or USB drive.
Next, create a bootable Windows PE drive using Windows AIK or AKD. Afterward, you can boot into it and begin working with Windows PE.
Finally, remember to back up your data before booting Windows PE. This way, if something goes wrong, you will not lose any important files.
Video Tutorial-How to Create a Bootable Rescue WinPe or Windows Portable USB
Deployment Task |
Verification Command |
Expected Result |
| Check Disk Info | diskpart > list disk |
Shows all connected drives. |
| Network Test | ping google.com |
Verifies TCP/IP stack is active. |
| Driver Load | drvload driver.inf |
Confirming storage/RAID access. |
| Exit WinPE | wpeutil reboot |
Safely restarts the system. |
The Bottom Line
In this detailed article, we’ve discussed Window PE, its features, and the existed versions. We also provided a comprehensive step-by-step guide on booting the Win PE on Windows 7 & 8. In the end, we discussed some tips for working with Windows PE.
Hopefully, you find this article helpful and can now boot Win 7 PE and Window 8 PE without any issue.
For Windows XP/Vista/7/8/10/11
For macOS X 10.10 or later


