
Check All Information About Windows 11
Read this article to learn the minimum system requirements to update to Windows 11 and the ways to enable TPM 2.0 and UEFI Secure Boot on the computer.
From systems to apps and machinery to tools, every technology is experiencing upgrades. It would be safe to say that without such updates, a society cannot progress rapidly.
Windows 11 is a successor of Windows 10 and takes responsibility for addressing the shortcomings of the previous update. The user interface has been redesigned to offer flexibility and ease of use for its millions of users. In addition, there are social features and upgrades regarding security and performance improvements.
The article presents an insight on the minimum system requirements for Windows 11 and aids the user in checking the compatibility status of Windows 10. The writeup also lets you enable TPM 2.0 and UEFI in their systems as it is required for a workable Windows 11 upgrade.
Part 1: What are the Minimum System Requirements?
An upgrade demands a set of minimum system requirements to be met to enjoy the latest features. Before going any further, it is crucial to understand the system requirements for Windows 11. To ensure the successful install of Windows 11, the user has to work on the following items to be present in the system.

- Processor: 64-Bit Architecture at 1 GHz or Faster; Intel: Eight-Generation or Newer; AMD Ryzen 3 or Better. Qualcomm Snapdragon 7c or Higher.
- RAM: 4 GB or Higher
- Storage:64 GB or Larger Storage Device
- System Firmware: UEFI, Secure Boot Capable
- TPM: Trusted Platform Module (TPM) Version 2.0
- Graphics Card: Direct X12 or Later Capable; WDDM 2.0 Driver or Newer
- Display: High-Def (720p) Display, Larger than 9" Diagonal in size, 8 Bits Per Color Channel (or Better)
- Internet Connection and Microsoft Account: A stable internet connection and a Microsoft Account are required for Windows 11 update. Moreover, the switching process out of Windows 11 Home in S Mode needs an internet connection. The internet connectivity to perform updates and download the features has to be ensured.
Part 2: How to Check if Your Computer is Windows 11 Compatible?
With Windows 11 update just around the corner, it is essential to keep oneself ready for it. The user should meet the minimum system requirements and check if their system is compatible with Windows 11. With a set of new features and upgrades, use Microsoft Health's Check app to scan your computer's compatibility.
Checking whether the system is compatible with Windows 11 is mandatory for several reasons. For once, it helps in minimizing lag and prevent the hardware from being corrupted. It also avoids the improper running of features. The user can have an idea of the efficiency of the system once the upgrade is installed. Moreover, one doesn't have to roll back to the older operating system; thus, it is time effective.
The use of Microsoft Health's Check app can be tricky. The section offers a detailed procedure to go through with the process.
Step 1: Downloading Process
The first and foremost step is to download the software through the official link of Microsoft. After the process is concluded, launch the application.
Step 2: Checking Process
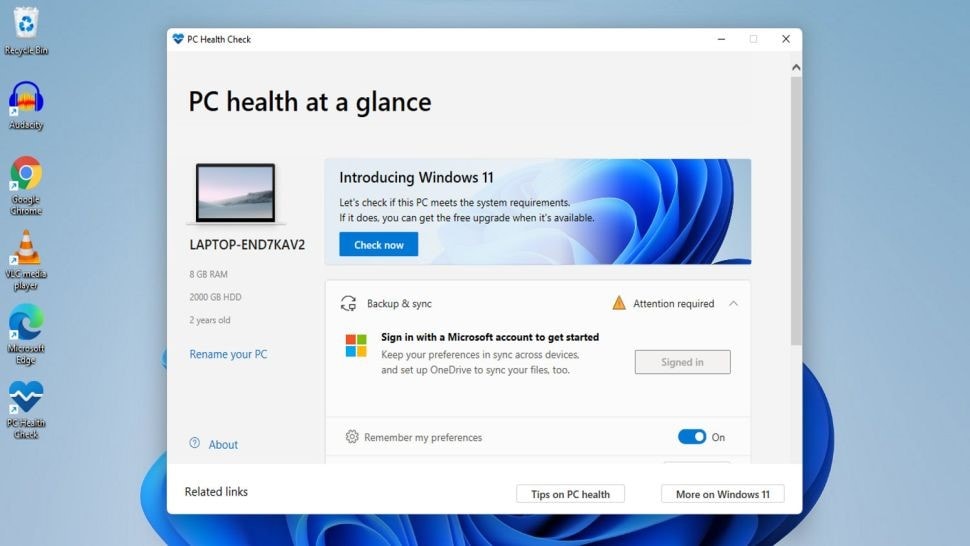
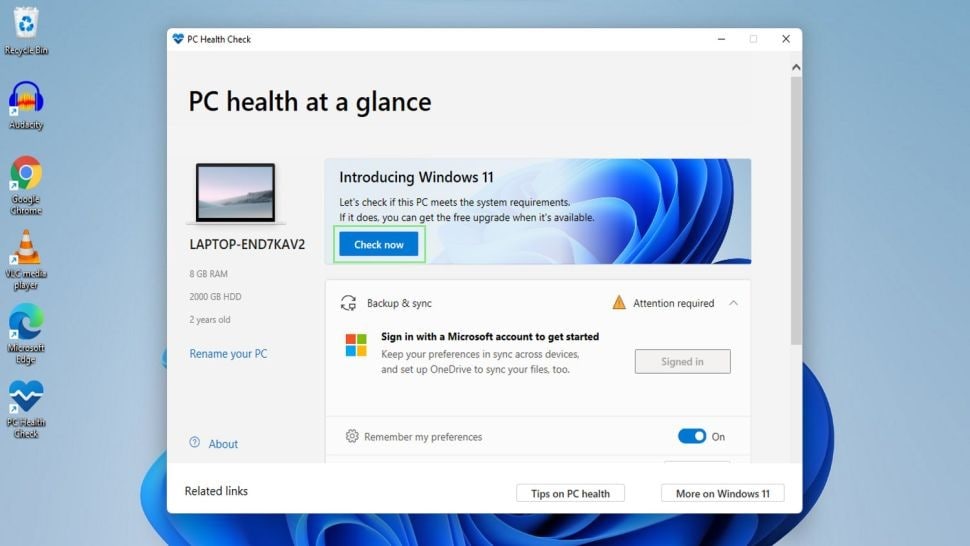
After that, the user shall have a glance at a new window stating, "PC Health Check." Click on "Check Now" under the title "Introducing Windows 11."
Step 3: Compatibility Report
The user is recommended to wait for a couple of minutes to get the results. After that, a window pops up, informing the user if the computer is compatible with Windows 11. Hit "Learn More" to have better insight into the results.

Part 3: How to Check and Enable TPM 2.0 on your Computer?
An international standard for protected encryption processors, the TPM chip is an abbreviation for Trusted Platform Module. The chip does a great job in securing the hardware through the integration of cryptographic keys. TPM chip is added to the Central Processing Unit (CPU) or integrated into the system's motherboard as a dedicated microcontroller.
Other than storing and managing passwords, the TPM technology encrypts hard disk partition and secures the integrity of the system device efficiently. It does not care what operating system is in use.
Checking TPM 2.0 on System
To check TPM 2.0 on your computer, follow the guidelines below.
Step 1: Launching the Run Command
For starters, press Windows+R from your keyboard. It will launch the Run command.

Step 2: Typing tpm.msc in the Command Window
After that, the user is directed to type tpm.msc in the command window. Hit the "OK" button afterward. You will be displayed with information if your computer has a TPM chip and is ready to use.

Enabling TPM 2.0 in the System
To enable TPM 2.0 in the system, the procedure is given below:
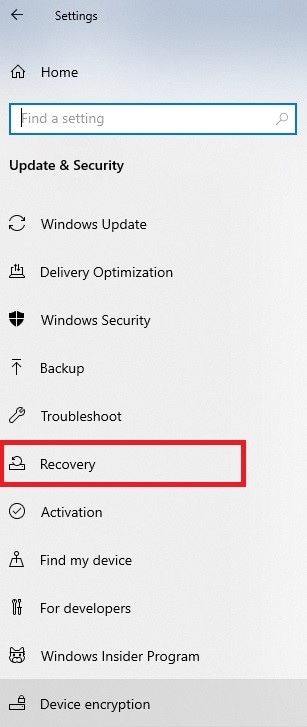
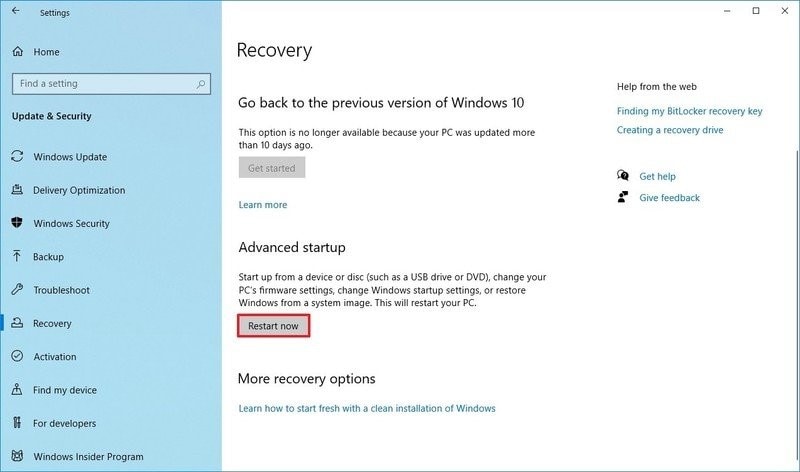
Step 1: Recovery of Update and Security System
For starters, you should navigate to the "Start" menu and launch "Settings." From the "Settings" that appear, hit "Update and Security." The left panel shows the "Recovery" option. Click on it.
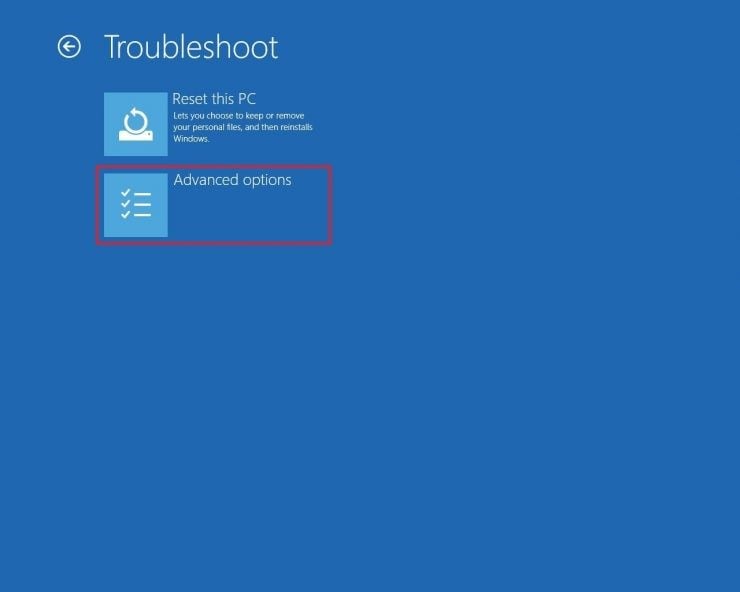
Step 2: Troubleshooting Process
The "Recovery" option shows the "Advanced Startup" headline. Tap "Restart Now" from there. A blue screen pops up. Choose "Troubleshoot." Hit "Advanced Options" afterward.
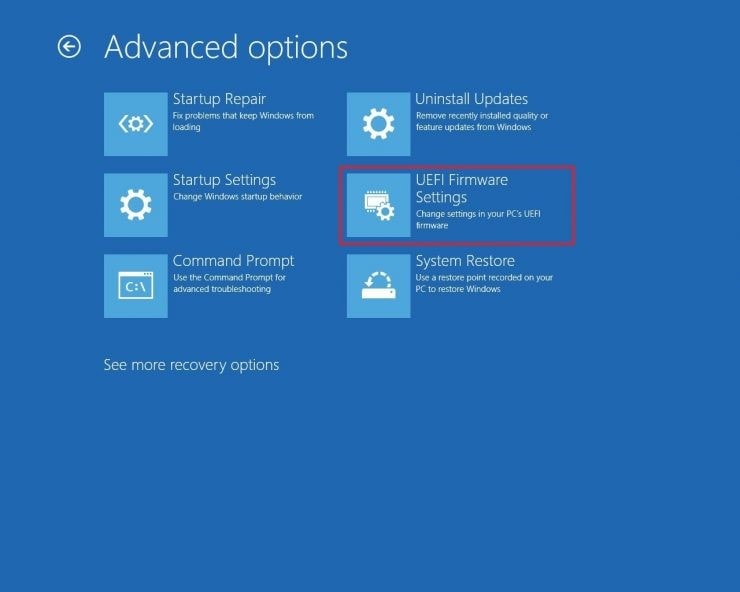
Step 3: Changing Firmware Settings
From the "Advanced Options," select "UEFI Firmware Settings" and tap on "Restart." Afterward, locate the "Security Settings."
Step 4: Enabling Process
Now choose the "Configuration" option from TPM Settings and enable it. After that, exit the Settings and restart your computer.

Part 4: How to Enable UEFI Secure Boot on a Supported Computer?
While staying on the Windows 11 upgrade, the users must know the need for UEFI Secure Boot. Without this, Windows 11 ceases to operate. A UEFI Secure Boot is a security feature that presents a secure environment to start Windows. Moreover, one can count on it to prevent malware from taking over the system while the boot process continues.
To enable the Secure Boot on a supported computer, follow the procedure below:
Step 1: Recovery Process
To begin, navigate to the system "Settings" and tap on "Update and Security." The left panel shows "Recovery." Click on it and choose "Restart Now" under "Advanced Startup."
Step 2: Restarting the UEFI Firmware Settings
After that, a list of options appears. Choose "Troubleshoot" from that and then hit "Advanced Options." Moving on, click on "UEFI Firmware Settings" and select "Restart."
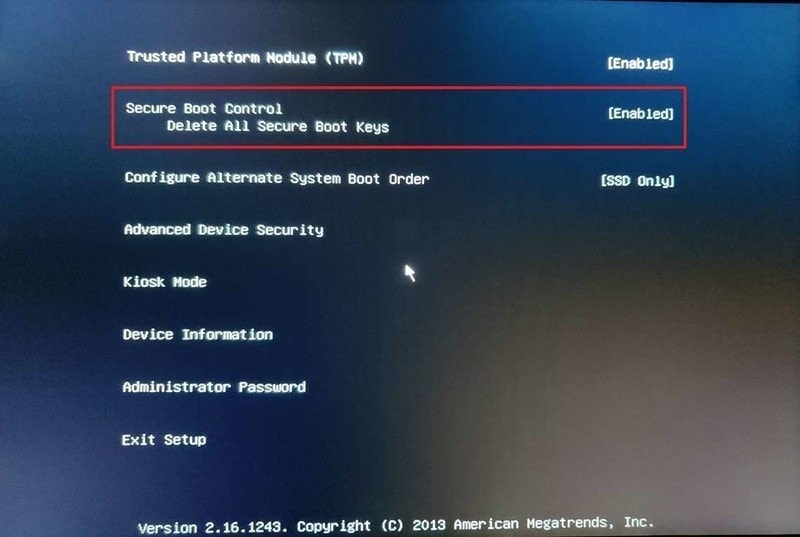
Step 3: Choosing the "Secure Boot" option
Now, launch the "Security Settings" page and choose the "Secure Boot" option. Tap "Enter" afterward. Choose the "Enabled" option and press "Enter."
Step 4: Enabling UEFI Secure Boot
Now, quit the UEFI Settings, and confirm the alterations. Restart your system after that.
Conclusion
Windows 11 upgrade is coming, and it has promised to bring more to the table compared to Windows 10. Before installing the upgrade, the user is suggested to undergo some checks to ensure that their operating system is compatible with the new update.
One can check and enable the TPM 2.0 in their system to set the stage and welcome the new traits of Windows 11 effectively. Moreover, do enable the UEFI Firmware Settings and avoid worrying about the compatibility of the system.


