
Although Windows 11 has not been officially released yet, a Beta version has been released. Those people who are members of the Windows Insider Program can download and install it. The Insider Preview build was full of risk, yet many people took the danger of checking the updated features. The risk was not worth it, and some people seemed disappointed.
While using Windows 11, people faced some issues and bugs. That is what made them upset. The issue in the taskbar could be seen while rearranging the icon of the application in the taskbar; it either minimizes it or else launches the app. It is also observed that users might be unable to type text and search from Start. There are many more issues noticed in Windows 11.
If you are upset from Windows 11 and you want to roll back to Windows 10, then the article below will provide you full assistance.

In this article
Part 1: Roll Back from Windows 11 to Windows 10 in Settings
After upgrading from Windows 10 to Windows 11, multiple issues have been spotted. Taking about the Widgets, it is possible that initially, the widget board might appear empty, but after singing out and singing in again, the problem can be resolved.
Although the features and updates are mind-blowing yet some things are causing trouble. For this very reason, people want to roll back to the old Operating System. If you are among those people, then the step by step guideline underneath will contribute by helping you roll back to Windows 10 using ‘Settings’:
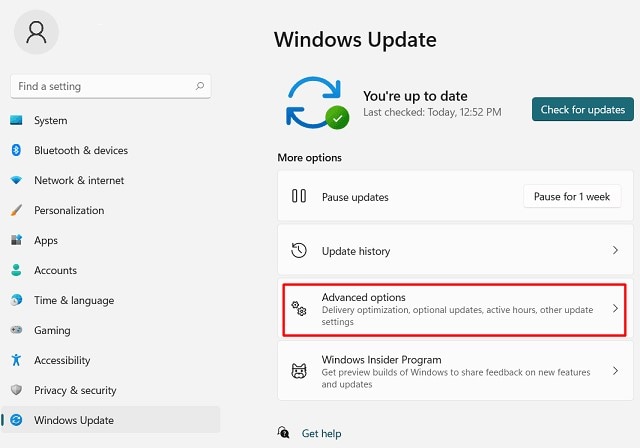
Step 1: Launching Settings
The first step for this process is to launch ‘Settings’ on your PC. That could be done by tapping on the windows icon in the taskbar and selecting 'Settings.' After the ‘Settings’ screen appears, go to the option of 'Update & Security' and select 'Windows Update.'

Step 2: Selection of Advanced Options
A list of options is given on the 'Windows Update' screen, and you are requested to tap on the option of 'Advanced Options.'
Step 3: Recovery Process
Once the ‘Advanced Options’ screen appears in front of you, click on the ‘Recovery’ button. After that, a list of recovery options will appear, and from that, you are suggested to tap on the ‘Go Back’ button.
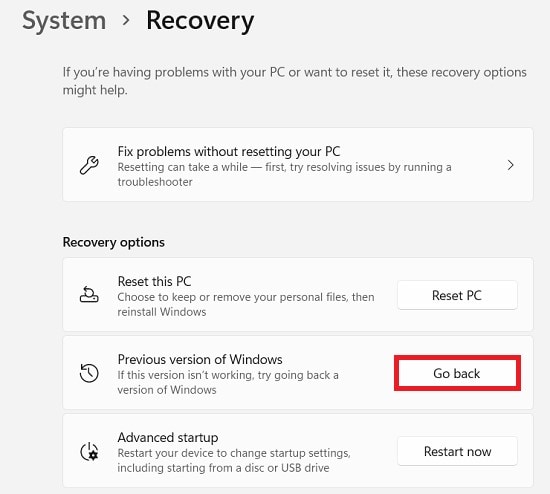
After this, the recovery process will start, and a message will be displayed on your computer’s screen as 'Getting Things Ready.'
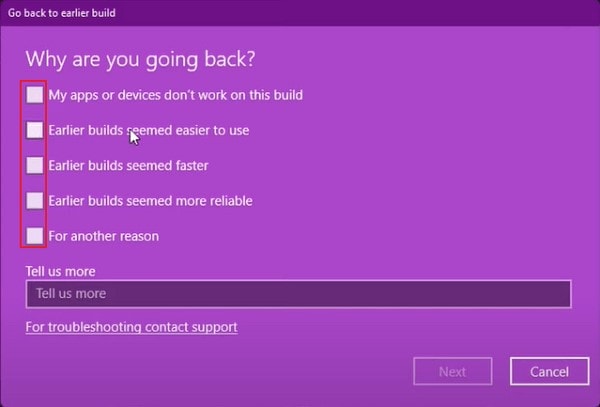
Step 4: Reason to downgrade
At this point, a screen will pop up with multiple reasons listed down. You are requested to select one or more reasons from the given options telling why you want to downgrade to the previous version and why you are uninstalling Windows 11. In the end, tap on the ‘Next’ button at the bottom of the screen to proceed.
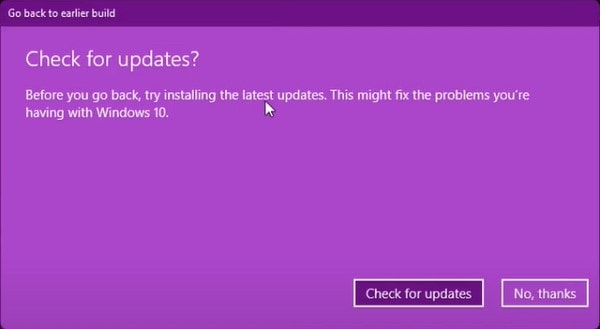
Step 5: Say ‘No’ to Updates
Once the reasoning has been completed, a screen will appear asking you to ‘Check for Updates?’. You can check the updates but simply tap on the 'No, thanks' button if you want to roll back.
Step 6: Rolling back to Windows 10
The process of a downgrade from Windows 11 to Windows 10 is just a screen away. Now a window will open up, and it will tell you the consequences of what will happen when you go back to Windows 10. Just click on the ‘Next’ button to move on to the next screen.

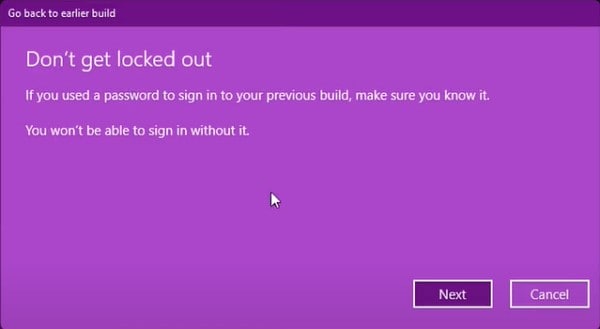
At this point, another screen will pop up with a warning message to recall your old password. Without hesitating, select the option to move on and click on the ‘Next’ button.
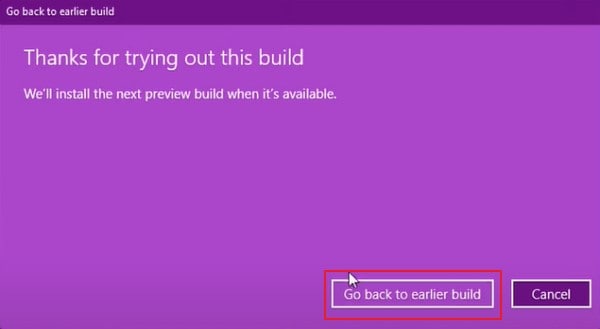
Step 7: Go back to the earlier build
After all the reasoning and warnings, a final window will show up. It will be asking you to confirm your decision, and by choosing the option of ‘Go back to earlier build,' you can do that.
After a restart and a restoration process of a few minutes, you will be downgraded to Windows 10 successfully.
Part 2: Do a Clean Installation of Windows 10
If you are unhappy with the performance and bugs of Windows 11, then the easiest thing to do is to step down to the older version. Downgrading from Windows 11 can be either done through Settings, which has been discussed in the above section, but if you don't want to take that path, there is another way.
Downloading and installing Windows 10 from the start can also be the solution to this problem. What if someone doesn't know how to install Windows? You do not have to worry about that because, in the coming section, we will share the steps to download and install Windows 10.
Step 1: Boot from an External Device
To install Windows 10 on your system, first of all, you should have an external device with Windows 10 installation files in it. Once that is ready, now you have to boot the device.
If you are using a DVD, then you will see the option to ‘press any key to boot from CD or DVD’ on the screen. Or else, if you are using a USB drive, then you will be asked to select between 32-bit or 64-bit Windows 10. After that’s done, the Windows logo will appear on the screen for some time.

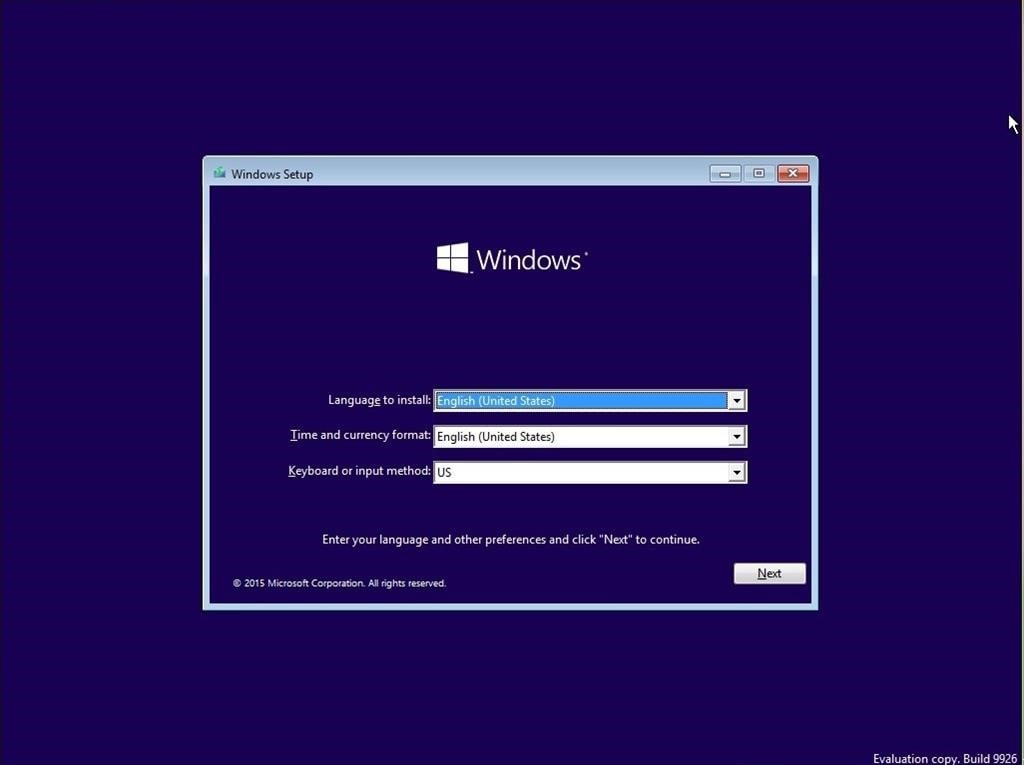
Step 2: Initiate the Installation
Now ‘Windows Setup’ screen will appear with a few questions for you. You are supposed to pick your preferred language to install Windows. Choose the correct time and also select the keyboard method. After completing this, click on the 'Next' button in the bottom right corner to proceed with the installation.
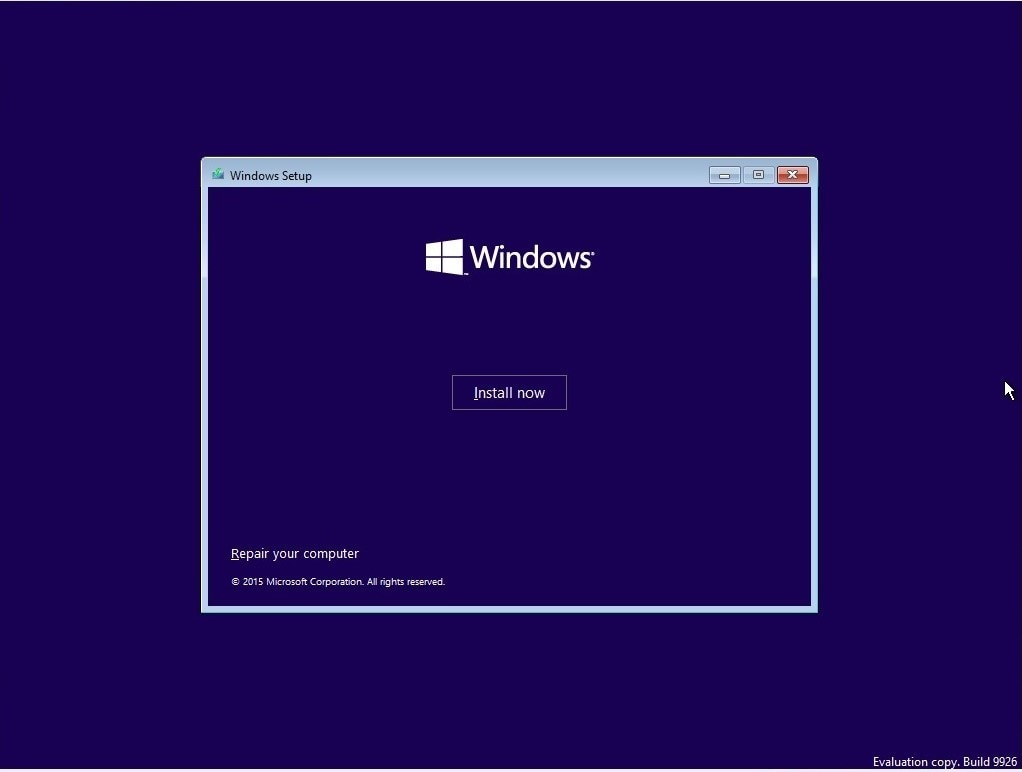
At this stage, a new screen will appear with a button in the center that says 'Install Now.' Simply press the button to start the installation.
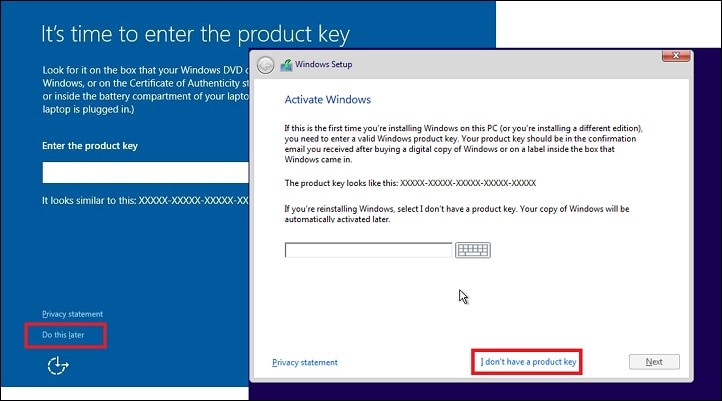
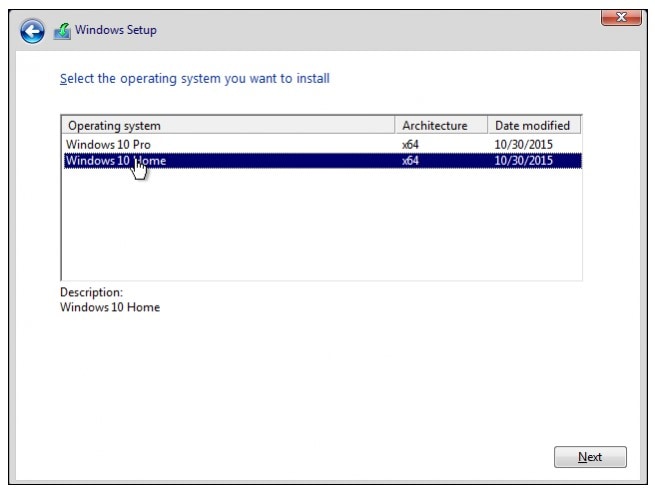
Step 3: Enter Product Key and Select Version
During the installation process, a Window might pop up a couple of times. That will be asking for a product key. You are requested to type in the product key for Windows 10.
Another thing that will be asked during the installation process is to choose the correct edition, for which you have the license. After choosing from Windows 10 Pro or Windows 10 Home, you should click on the ‘Next’ button to move on.
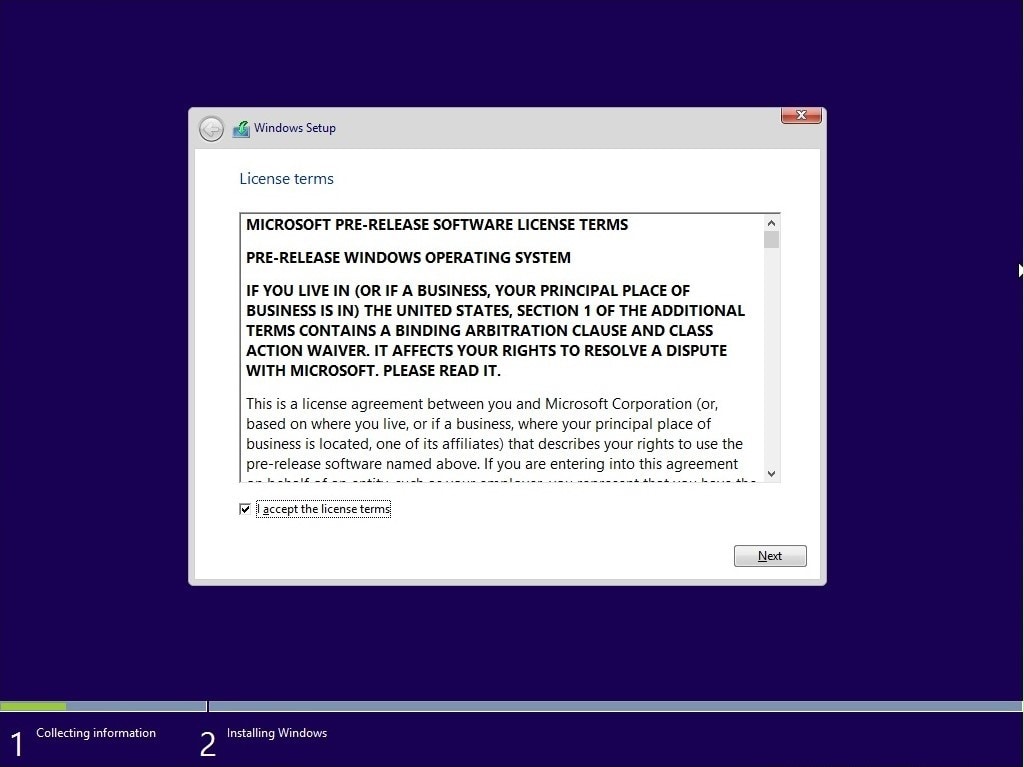
Step 4: License Agreement
A blank screen will appear as the setup is copying the files. At this point, there will be a message on the screen saying 'Setup is Starting.' As soon as that is completed, a screen will show up with 'License Terms.' You are requested to tick the box saying ‘I accept the license terms’ and then tap on the ‘Next’ button to continue.
Step 5: Choose Installation Type
Now, you will be asked to select the type of installation. A window will show 2 options, either to Upgrade or else, to Install Windows. You have to select the option of 'Custom: Windows Install only (advanced).'

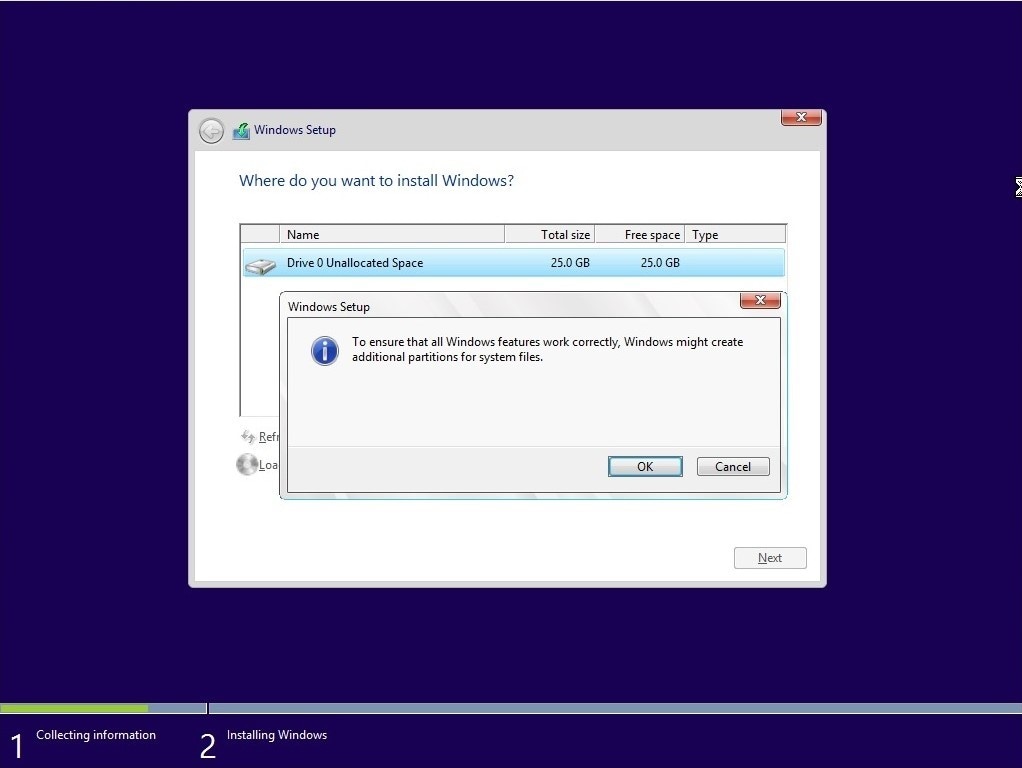
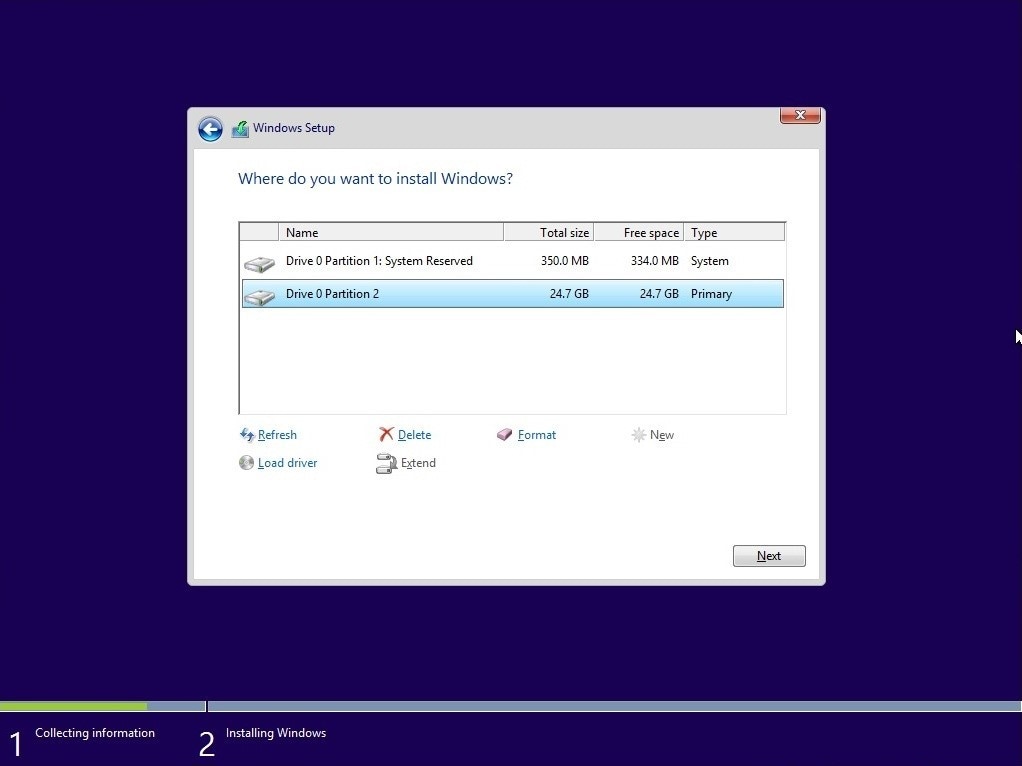
Step 6: Location to Install Windows
After selecting the type of installation, now it’s time to select the drive where you want to install the Windows. You should pick the unallocated drive from the list and then click on the 'New' button. After that, tap on the 'Apply' button, and to confirm and complete this, lastly click on the ‘Ok’ button.
This whole process will split the drive into numerous partitions. Among those split sections, you have to choose the ‘Primary’ partition. Once you have done that, tap on the ‘Next’ button to go ahead.
Step 7: Final Restart and Reboot
After you have completely followed the above-mentioned steps, wait for some time while the Windows install. Once the installation phase is complete, the Windows will spontaneously restart and then automatically reboot into the setup.

Patiently wait for this to complete as Windows is detecting and installing your hardware. As soon as this is complete, the Windows will restart for the last time, and your wait will be over then.

More Related:
Backup And Restore Files on Windows
Backup Only Changed Files in Windows
Bottom Line
People always hesitate when it comes to Windows installation, but after reading this article, you will never worry about installing Windows because the steps for installation have been discussed. Also, if you are not satisfied with Windows 11, don't worry because you can still use Windows 10.
Two different methods have been shared for your convenience. Users can downgrade from Windows 11 or else can do a clean installation of Windows 10. Users can go either way.
 ChatGPT
 Perplexity
 Google AI Mode
 Grok
Grok


