
 TL;DR:
You can resolve the Windows 10 and 11 ntoskrnl.exe BSOD or high CPU usage errors by updating device drivers, repairing corrupt system files via command line tools, resetting BIOS overclocking, and testing physical hardware memory.
● Run the sfc /scannow and chkdsk C: /f /r /x commands within an Administrator Command Prompt to automatically detect and repair corrupt Windows system files or drive data errors causing the kernel crash.
● Launch the Windows Memory Diagnostic tool by executing mdsched.exe to test for faulty RAM, and enter your BIOS setup during system restart to revert any hardware overclocking by pressing F9 to load factory defaults.
● If the BSOD prevents your system from booting, you must install Wondershare Recoverit on a separate, functional computer to create a bootable USB drive that allows you to bypass the crash and extract your files.
Ask AI for a summary
 ChatGPT
 Perplexity
 Gemini
 Claude
 Grok
Grok

There are varying reports of Blue Screen of Death by Windows 10 users. One of the major causes of this issue on your PC is the ntoskrnl.exe program. This bug check issue indicates that Microsoft Windows or a kernel mode driver that was accessed paged memory at the DISPATCH_LEVEL or higher.
Wondering what ntoskrnl.exe is? We’ll be getting into all of that in this article. We’ll also explore what might be causing the issue and the best fixes for you to explore.
In this article
Part 1. What Is Ntoskrnl.exe?

The ntoskrnl.exe process is quite safe. Unlike speculations, it isn’t a virus or malware. However, your Windows PC cannot function without this system process. Ntoskrnl Windows 10 process is a system function called the Windows NT Operating system Kernel Executable. It is a crucial part of your system, and that’s why issues arising from it are so severe.
However, you should note that it is entirely safe and cannot harm your computer. As an official Microsoft process, the Ntoskrnl.exe process is required by your operating system to run. This process is related to a kernel, a piece of software connecting hardware and software.
This kernel gives your GPU and CPU instructions to carry out actions when you’re on your PC. The executive layers of the Microsoft Windows NT kernel area and the kernel are provided by the Ntoskrnl.exe function.
Is Ntoskrnl.exe Safe, and Can You Delete It?
Many Windows services rely on this kernel to function efficiently. Some of them include the process of accessing PC hardware and the management of memory. This makes it safe for your PC, especially as an official Microsoft process.
Since it is causing issues, you might be considering deleting it. Unfortunately, you cannot delete this system process, even when it is the main cause of issues on your PC. Deleting it might cause your PC to crash, so it is best to avoid that.
2 Common Issues Caused by Ntoskrnl.exe
Although many issues could result from the Ntoskrnl crash, two stand out. However, the most common options are:
- ntoskrnl.exe blue screen
- ntoskrnl.exe high CPU/disk usage.
Many processes could result in any of these errors and when they occur, refer to this article for fixes you can try to eliminate the process.
Part 2. What Causes Ntoskrnl.exe Blue Screen of Death (BSOD) Error?

When your system faces a serious issue, it tends to resort to the blue screen of death (BSOD) error. Unfortunately, this error is common, especially when your PC receives a STOP code and needs to reboot. Unfortunately, every blue screen error comes with a code, and there are unavoidable times that it includes the ntoskrnl.exe file as a reference.
We can’t point to one main cause of this issue as it could be hardware or software-related. However, below are possible causes that could result in the ntoskrnl blue screen Windows 11 error.
- Outdated, incompatible, or corrupt device drivers could cause this error
- A faulty RAM
- Overclocked devices
- Inadequate local storage and RAM space for the various activities on your PC
- Corrupt system files
If any of these results in the ntoskrnl blue screen Windows 10 or 11 error, you don’t have to spend a dime on repairs. Check out our solutions to fix blue screen errors related to the ntoskrnl.exe process.
Part 3. What Causes Ntoskrnl.exe High CPU or Disk Usage Error?

Unfortunately, there’s no exact reason why the ntoskrnl.exe process might experience excessive CPU or disk usage errors. Furthermore, the cause of this issue often changes from one PC to the next. This is because ntoskrnl.exe is responsible for many Windows system operations. Therefore, it ensures the success of many system actions as well.
Therefore, another Windows application, service, or even a damaged system file could result in the ntoskrnl.exe system process causing a high CPU usage error.
Part 4. How To Fix ntoskrnl.exe High CPU or Disk Usage Error
Like the reason behind this error, there are a few fixes you can explore to tackle the issue. You sometimes have to seek external help to fix the issue. Try to update your device drivers to see if it is responsible for the high CPU or disk usage.
Another tried and true method you can explore to eliminate the High CPU or disk usage errors resulting from the ntoskrnl.exe system process can be found in this comprehensive video tutorial to learn all the steps involved. Again, you can check it out to learn all the steps involved.
For Windows XP/Vista/7/8/10/11
For macOS X 10.10 or later
Part 5. How To Fix ntoskrnl.exe BSOD Error
We’ve seen the possible causes of the blue screen of death error associated with the ntoskrnl.exe system process. Now, let’s check out the possible solutions to this issue when it arises on your PC.
Fix 1: Update Your Driver
Updating the device drivers is an excellent way to resolve many issues that arise in the computer, like the blue screen of death caused by the ntoskrnl.exe file. In addition, it will improve your PC’s overall performance while eliminating the high CPU consumption in the process. To update your device drivers automatically or manually, follow the steps below.
Step 1. You should access the start menu by clicking the Windows symbol on your screen to get started. Afterward, search for device manager and select it when it pops up. Alternatively, you can press Windows + I simultaneously and select Update & Security from the available options.

Step 2. When the new windows pop up, go to the Windows update section and click ‘view optional updates’ to proceed.

Step 3. When you expand the driver updates section, you can easily see the drivers that need to be updated. Right-click on a driver that needs updating and hit the update drivers button.

Step 4. Next, Windows will ask you to choose how you want to update your driver. You can now choose whether to update the drivers or automatically manually. In this article, we’ll choose the automatic option to allow Windows to find and update new driver files on your PC.

Fix 2: Run the Windows Memory Diagnostic
The Windows Memory Diagnostic is an in-built Windows utility that comes in handy when locating and fixing system memory issues. This tool effectively tests your RAM and informs you if any arising issues interfere with the operation. Follow the detailed steps below to run the Windows Memory Diagnostic tool when trying to fix the ntoskrnl Windows 11/10 error.
Step 1. First, press the Windows + R keys on your PC keyboard simultaneously to open the run utility.
Step 2. Once it pops up, type in mdsched.exe and then hit the OK button to proceed.

Step 3. On the Windows that appears, select 'restart now and check the problems (recommended)' to kickstart a memory scan. Before doing this, ensure you save all files on your PC and close open applications.

Step 4. Alternatively, you can choose ‘check for problems the next time I restart my computer.’ This option allows you to restart your PC and a more convenient time.
Step 5. Once you select one of these options, the Windows Memory Diagnostic tool will launch and test your PC for memory problems.

Step 6. The scanning process might take a few minutes, so be patient until it completes the process and displays the result.

If the tool finds no fault in displaying, the computer’s memory is in good condition and functioning excellently. If that is the case, you need to move on to another fix on the list.
Fix 3: Reset the Overclocking Settings
Sometimes the issue resulting in the ntoskrnl exe error is an overclocked CPU or GPU. You must reset your settings and run your PC on default if that is the case. Although overclocking can improve the hardware’s overall performance, it could also result in severe issues. Sometimes, it causes the ntoskrnl.exe to consume too many resources.
There are different overclocking methods and applications, and they usually determine the right steps to reset your hardware. If you have a trusted program to alter the overlock in BIOS, you should utilize it. However, another simple way to reset the overlocking setting to the factory default state is through these settings.
Step 1. To open the Bios Setup utility screen, press F2 or delete while your computer’s splash screen is still visible when you restart it.

Step 2. Afterward, load the factory default setting automatically by pressing the F9 key.

Step 3. The PC will ask you to confirm the new changes, press ‘enter’ to proceed.

Step 4. Next, press F10 to save your new changes and exit the BIOS Setup utility screen.

Fix 4: Run SFC Scan to Detect and Repair Corrupt System Files
Corrupt system files on your PC could result in many issues, including the BSOD, due to the ntoskrnl crash. Therefore, if some crucial files were tampered with or damaged, you must repair them to eliminate the issue. One effective method to do this is with the SFC Scan, which detects and replaces damaged system files you might have. Below are the steps you should follow.
Step 1. Open the search bar in the taskbar by tapping the magnifying glass icon. You can also utilize the Windows + s keyboard shortcut to access the search tool.
Step 2. In the space provided, type in the command prompt, and when it pops up, right-click on it and choose ‘run as administrator’ to proceed.

Step 3. When the command prompt launches, type in the command ‘sfc/scannow’ and then proceed to press ‘enter’ to execute the command.

The System File Checker (SFC) scan will begin scanning your computer. If there are issues, it will immediately restore system files and fix the related issues.
Fix 5: Run CHKDSK Command to Repair Corrupt Data
If the SFC scan doesn’t fix the issue, then you can also run the Check Disk command to fix the issue and eliminate the ntoskrnl BSOD error. The CHKDSK command allows the PC to search and try to fix disk issues. This could solve your problem; follow the steps below to proceed.
Step 1. First, open the search bar by clicking the magnifying glass icon on the taskbar or press the Windows + s button simultaneously.
Step 2. When the search bar appears, type in the command prompt in the bar provided and run as administrator when it appears.
Step 3. On the command prompt, enter the command ’chkdisk C: /f /r /x.’

Step 4. This command will cause your PC to check the C: drive for errors. If you installed Windows on a separate drive, you should modify the command to reflect the right drive.
Step 5. Wait for the CHKDSK command to run completely, which will fix the ntoskrnl drive issues. It will also recover readable information that was lost.
Step 6. After running this command, restart your device to save the new updates.
Fix 6: Check Your Computer for Viruses and Malware
We also recommend checking your computer for malware and virus to ensure no infection harming your PC or imitating the ntoskrnl.exe process. You can simply use the in-built Windows Defender application if you don’t have antivirus software. This tool is free for Windows and will effectively scan your device. Follow the steps below to check for viruses using Windows Defender.
Step 1. First, open the search bar on your taskbar and type on windows security.

Step 2. When it appears, launch it to proceed.
Step 3. Select the virus & threat protection tab on the window that appears.

Step 4. Next, click the scan options link provided.

Step 5. Choose the full scan option to continue; this will cause the tool to check every file on your driver for the presence of threats. The scan length depends on how many files you have on the PC.

Step 6. Next, choose the scan now option to start the scan. During the scan, Windows will quarantine or remove any threat. You can also view the scan result once the scan is complete.

Fix 7: Install Windows Updates
You can also try installing a Windows update when trying to fix the ntoskrnl blue screen Windows 11/10 error. Updating the operating system can help you fix the issue. The steps below cover installing Windows updates for Windows 8, 10, and 11.
Step 1. First, click the Windows icon on the left corner of the Windows screen to open the start menu. Then, from the available options, click settings.
Step 2. When the settings window opens, select the update & security tile to proceed. You can find most windows update settings in this location and choose when you would like to receive updates.
Step 3. Stay on the default windows update tab and select check for updates. Then, wait for Windows to find the available updates.

Step 4. If any updates are available, click the ‘view all optional updates’ button to view and install the new updates.

Step 5. When the new updates appear, click ‘install’ and wait for your PC to download and install the updates. This could fix the ntoskrnl crash issue you’re experiencing.
Fix 8: Perform a System Restore
When you perform a system restore, it will take your operating system back to when there were no issues like the ntoskrnl blue screen Windows 10 error. Therefore, this is a great option for eliminating the issue. Follow the steps to get it done.
Step 1. Press the Windows + I keyboard buttons together to launch your settings.
Step 2. On the settings window, click about to proceed and then select ‘system protection.’

Step 3. On the system protection window, select ‘system restore’ to continue.
Step 4. The System Restore window will appear; click ‘next’ and choose a restore point.

Step 5. Now, follow the instructions from the onscreen wizard to finish the system restore process.
Fix 9: Check Your Hardware
If you have a failing Solid State Drive (SSD) or a failing RAM module, it could cause the ntoskrnl.exe issue. Therefore, you should replace the hard sticks to see if that will fix the issue. If you have two RAM slots, a great idea would be to remove both sticks, clean the slot, and reinsert them one after the other. Check to see if inserting one fixes the issue; if it doesn’t, insert the other stick and check again. Alternatively, you can try reinstalling your Windows OS if it is installed in an SSD.
More Related: How to Fix Windows Black Screen With Cursor?
Part 6. How to Access and Backup Data When the ntoskrnl.exe Blue Screen Error Occurs
It can be devastating if you lose data due to the blue screen of death error caused by the ntoskrnl.exe file. However, there’s no need to panic as the Wondershare Recoverit System Crash Computer recovery feature helps you get your data back within minutes. This tool can recover over 1000 file types and formats from different storage media.
You can watch the video tutorial or follow the simple steps below to get data back from ntoskrnl.exe BSOD.
For Windows XP/Vista/7/8/10/11
For macOS X 10.10 or later
Step 1: Select System Crashed Computer Mode
Download and install Recoverit data recovery software on a working PC. Then, launch it and select System Crashed Computer from the navigation panel.
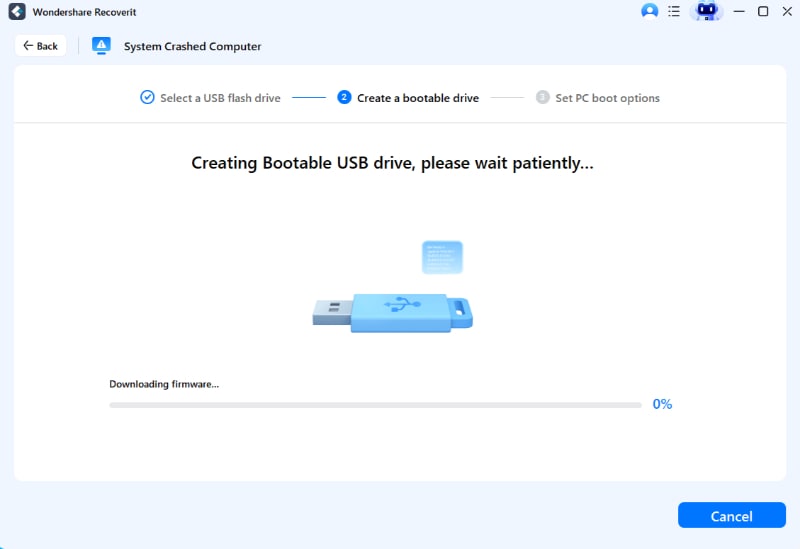
Step 2: Create a Bootable USB
You need to create a bootable media using a blank USB drive. This bootable media helps you start your PC when experiencing the ntoskrnl BSOD error.
- Download and install Recoverit data recovery software on a working PC.
- Connect a blank USB drive to the computer with Recoverit installed.
- Launch Recoverit and select System Crashed Computer from the navigation panel.

- On the next screen, select the connected USB drive and hit Create to begin. Note that when you choose to create the bootable drive, a message about formatting the drive will pop up; click Format.

- Then, Recoverit will start creating the bootable media. Just wait for a while.
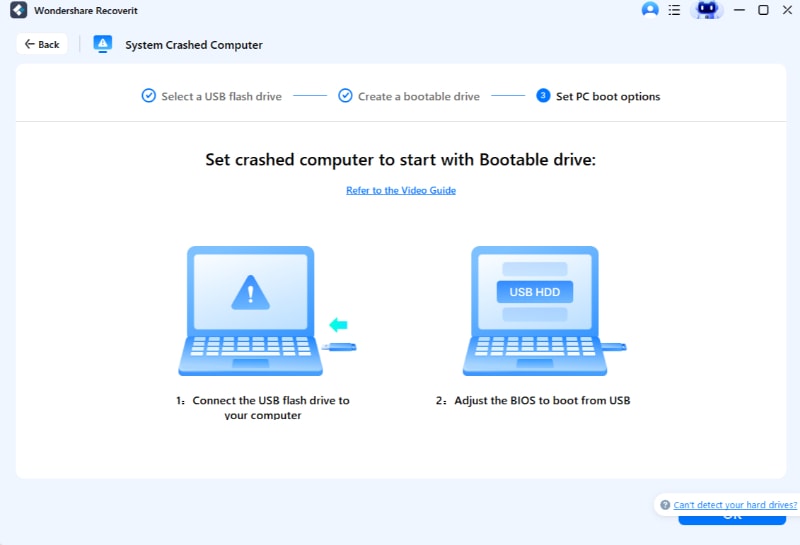
Step 3: Boot Crashed Computer From USB
- With your bootable USB ready, connect it to the crashed computer and restart it.
- Press the BIOS entry key when the first screen appears and choose to boot from the USB drive instead.
Step 4: Recover Data From ntoskrnl.exe BSOD
- Once the crashed computer finishes booting from the bootable USB drive, you are able to copy data from the computer experiencing exe BSOD error to a safe external hard drive.

For Windows XP/Vista/7/8/10/11
For macOS X 10.10 or later
The Bottom Line
There are many reasons why the ntoskrnl.exe error may occur, resulting in high CPU consumption or the blue screen of death. Luckily one of the fixes shared above will fix the issue for you. However, note that some of these methods could result in data loss. In such cases, a professional data recovery tool like Wondershare Recoverit can help you boot and recover the lost data from the crashed computer.


