

File loss is a common challenge for many Mac users. Isn’t it? Whether it’s an important work document, treasured photos, or vital spreadsheets, data can disappear unexpectedly. Thankfully, Mac provides several auto recovery options that help protect against such situations and reduce the risk of permanent loss.
With the advancement of modern technology, recovering files has become more accessible. Built-in tools and intelligent recovery features allow Mac users to restore accidentally deleted or lost data with ease. Familiarizing yourself with these methods can make a significant difference during urgent scenarios.

Every Mac user benefits from being prepared for unexpected data loss. From accidental deletions to system crashes, understanding auto recover Mac techniques can save time, prevent stress, and avoid interruptions in your work.
Try Recoverit to Auto Recover Mac Files
![]() Security Verified. Over 7,302,189 people have downloaded it.
Security Verified. Over 7,302,189 people have downloaded it.
In this article
Part 1: Is Auto Recovery Mac Possible?
Microsoft offers robust auto recovery features for Mac users, making file recovery more accessible than ever. Word and Excel have built-in mechanisms to help protect your work from unexpected interruptions.
Mac users can leverage Microsoft's auto recovery options seamlessly. These features are designed to minimize data loss and provide peace of mind during critical work sessions. The auto recovery system works silently in the background.
Whether you're using Microsoft Office on Mac or working with various applications, auto recovery methods can be your first line of defense against data loss. Understanding these techniques is crucial for maintaining your digital workspace.
Part 2: Simple Methods to Auto Recover Mac Files
When it comes to recovering lost files on your Mac, simplicity can often be the key to success. Part 2 explores straightforward methods that every Mac user can utilize to retrieve their data efficiently. These user-friendly techniques are designed to ensure that even without advanced tools, you can regain access to important files quickly and with minimal effort.
By mastering these simple approaches, you can confidently handle unexpected data loss and keep your digital content secure.
Method 1: Use the Undo Command
The Undo command is one of the quickest and easiest auto recover methods available on Mac. With just a click or a keyboard shortcut, you can reverse recent actions and restore accidentally deleted content. This feature is especially useful for correcting mistakes instantly without needing advanced recovery tools.
By using the Undo command, Mac users can tackle small errors efficiently. Whether it's recovering a mistakenly deleted file or undoing a change in a document, this straightforward method offers immediate results. It's a reliable first step in managing unexpected situations with minimal effort.
How it helps:
- Reverses recent actions instantly
- Works across multiple applications
- No technical skills required
Steps to use the undo command:
- Press Command + Z simultaneously.

- Repeat if multiple actions need reversal
Method 2: Check Trash Bin
The Trash Bin is the simplest and quickest way to recover recently deleted files on a Mac. When you delete a file, it isn't removed permanently right away; instead, it moves to the Trash Bin. This temporary storage allows you to locate and restore files effortlessly if you act before they are permanently erased. It's a reliable first step for file recovery.
By regularly checking the Trash Bin, you can recover important files without the need for additional tools or software. Simply open the Trash Bin, locate your file, and restore it with a few clicks. This straightforward process ensures that accidental deletions are easy to fix with minimal hassle.
How it helps:
- Stores recently deleted files
- Easy visual recovery process
- Temporary storage before permanent deletion
Steps to check the trash bin:
- Open Trash Bin from Dock.

- Select and restore desired files
Method 3: Use the Time Machine Backup
Time Machine is an effective, built-in recovery tool available for Mac users. It automatically creates backups of your data, including files, system settings, and apps, allowing you to restore them when needed. Its simple setup and user-friendly interface make it easy to safeguard your content effortlessly.
This tool runs regular backups and stores them on external drives, ensuring your data remains secure even in unexpected situations. If you accidentally delete a file or need to recover an earlier version, Time Machine lets you browse through saved snapshots and retrieve items quickly. It's a reliable solution for maintaining data protection.
How it helps:
- Automatic hourly backups
- Comprehensive file and system recovery
- Seamless integration with Mac systems
Steps to use time machine backup:
- Connect Time Machine backup drive.
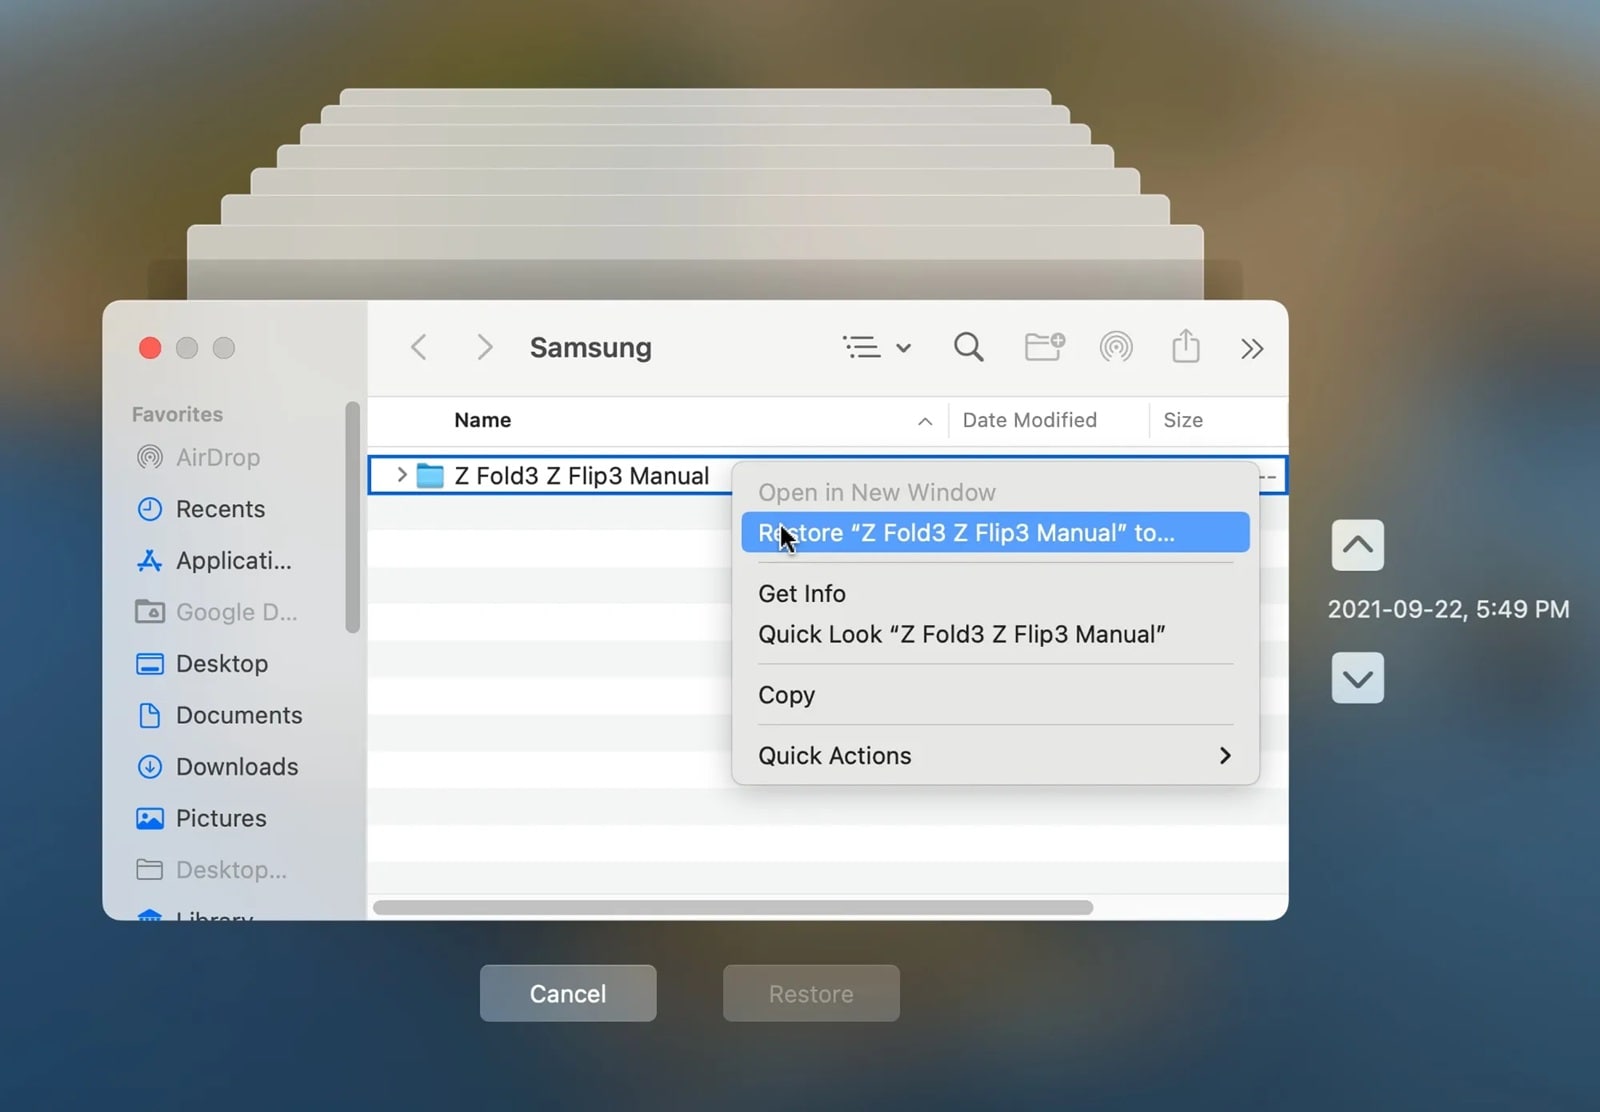
- Navigate through backup versions to recover files. Hit Restore.
Method 4: Use iCloud Drive
iCloud Drive is a reliable cloud-based solution that ensures automatic file protection for Mac users. It syncs your files across all Apple devices, keeping them updated and accessible from anywhere. This feature minimizes the risk of data loss by storing your important documents securely in the cloud.
With iCloud Drive, files are automatically backed up without any manual effort. Even if your Mac is lost or damaged, you can easily access your data from another device. It’s a convenient and efficient way to protect your files and ensure they are always within reach.
How it helps:
- Automatic cloud syncing
- Access files from multiple devices
- Protects against local device failures
Steps to use icloud drive:
- Check iCloud Drive settings.
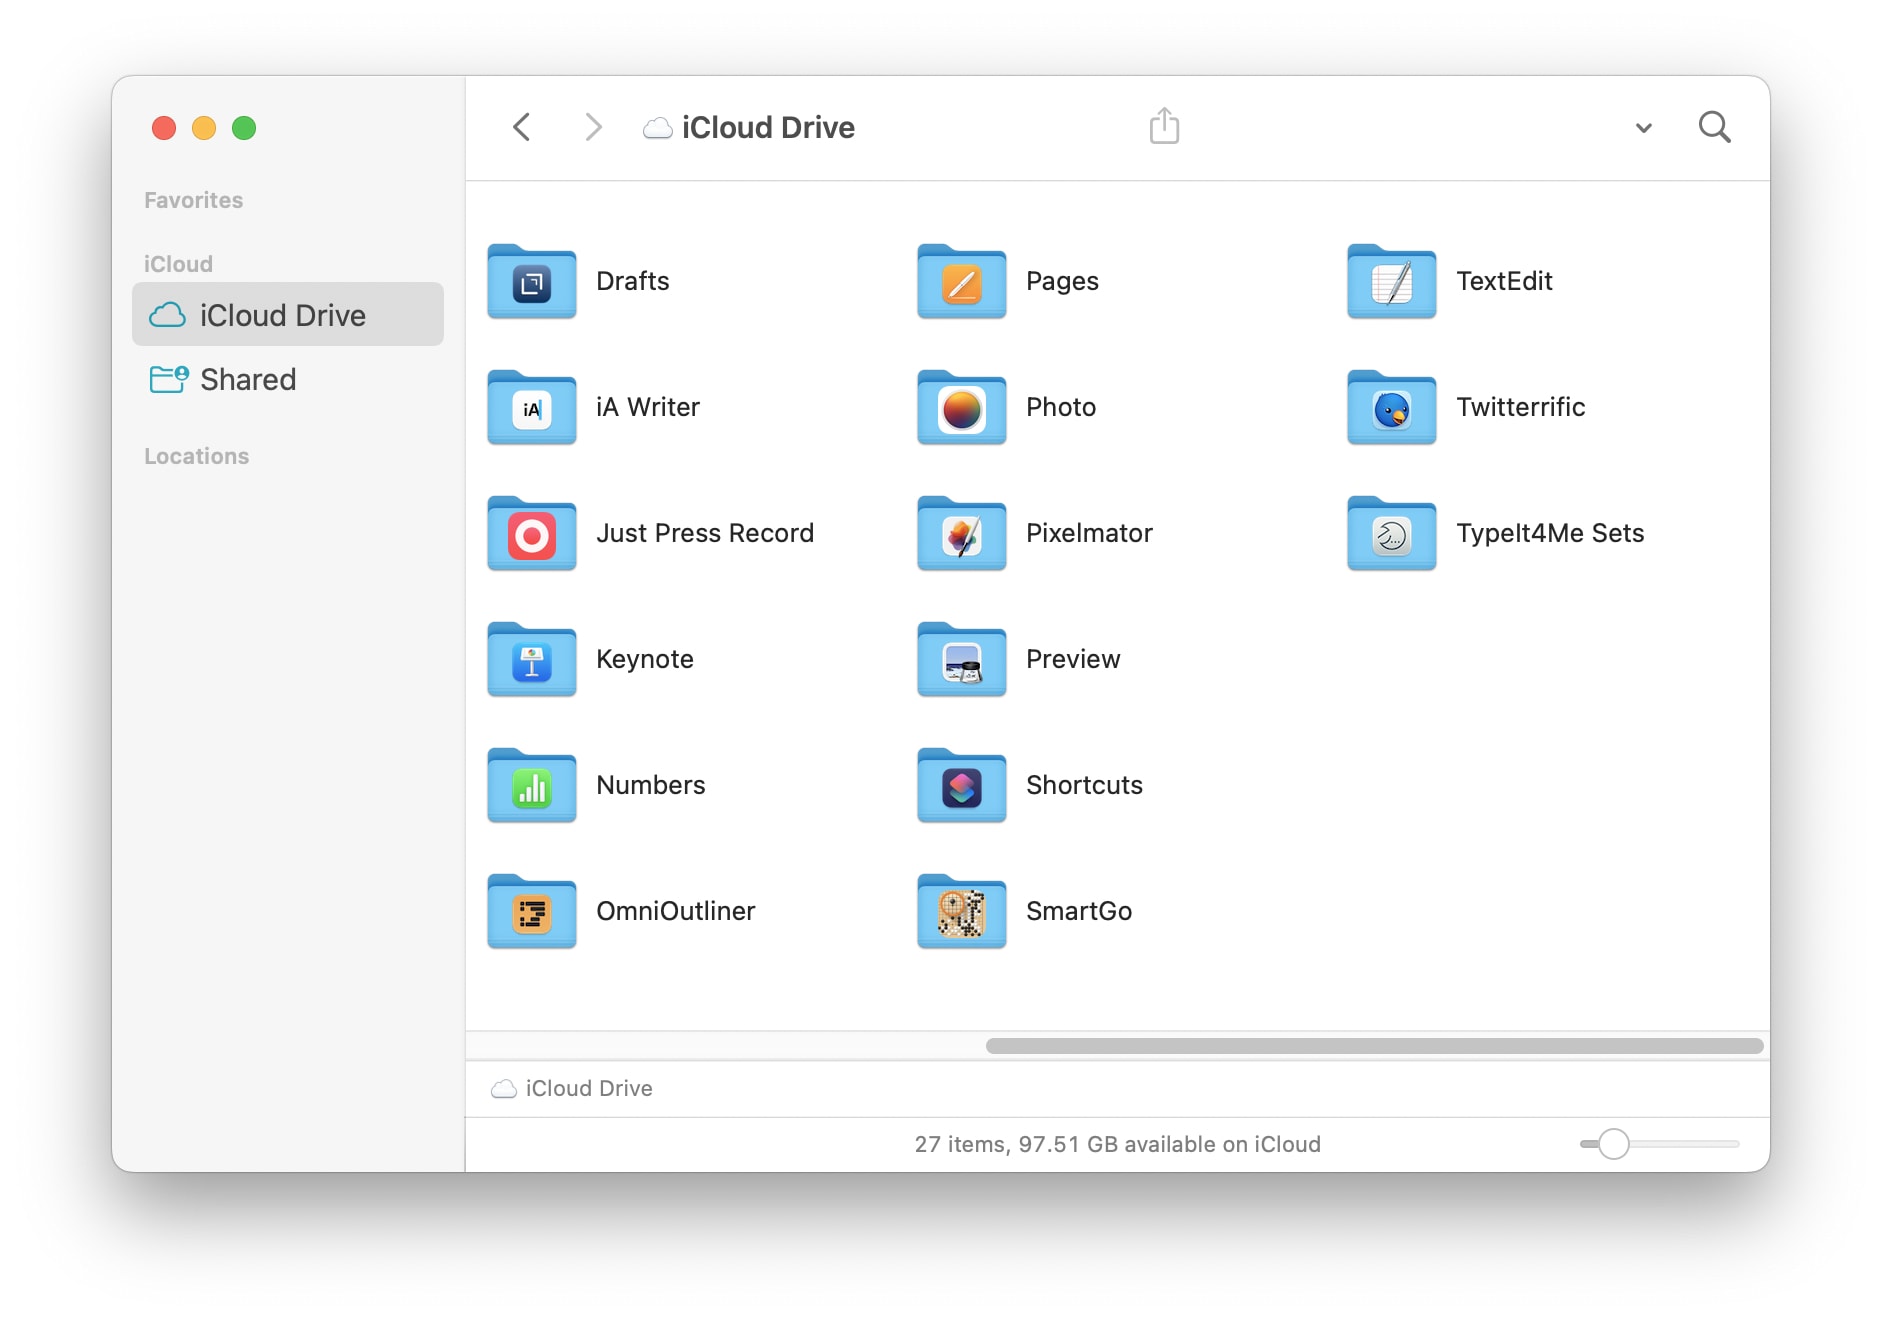
- Restore files from cloud storage
Method 5: Try Auto-Save/Recovery in Apps
Many Mac applications come with built-in auto-save features that protect your progress automatically. These tools ensure that changes to your documents are saved regularly, reducing the risk of losing work due to sudden shutdowns or errors. Auto-save is a simple yet effective method to keep your content secure.
Additionally, these applications often include recovery options that allow you to retrieve unsaved changes after unexpected interruptions. Whether it's recovering drafts or restoring recent edits, these features provide peace of mind and make file management easier for Mac users.
How it helps:
- Automatic document saving
- Prevents complete data loss
- Minimal user intervention required
Steps to try Auto-Save in Apps:
- Check application preferences.
- Enable auto-save and recovery options
Part 3: Unable to Recover Files with Auto Recover Mac? Try Recoverit Auto Recover
Recoverit is a highly effective file recovery tool tailored for Mac users. It is designed to retrieve files that standard Mac methods cannot recover. Whether the issue is accidental deletion, formatting errors, or system crashes, Recoverit offers a reliable way to restore lost data.
This software provides advanced scanning options, allowing it to locate and recover files from various storage devices. Its user-friendly interface ensures that even individuals without technical expertise can navigate it with ease. Recoverit supports a wide range of file types, making it a versatile solution for different recovery needs.
When built-in Mac recovery methods fall short, Recoverit steps in as the ultimate rescue tool. It offers powerful recovery capabilities and ensures that important documents, photos, and other files are not lost forever. In critical situations, it becomes an essential tool.
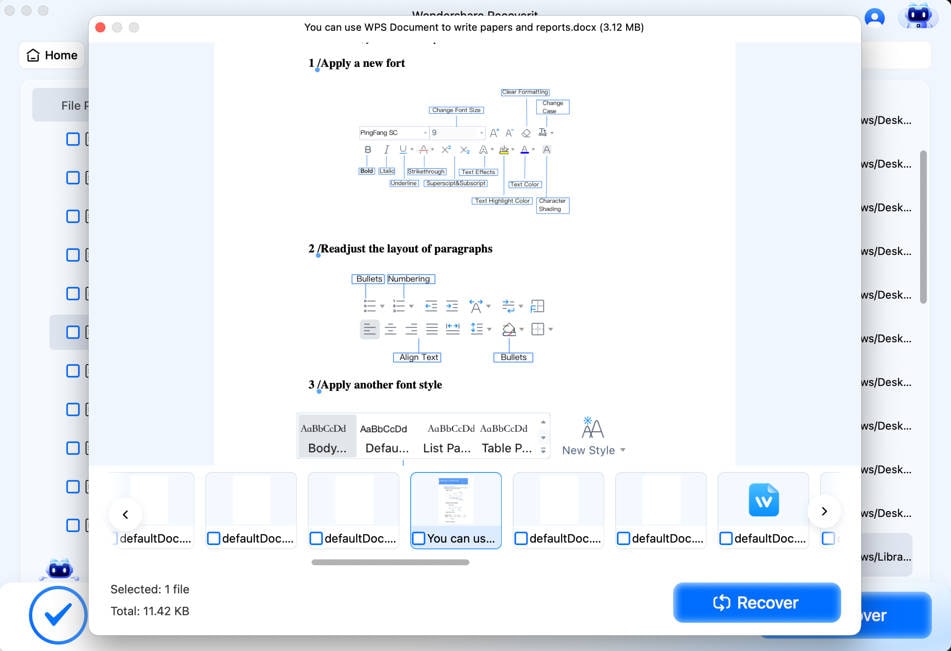
Recovery steps with Recoverit:
- Download and install the Recoverit application. Select the location of lost files.

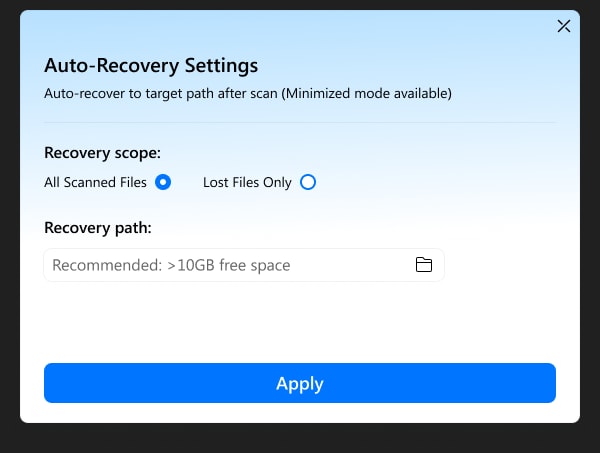
- Wait for the scanning process. If you don't want to wait for scanning, you can click the A icon to set automatic recovery (in which you can set recovery scope and recovery path). After the scanning is completed, the target files will be recovered automatically. It will save you time and energy.
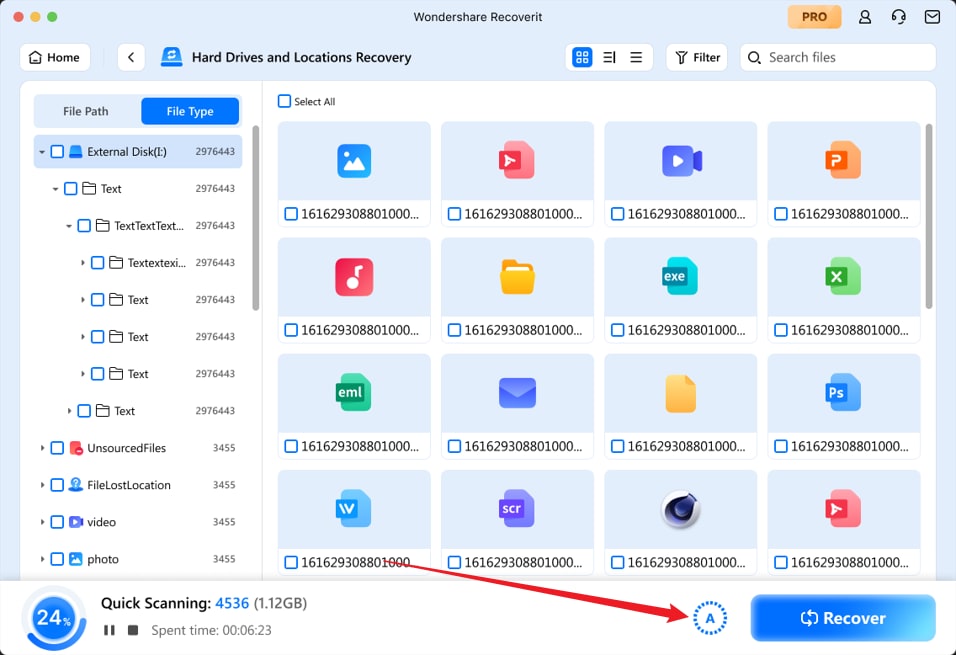
- Preview and recover your precious data.
Related Video >>: How to Recover Files on Mac?
Part 4: Tips for Auto Recovery Word and Excel
Here are some helpful tips for auto recovery in Word and Excel:
- Enable AutoSave: Turn on AutoSave to ensure your changes are saved continuously in both Word and Excel. This feature is especially useful for cloud-synced files stored in OneDrive or SharePoint.
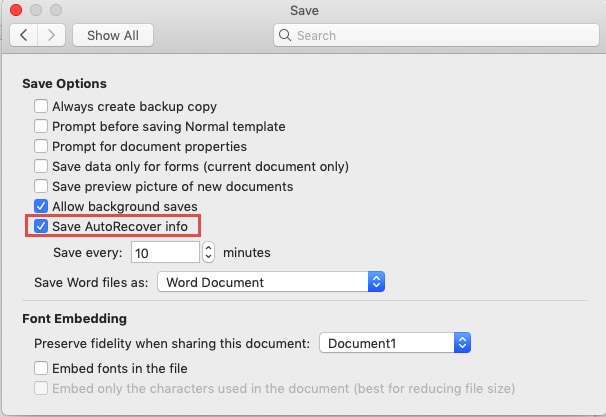
- Check AutoRecover Files: After unexpected shutdowns, look for AutoRecover files. These temporary files often restore unsaved changes and can be found in the application’s recovery pane or designated folders.
- Save Files Frequently: Make it a habit to manually save files at regular intervals. A quick Ctrl+S (or Command+S on Mac) ensures your work is backed up frequently, even if auto-saving is enabled.
- Adjust AutoRecover Settings: Customize the AutoRecover interval in Word and Excel to save your work more frequently. You can set this feature to save changes every minute for additional security.
- Recover Unsaved Workbooks/Documents: Use the "Recover Unsaved Workbooks" in Excel and "Recover Unsaved Documents" in Word to retrieve files you forgot to save. These options are accessible through the File menu in each application.
- Enable Cloud Sync: Save your files to cloud services like OneDrive or SharePoint for automatic syncing. This ensures your work is backed up instantly and can be recovered from other devices.
- Save Backup Copies: Turn on the option to save backup copies of your files. This provides an extra layer of security by keeping previous versions safe even after changes are made.
These tips help ensure your work remains safe and easily recoverable!
Conclusion
Mastering auto recovery techniques is a vital skill for Mac users. These methods provide multiple layers of protection, ensuring that your important data remains secure even in unexpected situations. By incorporating these strategies, you can significantly reduce the chances of losing valuable files.
The evolution of technology has introduced more advanced file recovery options. Staying updated and familiarizing yourself with these tools allows you to recover documents effectively while minimizing stress related to data loss. Leveraging sophisticated recovery solutions can be a game-changer in safeguarding digital content.
Prevention is always the best approach when it comes to protecting files. Regularly creating backups and understanding the available recovery methods will ensure that your digital data remains safe and accessible whenever needed. A proactive mindset not only offers peace of mind but also eliminates the anxiety of potential data loss in the future.
Try Recoverit to Auto Recover Mac File
![]() Security Verified. Over 7,302,189 people have downloaded it.
Security Verified. Over 7,302,189 people have downloaded it.
FAQ
-
How often should I backup my Mac?
It’s best to create backups for your Mac on a daily basis. If that's not possible, aim to backup at least once a week. Use tools like Time Machine or trusted cloud services to ensure your data is safe and can be easily recovered when needed. This routine provides effective protection against data loss. -
Are paid recovery tools better than built-in Mac methods?
Paid recovery tools typically provide advanced features such as deeper scanning capabilities and support for more file formats. While they might offer better results in some scenarios, the built-in recovery options on Mac can handle most basic file recovery tasks effectively and may be enough for your needs. -
Can I recover files deleted long ago?
The ability to recover files depends on how much time has passed since they were deleted. Over time, recovery becomes harder as the data may be overwritten. However, specialized recovery tools like Recoverit can sometimes retrieve files even if they were deleted several weeks or months earlier. Success rates vary based on factors like storage activity and file type.
 ChatGPT
 Perplexity
 Google AI Mode
 Grok
Grok


