

 TL;DR:
To resolve the "This document is either deleted or not currently accessible" error for Microsoft Word on Mac, first search the Trash and Spotlight for displaced files, then attempt to retrieve unsaved versions via Word's AutoRecovery folder or Mac's Time Machine backup.
● Navigate to "/Library/Containers/com.microsoft.Word/Data/Library/Preferences/AutoRecovery/" using the Shift+Command+G shortcut, find your temporary document, and change its file extension to ".docx" to restore it.
● If the document is corrupted or restricted by software conflicts, bypass third-party extensions by booting the Mac into Safe Mode by holding the Shift key during startup, or use Word's native Open and Repair drop-down function.
● In cases of permanent deletion or severe formatting damage, third-party utilities like Wondershare Recoverit can perform deep storage scans, while Wondershare Repairit can be used specifically to fix corrupted file architectures.
Ask AI for a summary
 ChatGPT
 Perplexity
 Gemini
 Claude
 Grok
Grok
When you spend hours creating an important document and see the “This document is either deleted or not currently accessible” while reopening it, you might get frustrated. You check the folder again and again, but the file seems to have vanished from your Mac. This could be a simple case of file corruption or damage within the system. Fortunately, there are various tools available that let you get back these files.
In this article, we will discuss various ways through which you can possibly recover your Word document on Mac and prevent future data loss.
Try Recoverit to Perform Mac Data Recovery
 Security Verified. 3,591,664 people have downloaded it.
In this article

Part 1. Why Is This Document Either Deleted or Not Currently Accessible
Before moving towards the solution, you must be aware of the reasons why this error message occurs when you try to access a Word document. Mentioned below are some of the reasons why your document becomes inaccessible when you try to open it:
- Accidental Deletion: If you see that this document is either deleted or not currently accessible on Mac, one of the reasons could be that you have deleted it accidentally. This usually happens when you are performing the routine file cleanup or when multiple files are open.
- File Has Been Moved or Renamed: The shortcut path for a Word file becomes invalid if you have moved or renamed the file. The software relies on the original location of the file, and if it changes, the tool will be unable to locate and open the document.
- The Document is Corrupted: Another reason could be that your files get corrupted when you try to open them. It happens when the document is not properly shut down, or the software crashes while saving the file.
- Restricted File Permission: Sometimes, some users do not have permission to access a certain document that is created by someone else. The operating system on Mac restricts access based on file ownership and permissions, and if it is not granted, the document will not be accessible.
- Software Glitches and Bugs: If there are temporary bugs or glitches within the software or the operating system, this can make the documents disappear. These glitches usually occur randomly or after updates to the software or the tool.
Part 2. Potential Ways of Recovering a Word File That is Either Deleted or Not Currently Accessible
The file is unaccessible, meaning that it might have been deleted or lost within the system storage. To learn how to recover these files, read the system-oriented solutions below:
1. Check Trash on Mac
When a document is deleted accidentally, macOS moves it to the Trash rather than removing it permanently. Hence, it is quite convenient to recover a document from the Trash. The solution is especially effective when file loss happens due to accidental deletion during file management and cleanup. Provided below are the instructions on how you can check the Trash and recover your document from there:
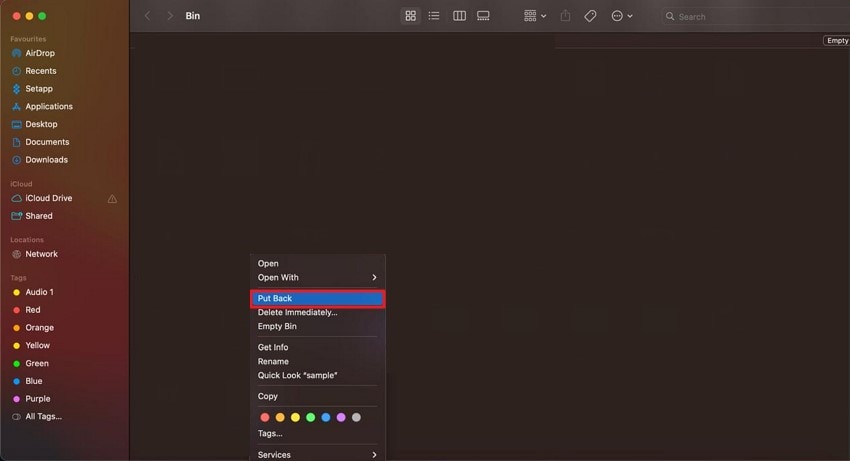
Instructions. Head to the extreme bottom right of your screen and access the “Bin” from there. Scroll through the Trash to locate your file within it. Right-click on the document and press the “Put Back” option to recover the file from the bin.
2. Check the Location of the File and Access
Sometimes, the “this document is either deleted or not currently accessible” message appears if it has been removed or stored in a location that Word does not recognize. If the file has been relocated within the system, the software’s recent file history will not update accordingly. To check the file’s location, you can use Spotlight Search by following the instructions below:
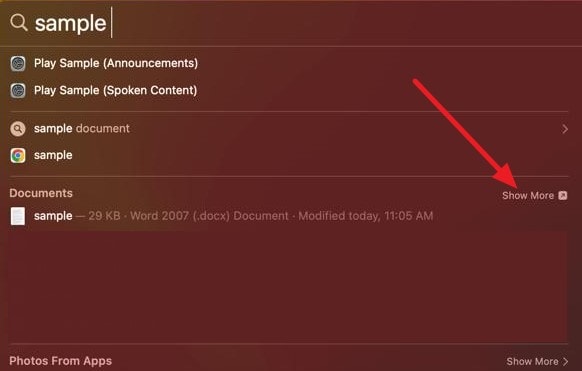
Instructions. After accessing the “Spotlight” search on your Mac, type in your file name to let the utility search for it. Once you find the document within the search, press the “Show More” option from the right corner to get the location of the selected file.
3. Check the AutoRecovery Folder on the Mac
Word has an AutoRecovery feature that automatically saves the temporary version of your document at different intervals. If the system or the tool crashes accidentally, you can recover the file till the last changes made are saved.
This folder saves your files separately from your main document, making it a valuable utility to check the file recovery process. Read the steps mentioned below if you do not know how to use this utility on your Mac device:
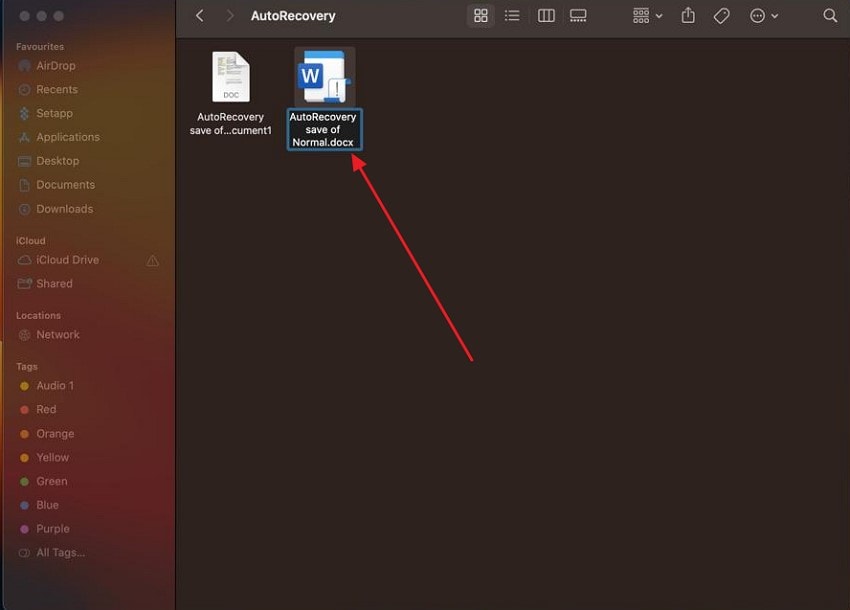
Step 1. Press the "Shift+Command+G" keys on your keyboard and paste the following path link:"/Library/Containers/com.microsoft.Word/Data/Library/Preferences/AutoRecovery/".

Step 2. Once you locate the document, right-click on it and rename it by changing its extension to ".docx," and open it successfully within the software.
4. Consider Updating Word For Bugs
Another reason for the “this document is either deleted or not currently accessible on Mac" error could be because of an outdated version of Word. You can update the tool to resolve the issue and ensure that all the critical patches and compatibility updates are applied. Mentioned next are the instructions on how you can update your tool for file accessibility:
Instructions. Go to the menu bar at the top and press the "Help" option once you have launched Word on your device. Find the "Check for Updates" option from the list, and if there are any updates available, click on it to update your tool to the newest version.

5. Boot Mac Into Safe Mode and Open Word File
This method enables the Safe Mode on your Mac device, in which only essential files are loaded. The mode disables the third-party extensions that may interfere with the tool. This method is one of the useful diagnostic steps that can potentially allow you to recover and save the document safely. For people who do not know how to enable Safe Mode while starting their system, the instructions are provided below:
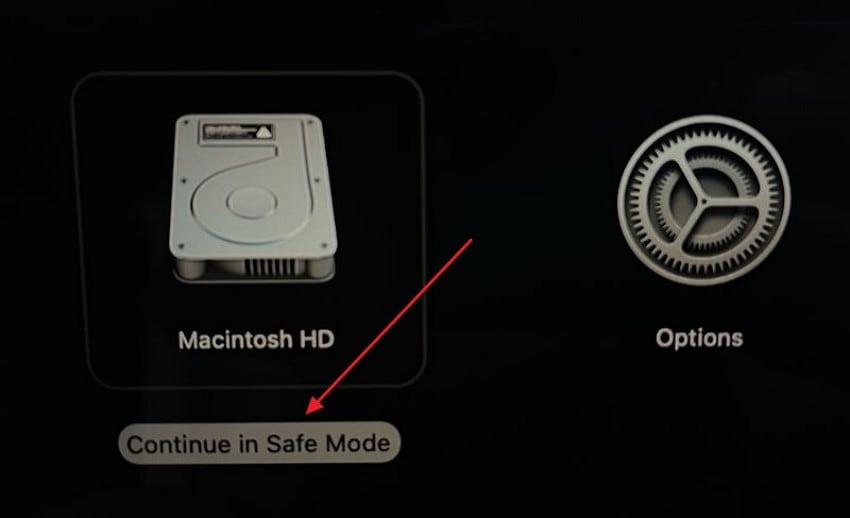
Instructions. After you have successfully shut down your device, wait for a while and hold the power button until you see the startup menu. Now, keep holding the Shift key and choose the "Continue in Safe Mode" option. This will launch your device in safe mode, where you can head to Word and open your desired file.
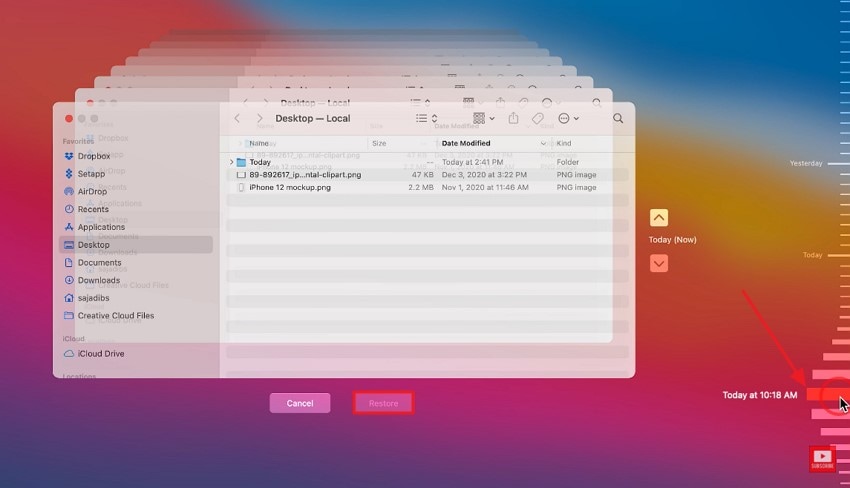
6. Use Time Machine Backup
Time Machine is a built-in backup utility that saves the versions of your files, including Word documents, in case the software or the system crashes. This method uses the system-wide snapshots to retrieve files that are unaccessible meaning they do not rely on the tool’s recovery feature. Read the steps provided next to know how to recover the file using the Mac’s Time Machine feature:
Step 1. Once you have accessed the Time Machine app on the Mac device, head to the top bar on the screen, click on the small "Clock," and press "Enter Time Machine."
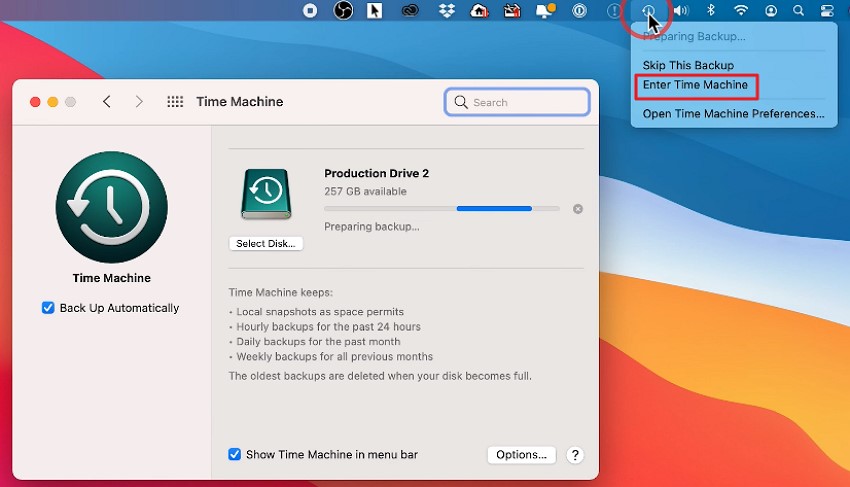
Step 2. The system will open multiple versions of the storage on the screen, scroll through the dates on the right, and choose the date you want. Now, select the file and press the “Restore” button at the bottom.
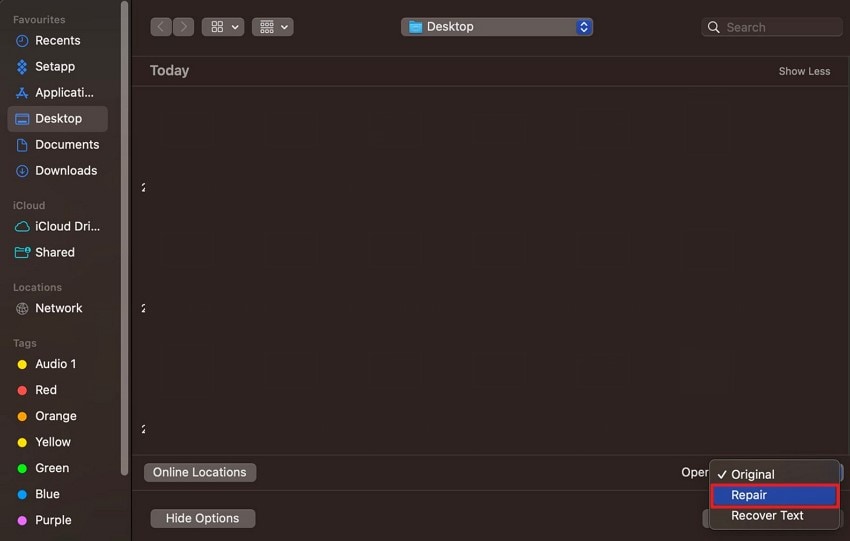
7. Try the Open and Repair Method in Word
The Open and Repair method is a built-in functionality offered by MS Word to fix files that are corrupted or damaged and do not open normally. It is especially useful when a Word file becomes inaccessible because of formatting errors.
By using this utility, you allow the tool to automatically resolve minor formatting errors and corruption issues before opening the file within its interface. Read the instructions below to know how to use the Open and Repair feature of Word:
Instructions. When you are within the Word interface, head to the menubar at the top and press the “File” option. Click on the “Open” option located within the expanded list and locate the file within the folder. Expand the “Open” drop-down menu, choose the “Repair” option, and hit the “Open” button to let the tool fix the document and open it successfully within its interface.
Part 3. How To Recover a Deleted or Inaccessible Word File Using Wondershare Recoverit?
You can use tools like Wondershare Recoverit to get your file back with the formatting intact if your file is inaccessible even after trying all the above-mentioned solutions. This advanced tool provides the utility of recovering multiple files, including photos, videos, and documents, especially for “this document is either deleted or not currently accessible" errors. With a recovery rate of 99.5%, this advanced tool offers data recovery even for system crashes or formatted drives.
Moreover, it provides you with an intuitive interface to preview the document before saving it to your device. This advanced tool efficiently performs a deep scan and finds all the recoverable files within it. Moreover, it provides multiple recovery modes depending on the intensity of the data deletion or damage.
Some Prominent Features Of Recoverit
- Numerous Device Support: Recoverit offers data recovery for more than 200 storage devices, including Windows and Mac.
- Batch Processing: You get the ability to recover more than one file at a time, saving you the effort of recovering each file separately.
- Zipped File Recovery: Besides single documents, users can also get back their lost or damaged zipped folders using Recoverit.
Comprehensive Steps for Recovering Files With Recoverit
Having learned about this recovery tool in detail, let us now have a look at how to use this tool for data recovery on your Mac device:
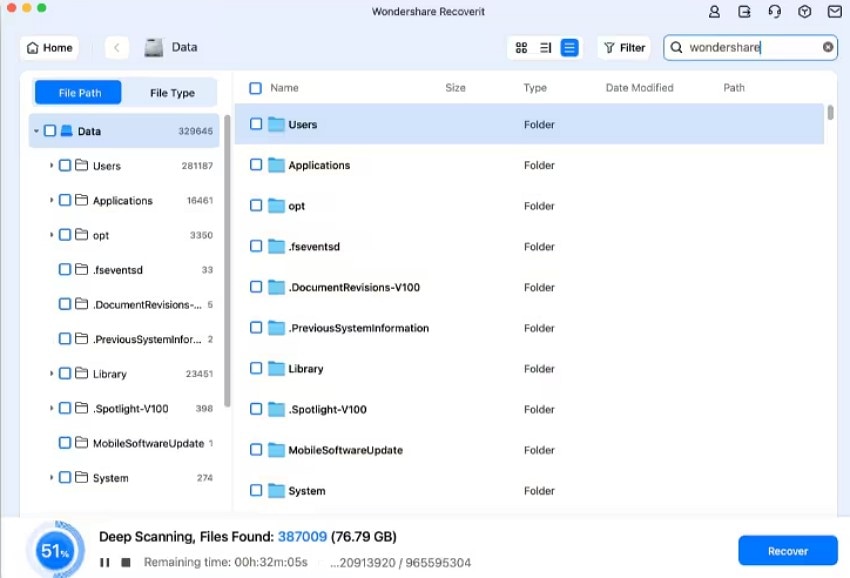
Step 1. Choose Your Storage Device
To begin the process, launch Recoverit on your device and select the storage from the homepage. The tool will start scanning the storage as soon as you choose it.
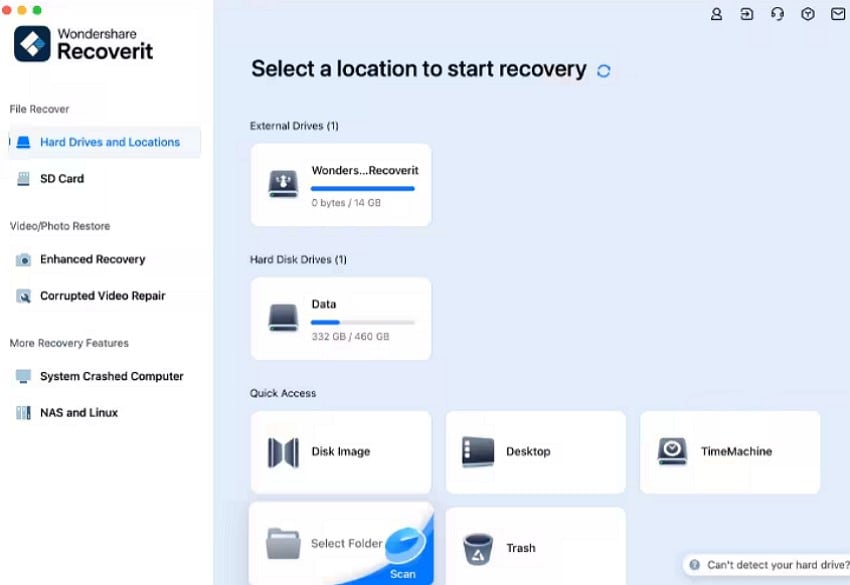
Step 2. Select the File You Want to Recover
Choose the file you want to recover from all the files scanned by the tool once the scan is completed. Now, press the “Recover” button located at the bottom of the window to get the file back.
Step 3. Preview the File and Save on Mac
Once the file is recovered within the tools’ interface, preview it to check the formatting and other attributes. When you find the recovered file satisfactory, press the “Recover” button to save the file.

Part 4. Word File Inaccessible? Try Using Wondershare Repairit To Repair Corrupted Word Documents
A damaged or corrupted file could be the reason for the “this document is either deleted or not currently accessible on Mac” error still appears. However, the issue can be resolved using tools like Repairit. This advanced tool offers a simple interface for users to simply drag and drop the files within it for easy access. Once you have imported the document for repair, you can access its details like name, location, and size.
Users get the ability to repair multiple forms of media, such as photos, videos, and even documents. The tool performs a deep scan and repairs the files while keeping the original formatting intact, unlike other repair tools. Moreover, you get the ability to preview the repaired file before saving it to your system.
Coherent Features Offered by Repairit
- Batch File Repair: The tool allows you to repair more than one file at the same time to save you time and effort.
- Numerous Device Support: You get the ability to perform scans and repairs for files on multiple internal and external storage devices.
- Select File Location: It allows you to select the location of your choice within the device before saving the repaired document.
Comprehensive Steps for Repairing a Damaged File on Mac
As discussed, Repairit offers advanced functionalities to repair the damaged or corrupted media within your device. Read the steps mentioned below to learn how to use this tool for a document that has unaccessible meaning:
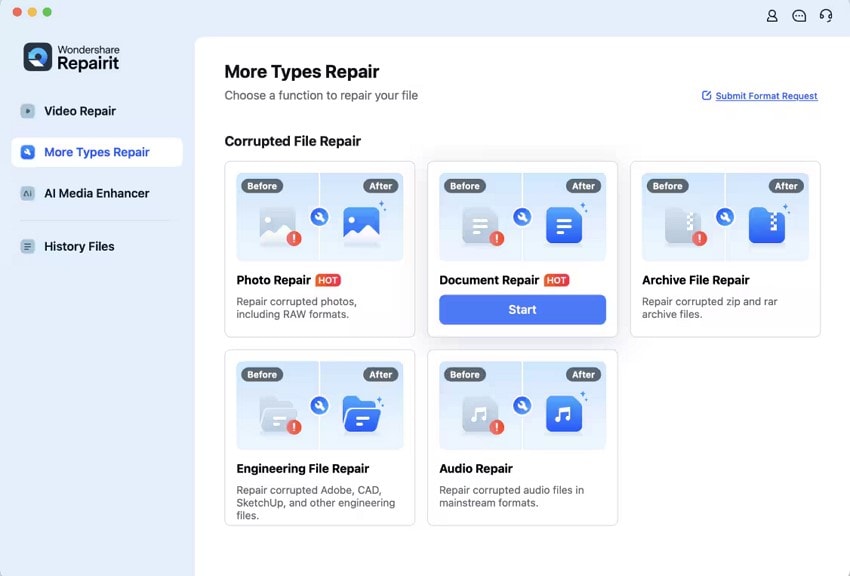
Step 1. Choose Document Repair and Import File
After launching Repairit on your device, select the "Document Repair" option on the homepage and press the "Start" button located under it. Next, import your file within the tool's interface using the designated option.
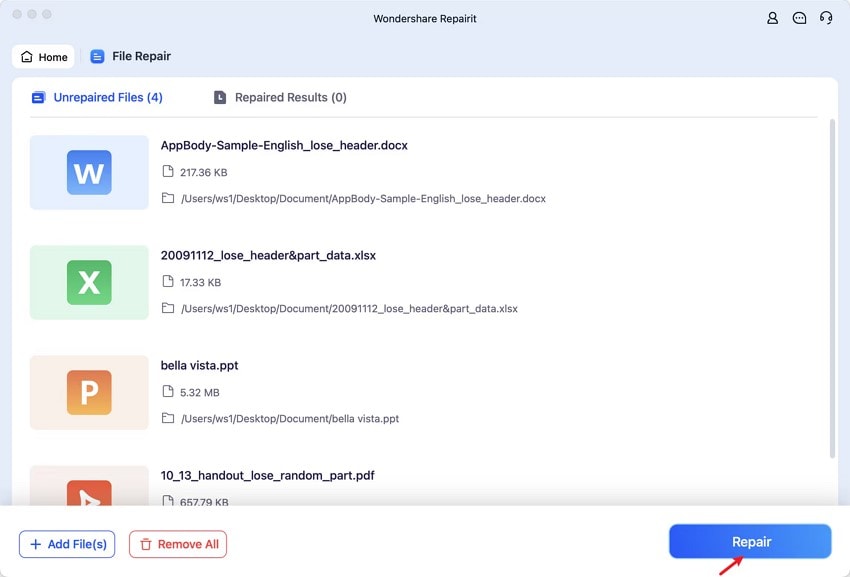
Step 2. Click Repair to Begin The Process
Click the “Repair” button located at the bottom after adding the documents within the tool’s interface. Press the “Add Files” button to add more files or the “Remove All” button to clear all the documents.
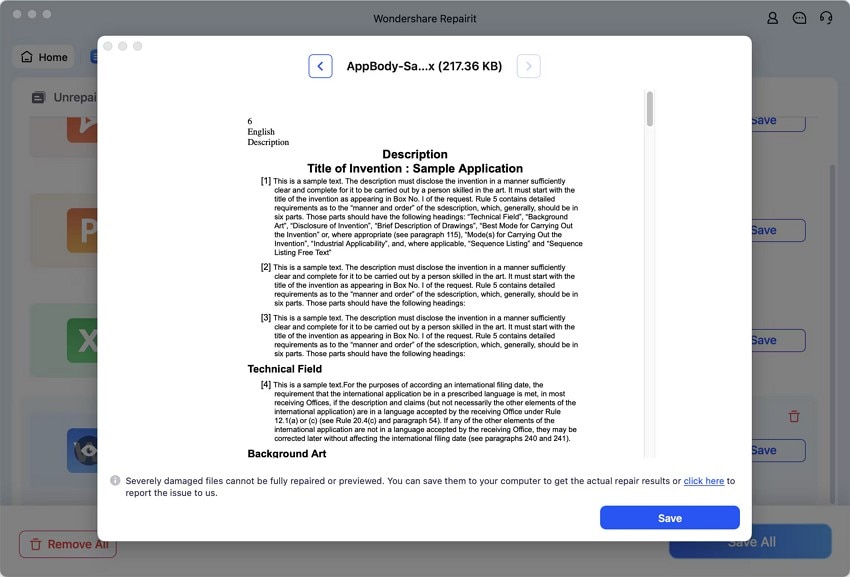
Step 3. Preview the Document and Export
Once the file has been repaired, you can review it in the tool’s interface and hit the “Save” button when you are satisfied with the results.
Conclusion
To wrap it up, this article discussed the top solutions for the “this document is either deleted or not currently accessible” error. Various system-level solutions can be used to fix this issue; however, if it still persists, you can use tools like Recoverit to get back access to your file. This advanced tool offers data recovery for multiple types of files with a large variety of platform support.
FAQ
-
1. Is the “this document is either deleted or not currently accessible” error unrecoverable?
Yes, the “this document is either deleted or not currently accessible on Mac” is recoverable by using various system-level solutions. You can update the tool or check AutoRecovery to resolve the issue instantly. -
2. Can restarting your system resolve this error?
Yes, sometimes temporary bugs and glitches prevent a Word file from opening within your system. Restarting your device can help you resolve this issue with minimal effort. -
3. Which tool can I use to get back my lost Word document?
You can use tools like Wondershare Recoverit to resolve file inaccessibility issues. Most files become inaccessible if they are accidentally deleted or lost. With Recoverit, you can scan the storage and find them quickly.


