


 TL;DR:
A dual boot setup on a Mac allows you to run an additional macOS version or Windows operating system natively, granting the active OS full access to the system's processor and memory without allowing simultaneous operation.
● To install a second macOS version, your Mac must be running macOS High Sierra or later; use Disk Utility to create a new volume and select it as the destination drive when running the downloaded macOS installer.
● Dual booting Windows requires an Intel-based Mac, a USB drive, a 64-bit Windows ISO image saved outside your Downloads folder, and a minimum 64GB partition configured through Apple's native Boot Camp Assistant.
● Switching between installed operating systems requires you to restart the Mac and hold down the "Option" key during the boot process to select your desired startup volume.
Ask AI for a summary
 ChatGPT
 Perplexity
 Gemini
 Claude
 Grok
Grok
Although the Mac is among the most reliable and secure computers for many users, sometimes users might face issues after upgrading to the latest macOS or need to work on Windows OS. In both scenarios, dual boot Mac is the best method to resolve the issues. Not only does it help to install additional OS on your Mac, but it can also preserve the current macOS you are running. It is a win-win situation with a double-boot Mac that also offers many benefits. However, one of the begging questions is how to dual boot Mac.
To help you dual boot Mac for added advantages, in this article, we have included a comprehensive guide on dual booting your Mac. You can learn about dual boot Mac and what are the main reasons for double boot Mac with another macOS and Windows. In addition, the article also provides easy methods to dual boot Windows in Mac and Mac dual boot another macOS.
In this article
Part 1: What is Dual Boot Mac
Before you understand the dual boot Mac, you need to understand what dual boot means in computers. So, dual booting is the process of installing and running two separate operating systems on a single machine. Most often, this involves the setting up of a custom boot loader or another program that handles loading the operating system.
In a similar vein, a dual boot Mac refers to installing and running another macOS or Windows OS on a Mac system while the initial macOS remains operational. You can select which OS to boot into during the boot process, or you can configure the default OS to boot into when the Mac starts. Apple offers native dual boot utilities that allow Mac users to dual boot their Mac with another macOS or Windows operating system using partitions and Boot Camp Assistant.
Part 2: Why Dual Boot Mac and Its Advantages
Now that you understand what Mac dual boot is, you might be wondering why exactly you would want to do dual boot Mac to Windows or another macOS version.
Here are some of the common reasons why you would want to dual boot Macbook:
- Most users tend to avoid the latest updates due to inert bugs or glitches causing issues. Therefore, if you want to try the latest or beta version of macOS on your system, you can double boot Mac with a different macOS.
- You might want to update your Mac to the most recent version, but you have legacy applications that might not be compatible with it. In that situation, dual boot Mac with multiple macOS can be really helpful.
- Application developers sometimes need to test their applications across many macOS versions or Windows platforms. Thus, having dual boot Mac and Windows can be useful.
- If you dual boot Windows in Mac, you will be able to run Windows-specific apps and perform additional functions. Furthermore, you can enjoy the benefits of both platforms on a single device.
There are many advantages of dual boot Mac, especially when you dual boot Mac and Windows on one Macbook. However, the most significant advantage of dual booting is that the second operating system can function just like the first macOS, as it has full access to the processor and memory of the system. Dual booting, on the other hand, does not allow the second macOS or Windows with the first macOS to run at the same time, making it unsuitable for those who must use both operating systems simultaneously.
Part 3: How to Dual Boot Mac With Multiple macOS Versions?
After knowing the benefits of dual boot Macbook, you might want to install another macOS version according to the reasons mentioned. Thankfully, Apple provides easy ways to Mac dual boot with multiple macOS versions with built-in features. If you do not have enough free storage space on the built-in startup drive to install another macOS. You have to make free space by deleting or moving data from it. In addition, older versions of macOS are incompatible with APFS, which is why you have to make sure your Mac is running macOS High Sierra or later to continue with the process.
Here are the steps to double boot Mac with multiple macOS versions:
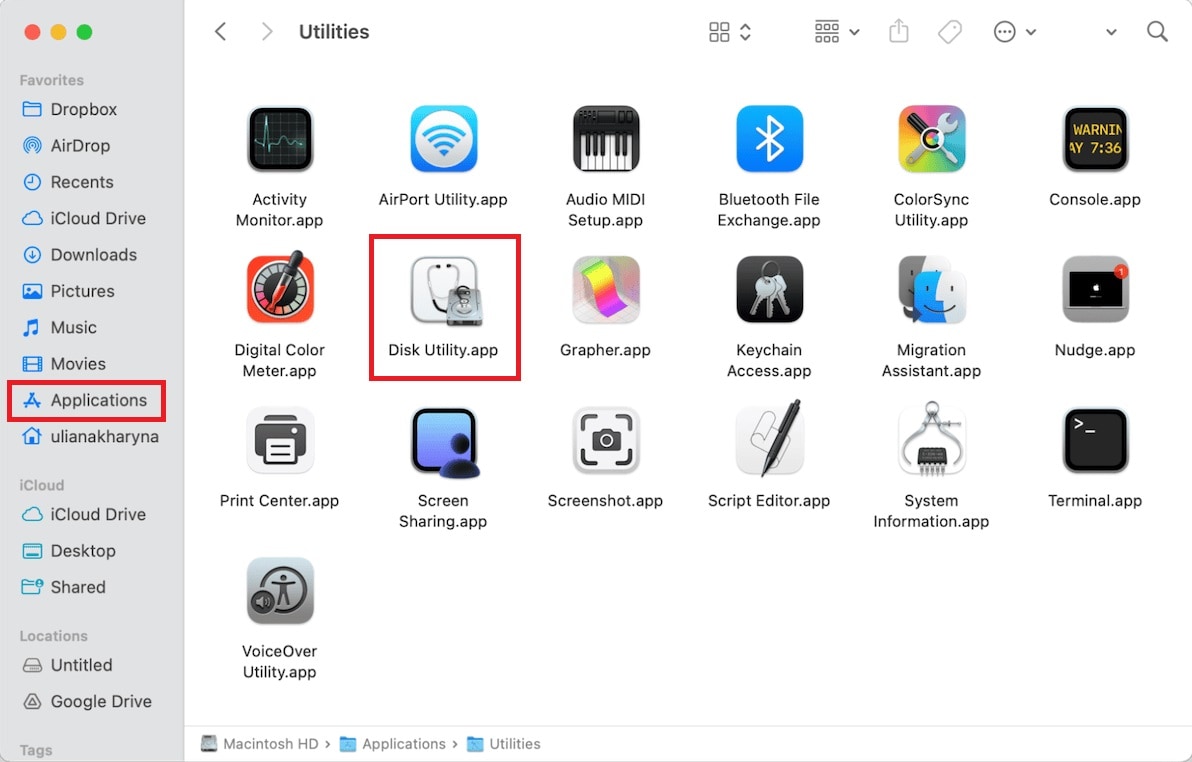
Step 1: Launch "Disk Utility" from the "Applications" or press the "Command + Space" keys simultaneously and type "Disk Utility" and "Return" keys to launch it.
Step 2: To view the volumes on your hard drive, click the "drop-down" menu next to the "View" button in the toolbar and select "Show All Devices".
Step 3: Create a new volume by selecting the "Home" or "Macintosh HD" volume on the left and clicking the "+" button in the top toolbar.

Step 4: Next, name your new volume, specify the storage limit by clicking on the "Size" options, and fill out the "Reserve" and "Quota" fields. To add your new volume to the Mac, select the "Add" option.

Step 5: Wait for the volume creation to complete. After the process is over, you can close the "Disk Utility".
Step 6: Now that the second volume is created, to continue, download the macOS version installer you want to install from the App Store.
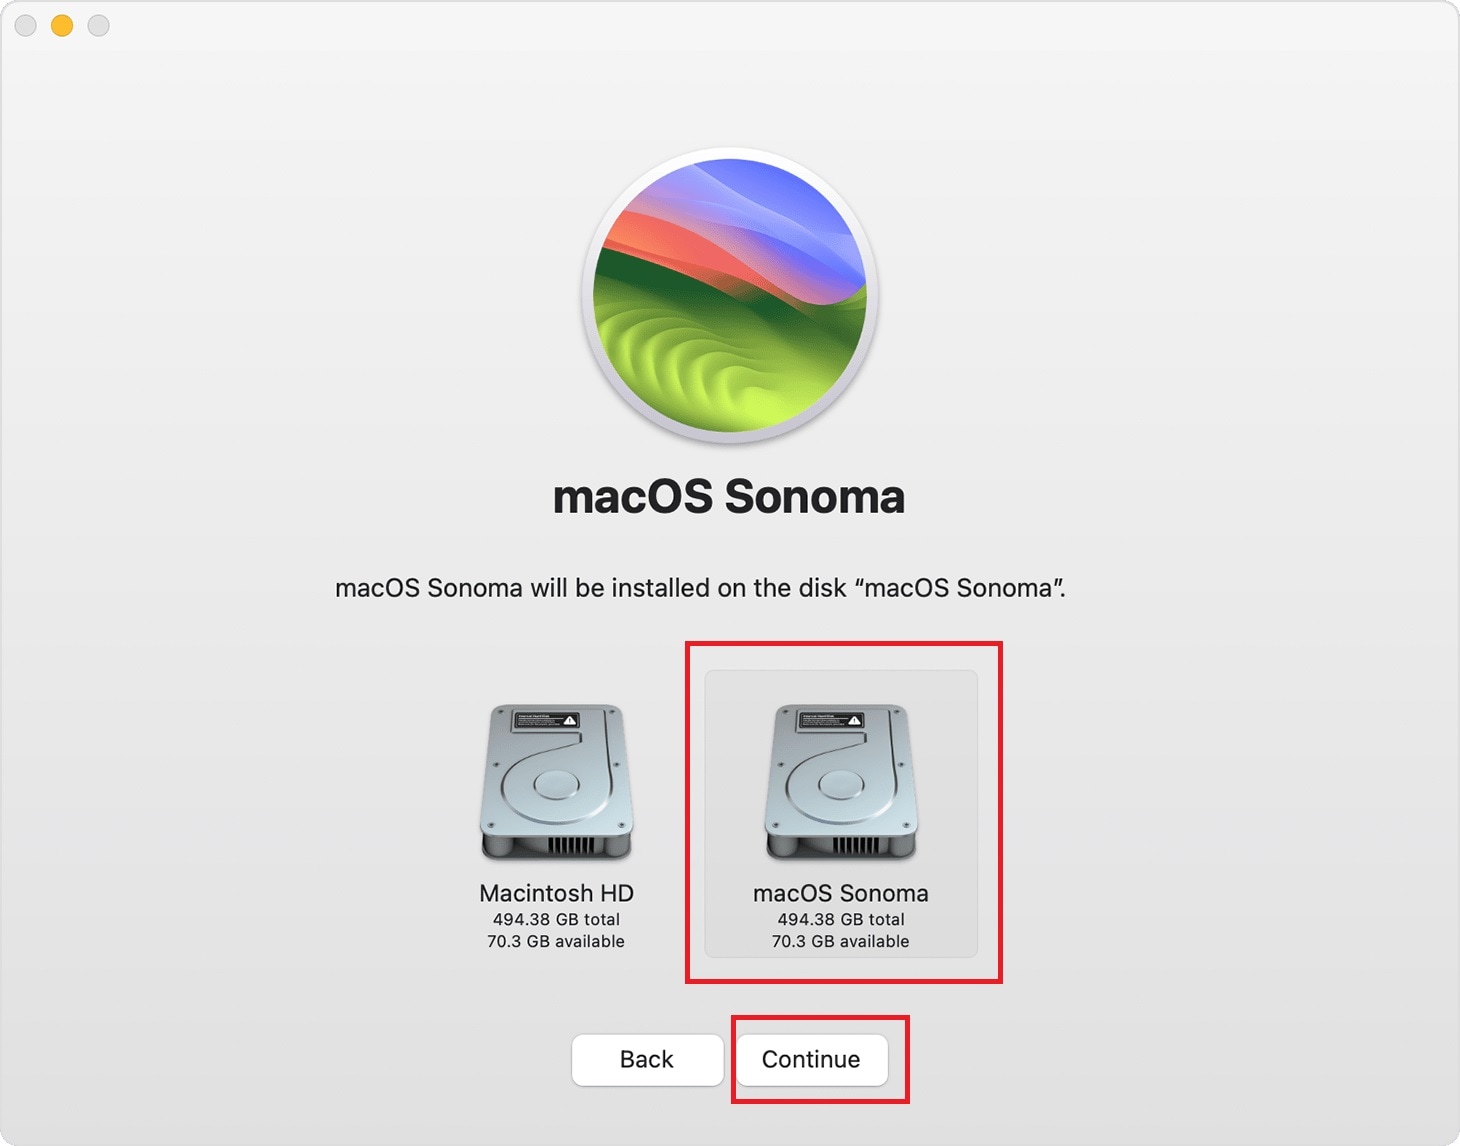
Step 7: Run the macOS installer; when it asks where macOS should be installed, click "Show All Disks" and then choose the new volume. Make sure to install another version of macOS on the new volume you created rather than your main volume.
Step 8: Wait for your Mac to install another macOS on the new volume. Once completed, your Mac will restart and open in the volume containing the newly installed OS.
When you want to return to another version of macOS, simply restart your Mac. While it starts up, press the "Option" key until you see a choice to select which volume to use and which version of macOS to run.
Part 4: How to Dual Boot Mac and Windows
As explained earlier, you can dual boot Mac to Windows using Boot Camp Assistant. Apple provides a native utility on its Mac systems to help easily install Windows OS along with macOS. It is one of the safest and recommended methods to MacBoot dual boot Windows on an Intel-based Mac system. You can install Windows on your Mac using Boot Camp Assistant with simple steps by creating a Windows partition, installing the Windows ISO image file on USB, and installing the required drivers.
Here are the steps to dual boot Windows in Mac using Boot Camp Assitant:
Step 1: First, download the Windows ISO disk image from Microsoft and select the 64-bit version of Windows. Also, save the ISO image somewhere other than the Downloads folder on your Mac.
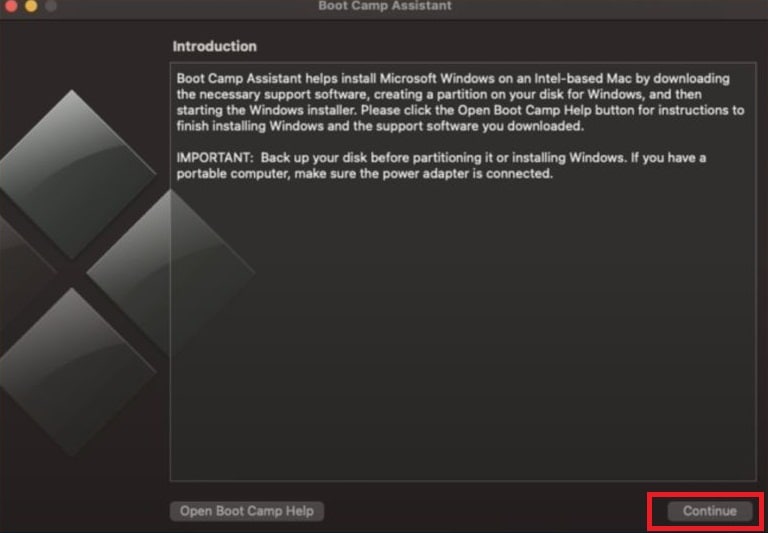
Step 2: Next, navigate to the "Applications" on your Mac and select the "Utilities" options. Then, click on the "Boot Camp Assistant" option from the list of applications.

Step 3: Click on the "Continue" button after you go through the introduction on the screen.
Step 4: On the next screen, select the "Create a Windows install disk" and "Install Windows" options and click on the "Continue" option.
Step 5: Click on the "Choose" option to choose the Windows ISO image file you have downloaded. Then, insert your USB drive into your Mac and select the drive as the destination disk to save the ISO image file. Click on the "Continue" option to create the Windows USB installation disk.
Step 6: Wait for your Mac to create the installation disk for Windows and click on "Continue" when it is done.
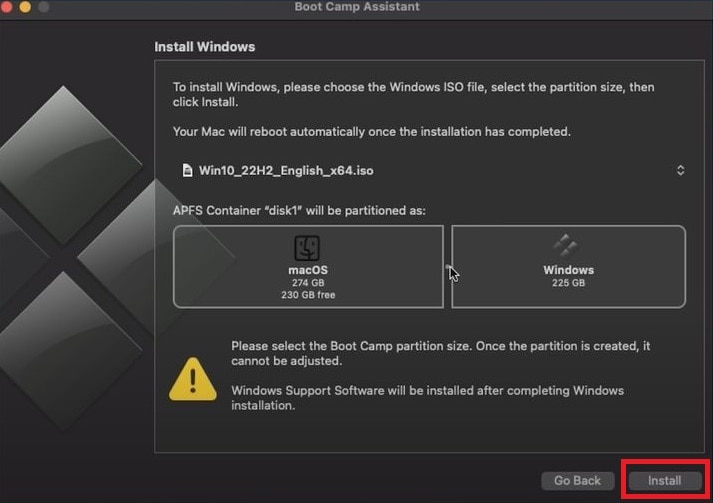
Step 7: When prompted, use the slider to select the required size for the Windows partition. However, it is recommended at least 64GB for Windows. Then, to create the Windows partition, click "Install". Once the partitioning process is complete, your Mac will resume with the Windows installer.
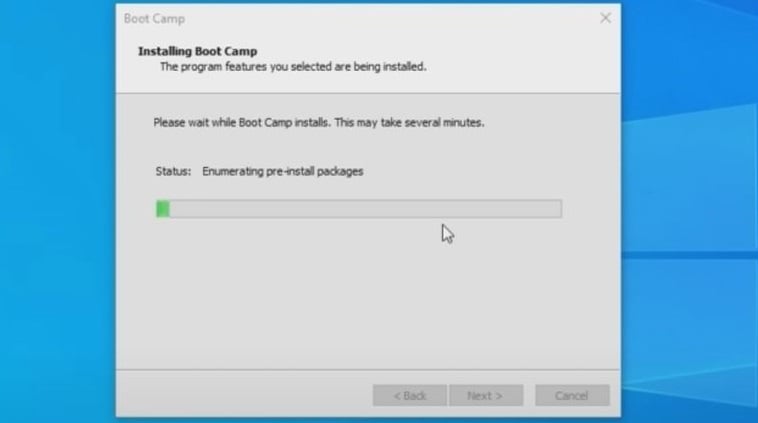
Step 8: Lastly, follow the onscreen instructions to install Windows on your Mac. Wait for the Boot Camp to install all the required drivers for Windows.
Step 9: After the process is completed, your Mac will restart. During the restarting of the Mac, you can press and hold the "Option" key to select which OS you want to boot into between Windows and Mac.
Part 5: How to Recover Lost Data During Failed Dual Boot on Mac
When Mac users dual boot and add Windows to their machine or multiple macOS versions, it can lead to system crashes and data loss. However, unless you have already made a backup of the data, it is best to recover it before attempting to correct the mistake. To accomplish this, try using a reputable data recovery application for Mac, such as Recoverit Data Recovery, which can easily recover all of your data from any hard disk. Whatever the reason, you can recover any sort of data, including images, videos, documents, and other important files. It also helps retrieve data from a formatted hard drive, corrupted storage, garbage deletion, unintended deletion, and so on.
Here are the following steps to recover data from Mac using the Recoverit tool:
Step 1: First, click the link above to download and install Recoverit on your Mac. However, ensure that the application is installed on a different drive than the one from which you want to recover data.
Step 2: Launch the tool and select "Hard Drives and Locations" from the left-hand side panel. Next, select the drive from which you want to recover data from the "Hard Disk Drives" section.

Step 3: To start scanning, click the "Start" button in the lower right corner of the selected drive tab.
Step 4: Wait for the tool to scan and recover files from the selected partition. Once the scan is finished, you can preview the recovered files to ensure the data is correct.

Step 5: If you are satisfied with the recovered data, click the "Recover" option to restore the lost or deleted data on your Mac.

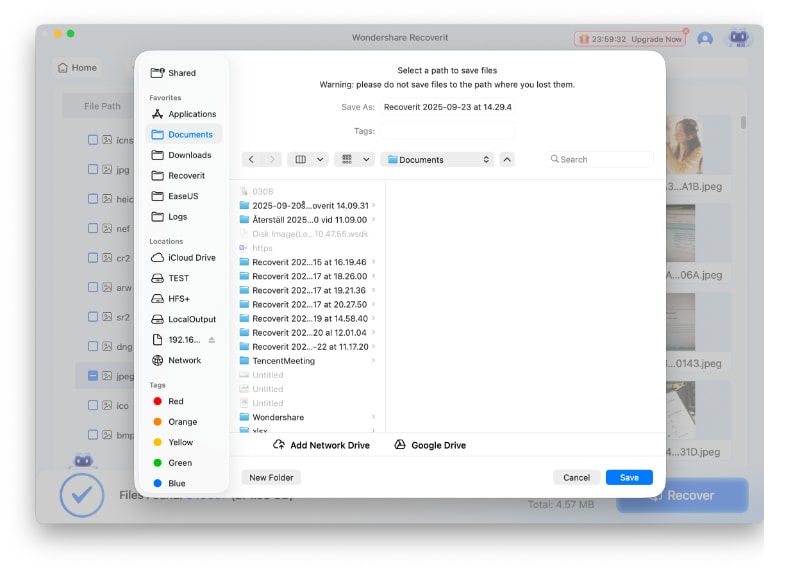
Step 6: Select the location where you want to save the retrieved data on your Mac. Also, choose a new location to store retrieved data from the original location.
Related Video >>: How to Recover Data From Crashed Mac?
Conclusion
As you can understand, dual boot Mac has many advantages, especially if you want to run the latest macOS or Windows on your Macbook. Thankfully, Apple provides built-in features that allow you to easily install a second operating system on your Mac and boot between them when required. Follow the above steps in the article to dual boot Mac to Windows or Mac dual boot to another macOS. In addition, for any unknown reasons, if the MacBook dual boot Windows or double boot Mac with macOS causes issues, you can use Recoverit to retrieve data before moving to solutions.
Try Recoverit to Perform Mac Data Recovery
![]() Security Verified. Over 7,302,189 people have downloaded it.
Security Verified. Over 7,302,189 people have downloaded it.
Learn more >>:
How To Recover Files from Mac That Won't Boot?
What takes to be the Best Data Recovery Software for Mac?
How to Recover Deleted Partition on Mac?
Which is the Best SD Card Data Recovery Software in 2024?
FAQ
-
1. Can you dual boot on a Mac?
Yes, you can dual boot your Mac between the operating systems installed on the system. It is a practical approach to install dual operating systems on a single device, providing additional benefits. You can dual boot your Mac with another macOS or Windows system. To learn how to dual boot your Mac, follow the steps in the above article. -
2. How do I switch between OS in dual boot Mac?
In a dual boot Mac, you can easily switch between operating systems like macOS and Windows. First, restart your Mac, and then press and hold the "Option" key until the "Startup Manager" screen appears. Select your macOS or Windows startup disk and then hit "Return". -
3. Is dual booting Windows on Mac safe?
Yes, installing Windows on a Mac is a safe choice for those who need to dual boot Mac and Windows. However, to ensure safety when dual boot Windows in Mac, utilize the built-in tool Boot Camp Assistant.


