

It's the worst possible scenario - you need to get an important file from your computer fast, but your Mac just won't boot. As a Mac user, you don't expect to be in a situation like this, but even though it's unnerving, recovering files from a Mac that won't boot is possible.
Below, we've described seven effective solutions for retrieving your Mac files to a safe location using a bootable drive, Time Machine, disk image, a professional recovery tool, etc.
Table of Content
- Recover Data From a Mac That Won't Boot With Recovery Software
- Recover Files From a Mac That Won't Boot via Time Machine
- Create a Disk Image to Recover Files
- Use Target Disk Mode to Recover Files From a Mac That Won't Boot
- Use the Terminal to Recover Files From Unbootable Mac
- Use APFS Snapshots to Recover Files
- Get Professional Help
Way 1: Recover Data From a Mac That Won't Boot With Recovery Software
The fastest, most effective way to recover data from a Mac that refuses to be turned on is by using a special tool. But make no mistake - data recovery is a complex process that usually requires technical skill and sophisticated technology. Unless you have an excellent tool.
Wondershare Recoverit is one of the best Mac data recovery solutions on the market for this.
This tool makes it possible to retrieve lost or deleted data from many different devices, including unbootable Macs.
Of course, you'll still need to make your Mac bootable before you run data recovery. No worries. You can use Wondershare Recoverit to create a bootable drive as part of the data extraction process. To do this, you'll need a working Mac, a blank USB drive, and a hard drive.
- Install Wondershare Recoverit on a working Mac and plug in a blank USB.
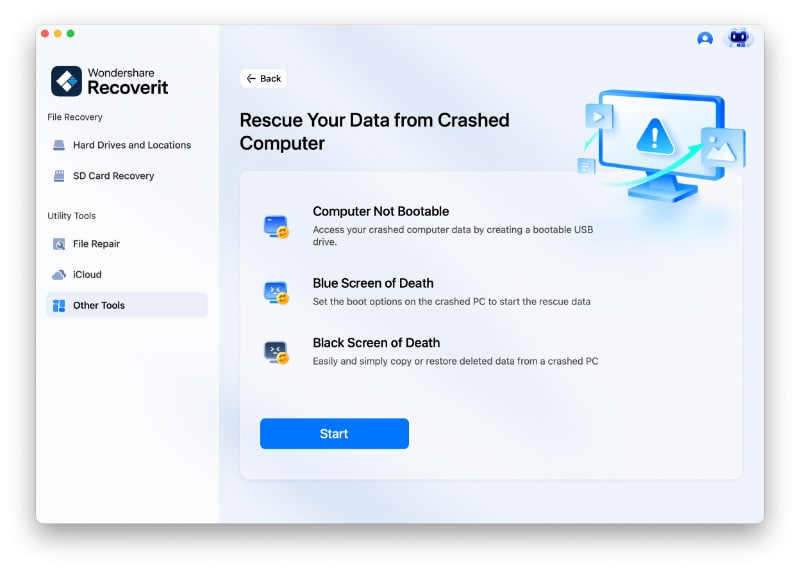
- Select System Crashed Computer from the sidebar menu and click on Start.
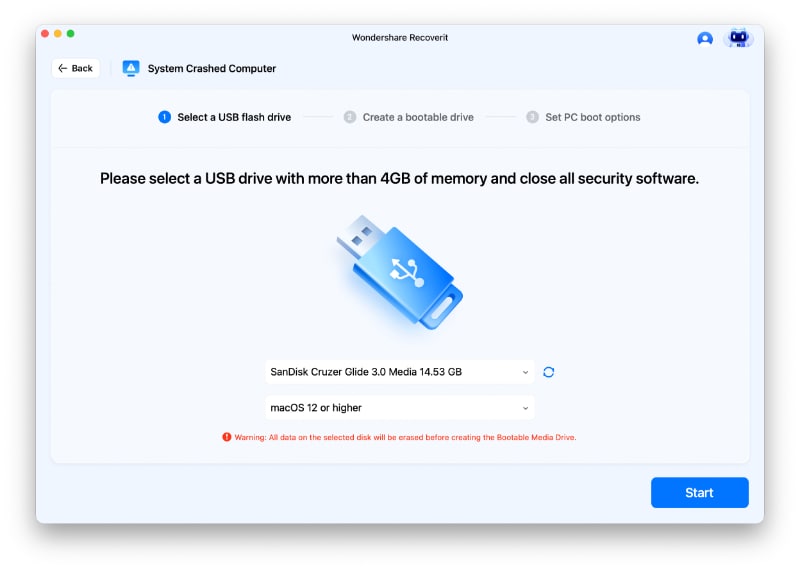
- Insert the blank USB drive and select it from the drop-down list.
- Select the OS version of the Mac computer that you're trying to boot and recover.
- Click the Start button to begin creating a bootable media drive for your Mac.
- The bootable drive will be created shortly. Read the instructions and click OK.
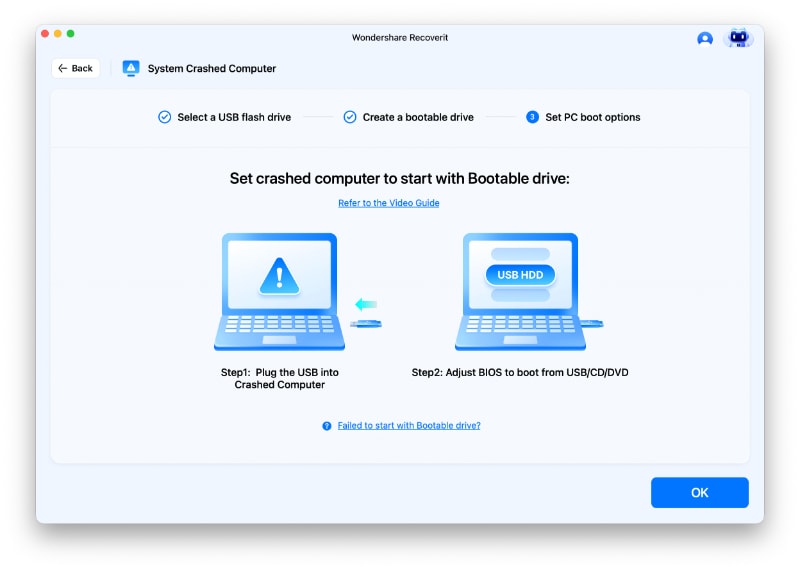
Now, you can use a bootable drive created using Wondershare Recoverit to start the MacOS on your crashed computer. If this is your first time doing this, just follow the steps below:
- Insert the bootable drive into the crashed Mac and press the Power button.
- Press and hold the Option key when the computer starts to access Options.
- When the Options window pops up, select Recoverit Bootable Media Drive.
- Did you prepare a good hard drive? Now is the time to connect it to your Mac.
- Choose the hard drive as the destination to rescue your crashed Mac data.
- Click on the Start Copy button and wait until you see Copy files completed!
Way 2: Recover Files From a Mac That Won't Boot via Time Machine
Another option is to restore Mac data from Apple's native backup system, Time Machine - presuming you've saved your Macintosh data there in the first place. Time Machine is enabled by default, so it probably backs up your precious file without you having to worry about it.
Remember that this method won't work if you've disabled Time Machine.
- Hold the Power button (and Command + . on Intel-based Macs) and click Options > Continue to enter Recovery Mode.
- Select the Restore from Time Machine option and click on Continue again.

- Once in the Time Machine, select a previous backup of your Mac disk to restore.

- Choose the destination where you want to restore your files and click Restore.

Way 3: Create a Disk Image to Recover Files
If your Mac won't boot and you feel comfortable with this method, you can create a disk image to recover files. For those who may not be familiar with the concept, a disk image is a file that includes an exact copy of your hard drive with its operating system, applications, and data.
One more thing before you start: If you're going to create a disk image of your MacOS, you need to make sure that your Macintosh disk is not corrupted. The tricky bit is you can't run the diagnostics yourself, and failing to boot is a strong indicator of system or file corruption.
If you still want to create a disk image of your MacOS, follow these steps:
- For this operation, you'll need to prepare a reliable large-capacity external storage device. If you have one ready, plug it in.

- Press and hold the Power button (and Command + .) to enter the Recovery Mode.
- Select Disk Utility and pick your external storage device from the sidebar list.
- Click the Erase button to reformat the drive first. It will erase everything on it.

- Now, name your device and choose the following specifications: Mac OS Extended (Journaled) for Format and GUID Partition Map for Scheme. Click Erase.

- Next, select your internal disk from the sidebar list and open the File tab.
- Choose New Image > Image from Macintosh HD from the drop-down menu.

- Name your image file next to Save As and choose your external drive next to Where to specify the location where your disk image will be saved. For Format, choose read/write. When you're done, hit the Save button.

With this last step, you will have created a disk image of your MacOS with all your files and data. To see what's in your disk image, simply connect the external hard drive to a working Mac and then double-click the disk image file to reveal its contents.
Way 4: Use Target Disk Mode to Recover Files From a Mac That Won't Boot
Target Disk and Share Disk are convenient solutions developed for Mac machines. Both allow you to transfer files from an unbootable Mac to a healthy one, but there's a catch. To do this, you will need special cables and adapters to connect the two Macs, in addition to a working computer.
And this can't be just any working Mac. If you're using an Intel-based Mac, you will have to find an Intel Mac and compatible cables to help you out. The same goes for Apple Silicon Macs.
Target Disk mode is available on Intel-based Macs, while Apple Silicon Macs have a Share Disk option. In the cables department, you'll need to prepare a USB, USB-C, or Thunderbolt cable - unless your Mac is running Big Sur or a newer MacOS version, in which case only Thunderbolt will work.
If you have the necessary equipment, here's how to use Target Disk on an Intel Mac:
- First, connect the two Mac computers using the appropriate cable.
- Shut down the unbootable Mac.
- Press the Power button on the unbootable Mac while holding the T key.
- Your Macintosh HD should appear on the desktop of a working Mac. Click on it.

- Now, simply copy the files and data that you want to recover to a healthy Mac.
And here's how to use Share Disk to recover files from an Apple Silicon Mac:
- Connect the two Macs using the compatible cable.
- Shut down the unbootable Mac.
- Press the Power button and hold it until you see the boot manager.
- Click Options > Continue. Type in your admin password if you need to.
- Select the Utilities option and then choose Share Disk.
- Select the disk you wish to share and then click Start Sharing.

- Go to the other Mac and head to Finder to access the shared disk.
- In Finder, find your unbootable Mac in the sidebar under Network.
- Double-click the unbootable Mac and select Connect As > Guest.
- After you click Connect, you can start copying your data to a healthy Mac.
Way 5: Use the Terminal to Recover Files From Unbootable Mac
Mac users who have no problem executing commands in the Terminal can rescue trapped data from an unbootable Mac with a single command. It's a relatively easy process that is both quick and effective. However, if you're uncomfortable with the Terminal, skip it.
- Connect the external hard drive to the Mac that won't boot.
- Press the Power button (or Command + .) of the unbootable Mac to access Recovery Mode.
- Choose Utilities > Terminal.

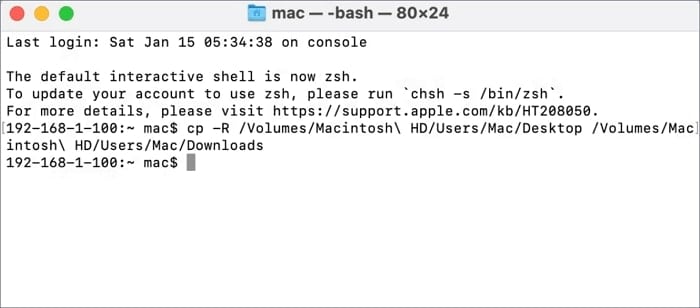
- When in Terminal, you need to write the appropriate cp - R command and press Enter. If you want to copy a certain file or folder, you need to include the source where the file is and the destination where you want to copy it. For example:
cp -R /Volumes/Macintosh\ HD/Users/Dany/Documents /Volumes/External\ Drive/
- If you want to see the contents of a folder, use a ls command. For example:
ls /Volumes/Macintosh\ HD/Users/Dany/Documents
Way 6: Use APFS Snapshots to Recover Files
The Apple File System (APFS) has a snapshot feature that allows your Mac to take point-in-time copies of your file system. You can find APFS snapshots in your computer's Time Machine. However, this method is limited only to MacOS Sierra and higher versions with APFS formatting.
Restoring an APFS snapshot will revert your Mac to a point in time when the snapshot was taken, so you'll need a snapshot that will take you to a version of MacOS when your Mac was still bootable. Of course, this will only work if the failure to boot was not caused by a hardware issue.
If your Mac satisfies these two requirements, you can proceed with the steps:
- Press the Power button (and Command + R on Intel Macs) to enter Recovery Mode.
- Choose Recover from Time Machine from the Utilities options.

- Click Continue and select the startup disk with APFS snapshots.

- Select the most recent APFS Snapshot for the list and click Continue.

- The Mac will automatically reboot when APSF recovery is complete.
Way 7: Get Professional Help
If none of these solutions have been able to help you, it's best to admit defeat and leave your Mac in the capable hands of Apple professionals. Most cities have at least one Apple-licenced repair and data recovery shop, but if there isn't any nearby, contact Apple Support.
Conclusion
Recovering data from a Mac that won't boot is seldom easy, but the good news is that you have several different ways to go about it. The above solutions cover all unbootable Mac scenarios and user skill levels, from using the Terminal to trusting a recovery tool like Wondershare Recoverit.
We recommend trying every method until you find the right one. When you can't start up your Mac but need access to hard disk data, Wondershare Recoverit could be the answer, but you can also try the Time Machine, disk image, Target Disk, Terminal, and APFS snapshots.
FAQ
-
Can I recover files from a Mac that won't boot?
It is possible to recover files from a Mac that won't boot using one of these methods:- Recover files using Wondershare Recoverit.
- Recover a Mac backup from Time Machine.
- Use Wondershare Recoverit in combination with the disk image.
- Use Target Disk to move files to a healthy Mac.
- Copy files to an external device with the Terminal.
- Recover a Mac version from APFS snapshots.
- Seek advanced solutions from Apple professionals.
-
How can I transfer data from a crashed Mac?
One way to transfer data from a crashed to a healthy Mac is with the feature called Share Disk if you have an Apple Silicon Mac or Target Mode in Intel Macs. Besides a Mac that works normally, this method also requires you to use a USB, USB-C, or Thunderbolt cable. -
Can I recover my Time Machine backups if my Mac won't turn on?
Yes, you can recover data from a Mac computer that won't turn on using Time Machine backups. You can access Time Machine with the MacOS Recovery Mode. To enter Recovery Mode on an Apple Silicon Mac, press and hold the Power button and then click Options > Continue. To enter Recovery Mode on an Intel Mac, press and hold the Power button and then immediately press and hold Command + R.


