
 TL;DR:
The "NTDETECT failed" boot error on Windows XP and Server 2003 can be resolved by restoring the NTDETECT.COM file via the Recovery Console, defragmenting the file, running a disk repair scan, or using automated third-party repair software.
● To manually restore a missing or corrupt NTDETECT.COM file, you must boot into the Recovery Console using a Windows XP setup CD that matches your exact service pack and system architecture (32-bit or 64-bit), then execute the command copy D:\i368\ntdetect.com C:\.
● If the error stems from partition compression or file fragmentation, you can defragment the file using Microsoft's free contig.exe utility, run a chkdsk /r scan to fix corrupt FAT32 or NTFS partitions, or use Easy Recovery Essentials for automated repairs on Windows XP, Vista, 7, and 8.
● Because this error prevents the operating system from booting, you can rescue locked data prior to executing repairs by customizing your BIOS to boot from a USB drive created with Wondershare Recoverit on a separate working computer.
Ask AI for a summary
 ChatGPT
 Perplexity
 Gemini
 Claude
 Grok
Grok
I was using my SATA laptop hard disk on my laptop, and it was working properly, but when I used it externally and returned it to my PC, it wasn’t working. My computer was giving the error message ‘Ntdetect failed.’ I would be grateful if you solved this problem and gave me instructions on how to solve it.
Like this user, many people have encountered the Ntdetect failed error at some point. NTDETECT is a helper program used by NTLDR (the Windows XP and server 2003 bootloader. It comes in handy when detecting basic hardware necessary to start the operating system. NTDETECT passes the hardware information to NTLDR, which then proceeds to give control to ntoskrnl.exe.
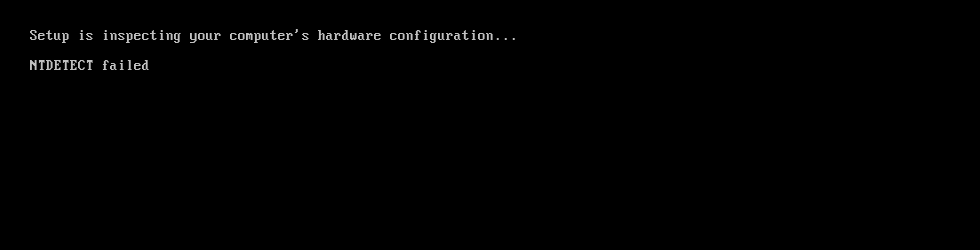
If at some point, NTDETECT is not found or cannot perform its task properly, then the ‘NTDETECT failed’ error will pop up. This error tends to occur when you try booting into the Windows XP setup CD. In this article, we’ll explore the leading causes of the ‘NTDETECT failed’ error and how to fix it.
Part 1. About the NTDETECT Failed Error
NTLDR is an abbreviation for NT Loafer, a bootloader for most Windows operating system versions. Some versions of this loader include Windows 10, XP, 7, and many more. It usually runs from the system’s primary hard drive. However, you could also run it from portable devices like a CD-ROM, USB flash drive, and many more. To run successfully, the NT loader needs NTDETECT.COM. This file boots the NT-based OS by detecting the basic hardware data required for a successful boot.
The Ntdetect failed error occurs when the file cannot detect the basic hardware data. It also pops up when the NTLDR is missing or damaged. Many circumstances result in this error, and we’ll explore them further in this article.
Part 2. Causes for NTDETECT Failed Error
There are many reasons why this error could pop up on your PC; below are some common reasons.
Incompatible NTDECT Version
The NTDETECT.COM comes with Windows and is installed from the Windows setup CD. If you’re using an older version of NTDECT, you might experience this problem because it will not be able to read NTFS file systems from newer drives. Additionally, older versions will find it challenging to communicate with new hardware. Incomplete or interrupted Windows installation could cause NTDETECT.COM to downgrade to an older version resulting in an NTDETECT failed Windows XP installation error.
NTDETECT File Is Corrupt or Missing
You can find the NTDETECT file in the root of the boot partition on disk 0. It is an essential component in the boot process. Therefore, this error could appear if it is accidentally deleted, becomes corrupt, or is moved to another folder. In addition, user errors or a sudden loss of power during writes to the boot partition could also cause this file to go missing, resulting in this error message.
Compressed NTDETECT File
Over the years, we learned that one of the causes of this NTDETECT failed error is improper compression of the boot partition. Most people do not know this, but you should never compress crucial Windows boot files. However, most third-party products try to compress every file in the system partition, including NTDETECT.COM. When this happens, you might experience this error.
Additionally, attempting to compress the boot partition manually or using DriveSpace or Doublespace will also result in this error occurring.
Fragmentation of NTDETECT File
Sometimes, NTDETECT is written to non-adjacent clusters on NTFS or FAT Partition with small cluster sizes. This is done through a process referred to as file fragmentation. Unfortunately, there’s no way to tell if any NTLDR versions released by Microsoft over the years can read NTDETECT files divided into multiple clusters. Therefore, this could be the cause of the NTDETECT failed error.
Part 3. How to Fix NTDETECT Failed Error
Now that you know the leading causes of this error on your PC, there are three effective ways to fix the problem and get back to using your PC without any hitch. In this section, we’ll explain the four fixes, providing the steps to simplify the process.
Way 1: Restore the NTDETECT.COM
If the NTDETECT error occurred because the file is damaged or corrupt, restoring NTDETECT.COM might be the right solution. This solution also works if you installed an older version of NTDETECT on your system partition. To restore the NTDETECT.COM file, you’ll need to use the correct Windows setup CD. This means the right service pack and 64-bit or 32-bit setup. If the file is missing or simply correct, use Windows XP installation disc can help you restore the original NTDETECT file. Below are the steps you have to follow.
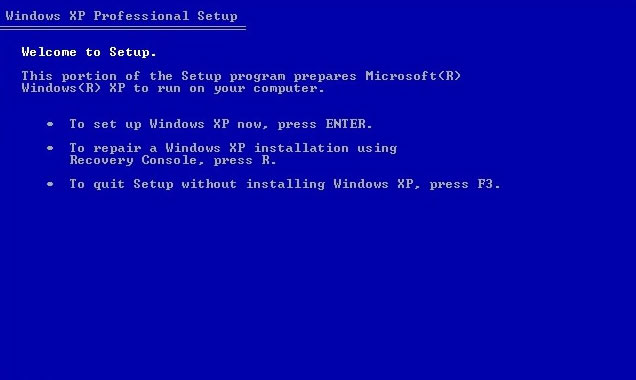
Step 1. To fix the NTDETECT failed Windows XP installation error, insert the Windows XP installation CD into the PC.
Step 2. Next, restart your PC and boot directly from the CD. To do this, press any key while the PC is starting.
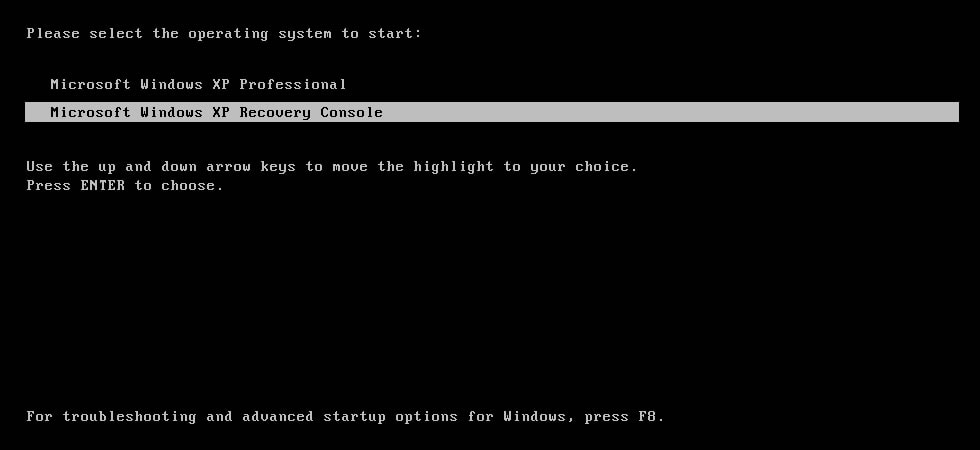
Step 3. Next, on the Windows Options Menu appear, choose to access the Recovery console.
Step 4. Afterwards, log into Windows by pressing ‘R’ using the Administrator password.
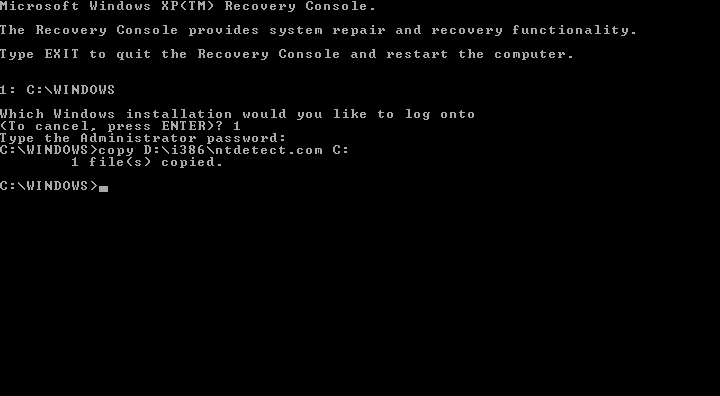
Step 5. At this point, use the command ‘copy D:\i368\ntdetect.com C:\’ to copy the NTDETECT and NTLDR files from the installation disk to the hard disk. In this command, ‘D: \’is the installation disk’s drive letter, while C: \ is the PC’s partition drive letter. Therefore, you should edit the drive letter appropriately.
Step 6. Once you copy these files, remove the installation disk from the PC and then restart the PC. Your PC console output should look like this once the error is resolved.
Way 2: Defragment the NTDETECT
This would be the best solution if the NTDETECT failed error occurred because of file fragmentation. But first, try to defragment the NTDETECT.COM file or the file system you can find. There are different ways you can defragment the NTDETECT.com file. However, the best option for you is to utilize the free contig utility provided by Microsoft. Below are the steps you should follow to defragment the NTDETECT file.
Step 1. First, you have to download contig.zip from Microsoft.
Step 2. After downloading the zip file, extract contig.exe to proceed.
Step 3. Next, launch the command prompt window and navigate to the location of the contig.exe file.
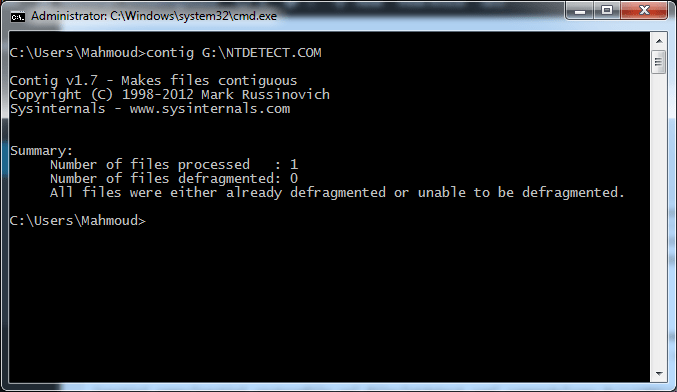
Step 4. Next, run the contig.exe file against the NTDETECT file you need to defragment.
Step 5. Wait for the defragmentation to finish, and the PC console output should look like this after the defragmentation process.
Way 3: Use CHKDSK to Repair Corrupt System Files
If the NTDETECT failed error is caused by a corrupt boot or system partition, then you can repair it by scanning the FAT32 or NTFS partition for malware or errors. Using the CHKDSK command will verify data and files on the disk. Below are the simple steps to follow to fix the NTDETECT failed error.
Step 1. Insert the Windows installation CD and restart your computer to begin.
Step 2. Boot into the CD by pressing any key when the alert ‘press any key to boot from CD’ pops up on your PC.
Step 3. Next, press R to open the recovery console through the ‘options’ menu.
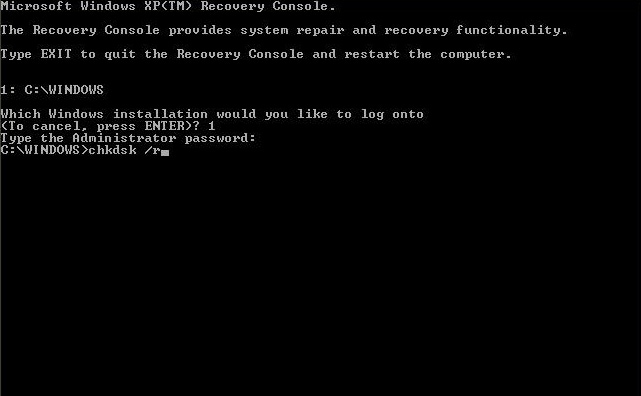
Step 4. You will be required to enter your administrator password; do this and click ‘enter.’
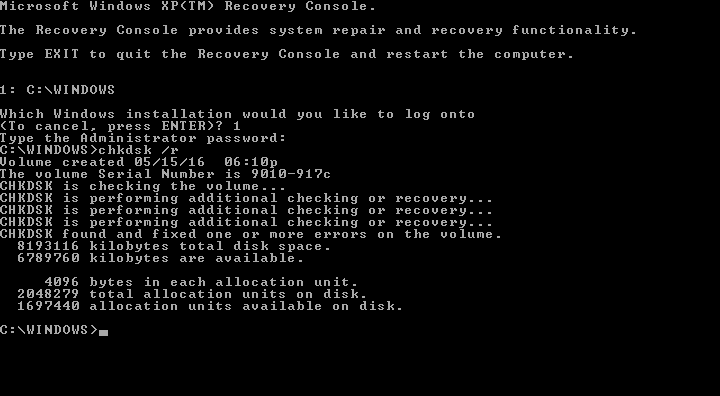
Step 5. At the command prompt, type ‘chkdsk /r’ and then press ‘enter.’
Step 6. After the ‘chkdsk’ process is complete, restart your PC. If there are any alerts or warnings from chkdsk, take note of them.
Way 4: Use Third-Party System Repair Software
Sometimes, the best solution to the NTDETECT failed error is third-party repair software. The best option would be the Easy Recovery Essentials. This software is best when the NTDETECT.COM file is missing, as it will help with recovery. Additionally, it has an in-built automated repair option guaranteed to fix the NTDETECT failed Windows XP installation error automatically.
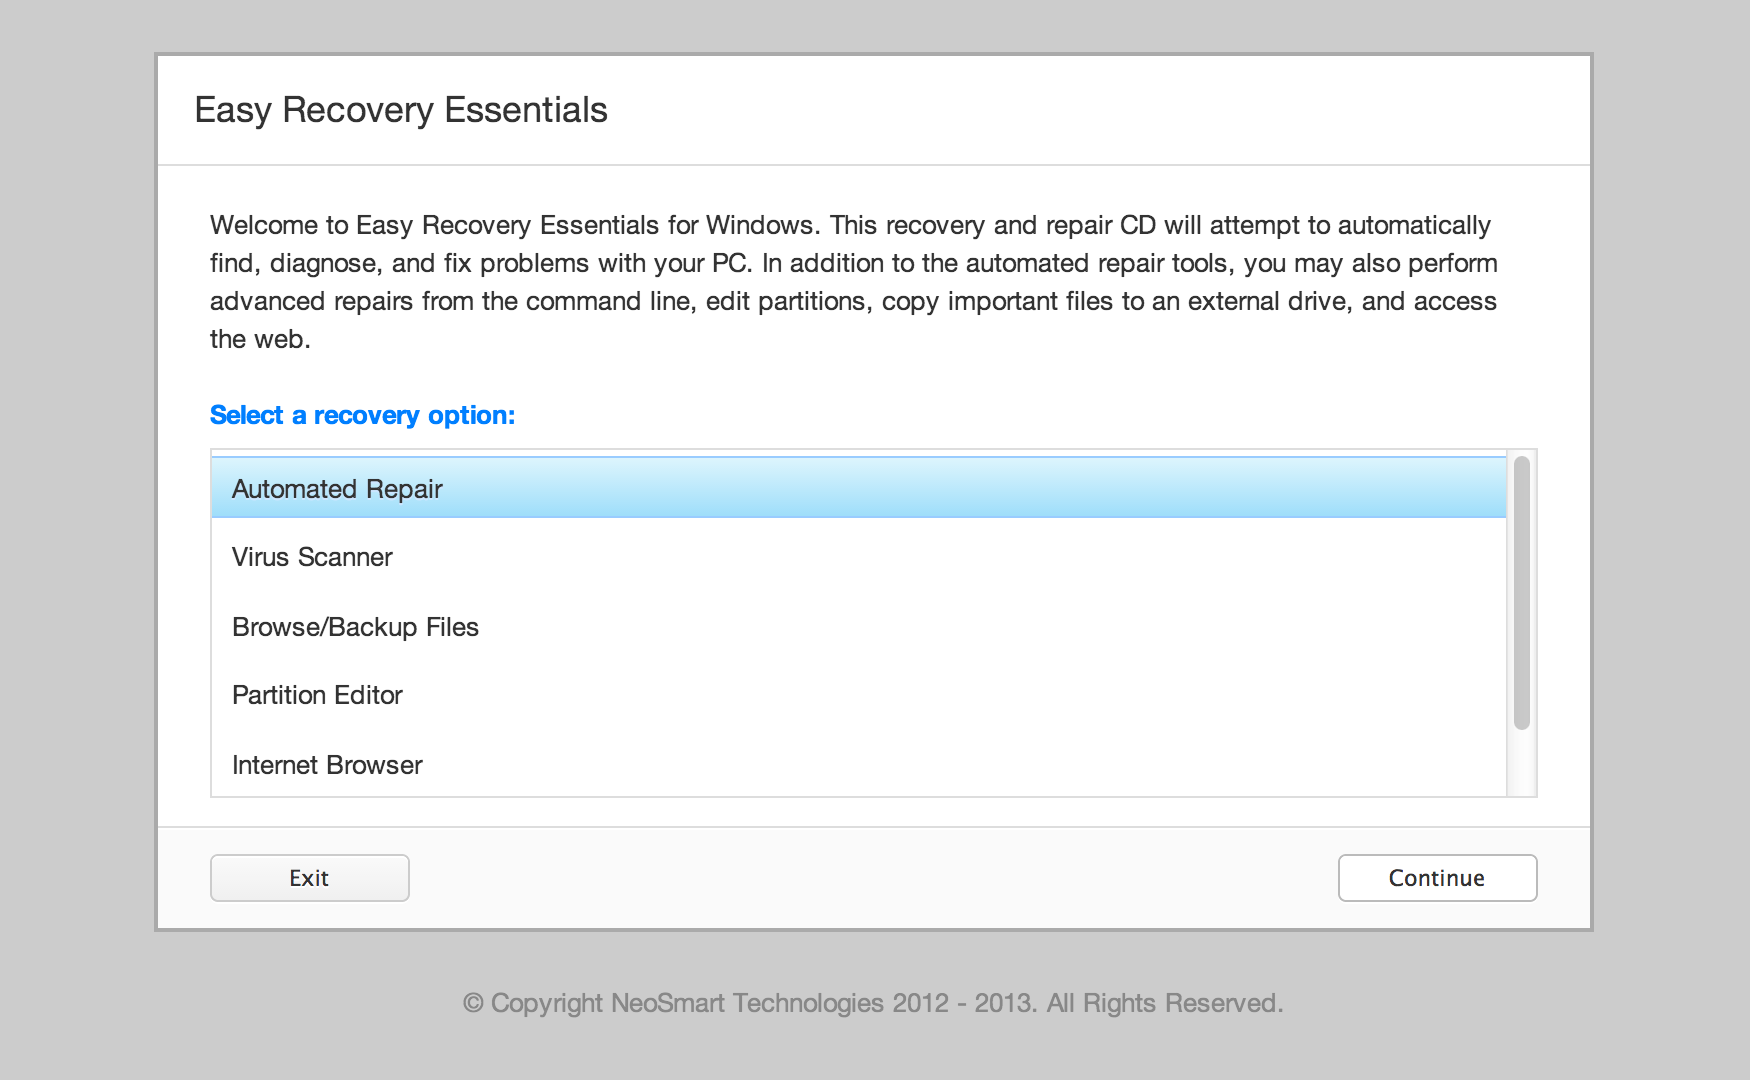
You can use the Easy Recovery Essentials software on Windows XP, Windows 7, 8, and Vista. You can easily download and utilize it on any PC.
Part 4. How to Access and Backup Data When the NTDETECT Failed Occurs
In cases where your PC refused to boot due to the NTDETECT failed error, your PC might be stuck on the blue screen of death, preventing access to your data. In such a case, you might wonder how to recover your data. Luckily, Wondershare Recoverit offers a System Crash Computer Recovery feature that allows you to recover your lost files after a system crash by creating a bootable USB drive.
You can watch the video below to learn how to recover your data using the System Crashed Computer Recovery feature on Wondershare Recoverit or simply follow the steps below.
For Windows XP/Vista/7/8/10/11
For macOS X 10.10 or later
Step 1: Download and install Wondershare Recoverit on a workable Windows or Mac PC.
Step 2: Get a blank USB drive and connect it to the working computer with Wondershare Recoverit installed.

Step 3: On the System Crashed Computer mode of Recoverit, click Start. Then, choose the inserted USB drive to create a bootable media and hit the Create button to begin.

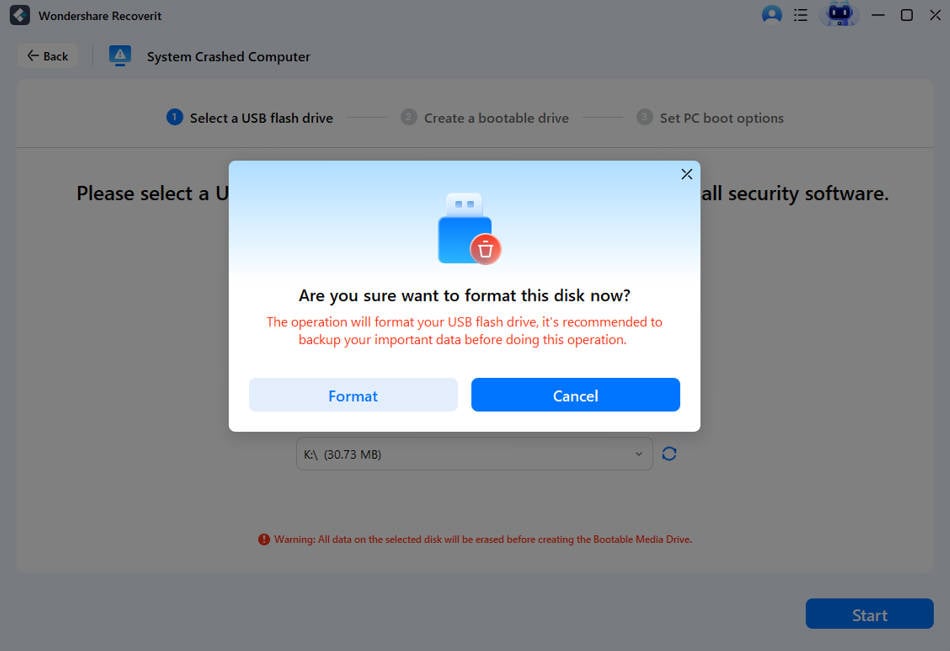
Step 4: You must format the USB drive first.
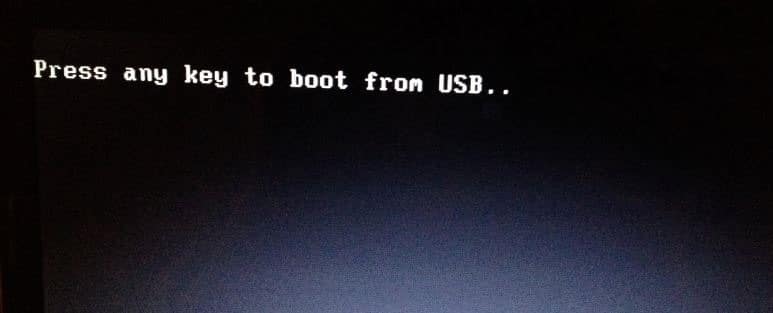
Step 5: After creating the bootable drive, connect it to the crashed computer and restart the PC.
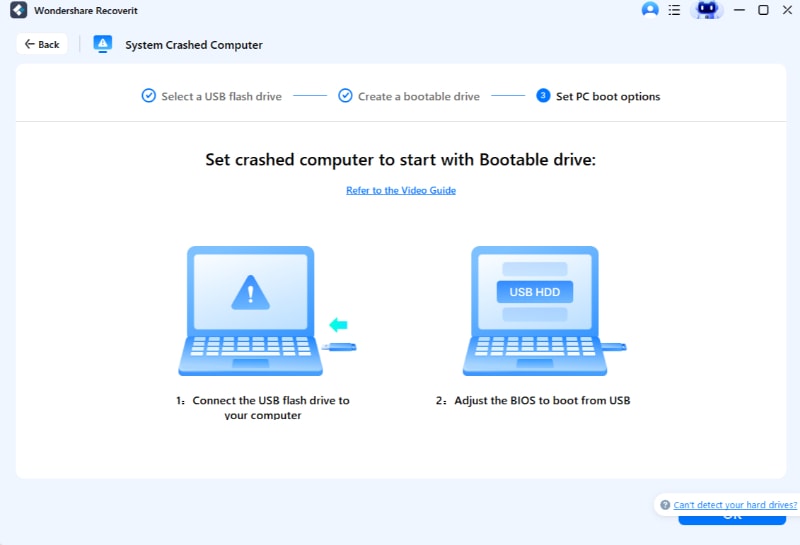
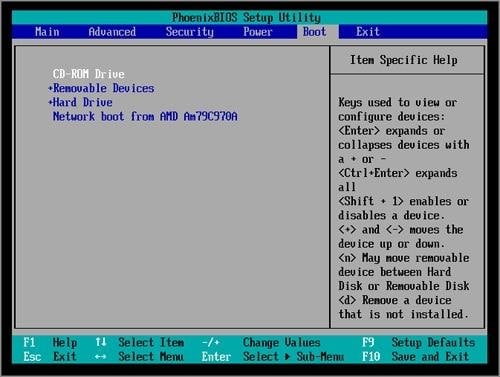
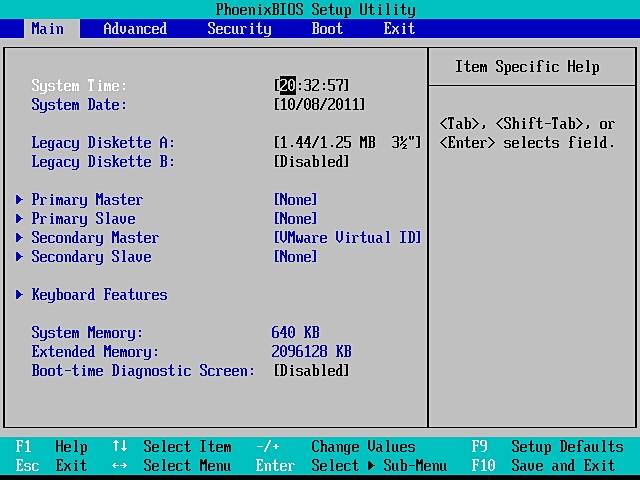
Step 6: Press the BIOS entry key when the first screen appears and customize the BIOS settings to use the USB drive as a primary booting source.
Step 7: Once the PC boots up, you can choose Hard Disk Copy or Data Recovery to rescue your data from the computer with NTDETECT Failed error.

For Windows XP/Vista/7/8/10/11
For macOS X 10.10 or later
Summing Up
Although the NTDETECT Failed error can be confusing and inconvenient, the four methods shared in this guide will help you solve the issue. We recommend recovering your data first using reliable data recovery software like Wondershare Recoverit. The System Crash Computer Recovery feature allows you easily recover and backup data from a computer that crashed due to the NTDETECT failed error.


