It becomes a nightmare if, as a computer user, you mistakenly delete a file or discover that you need a file you initially deleted. Although deleted files usually go to the Recycle Bin, this may not always be the case, especially for older files. That is why this article will show you how you can recover the Windows files you deleted with Linux. With the use of Ubuntu Live CD, or by dual-booting Linux and Windows, you can apply the solutions provided in this article.
Part 1. How To Recover Windows Files With Linux Live CD/USB?
Linux is an adaptable and open-source operating system. A Live CD or Live USB allows you to use an operating system without installing it on your computer. After creating the Live USB, you input it into your turned-off computer, restart it, and configure it to boot from the USB. The Linux operating system and all of its applications remain on the USB. They do not set up on your computer, but they do provide access to any hard drives that are present.
Prerequisites
If your Windows computer's hard disk or solid-state drive fails, you can use Linux Live CD/USB to recover your files and data. So, let's begin by listing the resources you'll need:
- A Linux Live.ISO image file
- Rufus with Source Code
- An empty USB/CD to place the Linux Live ISO on (you can do the same thing with either, change the boot priority to the medium of your choice)
- Another USB drive on which to save your recovered files.
Recover Windows Files With Linux Live USB/CD
Follow the steps below for a smooth process of recovering Windows files with Linux Live USB/CD. For a more detailed explanation, here is a video tutorial to watch.
After downloading UBCD and Rufus (the simplest and quickest way to create bootable USB drives), proceed to the steps below to create a Bootable Linux USB Drive.
Step 1. Create a Bootable Linux USB Drive
- Launch the previously downloaded Rufus. Check that you've selected the correct USB drive. Note that the USB drive will be completely erased during this process. Rufus will already be set to the appropriate setting for you. To select UBCD.ISO, click Select.
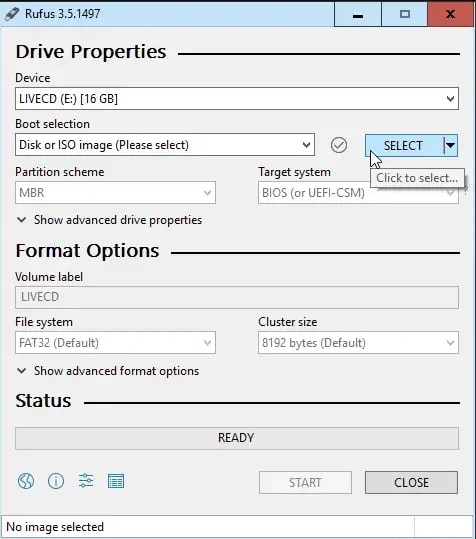
- Locate where you saved the UBCD.ISO and double-click on it to select it when the file explorer opens. Now, press Start. You will be informed that all data on the selected USB drive will be destroyed. To proceed, click OK.
- Rufus will begin creating the bootable USB drive. Under the Status section, you'll notice a progress bar. Click Close when the status bar says READY. Your bootable UBCD USB drive is now complete.

You can now adhere to the steps below to recover your files from the USB drive.
Step 2. Boot Computer With the Linux Live USB Drive to Recover Files
- Depending on your computer, you can boot from a USB drive. When you turn on the computer, you must press a specific key, or combination of keys, to enter BIOS and change the default boot drive to your USB. You'll see a text-based menu after rebooting your computer with UBCD. Use your arrow keys to navigate to Parted Magic and then press Enter.
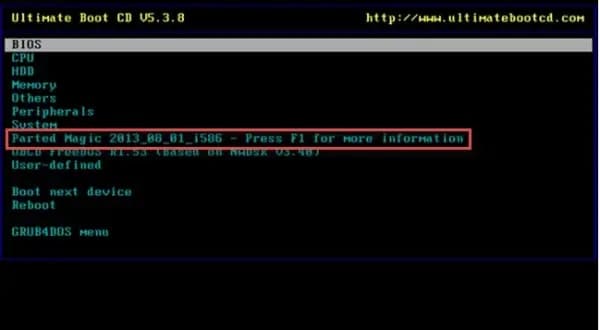
- You'll choose between:
- RAM-based default settings or
- Live with default settings.
If the first doesn't work, try the second. A desktop environment will now appear.
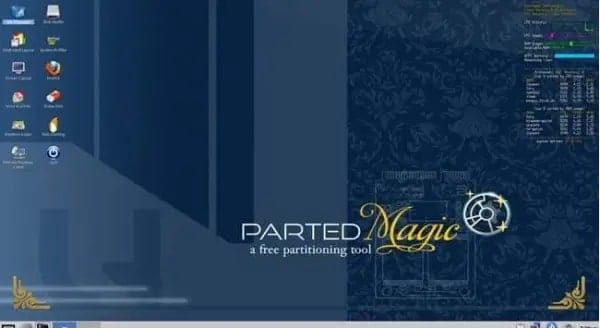
- Double-click on File Manager to open it. You'll see many drives on the left side of the File Manager. Look for a Windows folder.
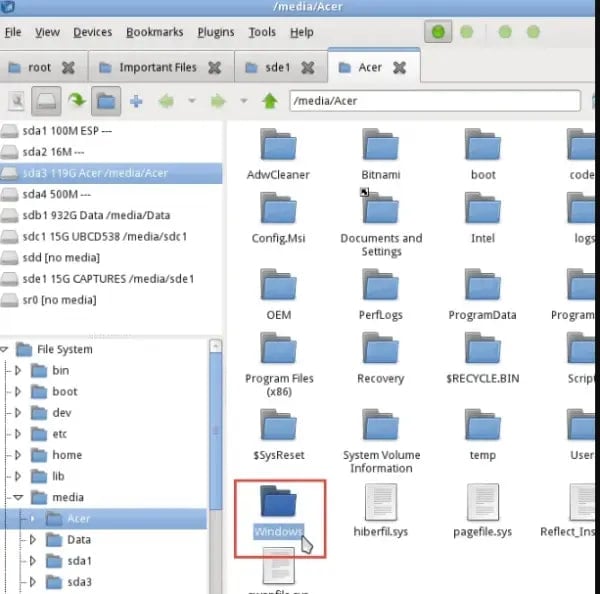
- Now, look through the folder for the files. Click Users > Your Account, where “Your Account” is the username of your account.
Find the files you're looking for. Select the files, right-click, and copy them, just as you would in Windows. Then, locate and select your other USB drive from the left pane, right-click, and copy to the right pane.
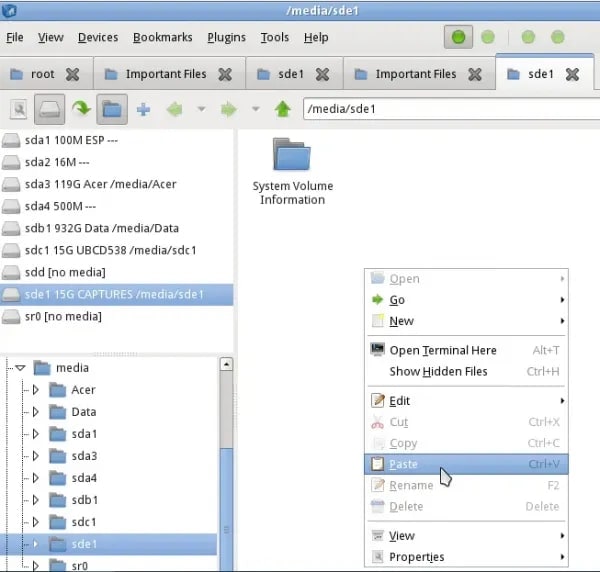
- Your files are now on your USB drive. Exit File Manager by clicking the Start menu button in the bottom-left corner of your desktop. Select Logout. A prompt will appear; select Turn Off Computer.
Part 2. How To Recover Deleted or Lost Windows Files From Linux
With the above steps, you can access and copy available files on Windows to another safe storage device. But what if you find some important files are missing or you want to recover previously deleted files on Windows? This part of the article will teach you how to recover deleted or lost Windows files using Linux data recovery tools.
Linux offers a wide range of tools for data recovery and can be a powerful tool in the event of data loss on a Windows computer. Whether dealing with a software issue or hardware failure, Linux can recover deleted files from a Windows computer. We will explore different methods of connecting a Windows computer to a Linux system, using various Linux commands and tools to recover deleted files.
Things to Do Before Recovering Deleted Windows Files
Before you start the recovery of your deleted Windows files, as will be taught below, you must do the following in preparation:
- Start by creating the folder to which you would send all the files you recover, i.e., the destination for your recovered files. Choose an external storage device or your home directory to serve this purpose.
- Make a switch from your current directory to the one you just created so your recovered files won't be overwritten. You can use the commands below to achieve this:
mkdir /home/username/RecoveredFiles
cd /home/username/RecoveredFiles
Note: Where it says "username," input your username.
- Next, you have to figure out where your deleted files are. Search for all the filesystems that are available by opening a terminal and inputting this command:
sudo fdisk -l
- Go through the list of partitions and filesystems that appear to identify the device your file is located on. If you still cannot identify the device, try this command:
df -h
- The above command will display all the filesystems mounted on your computer. You can then choose the correct device where your deleted files are contained. Once you have chosen the right filesystem, run the following command to unmount it:
sudo umount
Recover Deleted Windows Files From Linux Through Ntfsundelete
Recover deleted Windows files using the pre-installed Ntfsundelete on the Linux system. This utility is also available on Ubuntu's live CD.
- Run the command below to scan the selected filesystem for deleted files:
sudo ntfsundelete
- Use the -m flag if you know the exact name of the file or files you wish to recover. This retrieves files that match the indicated pattern. For instance, the following is a match for the deleted files, "SpecialFile2" and "SpecialFile1."
sudo ntfsundelete -m *special* /dev /sda2

- Now, Ntfsundelete will format the results and provide details about the files, like names, sizes, and the percentage of the file the tool can cover. To find out more about the flags of the ntfsundelete utility, type:
sudo ntfsundelete -h
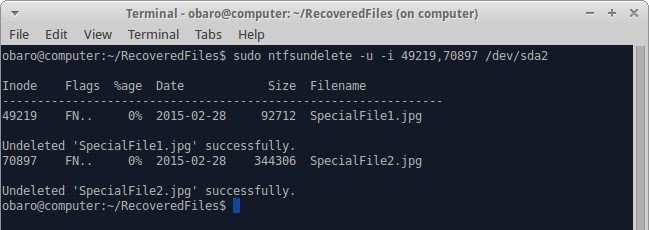
- Recover a file using the -u flag, which represents "undelete," and the -I flag, which represents "flag inodes." As shown below, you can specify more than a file inode by using a comma to separate them:
sudo ntfsundelete -u -I fileinode1 , fileinode2
Recover Deleted Windows Files From Linux Using Testdisk
A powerful tool to recover your Windows deleted files from Linux is Testdisk. This tool is so powerful that you need to use it correctly to avoid causing more harm than good to your system. This is why you need to carefully follow the steps below if you must do it correctly:
- Install Testdisk in Ubuntu by running the below in a terminal:
sudo apt-get install testdisk
- To run this program interactively, type:
sudo testdisk
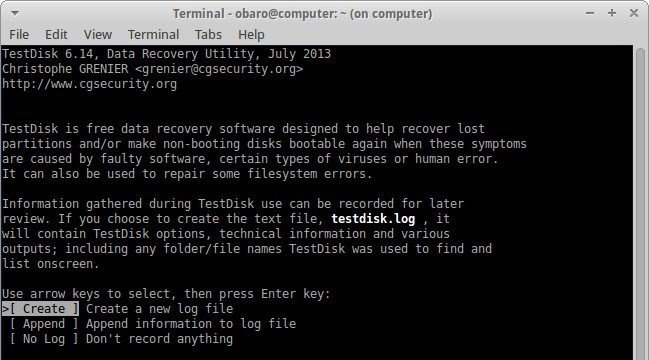
- Choose the option that creates a new log file for you.
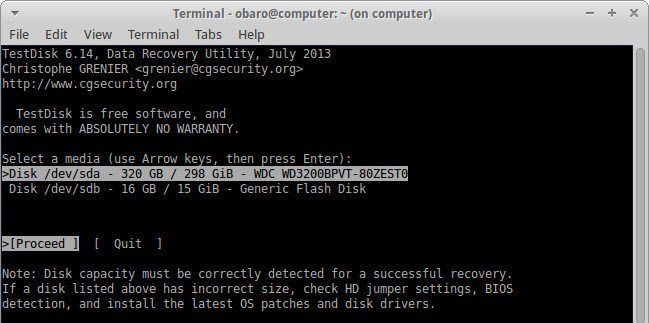
- Select the hard drive which contains all your files.
- This tool will indicate the type of partition found on your hard drive so you can have a guide on your choice. Now, unless you are sure beyond all reasonable doubt that the hint given by TestDisk is wrong, take note to choose the partition type suggested to you by the tool.
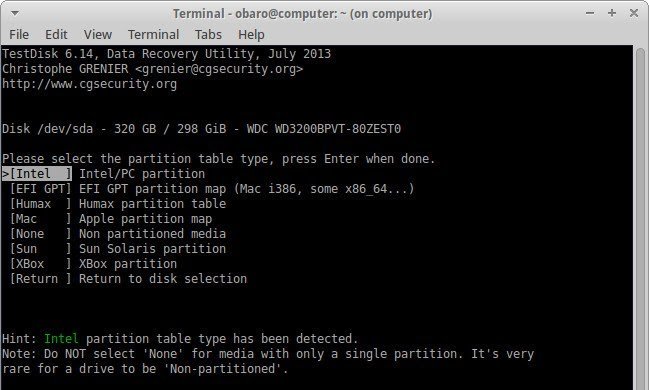
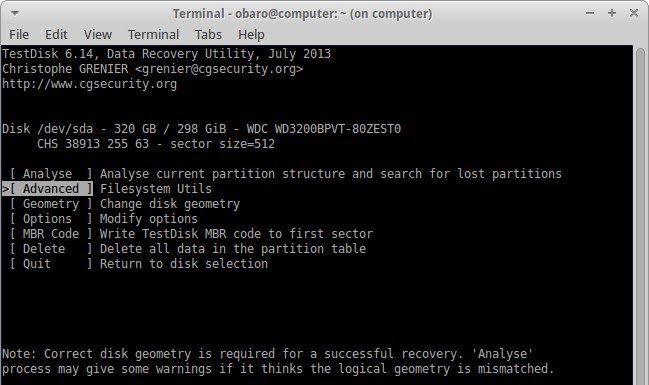
- Choose the option, [Advanced] Filesystem Utils and ignore all others.
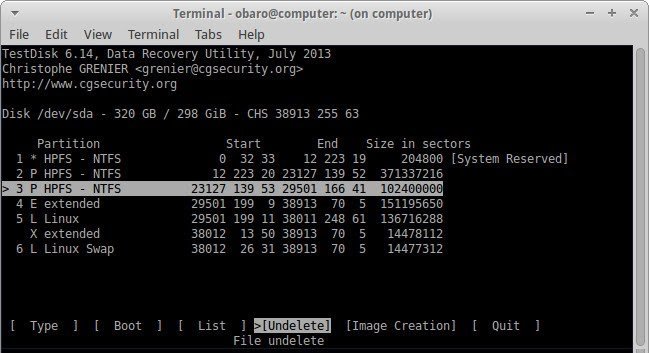
- Using the up/down arrows, choose the specified partition. Then, using the right/left arrows, go to the bottom of the terminal and choose the undelete option.
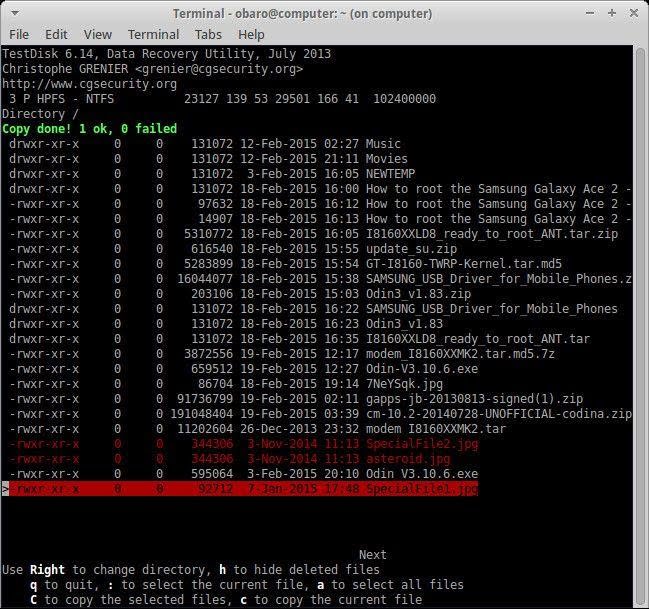
- Find your way to the directory you are sure has the deleted files you want to recover. You will know the files that have been deleted when you see them written in red. Now, navigate to the files using the up/down arrow.
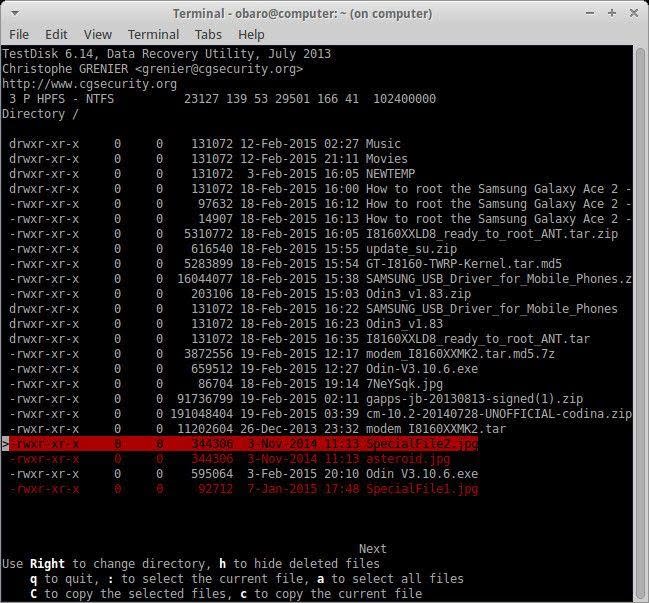
- Copy the files by pressing the "c" key on your keyboard. Again, undelete the files by pressing "y" and then choose a target destination after being asked by TestDisk, where you wish to save them. You will see a color-coded message to alert you whether the process is a failure or a success.
Part 3. A Simpler Alternative to Linux Live CD to Recover Windows Files
A Linux live CD can be complicated for those unfamiliar with Linux commands and file systems. Additionally, it requires a lot of time to learn and use. With this, a simpler alternative to Linux Live CD can be a great lifesaver. A data recovery software like Wondershare Recoverit provides a user-friendly interface and is easy to use for anyone, even for those who need to be tech-savvy. It can also save you time by providing a more efficient recovery process from a crashed computer and deleted file recovery.
Wondershare Recoverit – Leader in Data Recovery
5,481,435 people have downloaded it.
Ability to recover more than 1000 file types from almost any storage media, such as Windows/Mac/Linux PCs, NAS Servers, USB drives, SD cards, external hard disks, digital cameras, etc.
Efficiently handle various data loss scenarios, including accidental deletion, emptied recycle bins or trash, formatting, lost partition, virus attack, RAW, and RAID.
An intuitive interface that lets you preview the files before recovery. No payment is required if the files are unrecoverable.
Case 1. Recover Deleted Windows Files
To recover data from a Windows computer using Wondershare Recoverit, follow these three steps:
Step 1: Pick a Location Where the Data Was Lost
Launch Wondershare Recoverit after the installation. Hard Drives and Locations will be displayed by default. Please select a drive from the Hard Disk Drives tab or a specific path from Quick Access.

Step 2: Scanning Procedure
Click Start to begin scanning at the specified location. Scanning may take several minutes if there are many large files. Recoverit, on the other hand, has greatly accelerated the scanning process, saving you time during recovery.

In the meantime, you can view the scanning results and check them anytime. You can also stop or pause scanning at any time.
Step 3: Preview and Recover Files
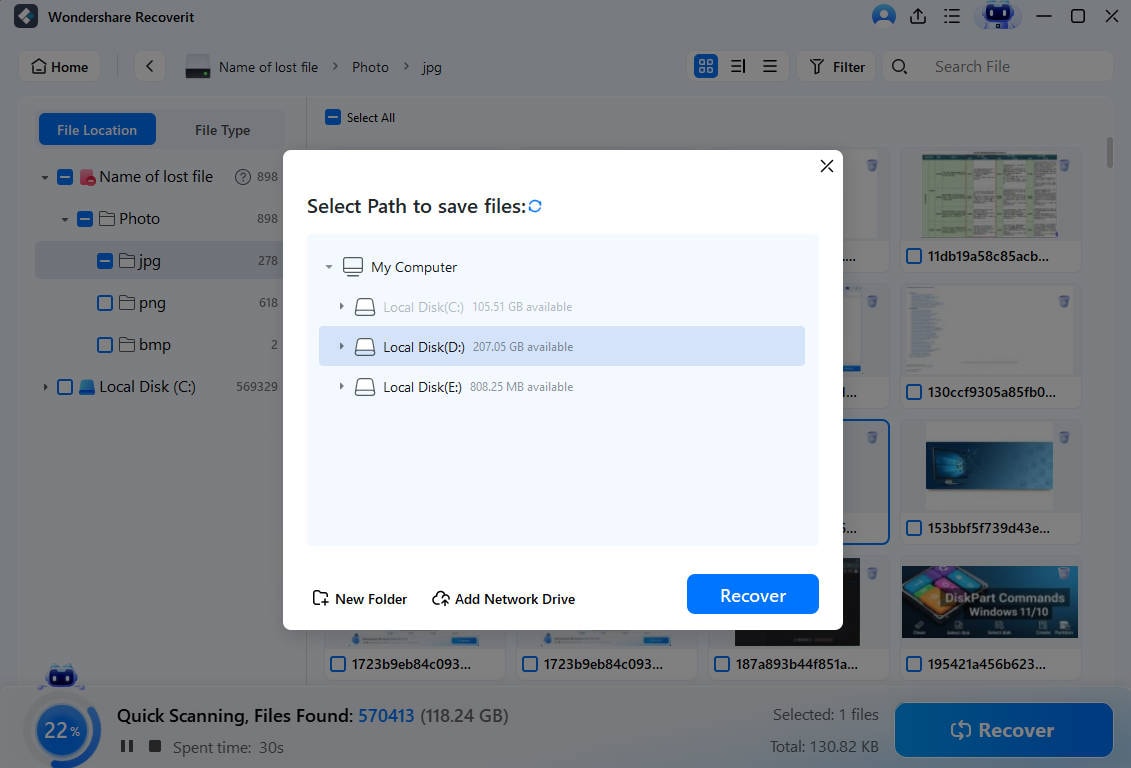
Before proceeding to the recovery step with Recoverit, users can preview the recoverable files. You can preview nearly any file type, including images, videos, audio, Outlook emails, documents, etc.

You can now use Recoverit to recover all of the files after reviewing them and confirming that they are what you want. Click Recover to recover your lost data, and then choose a new location to save the recovered files.
For Windows XP/Vista/7/8/10/11
For macOS X 10.10 or later
Case 2. Recover Files From Crashed Windows Computer
If your Windows system becomes unbootable or stops working properly, you can use Recoverit to access and recover your data. After downloading and installing Recoverit on another working computer, follow the steps in the video below to rescue your essential files right now.
For Windows XP/Vista/7/8/10/11
For macOS X 10.10 or later
Summing Up
This article teaches how to recover deleted files from a Windows computer using Linux. We cover different methods of using various Linux commands and tools to recover deleted files. Whether your computer suffers from a software issue or a hardware failure, this guide will help you recover your important files and get back to business as usual. The article also mentions the Wondershare Recoverit as a simpler alternative to Linux live CD for recovering files.

 ChatGPT
 Perplexity
 Google AI Mode
 Grok
Grok


