
 TL;DR:
Setting up a QNAP RAID combines multiple physical NAS drives into a single logical unit to balance data redundancy, storage capacity, and read or write performance based on your specific hardware limits.
● RAID 1 is ideal for home users with 2-bay NAS devices because it mirrors data completely but halves available capacity, whereas RAID 5 and RAID 6 are recommended for businesses needing to withstand one or two drive failures, respectively, though both suffer from slower write speeds.
● Upgrading an existing RAID configuration without data loss via the QTS Storage Manager requires strict minimum drive additions, such as adding one extra drive to migrate from Basic to RAID 1 or RAID 1 to RAID 5, and two extra drives to move from Basic to RAID 5.
● QNAP NAS systems running the QuTS hero operating system unlock exclusive support for Triple Mirror and Triple Parity configurations, allowing the storage array to protect against up to three simultaneous drive failures.
Ask AI for a summary
 ChatGPT
 Perplexity
 Gemini
 Claude
 Grok
Grok
Data loss, without a doubt, is one of the biggest challenges associated with both small and large-scale businesses. The common reasons behind losing data include; power outages, software corruption, hardware issues, human error, and more. You will find multiple third-party tools claiming to protect your data when exploring the market. But you can’t simply trust all of them.
This is where QNAP RAID lends a helping hand. This mechanism consists of multiple levels, like QNAP RAID 1, QNAP RAID 5, and others. This article presents a detailed discussion of what RAID is and what its different levels do. Let’s gain insight into the specifics.
Part 1. What is the Difference Between RAID and QNAP NAS?
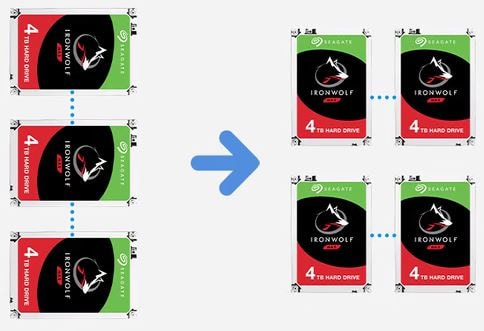
Well, RAID is a short form for a Redundant Array of Independent Disks. It is introduced by QNAP Systems, Inc., which is why it is commonly called QNAP RAID. RAID, with super easy configuration, prepares one logical storage unit by combining different drives to prevent data loss.
Structure of QNAP RAID
Different RAID types are supported by QNAP NAS. They provide you with various levels of data redundancy and performance. You have the option to choose hot configurations and single RAID (e.g., RAID 1, 5, and 6) based on the number of disks available in your NAS.
If your NAS has a QuTS hero operating system, it will offer great support for Triple Mirror and Tripe Parity. The Triple Mirror is known for providing mirroring protection for 3 disks, whereas Triple Parity protects 3 drives from failing.
What is the Main Advantage of RAID?
The biggest advantage of QNAP RAID is, of course, providing data protection. The best part of this protection is that it enhances the performance of a single disk by combining multiple drives together into a single logical unit. In addition, it uses a large number of lower-priced drives, making it a budget-friendly approach.
What is a QNAP NAS?
In case you don’t know, NAS is a shorter version of Network Attached Storage. As far as QNAP NAS is concerned, it is a system equipped with one or multiple hard disks. These drives are always connected to the internet. Moreover, it acts as a storage unit or a backup hub. It can carry different files, like music, videos, photos, and other similar data.
Differences between RAID and QNAP NAS
QNAP NAS is a system of one or more disks, as stated earlier. You can scale it up or down, keeping in mind your storage capacity. On the other hand, RAID backs up your data files by using multiple hard drives and does not offer support for protecting portable devices. They are unable to hold multiple disks, so using RAID on a personal level will be a costly approach.
Part 2. What are the Common RAID Levels?
This section presents a brief discussion on different levels of RAID, like QNAP RAID 0, QNAP RAID 1, QNAP RAID 5, QNAP RAID 6, and QNAP RAID 10. The pros and cons of these levels will also be part of this discussion.
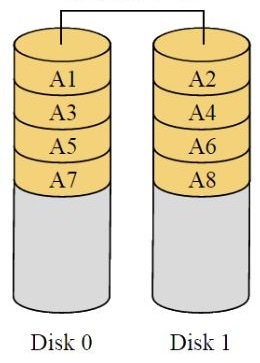
QNAP RAID 0
If you prefer to work without a net, RAID 0 is a perfect option for you. It helps you spread the data across more than 2 hard disks. This RAID level prepares one giant unit for you to access by adding the storage capacity of 2+ drives.
Pros
Easy to use
Pretty straightforward
The support of an extra RAID controller is rarely required
Features the availability of all capacity
Offers good write and good read speeds
Cons
It does not offer a long-term solution
RAID 0 is not an appropriate solution for important data. You will lose the entire data if the disk fails.
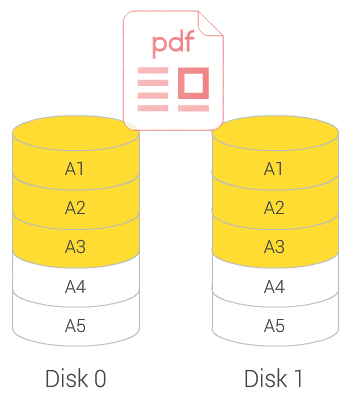
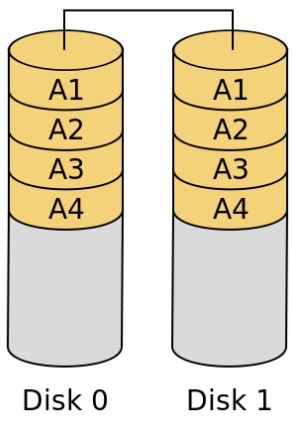
QNAP RAID 1
It is known for providing a good balance of speed and redundancy. QNAP RAID 1 is perfect for home users. In addition, it is the favorite in most 2-Bay QNAP NAS devices. This RAID level needs at least 2 hard disks and you can only RAID them in pairs.
Pros
You can perform quick and easy recovery after replacing the drive.
It is easy to maintain consistent good and good write speeds.
Duplicates your 100% data when it is in operation.
Additional RAID is rarely needed.
Cons
If the enclosure is running, you can rarely replace a faulty or damaged drive.
Once you set up the RAID, you can access only half of its total capacity.
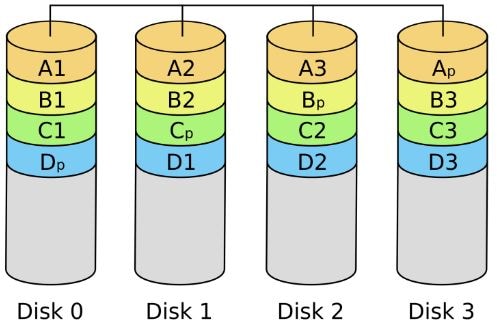
QNAP RAID 5
When setting up the storage array, QNAP RAID 5 is a top choice for both small and large-scale businesses. If you have four or more disks in the enclosure, this RAID level is recommended for you. Just like other RAID types, it spreads your data across multiple disks, but every stripe of the disk gives a small data nugget to one of the drives. This small data nugget is known as parity data.
Pros
You get access to excellent read speeds.
If a single drive fails, your data remains completely protected.
You can access the data when adding a new disk to the enclosure.
Cons
It takes more time to recover your data.
As far as the write speeds are concerned, they are below that of a single hard disk.
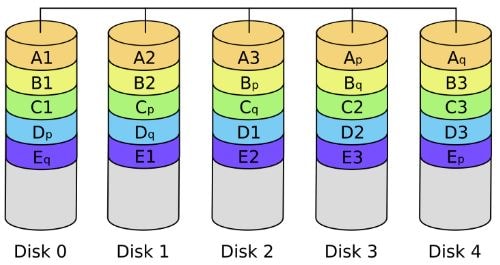
QNAP RAID 6
It is pretty similar to QNAP RAID 5 and uses the same principle as well. The use of TWO hard disks creates the difference. In the RAID type, the system duplicates the parity data on two disks. It is best to use for large-scale businesses that need more than 8 drives.
Pros
If one or two drives fail, your data remains completely secure.
Offers good read speeds.
You can easily access your data when introducing a new hard drive to the array.
Cons
Features slow write speeds.
Data recovery can take longer.
The storage of 2 drives gets lost.
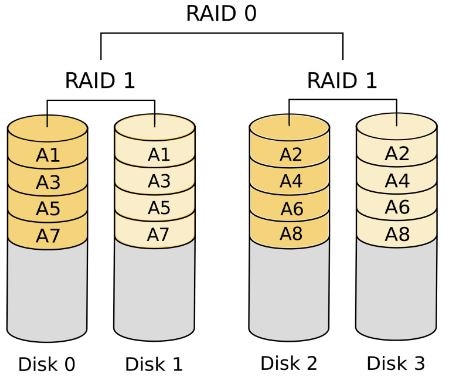
QNAP RAID 10
It offers combined benefits of RAID 0 and QNAP RAID 1. Though it offers high-performance solutions, its cost vs. capacity margin is high compared to all other RAID levels. QNAP RAID 10 needs four hard disks. It maps them all in a 2x2 volume. If you are looking for easy data recovery, this RAID is a suitable option for you.
Pros
In case of data loss, you can perform quick recovery.
It can afford the loss of two disks if they are not paired.
Features good read and write speeds.
Cons
All the data will be lost if you lose two mirrored disks simultaneously.
Half of the available storage capacity gets lost.
Learn More: What Is RAID?
Part 3. Why Do You Need RAID on Your QNAP NAS?
As mentioned earlier, RAID combines different small drives into one large storage unit. Your computer will see only a single drive instead of displaying multiple ones. RAID holds two different versions, i.e., Redundant Array of Independent Disks and Redundant Array of Inexpensive Disks.
The variation in the letters is due to the way the storage has changed. It is an inevitable fact that disk capacity has grown larger. As a result, the more recent trend of data storage arrays requiring redundancy has outweighed the need for constructing huge volumes. This is why you need RAID on your QNAP NAS.
Part 4. How to Set Up RAID in QNAP NAS?
It is super simple to set up a new RAID or change the RAID setup in QNAP NAS. This section presents a quick review of both setups.
Setting Up a New RAID
Haven’t you set up a RAID yet? Well, you can choose from the list of RAID setups given below.
From |
To |
Number of Disks (Minimum) |
| No RAID | JBOD or Basic | 1 |
| No RAID | QNAP RAID 0 or QNAP RAID 1 | 2 |
| No RAID | QNAP RAID 5 | 3 |
| No RAID | QNAP RAID 6 or QNAP RAID 10 | 4 |
The steps for setting up a new RAID are as follows.
Step 1: Make sure your computer and NAS are connected to the same network.
Step 2: Now, open any browser (e.g., Mozilla Firefox or Google Chrome) on your system.
Step 3: Enter the NAS IP address in the address bar. You will be able to see a QTS login screen now.
Step 4: It is time to provide your credentials (account name and password). By default, the username and password will be “admin.”
Step 5: Now, tap on “Login.”
Step 6: Navigate to the “Storage Manager” and hit the “Storage Space” option.
Step 7: Now, tap on “Create.”
Step 8: This time, select the desired RAID type and press the “Next” button.
Step 9: Select the hard drive you want to utilize for the RAID setup.
Step 10: Verify what you have chosen and click on “Apply.”
Step 11: Now, go to “Volume” in the Storage Manager and hit “Create.”
Step 12: Select “Choose an existing storage pool” and move next.
Step 13: It is time to select how large the volume should be. Then, tap on “Apply.”
Have you carefully followed all the steps listed above? Great. You have set up RAID in your QNAP NAS.
Changing the RAID Setup
Are your disks running in RAID setup successfully? Do you want to change the drives without experiencing data loss? It is possible, but with limited options. You have to select an option from the list below.
From |
To |
Number of Disks (Minimum) |
| JBOD or Basic | RAID 1 | 2 drives with one more than basic |
| JBOD or Basic | RAID 5 | 3 drives with two more than basic |
| RAID 1 | RAID 5 | 3 drives with one more than RAID 1 |
| RAID 5 | RAID 6 | 4 drives with one more than RAID 5 |
Let’s go through the steps required to change the RAID setup.
Step 1: Log in to your NAS and go to “Store Manager.”
Step 2: Select “Volume” and choose “Manage.”
Step 3: On the new screen, select “Change RAID type” and click on “Next.”
Step 4: Now, choose the RAID setup you want and tap on “Next.”
Step 5: Select the newly added disks and click “Next.”
Following the above steps will end up in changing the RAID setup.
Part 5. Do You Still Need Third Party Software to Recover Data from Your NAS?
Are you looking to get your important data file back from your NAS drive? Can’t just trust a random tool? On the hunt for a good suggestion to get over the line? Your search ends here, as this section presents a top-grade data recovery software - Wondershare Recoverit - that has constantly achieved a recovery rate of over 95%.
For Windows Vista/7/8/10/11
For macOS X 10.10 or later
Why should you download and try Recoverit? Is this what you have in mind at the moment? If yes, let’s look at the parameters below that will surely convince you to give this software a try.
- The highest recovery rate - 95%
- Fast, secure, and reliable data recovery
- Supports 500+ recovery scenarios, 1000+ file formats, and 2000+ storage media, including NAS
- Available in 15 languages with more than 35 registered patents
- More than 50 million people from 160+ countries are already benefiting from this program
- Money-back guarantee helps you boost your confidence when purchasing this tool
- Advanced recovery available
How to Use Recoverit to Recover Your Deleted/Lost Data Files from NAS?
Download and install Recoverit on your system. Open the program and follow the below steps.
Step 1: Click on “NAS and Linux” and hit “NAS Recovery” to proceed.

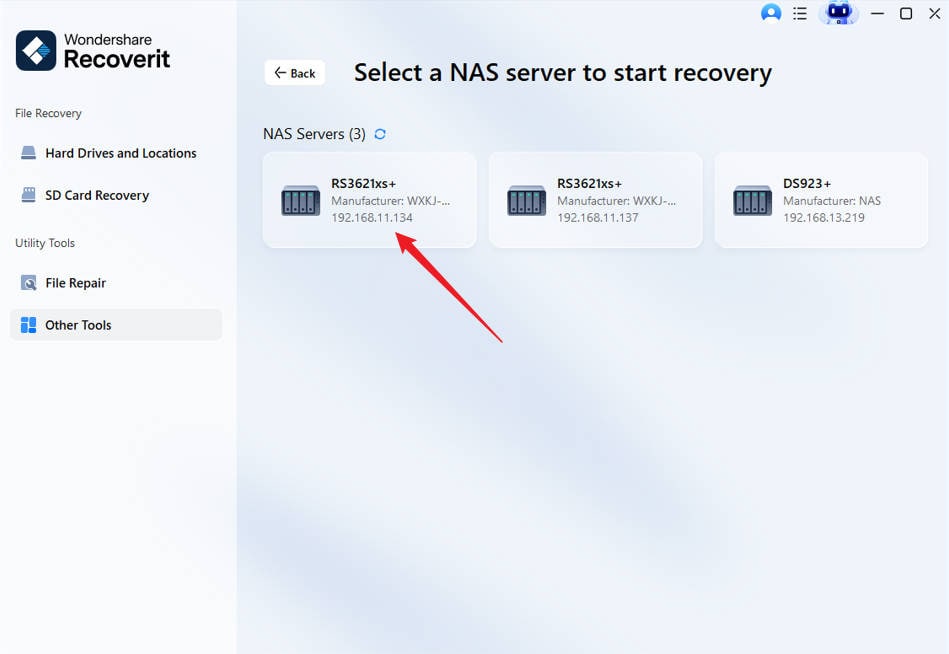
Step 2: Now, this tool will search for the available NAS devices and display them on your screen. Select the one which has your lost or deleted files.
Step 3: It is time to tap on “Connect” to connect your NAS device with a wireless connection. For this, you have to provide certain information, like user name, password, port, and IP address.
Step 4: Now, Recoverit will initiate a scanning process to find you deleted or lost files and folders in NAS. You can monitor the scanning progress by keeping an eye on the bottom of your screen, as displayed below.

You have the option to stop or pause the scanning process once you find the right file. Then, tap on “Preview” to confirm you have selected the right data to get it back.

Step 5: Now, hit the “Recover” button and the software will ask you to select a particular path to save the recovered or restored data files on your system.

Important Note: Make sure the path you choose to save the recovered data is different from the location where your files were deleted or lost due to any reason. It is just to ensure that your data will remain safe now.
Video Tutorial on How to Recover Files from NAS Server?
For Windows Vista/7/8/10/11
For macOS X 10.10 or later
Final Words
QNAP RAID is a combination of multiple disks that aims to prevent data loss. This disk combination is packed into a single storage unit. Your computer will show only a single drive, like C Drive, instead of showing each disk separately. QNAP RAID has different levels, e.g., QNAP RAID 0, QNAP RAID 1, QNAP RAID 5, QNAP RAID 6, and QNAP RAID 10. The above discussion explains them all.
If you are on the hunt for a truly wonderful tool to perform efficient and effective data recovery from your NAS, you should download and install Wondershare Recoverit to benefit from its one-of-its-kind recovery power. You will be happy to see that more than 50 million users worldwide are happily using this software to get their lost and deleted back.
For Windows Vista/7/8/10/11
For macOS X 10.10 or later


