

 TL;DR:
macOS Disk Utility natively handles drive formatting, APFS volume management, and RAID configurations, but repairing an active startup disk requires booting the system into a separate recovery mode.
● To run First Aid on your primary boot disk, you must restart the Mac and hold Command + R to enter macOS Recovery, as active system volumes cannot be repaired while the OS is running.
● Creating multiple APFS volumes within a single container allows them to dynamically share available drive space, eliminating the need to pre-allocate fixed partition sizes.
● While Disk Utility resolves structural directory errors, it cannot retrieve deleted or corrupted individual files, necessitating third-party recovery tools like Recoverit for deep drive scanning.
Ask AI for a summary
 ChatGPT
 Perplexity
 Gemini
 Claude
 Grok
Grok
The maintenance of your high-end devices is a necessity for making them last long and optimizing their performance. Managing their storage is among the key elements that you need to check to boost their productivity and get the tasks done. macOS users can benefit from the Disk Utility, a built-in facility for device maintenance. This article looks into this utility and explores how to use Disk Utility on Mac for optimized device performance.
Try Recoverit to Perform Mac Data Recovery
 Security Verified. 3,591,664 people have downloaded it.
In this article

Part 1. Detailed Overview of Disk Utility on Mac
Your disk and storage devices can be managed using the built-in Disk Utility tool offered by macOS. It allows users to format and monitor internal or external drives of their device to handle storage tasks. The following section explains what is Disk Utility and provides further details about it:
- Erasing and Formatting Drives: Disk Utility lets you erase a drive and choose a file system like APFS and more. This process is essential when preparing a new drive or wiping one for reuse or sale.
- Partitioning Disks: You can divide a physical disk into multiple logical volumes and make each act like a separate drive. This process is useful when you need to organize data or run multiple operating systems on the same MacBook.
- Using First Aid to Repair Disks: When your system has errors, the First Aid feature scans disks and attempts to repair them. It is often used when your Mac is experiencing disk-related issues or when it fails to boot correctly.
- Creating and Mounting Disk Images: Disk Utility allows you to create disk images for backups or software. You can also mount or unmount these images to access or hide their contents as needed.
Part 2. How To Use Disk Utility on Mac: A Detailed Guide
You must know how to open and use the Disk Utility tool in order to make the most of this facility. The following section explains how to open Disk Utility on Mac and use it further for various tasks:
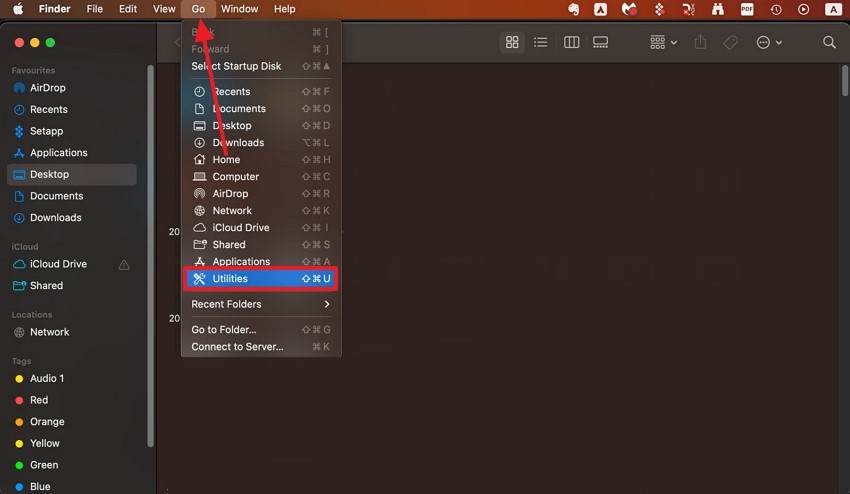
Step 1. Upon opening your MacBook, look for "Finder" and select "Go" from the options to enter "Utilities."
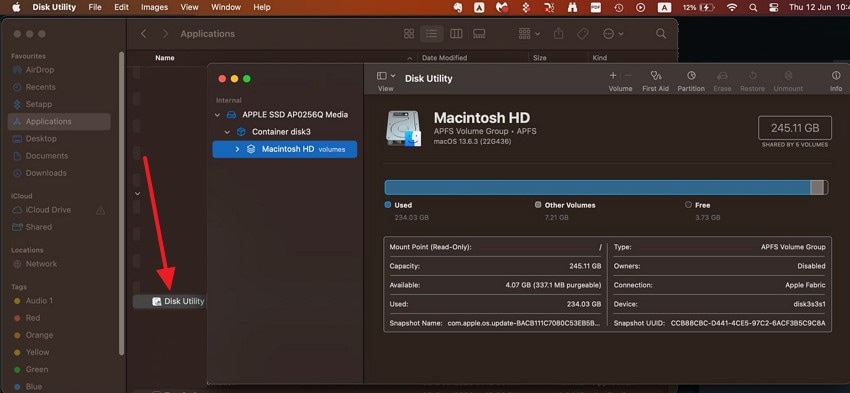
Step 2. As you enter "Utilities," select the "Disk Utility" option to access the tool in the next interface.
1. Managing Space Between Multiple Volumes
The first method of using this tool is managing space between multiple volumes, which is significant because it allows users to separate system and user files within a single drive. Volumes within the same container share available space dynamically to eliminate the need to pre-allocate fixed sizes in APFS.
This flexibility ensures better storage utilization and simplifies disk management without the risk of wasting unused space. Follow the guide below to learn how to use Disk Utility on Mac for this technique:
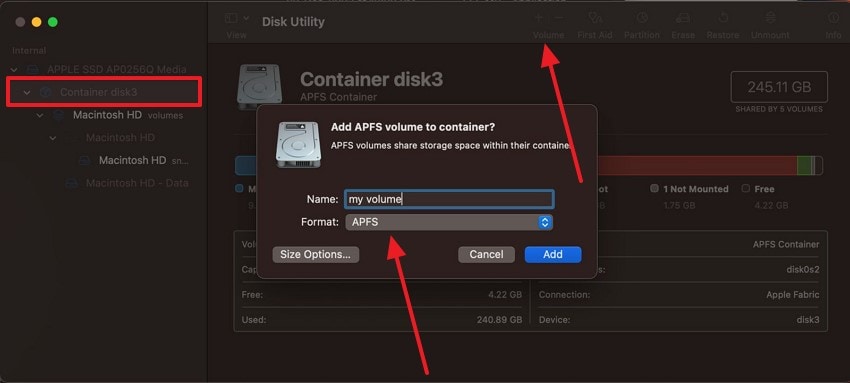
Add Volume
Instructions. Using the Disk Utility interface, select the "Disk" from the left panel and click the "Add Volume" icon to access a new window. In this window, change the name of the volume and select "APFS" as the format to add the volume to your device.
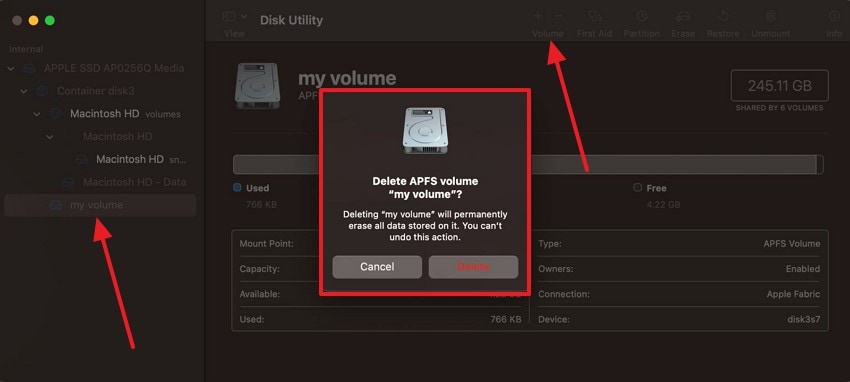
Remove Volume
Instructions. To remove volume, select the "Volume" from the left panel and click the "Remove Volume" icon to hit the "Delete" button in the next pop-up.
2. Erasing Drives and Formatting It
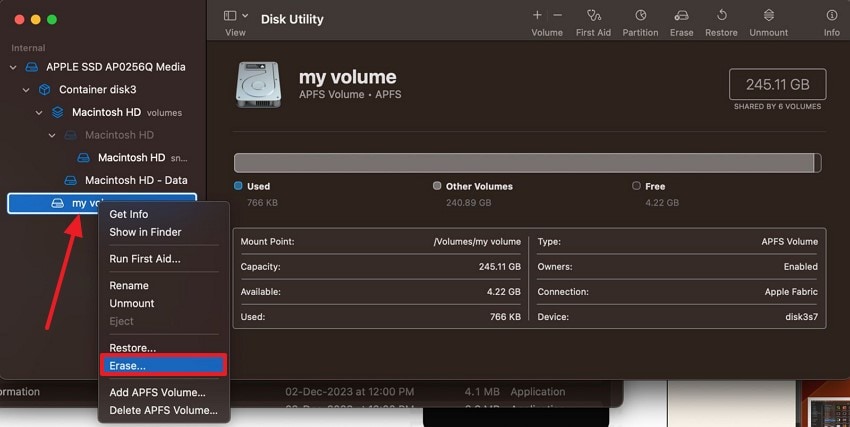
Erasing and formatting a drive is essential when you need to prepare it for purposes like installing macOS or creating a backup disk. It allows users to choose a suitable file system to ensure compatibility based on how the drive will be used. This method also eliminates potential disk errors that could interfere with new setups. Follow the guide below to learn how do I get to Disk Utility on Mac to perform this function:
Instructions. To begin with, access your "Volume" from the left panel and right-click on it to select the "Erase" button.
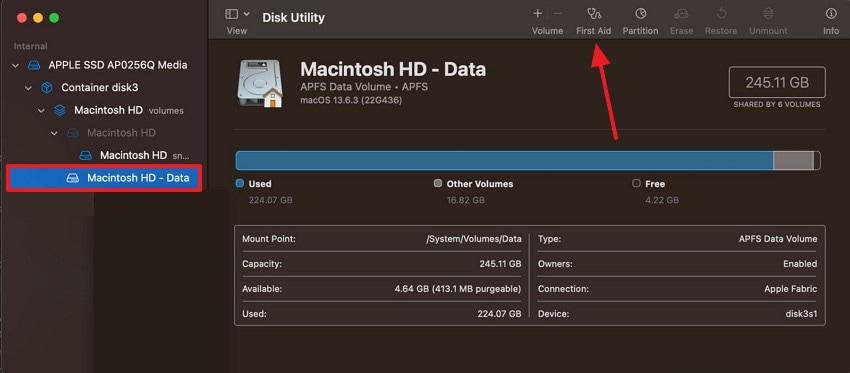
3. Using the First Aid Feature
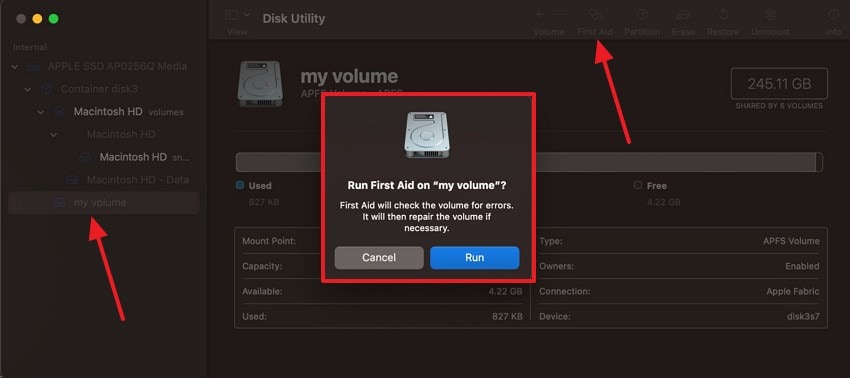
Using the First Aid feature in Disk Utility is essential for diagnosing and repairing disk errors that can affect performance. It checks the integrity of the file system and attempts to fix issues with volume structure or directory data. Regular use of First Aid prevents minor disk problems from escalating into system failures. Follow the guide below if you want to learn how to open Disk Utility on Mac for this process:
Instructions. Start the process by selecting your "Volume" in the Disk Utility window, then hit the "First Aid" button at the top right. Hit the "Run" button in the next dialogue box to execute the First Aid process.
4. Restoring Drive Spaces
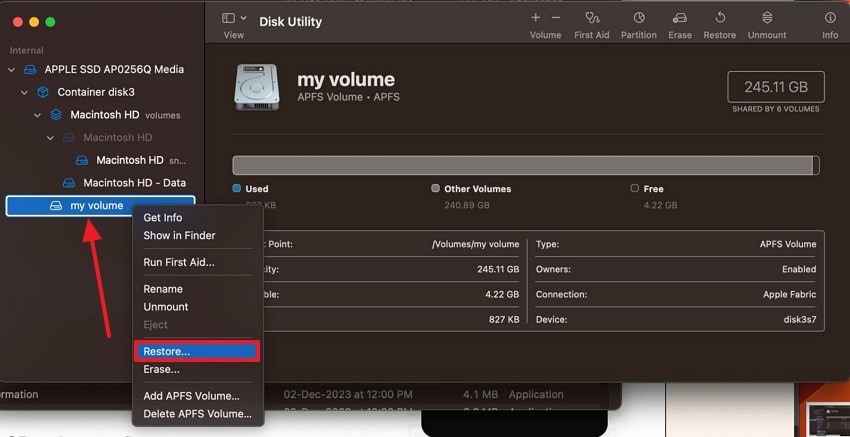
The restoring spaces process is important when you need to copy data from a known source and revert a volume to a previous state. Performing this task ensures consistency across drives and can save time compared to manually reinstalling or reconfiguring a system. The guide below explains how to use this technique from the Disk Utility window:
Instructions. To restore drive spaces on your MacBook, select your "Volume" and right-click on it to select the "Restore" option.
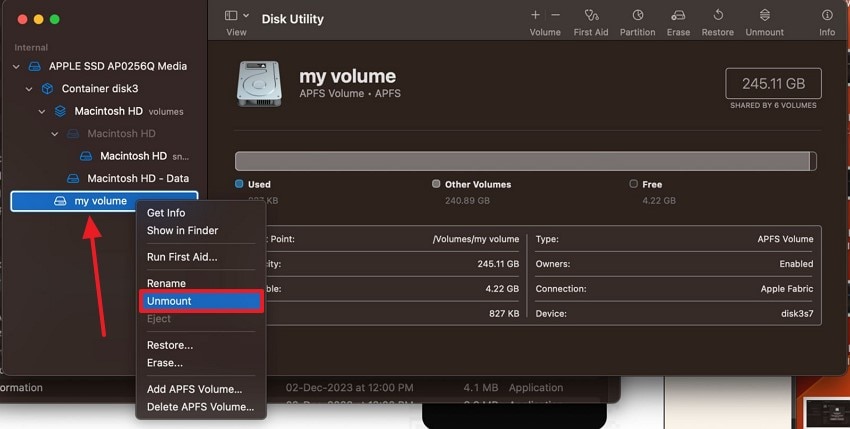
5. Unmounting/Mounting Drives Across Mac
By executing this process, you can safely manage external and internal storage devices without risking data corruption. Unmounting disconnects a drive from the system while keeping the data intact, which is useful before device maintenance.
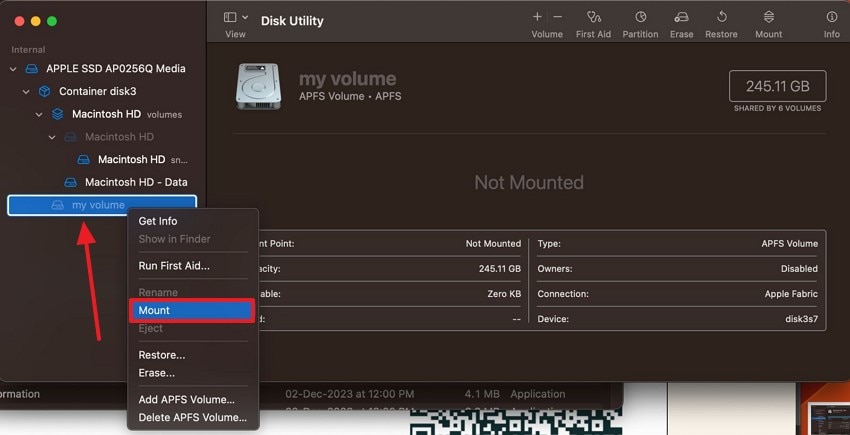
Mounting makes the drive accessible again to allow the system to read from or write to it as needed. Check out the guide below to learn how do I get to Disk Utility on Mac for this purpose:
Unmount
Instructions. First, open Disk Utility and right-click on your "Volume" to "Unmount" the drive.
Mount
Instructions. To mount the drive, right-click on your volume and hit the "Mount" button.
6. Repairing Boot Disk With Disk Utility (macOS Recovery)
Repairing the boot disk using Disk Utility in macOS Recovery is important when your Mac shows disk-related errors. Since the startup disk cannot be repaired while macOS is running, booting into Recovery Mode allows First Aid to scan and fix issues on the system volume safely. The guide below discusses how to use Disk Utility on Mac for this process:
Instructions. Restart your MacBook and hold the "Command + R" keys to boot into Recovery to start the process. Select "Disk Recovery" and pick your drive from the left panel to hit the "First Aid" button.
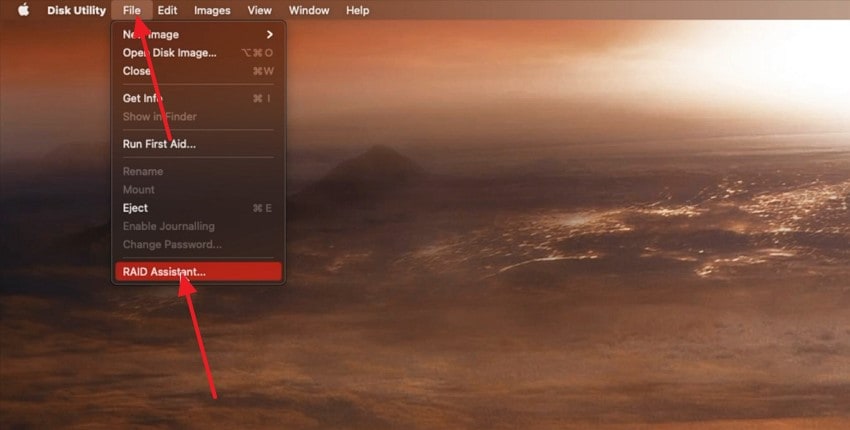
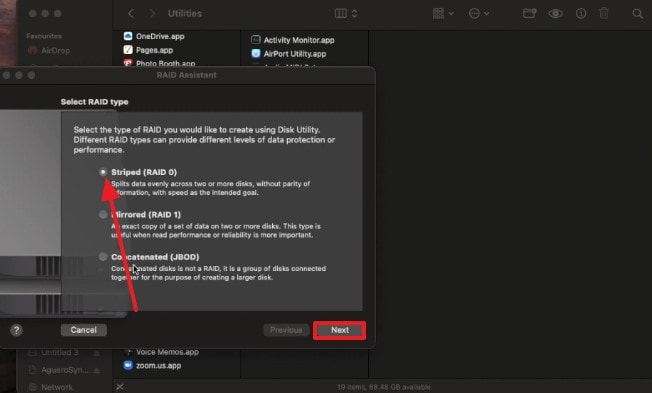
7. Configuring RAID across Mac
By executing this process, you will be able to combine multiple drives for improved performance. RAID setups are valuable for professionals who need consistent speed or fault tolerance in storage. Disk Utility and Terminal offer basic RAID support to enable users to build custom storage solutions tailored to their workflow needs. The guide below explores how do I get to Disk Utility on Mac for this method:
Step 1. First, connect multiple storage devices to your MacBook and open Disk Utility. From the "File" tab, select the "Raid Assistant" and access the new window.
Step 2. From the next interface, select the desired RAID type and hit the "Next" button to proceed.
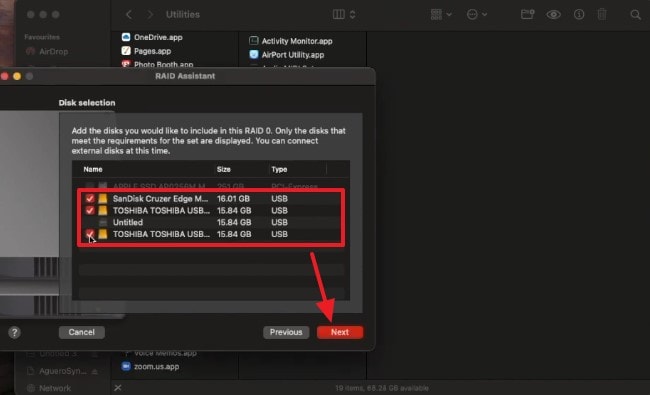
Step 3. Select the connected storage devices from the next dialogue box and click "Next" to name the combined file in the following dialogue box.
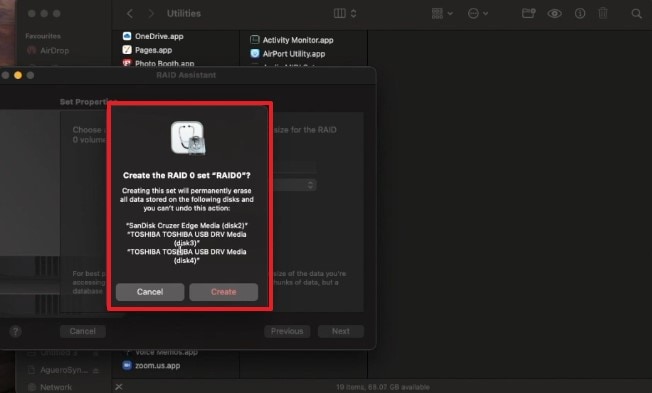
Step 4. After you have entered all the necessary details about the new combined folder of the storage devices, select "Create" to confirm their formation.
Bonus Part. Lost Important Drive/System Files on Mac: Recover With Recoverit!
While Disk Utility is effective in managing disks and fixing drive errors, sometimes Mac issues run deeper. Disk Utility may not be enough for occasions when you find a corrupted file on your system. You may need to rely on third-party recovery tools, such as Recoverit, to get this corrupt file back. This versatile platform works on both Windows and Mac systems to let you regain access to lost and even deleted files.
After learning how to use Disk Utility on Mac, you can explore Recoverit and cater to over 500 cases of lost files, including corrupted documents. This platform offers a helpful batch processing feature that recovers multiple missing files on your device within a single task. To further speed up tasks, users can recover complete ZIP folders instead of finding each document individually.
Key Features
- Format Support: Besides locating missing documents on Mac, this platform can also be used to recover files of over 1,000 formats.
- Storage Device Support: Whether you have the lost file in an SD card or a USB, Recoverit caters to more than 20,000 storage devices.
- Deep Scan Option: If the Quick Scan feature fails to locate your file, use the Deep Scan utility for an extensive search.
A Complete Demonstration of Using Recoverit to Find Lost System Files on Mac
Theoretical knowledge on file recovery is not enough, so you must know how to use it. Check out the following section and learn how to recover system files using Recoverit after learning what is Disk Utility:
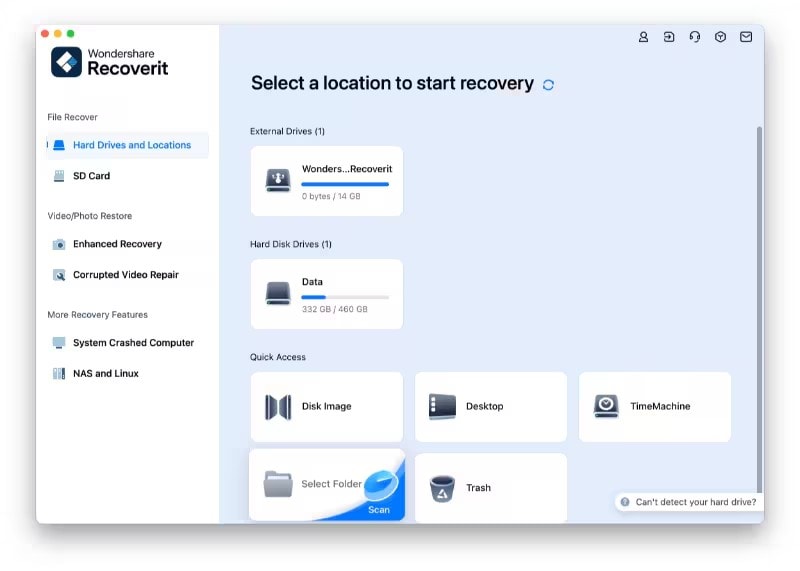
Step 1. Select the Storage Device with the Missing File
To start, open the main interface of Recoverit and select the targeted storage device using the left panel.
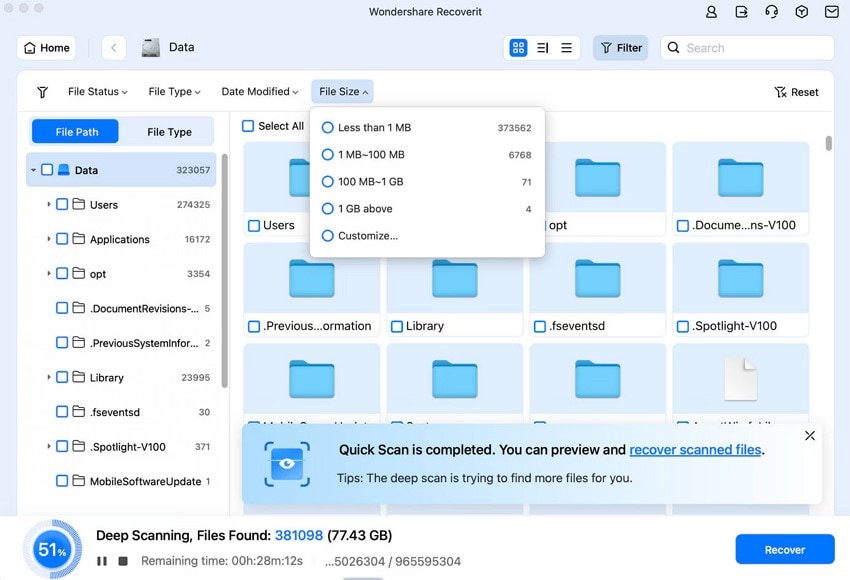
Step 2. Scan the File Using the Filter of Your Choice
As the desired folder opens, search for the lost file using various filters, like "File Size." You can also scan files by searching for a relevant keyword or the file format. When the scan is complete, select the lost file and click "Recover" to regain access to this file.
Step 3. See the Results of the Recovered File
Upon recovering the file, select the "Preview" option to preview the results in the dedicated window.

Conclusion
Conclusively, this article was a beginner’s guide on how to use Disk Utility on Mac devices. After learning the intricacies of this tool, we explored recovering lost system files on a MacBook. You can search for the lost documents on your macOS and regain access to them by using Recoverit.
FAQ
-
1. How can I recover a system file after it got corrupted on my USB?
Using the powerful recovery tools of Recoverit, you can effectively regain access to a lost file from your USB. Besides this, it recovers documents from more than 2,000 other types of storage devices. -
2. Can I regain access to my missing ZIP files without reinstalling macOS?
If you have Recoverit by your side, you do not need to reinstall your device’s macOS to regain access to lost ZIP files. This platform does not require any system reinstallations and gives you back your documents promptly. -
3. What is the right way to ensure that a system file does not go missing?
To make sure you do not end up with a missing file on a Mac, enable Time Machine for easy file version restoration. You can also consider having a backup of important documents that can be used if the original file is lost.


