

 TL;DR:
To restore missing recent Excel files, adjust the Show this number of Recent Workbooks setting in Excel Options, utilize the built-in unsaved workbook recovery feature, or extract temporary .xlsb backups from Windows system folders.
● To retrieve spreadsheets lost due to sudden closures, open Excel and navigate to File, select Open, and click Recover Unsaved Workbooks to locate automatically retained drafts.
● You can manually extract temporary backup files by navigating to C:\Users\AppData\Local\Microsoft\Office\UnsavedFiles on Windows 10 and Windows 11, or C:\Users\YourName\AppData\Roaming\Microsoft\Excel\ on Windows 7.
● Windows 10 users can exclusively utilize the native File History feature to restore missing XLSX versions by selecting the History button under the Home tab in the file's original File Explorer folder.
Ask AI for a summary
 ChatGPT
 Perplexity
 Gemini
 Claude
 Grok
Grok
Can't get hold of your recently opened Excel files? Windows has some cool techniques to access them quite easily via Excel, File Explorer, or by using system settings. But sometimes, there may be some situations when the Excel recent files not showing an issue, and it would be difficult to locate those important spreadsheets. Generally, this happens due to the settings of the system or rigorous privacy restrictions, and sometimes, by mistake, the options in Excel are changed.
Missing your list of recent files? Don't worry! There are really simple fixes to get it back, like changing some settings in Excel, looking up File Explorer's quick access, and enabling the system history. In this guide, we will take you through the steps to access your recent Excel files quickly, ensuring a smoother workflow without unnecessary panic attacks.
Try Recoverit to Perform Excel File Data Recovery
 Security Verified. 3,591,664 people have downloaded it.
In this article

Why Can't I See Recent Excel Files?
It is very annoying when you cannot see your recent Excel files on your computer because you have to reach out to them for daily work. One of the most common problems people face concerning Excel recent files not updating or, in other words, not showing the latest files you have worked on. Many reasons lead to this, and if you know the reason for the same, you can probably solve it fast.
Your Excel setting could be one of the reasons for this problem. Excel tracks the most recent file openings, but this feature may have been switched off or configured. You will find that if you change or reset the Excel settings, the recent file listing won't be updated. Check this easily by going to options in Excel and ensuring the "Show this number of Recent Documents" contains some appropriate value.
Another reason can be related to your Windows settings. If you use File Explorer, then you might also witness that the recent files list is not updating there either. This could be a consequence of some system settings blocking the recent files feature because of privacy settings or clearing your history too often. Ensure the system settings allow the storage and viewing of recent files.
The cases mentioned above might affect how Excel displays your recently used files after they have been updated or even when the computer crashes. Restarting Excel or rebooting the system might be needed before the feature can reset itself and your recent documents reappear. If "Excel recent files not updating" happens to you more often than normal, try checking for software updates or repairing Excel so that everything functions well in the program.
How to See Recent Excel Files?
If you are wondering how to see recent Excel files, you are not alone. Access to your recent documents saves time and makes your work easier. Whether through Excel's inbuilt features or by going to an option in Windows, recently opened spreadsheets can be found with an easy-to-understand method. Let's get to view how they can be viewed.
Fix 1. Customize the List of Recently Used Files
Excel, among its features, allows the customization of the list containing recently used files to provide easy access to favourite spreadsheets. The issue of Excel not showing recent files is, however, raised from time to time by users, which can be quite bothersome. Through an adjustment in the Excel settings, users will get to decide how many of the most recent files will be displayed while also pinning important documents for easy access. How can you custom-tailor this feature to make it work for you?
Steps:
1. Press Win + E to open File Explorer and quickly access Excel. Once in Excel, go to File> Options > Advanced > Display and find the option "Show this number of Recent Workbooks."
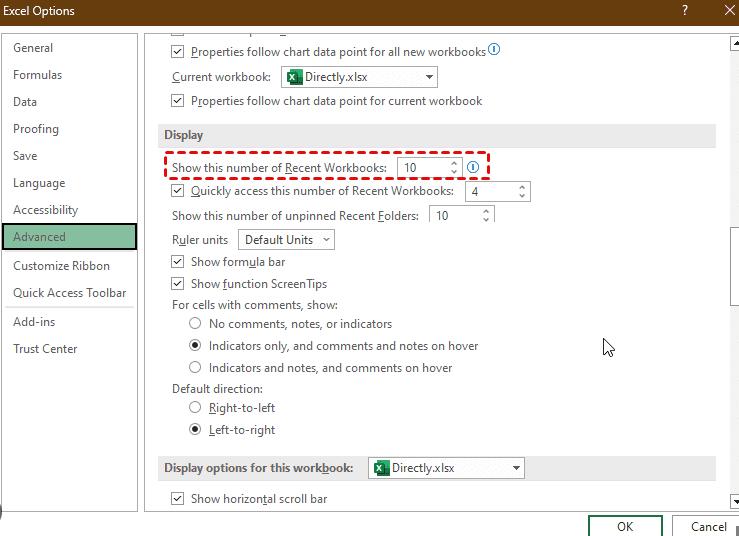
2. Choose how many recent files you want to display. After setting the number, press Ctrl + O to open the Recent Workbooks list and check if the File you need appears.
Extra Tip: Recover Unsaved Excel Files in Windows 10/11
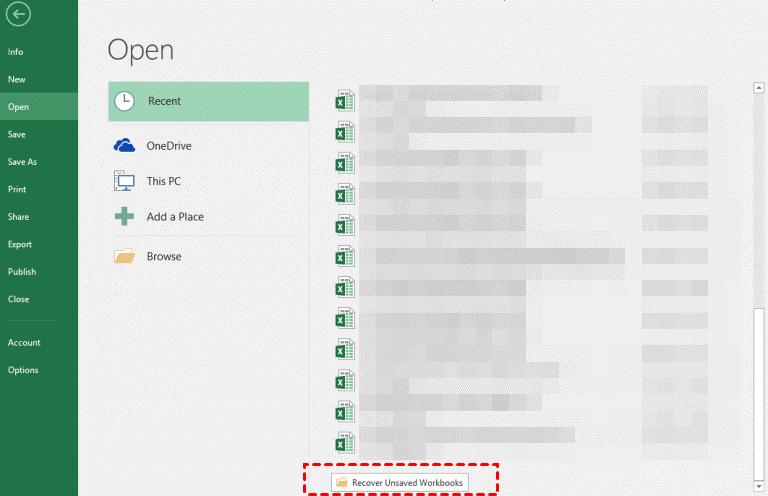
1. Open Excel, go to File> Open > Recent.
2. Scroll to the bottom and click "Recover Unsaved Workbooks." This will help restore an unsaved Excel file that might be missing.
Fix 2. Recover Lost XLSX files with the Recent Unsaved Option
It's always a pain to lose essential Excel files. There exist some ways to recover unsaved Excel files using the built-in features of Excel. The Recent Unsaved option can guide you through the process of finding and restoring files that were saved by mistake or not saved correctly. This is very helpful to recover XLSX files after a sudden shutdown or an unforeseen error.
Steps:
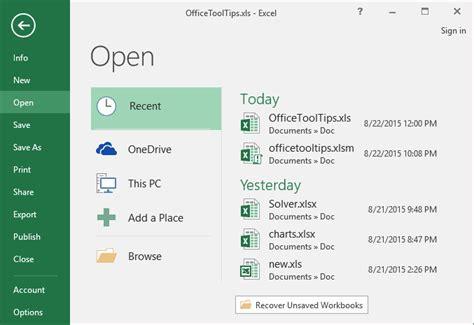
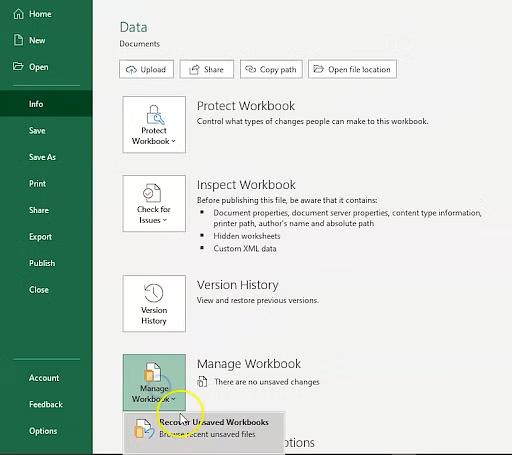
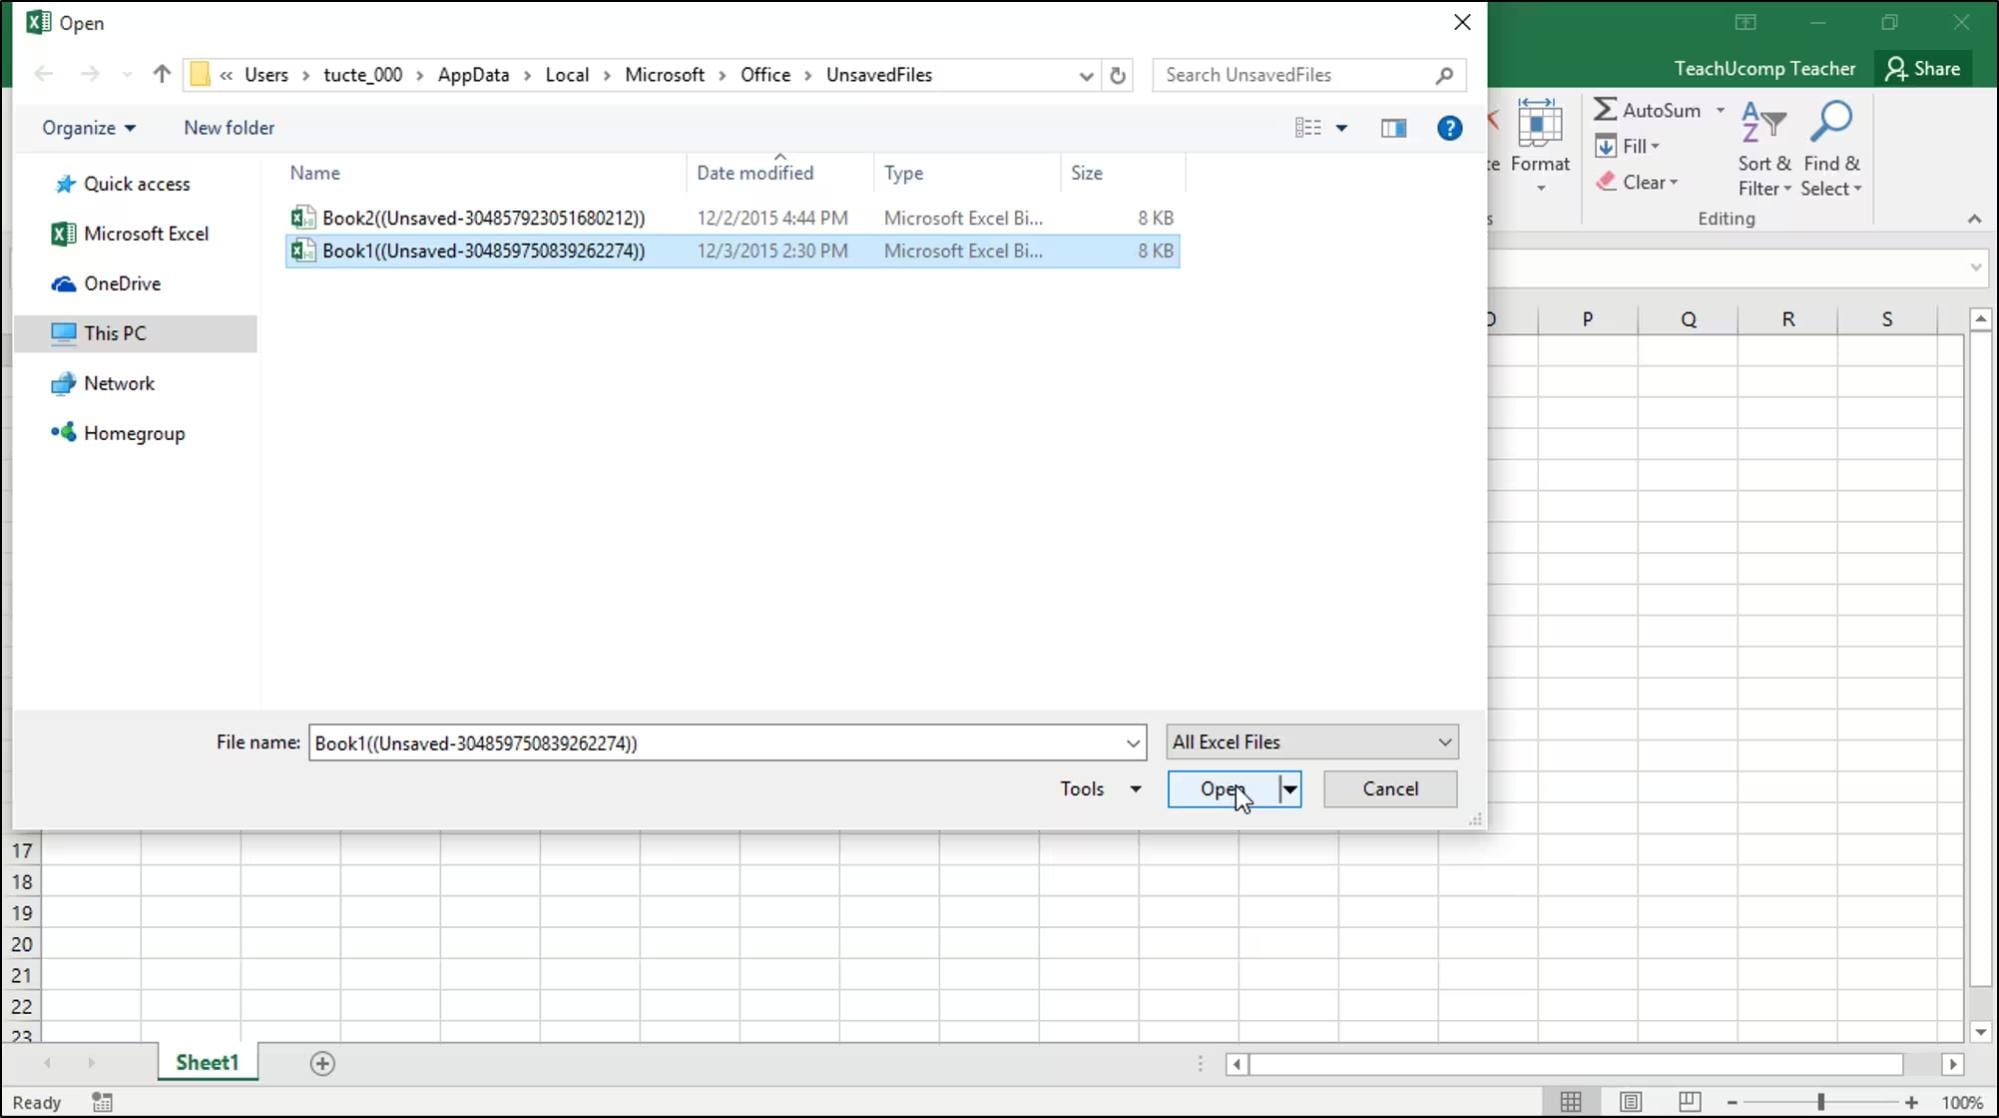
1. Open the Unsaved Workbooks Folder - Launch Excel, click on File, then select Open. Under the Workbooks tab, scroll down and click on Recover Unsaved Workbooks to access recently unsaved files.
2. Open the Excel File - A list of unsaved workbooks will appear. Browse through the files, select the one you need, and click Open to restore it.
3. Save the File - Once the File opens, click File> Save As and choose a different location on your computer to save it permanently. This prevents data loss and ensures you can easily access it in the future.
Fix 3. Restore with File History (Only for Windows 10)
The built-in feature of Windows 10, known as File History, can restore lost or missing Excel files. It helps you to solve the problem of "Excel recent files not showing". File History automatically saves previous versions of files, making them recoverable when needed. By enabling and using this feature, you can recover very important spreadsheets instead of losing them to mistakes or system errors.
Steps:
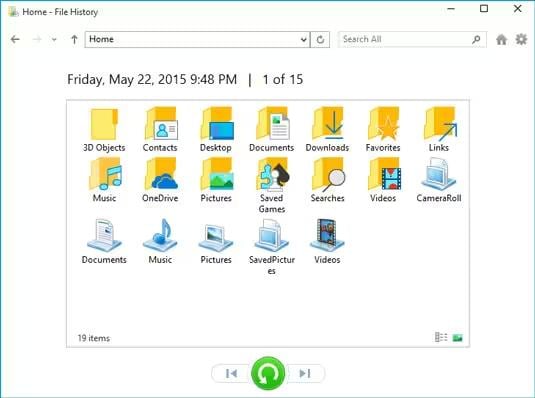
1. Open the Folder - Go to the folder where your missing Excel file was last saved. You can do this using File Explorer by navigating to the correct location.

2. Access File History - Click the Home tab at the top of the window, then select the History button. This will open the File History window, showing previous versions of files stored in that folder.
3. Restore the File - Look through the available versions, find the missing XLSX file, and double-click to preview it. Once confirmed, click Restore to recover the File and bring it to its original location. Your missing Excel file should now be available again.
Fix 4. Recover a Lost xlsx/xls from the .tmp Folder
Excel sometimes saves temporary files, which can assist in recovering lost spreadsheets. In the event of facing the issue of Excel recent files not updating or accidental loss of your files, you should check out the .tmp folder. These temporary files are backup copies of your work, allowing you to restore lost XLSX or XLS files effortlessly. Let's have a look at the process to follow to find and recover the missing Excel documents.
Steps:
1. Locate the Temporary Files Folder
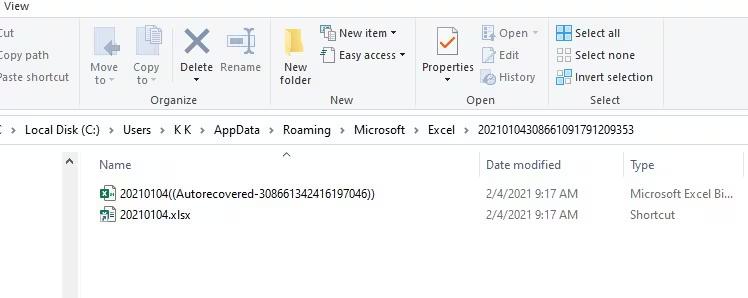
- For Windows 10/11: Navigate to `C:\Users\AppData\Local\Microsoft\Office\UnsavedFiles`.
- For Windows 7: Go to `C:\Users\YourName\AppData\Roaming\Microsoft\Excel\`.
Look for the folder containing temporary Excel files. These files are usually in Excel binary workbook format (.xlsb).
2. Find the Temp Folder - Open the folder and search for files that match the date and time you lost your document.
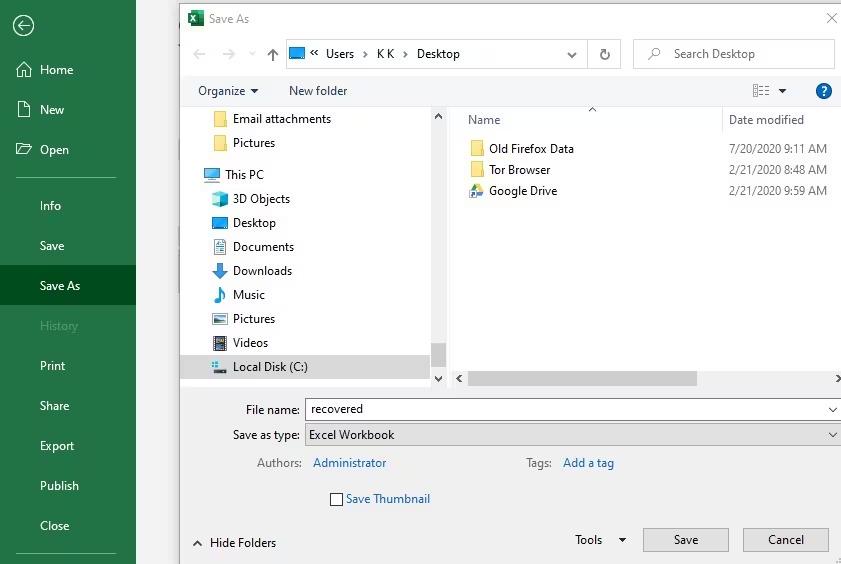
3. Restore the File - Copy the temporary File to another location and rename it. Please open the File in Excel (it may be read-only), then go to File> Save As and save it as an Excel workbook (.xlsx).
Bonus Tip: Recover Deleted or Unsaved XLSX Files Using Recoverit
It becomes frustrating when you lose an important Excel file; however, using Recoverit, you can easily restore the lost, deleted, or even unsaved XLSX and XLS files. Recoverit will recover files from computers, external hard drives, USB storage, memory cards, and more. It works on both Windows and Mac operating systems.
Curious to find out how they're able to see those recently deleted Excel files? Recoverit has made the whole process a whole lot simpler and efficient. To prevent overwriting, do not save any new data within the folder to be recovered before starting the operation. Let's examine the how-to procedure for recovering lost Excel files with the Windows version of Recoverit.
Steps:
1. Select the Hard Drive to Scan
Launch Recoverit and you'll see a list of available hard disk drives. Choose the drive where your lost XLSX file was stored and start the scan.

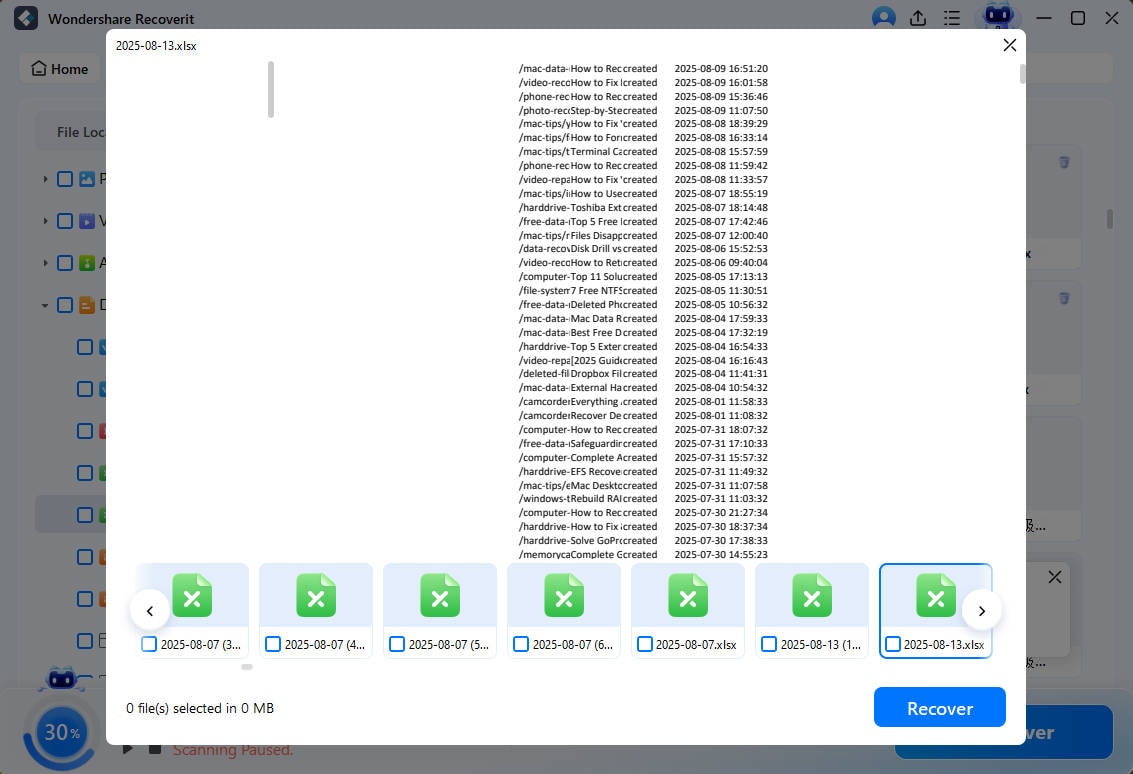
2. Scan for Unsaved or Deleted XLSX Files
Recoverit will run a quick scan on the selected drive. Once completed, check the "Unsaved Files" folder if you're looking for an unsaved Excel file. You can also use the Search or Filter options to quickly locate your missing XLSX file.
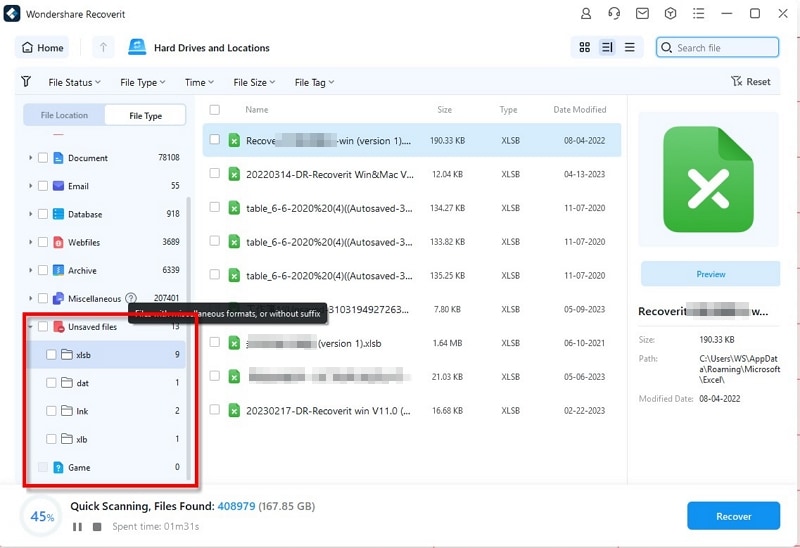
3. Preview and Recover Your File
After scanning, files will be displayed by category and path. Select the XLSX file, preview it to confirm, and click "Recover" to restore it. Save the recovered File to a new partition to prevent data overwriting.
Tips to Avoid File Deletion in Future
Losing an important Excel file can be frustrating; not only do you have to deal with Excel not showing recent files for recovery, but sometimes you also have to consider recovering files that were not saved. Prevention is the best cure for all these situations. Thus, you need to take precautionary measures and protect your data. Here are some valuable tips on how to secure your Excel files and also make them easily accessible.
·Switch on AutoSave
Excel has a feature called AutoSave and AutoRecover that saves your work at certain intervals during work. To use the apps, go to File> Options > Save, then enable either feature. The features make it possible to bring back the lost work after crashing or accidental closure of the program.
·Backup Your Files
Backups are among the best options against loss of data. Save copies of important Excel files on external hard drives, USB devices, and cloud storage like OneDrive or Google Drive. Automating these backups guarantees that previous versions are available at all times if something were to go wrong.

·Avoid Storing Files in Temporary Folders
Excel, at times, saves files in temporary folders which the system can easily delete. Always save such files in a dedicated folder with an organized structure. It thus becomes easier to locate your files and create fewer chances for accidental deletion caused by the system cleanups.
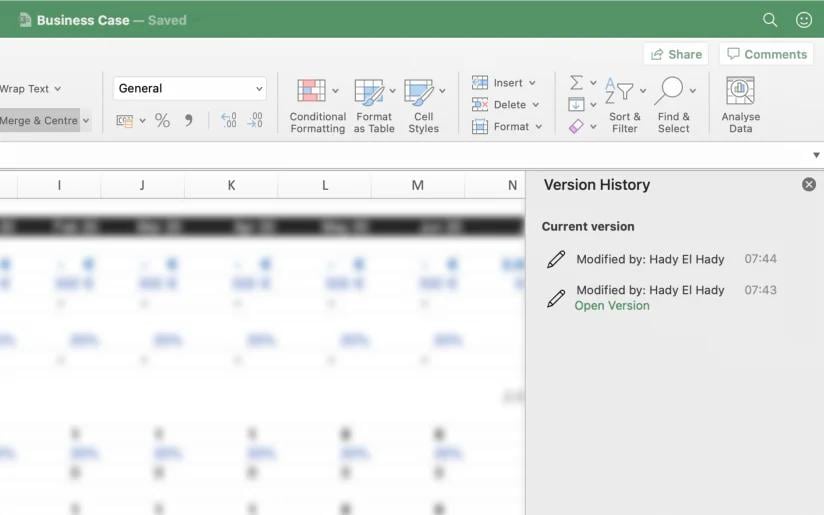
·Pay Attention to File Versioning
Windows and cloud storage, such as OneDrive, come with the versioning File, which allows the restoration of past work. It comes in handy when Excel faces troubles with a recent file or an alteration, inactivating its importance. Enable version history from which you can keep tracking changes herewith to restore an older version of this File when needed.
·Avoid Deleting Files With Caution
Accidental deletions happen even more than you think. Before permanently deleting the File, make sure the File's importance is known. The recycle bin should be there so that recovering deleted files would be very easy. Recovery software could be kept for extra safety to recover unsaved Excel files in case of accidental deletion.
So, it is simple to prevent the loss of files in the future, keep their integrity intact, and avoid the tediousness of missing Excel files.
Conclusion
It is necessary to keep Excel files safe and accessible, heading towards efficient workflow and productivity within an organization's setting. AutoSave, a backup diagnostics facility in the system, and a file versioning system prevent accidental loss and are also vital in the quick recovery of important spreadsheets. This then makes the next step, entitled, how to see recent Excel files, relevant since it will ensure finding essential recent documents doesn't turn frustrating. Save time and effort through such preventive measures to concentrate fully on set tasks, void of effort to treat lost Excel files.
FAQ
1. Why is my Excel running so slow when working with large files?
Excessive formulas, conditional formatting, and data linkages all cause Excel to slow down while handling huge files. Reducing superfluous calculations, employing fewer volatile formulas, and simplifying data structures can all help to increase speed.2. How can I speed up Excel without upgrading my computer?
To speed up Excel, turn off automated calculations, reduce formatting, close unnecessary workbooks, and utilize efficient formulas like INDEX-MATCH instead of VLOOKUP.3. What Excel settings can I change to improve performance?
To improve Excel's speed and responsiveness, go to File> Options and adjust options such as deactivating animations, setting manual computations, minimizing the number of recent files, and turning off superfluous add-ins.


