BitLocker is a Windows security tool that encrypts and protects data on your computer. You have the option to encrypt the entire drive or just the used space. But it isn't limited to securing data on your hard drive. It also has a feature called BitLocker to Go for Windows 10 and Windows 11 that encrypts and secures data on removable hard drives and USB flash drives.
Part 1. What Is BitLocker to Go?
BitLocker to Go is a drive encryption program for USB flash drives, SD cards, external hard drives, and other drives that are formatted with NTFS, FAT16, FAT32, and exFAT file systems. When the drive is encrypted, you can only access the data with a password or recovery key or when you use a smart card on another computer.

Before you can start, you must first enable BitLocker on your PC. Then, connect a USB or Flash Hard Drive to your computer. You'll have two options for securing your data:
- Used Disk Space Only: This is a faster option and ideally suited for new computers or hard drives.
- Completed Disk Space: This option encrypts the entire drive. While it takes a little longer to complete, it's the best option for computers and hard drives that aren't new.
Difference between BitLocker to Go and BitLocker
While BitLocker is a utility tool for encrypting the entire drive on a Windows computer, BitLocker to Go allows you to secure data on USB flash drives, SD cards, and removable hard drives.
Part 2. How to Use BitLocker to Go in Windows 10/11?
Before using BitLocker to Go, you must first enable BitLocker on your PC. To do this, open the Control Panel and choose the System and Security option. Near the bottom of the list of security options is the BitLocker Drive Encryption tool. Press on it, and then turn it on. The system will run a quick scan to ensure it is compatible with your Windows OS.
How to Encrypt a USB Flash Drive Using BitLocker to Go
Video Tutorial on What Is BitLocker to Go and How to Encrypt a USB Drive with It?
For Windows XP/Vista/7/8/10/11
For macOS X 10.10 or later
- Plug the USB flash drive into your computer.
- Open your Windows Explorer window and find your removable hard drive. Right-click on the icon and a box will open. Press Turn on BitLocker.

- The software will automatically initialize on your drive.

- Create a secure password and confirm it, then press the Next button.

- You can back up the recovery key by saving it to a file or printing it. If you choose to save it to a file, it can't be on an encrypted drive. When you're done, press the Next button.

- Choose how much of the drive you want to encrypt. The two options are only the used space or the entire drive.

- Pick your preferred encryption mode. The choices will vary based on your version of Windows, but the setup wizard clearly explains which mode is best for each situation.

- Once your settings are complete, press the Start Encrypting button, and BitLocker will begin securing your drive data. Do not disconnect the drive while the encryption process is running, or it can damage the files on the drive.

- When the encryption is complete, you will only be able to access the files with your password.
How to Access a BitLocker to Go Encrypted Drive
Once you encrypt your USB flash drive, you will need to enter your password to unlock the drive. It's a very easy process. Just make sure that you have the password you generated when encrypting the drive.
- Plug in the USB flash drive.
- A dialog box will open with a prompt to enter the password.
- Type the password in the field and press the Unlock button.

- The drive will unlock, and you will have unlimited access to your files.
How to Change BitLocker Password on a USB Flash Drive
You can use the recovery key that you printed or saved to a file when encrypting the drive to change your password.
- Plug in the USB flash drive and the dialogue box will open.
- Instead of entering the password in the space provided, click the More Options link.

- The dialogue box will expand. Click on the Enter a Recovery Key link.

- If you opted to save the recovery key on a file, you can simply open the file and copy/paste the key. If you printed it, you must enter the 48-digit code. Press Unlock when you're done.

- Open BitLocker through the Control Panel. Click on the Change Password link, and a dialogue box will open. Enter and confirm your new password and press the Change Password button.

How to Remove BitLocker Password from USB Flash Drive
If you changed your mind and want to use another security method or simply remove BitLocker encryption from your device, I'll explain how to do it below.
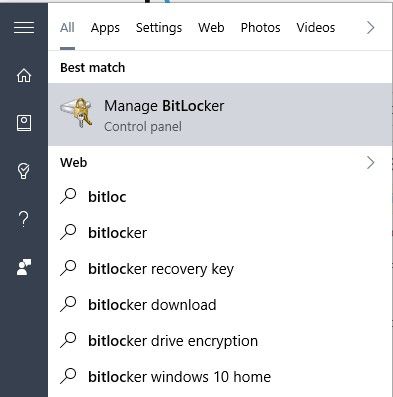
- Go to the Windows menu, type "Manage BitLocker" and click on its shortcut to access the BitLocker configuration.

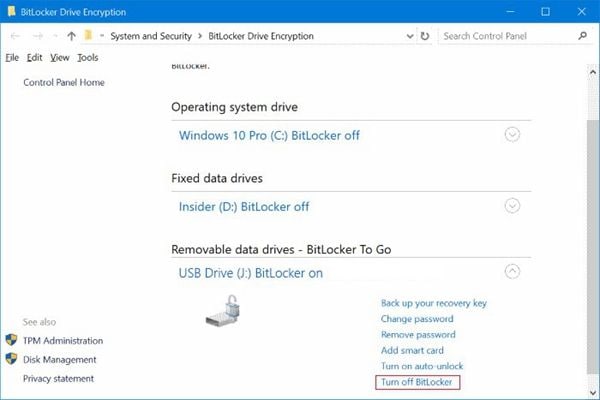
- Inside the BitLocker configuration panel, click on the "Turn off BitLocker" option, this and other options related to BitLocker are next to the icon and name of the drive that you've encrypted.

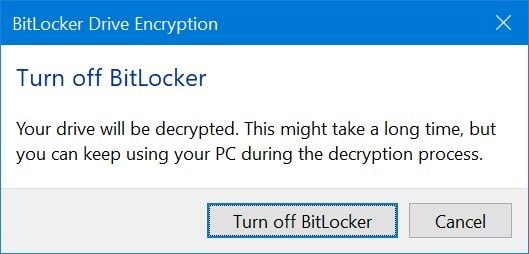
- A pop-up window will appear asking you to confirm the BitLocker disabling process. Click on "Turn off BitLocker". Then, the BitLocker encryption is successfully removed from your USB drive.

Related: there are 4 more methods to password protect a USB flash drive.
Part 3. How to Unlock the BitLocker Encrypted USB Drive If You Forgot the Password?
If you forgot your password but have the recovery key, you can bypass the BitLocker password requirements to access your data by following these simple steps.
- Plug in the USB Flash Drive and a BitLocker Dialogue box will open with a space to enter your password.
- Press the More Options link under the password box, and the dialogue box will expand.

- Press the link to enter the recovery key.

- You can paste the recovery key in the text field if you have it saved on a file or a smart card. If you printed the key, enter all 48-digits, and check to ensure there are no mistakes. Then press the Unlock button.

- The drive is now unlocked, and you can access your files.
What to Do If You Forgot the Password and Lost the Recovery Key?
The data on the USB flash drive is encrypted with 128-bit or 256-bit encryption. Without the recovery key or password, you won't be able to decrypt and unlock the data.
The first thing you should do is try and find the recovery key. When you encrypted the drive, you were given two options:
- Save it as a file
- Print the recovery key
If you saved the file, check your Microsoft account or any folders that might have the key. If you printed the copy, look for the paper and hope that you saved it and didn't throw it away as scrap paper.
Another possibility, if you have a password manager, is to check to see if you saved the password on the drive when signing in.
If you can't find the recovery key and don't remember the password, there is no third option for recovering the data. If you still want to use the flash drive, you can reformat it, which will delete all the data on the drive. The encryption will also be removed, so you can reuse the drive.
- Plug the USB flash drive into your computer
- Open the File Explorer folder.
- Find the removable drive on the left-hand panel. Right-click your mouse to open the menu options and click on the Format option.

- The options menu will open. Keep the default NTFS file system option if you're only planning on using the USB drive on a PC. However, if you want the drive to be compatible with macOS as well, you should select the exFAT option.

- Press the Start button and then confirm that you want to format the drive and lose all the data.
Part 4. How to Recover Deleted/Lost Files from BitLocker to Go Encrypted USB Flash Drive?
Even if you secure your data with BitLocker, it is still possible to lose the data that was saved on the flash drive. However, unlike a situation where you lost the password and recovery key, as long as you have the physical USB drive, there is a way to recover the lost data.
Common causes of data loss in a USB flash drive
There are several different ways that data can be lost on a USB drive.
- The hardware is corrupted after an unsafe ejection from the computer
- The microcontroller, capacitor, or resistor components get burnt out
- Accidentally deleted files or folders
- Damaged circuit board
- Issues with the USB driver
- Standard wear and tear on the flash drive
- Viruses and malware
Recover Lost Files Using Recoverit Data Recovery
The good news is that your data isn't lost forever. You can download the popular Recoverit Data Recovery software to recover the data from the BitLocker to Go protected USB drive or any other removable drives.
Recoverit is an easy-to-use solution that G2 selected as the Leader of Data Recovery Software. The patented technology is compatible with over 2,000 storage media devices, including all types of USB drives. When you run Recoverit, you'll be able to recover data loss of 1,000+ types of files from over 500 different types of data loss, including viruses, formatted devices, and partition recovery.
For Windows XP/Vista/7/8/10/11
For macOS X 10.10 or later
Recoverit is a desktop application. After the installation is complete, you can recover your data by following these three simple steps:
- Choose a drive or folder that you want Recoverit to search for data and press the Start button.

- Recoverit will scan the selected drive, looking for deleted or corrupted files.

- When the scan is completed, Recoverit will compile a list of all the files and folders it can recover. If you aren't sure which file you want to retrieve, there is the option to preview the file before pressing the Recover button. Just double-click on the file and the preview window will open. Once you find the files you want, press the Recover button and choose a file location to store the recovered files.

For Windows XP/Vista/7/8/10/11
For macOS X 10.10 or later
Conclusion
BitLocker to Go is a great tool for encrypting the data on external hard drives, USB flash drives, and SD cards. However, it is extremely important that you choose a password that you'll remember and store the recovery key in a safe location. If you forget the password and lose the recovery key, you won't be able to access the data stored on the drive.
The one workaround is that you can format the drive and use the Recoverit Data Recovery software to restore the formatted data back to your computer.

 ChatGPT
 Perplexity
 Google AI Mode
 Grok
Grok


