Seeing your Mac's hard drive not mounting can be very frustrating. When your Mac's disk0s2 is not mounting, you can't access important files. This issue can happen for various reasons and may seem difficult to solve.
Mac disk0s2 not mounted means that your Mac can't read the Macintosh HD. It's a problem many Mac users face, but it can be fixed with the right steps.
This article will help you understand why disk0s2 is not mounting on your Mac. We'll explore different causes and solutions to fix the disk0s2 not mounted issue. By following these steps, you can fix your Mac hard drive not mounted problem and get back to work.
In this article
Part 1: What is the Disk0s2 Not Mounted Issue?
The disk0s2 not mounted issue happens when your Mac can't access the Macintosh HD. Disk0s2 is a part of your Mac's internal storage. When it doesn't mount, you can't use the files stored there.
This problem can make your Mac hard to use. You might see errors saying your Mac hard drive is not mounted. Understanding what causes this issue is the first step to fixing it.
When your Mac disk0s2 is not mounted, you lose access to important data. This can be very disruptive. Knowing why your Mac could not mount disk0s2 after erase can help you prevent this issue in the future.
Part 2: What Causes the Disk0s2 Not Mounted Error?
Understanding why the disk0s2 is not mounted on your Mac is crucial for finding a solution. There are several common reasons that can lead to this issue.
Let's look at some of the main causes that might prevent your Mac from accessing disk0s2.
- Corrupted File System: The file system might be damaged, preventing your Mac from accessing disk0s2.
- Bad Sectors: Physical damage to the hard drive can create bad sectors, making it hard for the system to read the disk.
- Software Conflicts: Using incompatible or outdated software can create issues that prevent the disk from mounting.
- Power Failures: Unexpected power loss can result in disk corruption, making it difficult for the system to mount the disk.
- Virus/Malware: Harmful software can corrupt your disk's file system.
- Wrong Disk Settings: Incorrect disk settings can prevent mounting.
- Failed Updates: Unsuccessful software updates can cause disk0s2 not mounting.
- Hardware Issues: Problems with your Mac's hardware can stop the disk from mounting.
Part 3: Easily Recover Data From an Unmounted Disk. Use Recoverit
If your disk0s2 is not mounting, data recovery can be crucial. Recoverit is a reliable tool that can help you recover your files from an unmounted disk. It's designed to handle various disk issues and retrieve lost data.
Recoverit offers several key features that make it an excellent choice for Mac hard drive data recovery. It's user-friendly and supports many file types, making it easy for anyone to use. Let's look at how to use Recoverit for disk0s2 not mounting issues.
Key Features:
- High Recovery Rate: Efficiently recovers lost data.
- User-Friendly Interface: Simple to use.
- Supports Various File Types: Recovers photos, videos, documents, and more.
- Compatible with Many Devices: Works with internal and external drives.
Steps to Use Recoverit:
- Install Recoverit on your Mac. Open Recoverit and choose the unmounted disk (disk0s2). Click Start.

- Wait for the scanning process.
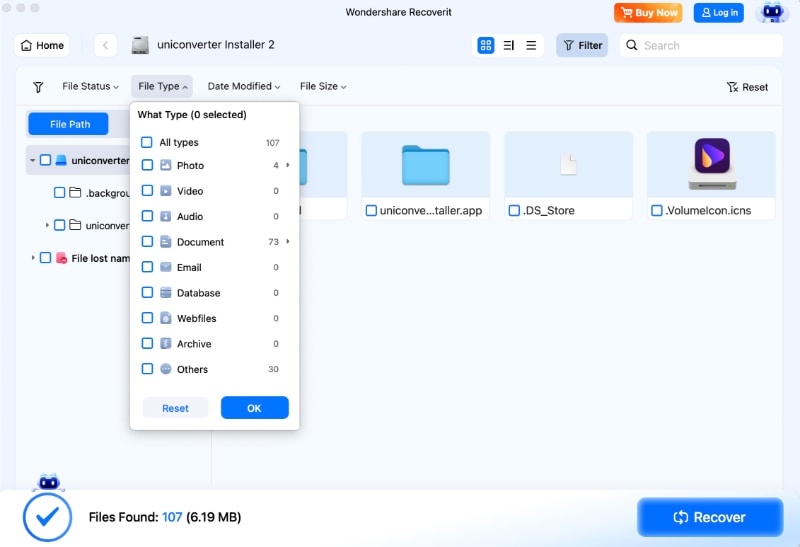
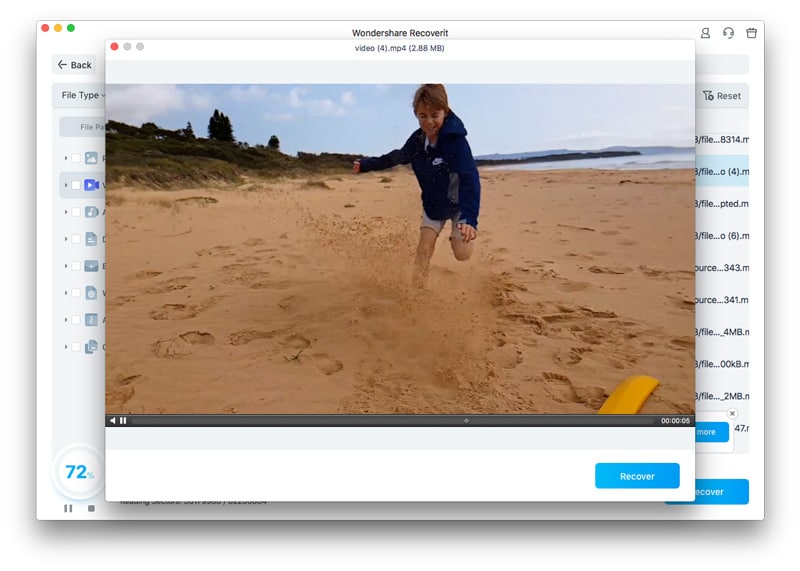
- Look through the files that were found and choose the ones you wish to recover. Then, click Recover to save these files back to your Mac.
Part 4: Mac Disk0s2 Not Mounted? Try These Fixes
If your Mac's disk0s2 is not mounting, it can be very frustrating. Thankfully, there are several methods you can try to resolve this issue. In this section, we will explore some effective fixes to get your disk0s2 back up and running. Follow these steps to tackle the problem and regain access to your important files.
Fix 1: Repair disk0s2 with First Aid in Disk Utility
One of the easiest ways to fix the disk0s2 not mounting issue on your Mac is by using the First Aid feature in Disk Utility. This built-in tool helps you check and repair errors on your disk. Running First Aid can fix many common problems that cause your hard drive not to mount. It's a simple process that can quickly diagnose and repair disk issues, allowing your Mac to access disk0s2 again.
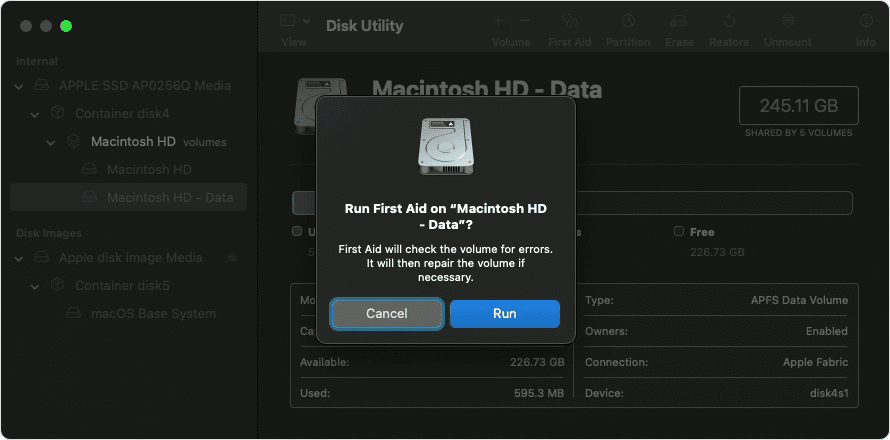
Open Disk Utility, select disk0s2, and click "First Aid." This can fix many common disk issues and might resolve the mounting problem.
Fix 2: Use the diskutil Command
If the First Aid method in Disk Utility doesn't resolve the issue, you can try using the diskutil command in Terminal to fix the unmounted disk0s2. Terminal is a powerful tool on your Mac that allows you to execute commands to control your system at a deeper level.
By using the diskutil command, you can manually mount the disk and attempt to fix any underlying issues that are preventing it from being accessed.
This method can be very effective in resolving stubborn mounting problems.
Follow these steps;
- Open Terminal and use the diskutil command to try and fix the unmounted disk.

- Type diskutil list to see all connected disks and find disk0s2. Then, type diskutil mount /dev/disk0s2 to attempt mounting it manually.
Fix 3: Boot Mac in Safe Mode
If the previous methods haven't worked, booting your Mac in Safe Mode might help. Safe Mode allows your Mac to start up with only essential system files and can fix many software-related issues. By doing this, your Mac can bypass any problematic software or settings that might be preventing the disk0s2 from mounting. Safe Mode also runs a basic check of your startup disk, which can resolve minor problems and potentially help your Mac mount the disk successfully.
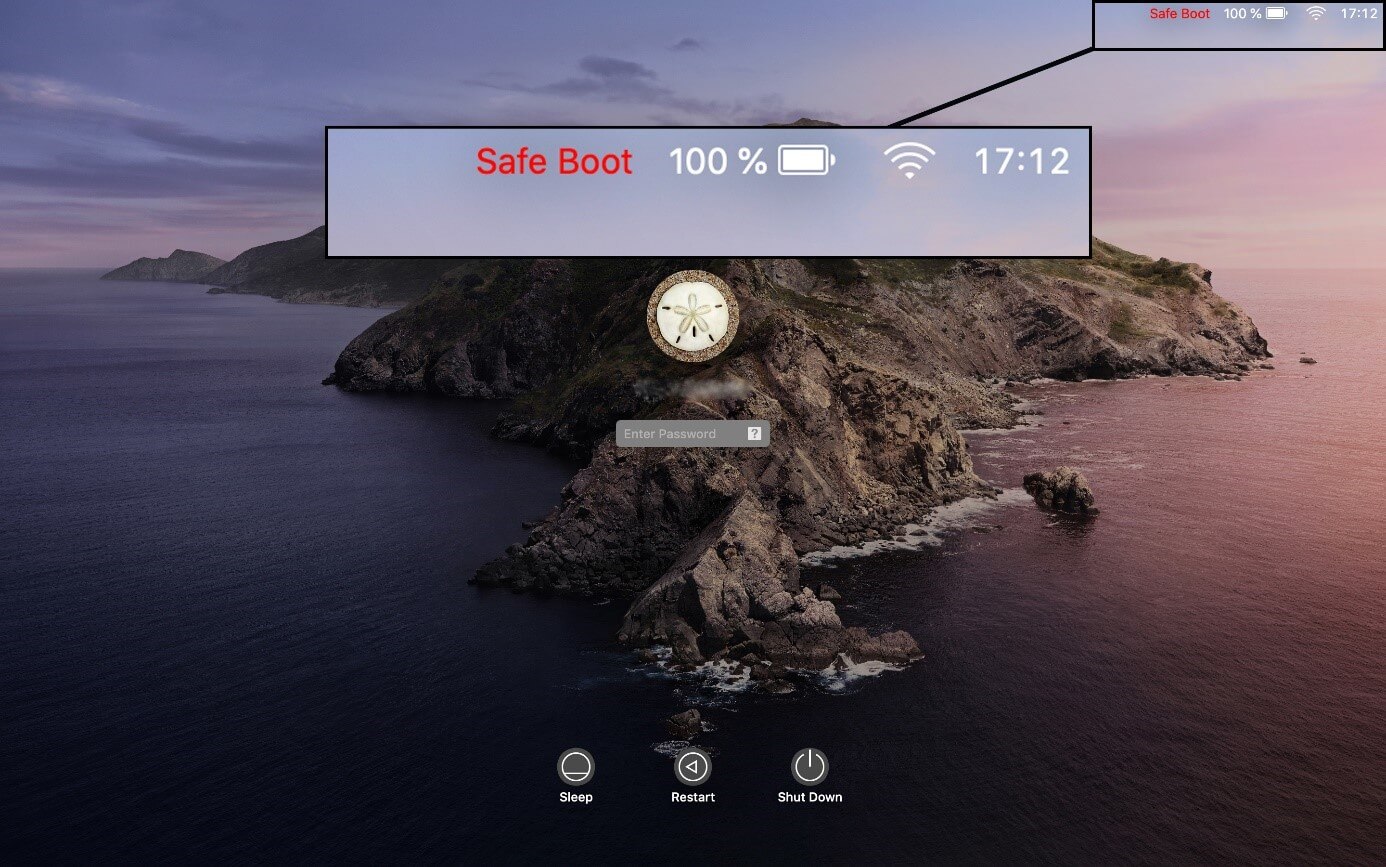
Restart your Mac and hold the Shift key to enter Safe Mode. This can help resolve issues by loading only essential system files. Safe Mode can sometimes allow your Mac to mount disk0s2 and fix errors.
Fix 4: Erase disk0s2 and Reinstall MacOS on Your Mac
If all other methods fail to fix the disk0s2 not mounting issue, you might need to erase disk0s2 and reinstall macOS on your Mac. This is a more drastic step and should be considered as a last resort because it will delete all data on the disk. Before proceeding, make sure to back up any important data if possible.
Reinstalling macOS can resolve deeper system issues that prevent the disk from mounting, ensuring your Mac works properly again.
Follow these steps:
Open Disk Utility, select disk0s2, and click Erase. After erasing, reinstall macOS from the recovery mode.
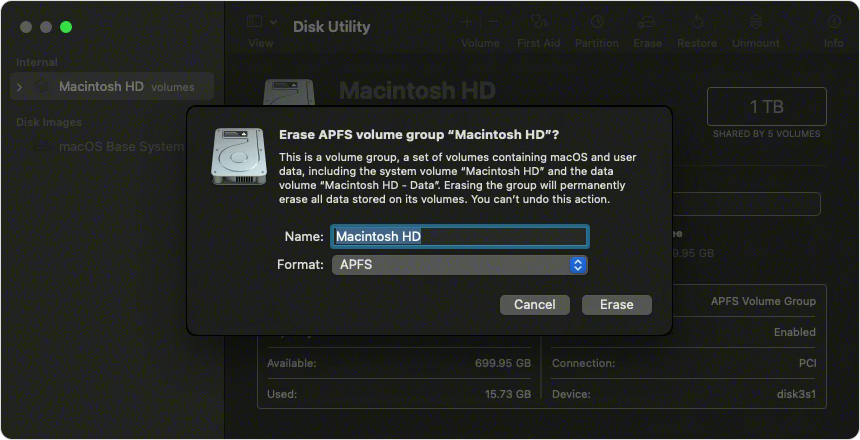
Be sure to back up any important data before doing this, as it will delete all files on disk0s2.
Part 5: Tips to Avoid the Hard Drive Not Mounting on Mac Issue in the Future
Preventing hard drive mounting issues on your Mac is better than trying to fix them later. By following some proactive measures, you can keep your Mac running smoothly and avoid frustrating errors. In this section, we'll share valuable tips to help you maintain your hard drive and ensure it mounts correctly every time. Let's explore these practical suggestions for a trouble-free Mac experience!
- Regular Backups: Always back up important data to avoid data loss.
- Keep Software Updated: Regularly update macOS and other software.
- Run Disk Utility Regularly: Use Disk Utility to check and repair disk issues.
- Use Reliable Antivirus Software: Protect your Mac from viruses and malware.
- Avoid Sudden Power Loss: Use a UPS to prevent power-related issues.
- Handle Hardware Carefully: Avoid physical damage to your Mac.
- Check Disk Settings: Ensure disk settings are correct.
- Monitor Disk Health: Use disk monitoring tools to keep an eye on disk health.
Conclusion
Dealing with a disk0s2 not mounted issue can be challenging, but it's manageable with the right steps. Understanding why your Mac disk0s2 is not mounted helps you take the necessary actions to fix it. Using tools like Recoverit can help recover your data, while methods like repairing the disk with Disk Utility or using Safe Mode can resolve the problem.
Regular maintenance and following best practices can help prevent hard drive not mounting on Mac issues in the future. Keeping your software updated, running regular disk checks, and backing up your data can save you a lot of trouble.
Remember, if you're unsure or the problem persists, seeking professional help is always a good idea. With these steps and tips, you can handle disk0s2 not mounting issues confidently and keep your Mac running smoothly.
FAQ
-
Why is my Mac's disk0s2 not mounting?
Your Mac's disk0s2 might not be mounting for several reasons. It could be due to a corrupted file system, where the data structure on the disk is damaged. Another possibility is bad sectors, which are parts of the disk that can't be read. Software conflicts, such as outdated or incompatible programs, might also prevent the disk from mounting. Additionally, power failures or sudden shutdowns can corrupt the disk, making it unmountable. Virus or malware infections can also damage the disk's file system. Finally, incorrect disk settings or hardware issues like a failing hard drive can cause mounting problems. -
Can I recover data if my disk0s2 is not mounted?
Yes, you can recover data even if your disk0s2 is not mounted. Using data recovery software like Recoverit, you can scan the unmounted disk to find and retrieve lost files. The software works by searching for recoverable data on the disk, even if it can't be accessed normally. Once the scan is complete, you can preview the found files and choose which ones to recover. This way, you can get back important documents, photos, and other data from your unmounted disk. -
What should I do if I could not mount disk0s2 after erase?
If you could not mount disk0s2 after erasing it, try using Disk Utility's First Aid feature. This tool can fix common disk issues and might help in mounting the disk. If that doesn't work, you can use the diskutil command in Terminal to attempt mounting the disk manually. Booting your Mac in Safe Mode can also help by loading only essential system files and fixing minor issues. If all else fails, consider seeking professional help to avoid further complications and ensure your data's safety.


 ChatGPT
 Perplexity
 Google AI Mode
 Grok
Grok


