
Quick Answer: How to Start M1 Mac Recovery Mode |
|
Shut down your M1 Mac, then press and hold the |
When your Apple silicon Mac encounters critical errors or startup failures, the M1 Mac Recovery Mode is your essential built-in tool for diagnostics and repair. This powerful utility allows you to restore your system from a Time Machine backup, reinstall macOS, repair your disk with Disk Utility, and more, all without needing the main operating system to be functional.Understanding how to use the recovery mode on an M1 Mac is a key skill for any user facing data loss or system instability.
Accessing the M1 Mac Recovery Mode involves a different process than on older Intel-based Macs.To begin, completely shut down your Mac. Next, press and hold the power button until you see the 'Loading startup options' screen appear.From there, you'll select 'Options' and click 'Continue' to enter the recovery environment.This guide will walk you through every step of using the recovery mode for your M1 Mac and explain each available option to help you solve your issue.
Part 1. What Is Recovery Mode
The Recovery Mode in MacBooks is a special mode used to help troubleshoot and fix issues with your computer. When you start up your computer in Recovery Mode, you will see a menu that will allow you to access various tools that can help you fix your computer, such as:
Recovery Mode |
Primary Purpose |
| Time Machine Restore | Restore your system from a Time Machine backup |
| Reinstall macOS | Reinstall a fresh macOS copy on your drive |
| Disk Utility | Repair, format, or manage your hard drive and volumes |
| Startup Security Utility | Configure security and startup settings |
| Safari | Browse Apple Support for help while repairing |
| Terminal | Run command-line tasks to fix system issues |
- Time Machine System Restore
- Recovery
- Disk Utility
- Startup Security Utility
- Safari
- Terminal and more…
The most useful tool in Recovery Mode is the Disk Utility. This tool can help you repair any issues with your hard drive and even help you format and reinstall your operating system if necessary.
You may be also intesrested in: What is Recovery Mode on iPhone and Android?
Part 2. How To Start A Mac In Recovery Mode
If your Mac is experiencing any trouble and you need to troubleshoot it using Recovery Mode, follow these instructions step-by-step:
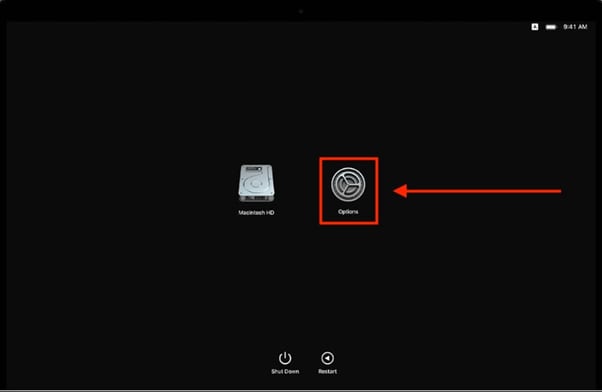
On M1 Macs: To start your M1 Mac in Recovery Mode, follow these steps in sequence.
- Go to the Apple Menu on your M1 Mac and click Shut Down.
- Press and hold the
Powerbutton and wait for the Loading Startup Options window to appear. - Select the gear-shaped
Optionsicon and click Continue. - Enter your password when requested, and you will be taken into macOS Recovery.
Tip: If holding Power does not show Startup Options, wait a few seconds, then press and hold Power again until you see Loading Startup Options.
On Intel Macs
To start the Recovery Mode in Intel Mac, follow these simple steps:
Step 1: Shut down or restart your Mac using the b>Apple icon in the Menu bar.
Step 2: Hold down the Command + R keys on your Intel Mac keyboard.
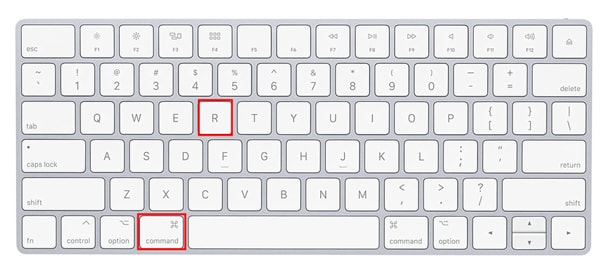
Step 3: Turn on your Intel Mac using the Power button or wait for it to restart.
Step 4: Keep holding the keys until you see the Apple logo or a spinning globe.

Step 5: Enter the password if asked, and you will enter the Utility Window.
Video Tutorial on How to Fix a Mac That Won’t Boot Into Recovery Mode
Part 3. Key Combinations for Booting into Recovery Mode On Mac
Command + R: Boots into the standard macOS Recovery Utility using the local recovery volume.
Option + Command + R: Starts Internet Recovery, downloading the latest compatible macOS directly from Apple over the network.
Shift + Option + Command + R: Starts Internet Recovery and loads the original macOS that shipped with your Mac.
Note: Internet Recovery is useful when you need to reinstall macOS but have no bootable disk or local recovery partition.

Part 4. Tasks You Can Perform After in Recovery Mode
Once in the Recovery Mode on Mac, you can perform the following tasks:
On M1 Macs
You can perform the following task in the Recovery Mode on M1 Macs:
- Recovery: Get access to additional apps in macOS Recovery.
- Restore from Time Machine: You can use the Time Machine backup to restore your data.
- Reinstall: Reinstall the macOS on your MacBook.
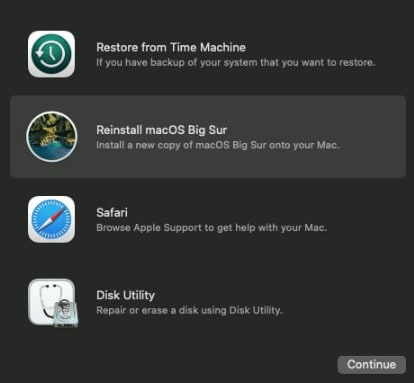
- Safari: Surf the internet to get information from the Apple Support website
- Disk Utility: Repair or reset your Mac.
- Startup Security Utility: Security procedures settings.
- Terminal: Change various settings and perform tasks from the command line.
- Share Disk: Share the disk of a Mac booted into Recovery Mode.
- Startup Disk: Mac startup disk setup.
On Intel Macs
On Intel Macs, you can perform these tasks in the Recovery Mode:
- Restore From Time Machine Backup: Restore the previous backup of the system.
- Reinstall macOS: Reinstall a new macOS copy on your MacBook.
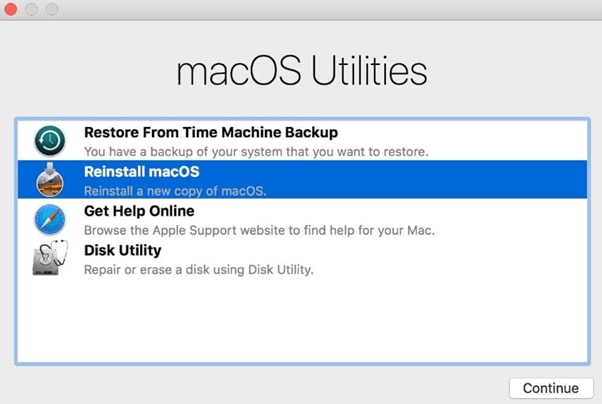
- Get Help Online: Use a web browser to get support from the Apple website.
- Disk Utility: Repair or reset your Mac.
Part 5. What to Do If macOS Recovery Doesn’t Work
If macOS recovery doesn’t work, you can do the following to resolve the issue:
- Use the Internet Recovery Mode to reinstall macOS. You can access it using the Shift+Option+Command+R or Option+Command+R keys.
- Replace your Mac keyboard.
- Use the Safe Mode if you are using an M1 Mac.
- Use the Time Machine Backup to restore your data.
- Create and use a bootable installer to restore your macOS.
- Reset the System Management Controller.
Part 6. How to Exit macOS Recovery?
To exit the macOS Recovery, press and hold the power button to restart your Mac. However, if your laptop is stuck in the Recovery Mode, do the following steps:
- Reset the PRAM and NVRAM on your Mac to clear out any bugged memory, making the system load into Recovery Mode. To do so, shut down your MacBook and hold down the Option + Command + P + R keys until the Apple logo displays and disappears for the second time.
- Sometimes, the user account gets corrupted, leading your Mac to boot into Recovery Mode. To avoid this, create a new account in this mode under the Users & Groups Preferences option.
- Reset the SMC or System Management Controller on your Mac. To do so, switch off your Mac, press and hold the Control + Option + Shift keys for at least 7 seconds. Keep holding the keys and press the Power button for an additional 7 seconds. Afterward, let go of all the buttons and wait for a few seconds before powering up your MacBook.
Part 7. How to Recover Data on M1 Chip Mac With Software?
If you're looking for software that can help you recover lost or deleted data on your Mac with M1 Max or M1 Pro, you may consider using Recoverit 15 version. This software is designed specifically for Mac users and offers an easy-to-use interface that makes data recovery a breeze.
Recoverit also supports a wide range of file types, so you can be sure that it can recover the data you need.
Here’s the step-by-step process to recover data on Macs with M1 Pro or M1 Max chips.
Step 1: Download the Recoverit software and install it on your Mac. Launch the software, and on the main interface, select the location to restore the data.
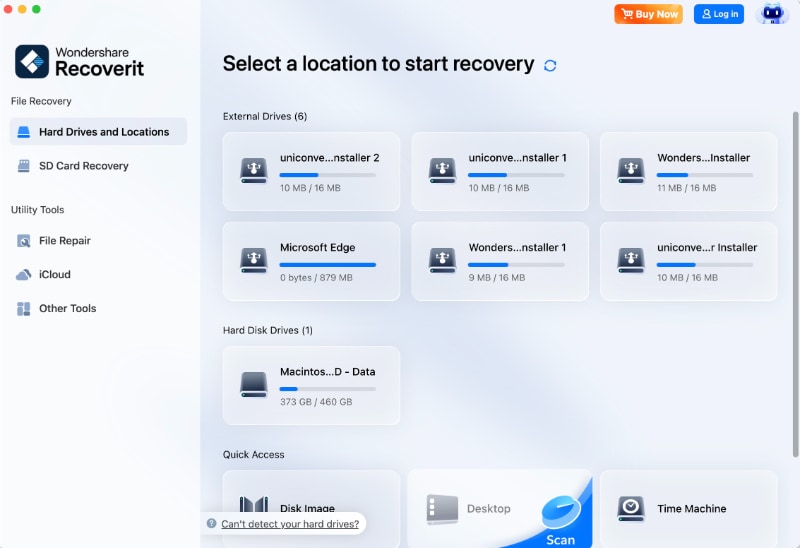
Step 2: Click the “Start“option, and Recoverit will start scanning your Mac to retrieve the lost files.
Step 3: Once all the files are displayed, choose the file you want to retrieve and click “Restore.”

Note: You can get back large video files using the “Enhanced Recovery” feature. And if you don't find the files you need, load system extensions and try the above steps again to make a deep scan.
Read More: M1 Mac Recovery
The Bottom Line
In this article, we’ve discussed what is the M1 Mac Recovery Mode, how to start it on your M1 or Intel Mac, and the tasks you can perform in this mode. We provided a few solutions if the macOS Recovery Mode is not working.
Moreover, we explored how to exit the Recovery Mode on Macs and how you can recover your data using the Recoverit software.
Hopefully, you found this guide helpful in resolving your questions, and you can now boot your M1 Mac into the Recovery Mode without any issue.
Video - Apple's M1 Chip Explained
FAQs
How do I get my M1 Mac into Recovery Mode?
Shut down your M1 Mac, then press and hold the Power button until the Loading Startup Options screen appears. Select Options, click Continue, and enter your password to open macOS Recovery.
What key combination boots my Mac into Recovery Mode?
Hold Command + R while booting to open the standard macOS Recovery Utility. Use Option + Command + R or Shift + Option + Command + R to start Internet Recovery.
How do I recover lost data on an M1 Mac after entering Recovery Mode?
If files were lost or deleted on your Mac, use data recovery software such as Recoverit. Launch it, select the drive, scan, preview the found files, and click Restore to get your data back.


