
![How To Fix Mac Internet Recovery Not Working [5 Ways]](https://images.wondershare.com/recoverit/article/internet-recovery-mac-not-working.jpg)

 TL;DR:
To resolve Mac Internet Recovery failures, verify you are correctly holding Option + Command + R with a stable Ethernet connection, as Wi-Fi instability or incompatible macOS versions predating Sierra frequently block access.
● Resetting the PRAM/NVRAM by holding Command + Option + P + R for 20 seconds during startup, or resetting the SMC on Intel-based Macs only, can clear system misconfigurations preventing Apple server connections.
● If network or server limitations persist, bypass Internet Recovery entirely by creating a bootable macOS installer on an external drive formatted to macOS Extended with a GUID Partition Map using OS-specific Terminal commands.
● For completely unresponsive devices where recovery modes fail, use a separate functioning computer and a 4GB+ USB drive to run Wondershare Recoverit to extract your data before sending the Mac for physical repair.
Ask AI for a summary
 ChatGPT
 Perplexity
 Gemini
 Claude
 Grok
Grok
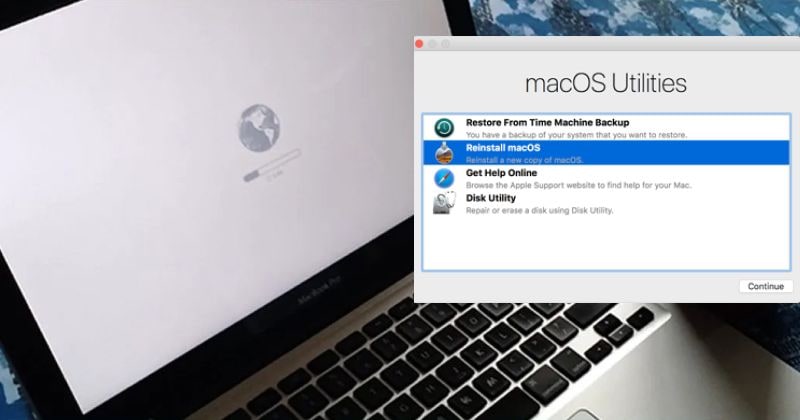
Mac Internet Recovery is a lifesaver when your device needs to reinstall the default macOS or fix major system issues. With just a few key steps, internet recovery mac not working errors can often be resolved, allowing you to maintain optimal performance and avoid costly repairs.
However, many users face a situation where their internet recovery mac not working unexpectedly halts progress, leaving the MacBook stuck or unable to connect. Before considering a new device, explore practical fixes—most internet recovery mac not working problems can be solved with proven troubleshooting methods and the right guidance.
Table of Content
Differences Between Internet Recovery and Recovery Mode on Mac
Before we get into fixing the issue of your Mac Internet Recovery not working, it's a good idea to learn a bit more about this mode and see how it differs from the classic Recovery mode.
Let's start with the basics. Your hard disk, the heart and soul of your Mac, is divided into several different partitions. All those partitions exist together on the hard disk but are logically separated. One of them is the recovery partition.
The recovery partition contains all the necessary data that makes it possible for you to reinstall your macOS, recover it from your Time Machine, repair or erase your hard disk, and more. When using the Recovery mode, you can easily reboot your Mac and install the latest version of the macOS compatible with your device.
However, the partition containing recovery data can get altered, or you can lose access to it. In that case, you must use the Mac Internet Recovery mode.
Whereas the traditional Recovery mode uses built-in systems, the Internet Recovery mode connects to Apple's servers to collect the required information and reinstall your macOS. Moreover, instead of reinstalling the newest version of the macOS, it reinstalls the default OS that came with your device when you first purchased it.
In a nutshell, the Internet Recovery mode is a backup plan for troubleshooting your Mac when it's misbehaving and restoring it to its original systems.
Why Is Internet Recovery on Mac Not Working?
Even though the Mac Internet Recovery mode was developed as a backup plan to troubleshoot your device, it's possible to encounter issues with it. If your MacBook Internet Recovery is not working, there could be several different reasons behind it.
| Reason | Explanation |
| Internet connection issues | An unstable internet connection could prevent your device from accessing Apple's servers and downloading your default macOS; |
| Keyboard issues | You'll need to use keyboard shortcuts to enter the Internet Recovery mode. If your keyboard doesn't work, you won't be able to enter the Internet Recovery mode; |
| Corrupted Recovery partition | The Internet Recovery mode requires your recovery partition to be in good condition if it's to help you download and install your default OS version; |
| Incompatible OS | Not all Macs have Internet Recovery mode. If you're using an older device with an OS that predates Sierra, you won't be able to use Internet Recovery. |
The Correct Steps for Entering Mac Internet Recovery
If your Mac Internet Recovery fails a few times in a row, there may be nothing particularly wrong with your internet connection, hard drive partition, or your macOS version. You could just be trying to enter the Internet Recovery mode incorrectly.
It can be a bit finicky to enter the Internet Recovery mode as you'll need to follow all the steps precisely. You can't skip any steps or perform them in a random order.
Therefore, if you're having problems with macOS Internet Recovery not working, make sure you're following these exact steps:
- Step 1: Click on the Apple logo and hit Restart;
- Step 2: Immediately press and hold the Option + Command + R buttons (before you see the Apple logo pop up);
- Step 3: Hold the buttons until you see "Starting Internet Recovery, this may take a while";

- Step 4: If you're using Wi-Fi, choose your network from the dropdown menu (not needed if you're connected via an ethernet cable);

- Step 5: Wait for the download of the recovery system to complete;

- Step 6: After the download is complete, you'll have the OS C Utilities window pop up;
- Step 7: Select Reinstall OS and wait for the process to complete.

If your Internet Recovery Mac is taking forever, don't worry. The Internet Recovery mode could take a while to download and reinstall your default macOS, so have some patience and don't interrupt the process.
How To Deal With Internet Recovery on Mac Not Working
If you have followed all the aforementioned steps to a T, and your Internet Recovery mode is still not working, there are a few options you could try to fix the issue.
Option 1: Check Your Internet Connection
As the name of this mode suggests, the Internet Recovery mode requires a stable internet connection to work. The files containing the default macOS version for your device are heavy, and the poorer your connection is, the longer it will take to download them.
So, before trying anything else, check your internet connection. In general, it's best to connect your Mac via an ethernet cable. A cable connection will always be faster and more reliable than WiFi.
Option 2: Check Your Keyboard
A stable internet connection is one part of the equation, and a functioning keyboard is the other. To enter the Internet Recovery mode, you'll need to use your keyboard – the Option, Command, and R buttons. If any one of those buttons isn't working, you'll also have problems with your Apple Internet Recovery not working.
So, you'll want to clean your keyboard and check whether everything is functioning properly. You might even want to send your Mac for professional cleaning if you notice any of your keys frequently getting stuck or becoming unresponsive.
Option 3: Use a Bootable Installer
If both your keyboard and your internet connection seem to be working fine, you might be able to fix the issue of your Mac Internet Recovery mode not working with a bootable installer. All you'll need is a reliable external drive and some time.
First, you'll need to format the external hard drive on Mac:
- Step 1: Connect the external drive to your Mac;
- Step 2: Go to Finder > Go > Utilities > Disk Utility;
- Step 3: Go to View > Show All Devices and locate your external drive;

- Step 4: Click on the drive and click Erase;
- Step 5: For format, choose macOS Extended, and for the scheme, choose GUID Partition Map;
- Step 6: Create the name for your external drive;
- Step 7: Click Erase > Done.
Once you've properly formatted the external drive, you can create the bootable installer. You'll need to enter some commands in the Terminal, which will vary based on your operating system. You can use one of the following commands:
| macOS version | Command |
| macOS Sonoma | sudo /Applications/Install\ macOS\ Sonoma.app/Contents/Resources/createinstallmedia --volume /Volumes/MyVolume |
| Ventura | sudo /Applications/Install\ macOS\ Ventura.app/Contents/Resources/createinstallmedia --volume /Volumes/MyVolume |
| Monterey | sudo /Applications/Install\ macOS\ Monterey.app/Contents/Resources/createinstallmedia --volume /Volumes/MyVolume |
| Big Sur | sudo /Applications/Install\ macOS\ Big\ Sur.app/Contents/Resources/createinstallmedia --volume /Volumes/MyVolume |
| Catalina | sudo /Applications/Install\ macOS\ Catalina.app/Contents/Resources/createinstallmedia --volume /Volumes/MyVolume |
| Mojave | sudo /Applications/Install\ macOS\ Mojave.app/Contents/Resources/createinstallmedia --volume /Volumes/MyVolume |
| High Sierra | sudo /Applications/Install\ macOS\ High\ Sierra.app/Contents/Resources/createinstallmedia --volume /Volumes/MyVolume |
| El Capitan | sudo /Applications/Install\ OS\ X\ El\ Capitan.app/Contents/Resources/createinstallmedia --volume /Volumes/MyVolume --applicationpath /Applications/Install\ OS\ X\ El\ Capitan.app |
Just remember, instead of MyVolume, use the name of your external drive.
To create a bootable installer, follow these steps:
- Step 1: Go to Finder > Applications > Utilities > Terminal;
- Step 2: Use the command compatible with your macOS;
- Step 3: Tap Return, input your password, then tap Return again;
- Step 4: Press Y, then press Return;
- Step 5: Click Ok.
Once the Terminal has completed the process, you can use the bootable installer to fix your iMac, MacBook Pro, or MacBook Air Internet Recovery not working issue:
- Step 1: Connect your Mac to the internet and plug in your bootable installer;
- Step 2: Restart your device and immediately press and hold the Option/Alt button;
- Step 3: When the bootable volumes pop up, release the Option/Alt button;
- Step 4: Choose your bootable installed and press Return;
- Step 5: Click Install macOS > Continue.
Though the process seems somewhat complicated, all you have to do is follow the steps, and you'll be ready.
Option 4: Reset PRAM/NVRAM

If the bootable installer doesn't work, you can try resetting your PRAM/NVRAM. PRAM and NVRAM store small amounts of data used by the start-up disk. They can become full and cause glitches, such as your MacBook Pro Internet Recovery not working.
To reset PRAM/NVRAM, you'll have to follow these steps:
- Step 1: Turn off your device;
- Step 2: Press the Power button;
- Step 3: Immediately press and hold Command + Option + P + R buttons;
- Step 4: Hold the buttons for around 20 seconds, then release them.
Your Mac will start up as normal, but your PRAM/NVRAM will now be reset.
Option 5: Reset the SMC (Intel-based Mac only)
One more option you can try when your Internet Recovery on Mac doesn't work is resetting your SMC. This option is only available if you have an Intel processor.
The SMC, or System Management Controller, controls most power functions on your Intel-based device. Resetting it will differ from one device to the next.
With iMac or Mac Mini, follow these steps:
- Step 1: Shut down the device;
- Step 2: Unplug the power cable;
- Step 3: Wait about 20 seconds, then plug the cable back in;
- Step 4: Wait another 5 to 10 seconds, then turn on your device.
With MacBook Pro and MacBook Air that don't have a removable battery and the T2 security chip, follow these steps:
- Step 1: Shut down the device;
- Step 2: Press and hold the Shift + Control + Option + Power buttons for around 10 seconds;
- Step 3: Release the buttons and turn on your device.
With a MacBook with a T2 chip, follow these steps:
- Step 1: Shut down the device;
- Step 2: Press and hold the Power button for around 10 seconds;
- Step 3: Release the Power button;
- Step 4: Wait a few seconds, then turn on your device.
Finally, with a MacBook with a removable battery, follow these steps:
- Step 1: Shut down the device;
- Step 2: Remove the battery;
- Step 3: Press and hold the Power button for about 5 seconds;
- Step 4: Put the battery back and turn on your device.
Following these steps will reset your SMC and hopefully eliminate the problem of your Internet Recovery on Mac not working.
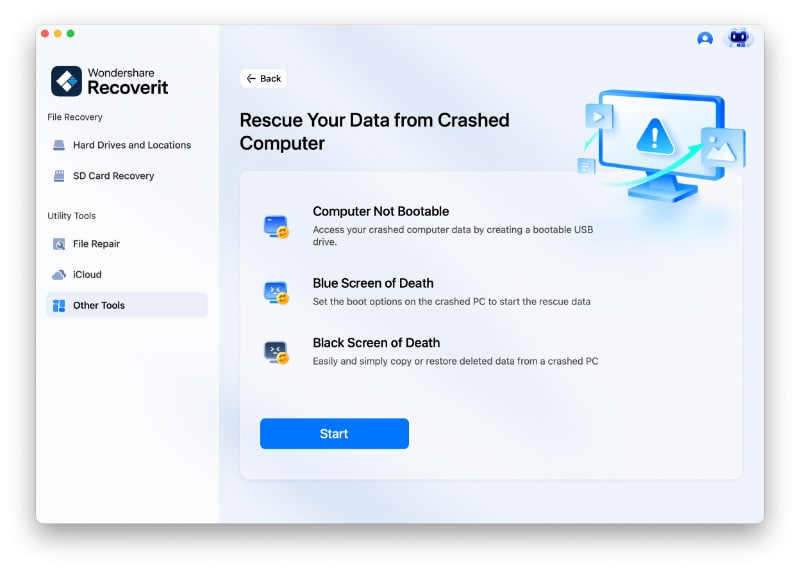
Bonus Tip: How To Recover Your Data if Mac Is Not Bootable
If it's not just the Recovery Mode or Internet Recovery that don't work, but your Mac won't boot at all, there may be a bigger issue at play. You'll lose access to your data stored on your Mac computer. Fortunately, you can use Wondershare Recoverit to create a bootable USB and recover files from your Mac that won't boot.
- Recovers data from 2000+ storage media, including HDDs, SSDs, USB drives, SD cards, etc.
- Enables recovery of data lost due to system crash, disk corruption, virus attack, and more.
- Works with all popular file systems, such as NTFS, FAT, HFS+, and APFS, among others.

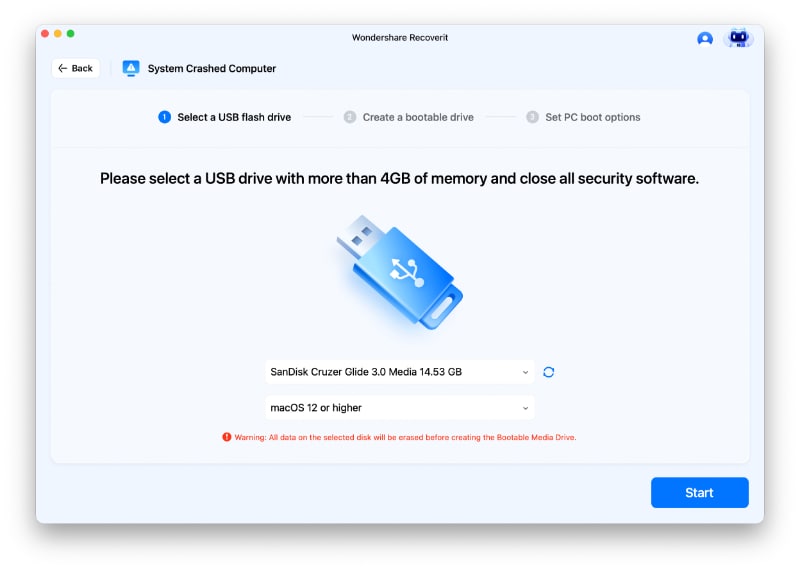
To use it and recover files from your crashed Mac, you'll first need to get a blank USB flash drive (with over 4GB of available storage) and a functioning computer. Then, download and install Recoverit on the functioning device and use it to create a bootable drive.
- Step 1: Launch Recoverit and select System Crashed Computer > Start;
- Step 2: Insert your blank USB flash drive, select the OS version of your crashed Mac, and click Start;
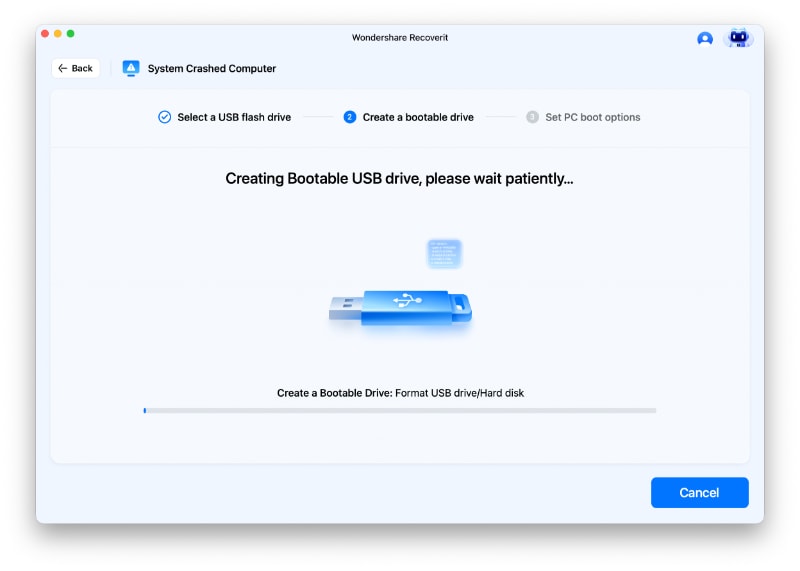
- Step 3: Recoverit will format your USB and start creating a bootable drive. Make sure not to remove the USB drive or interrupt the process in any way.
When you've created a bootable drive, you can use it to boot your crashed Mac:
- Step 1: Insert the USB into your crashed Mac;
- Step 2: When restarting your Mac, press and hold the Option key;
- Step 3: Select Recoverit Bootable Media Drive.
From there, you can start recovering your files:
- Step 1: Select the files or folders you want to copy;
- Step 2: Connect a working hard drive with enough storage to your crashed Mac;
- Step 3: Select the working hard drive for your destination and click Start Copy.
When the process is complete, you can disconnect your hard drive and access the files on it using your functioning computer.
In most instances, fixing the problem of Mac Internet Recovery not working is relatively easy. However, if you've tried all the options mentioned here and nothing's yielded results, the only thing left to do is recover any lost data with solutions like Recoverit and send your device for a professional repair.
FAQs
-
Why is my mac internet recovery not working and stuck on the globe screen?
This usually means poor network quality or a server issue. Check Wi-Fi stability, use ethernet, and restart your router to troubleshoot internet recovery mac not working. -
What should I do if internet recovery mac is not working due to a full disk?
Try deleting unnecessary files in Target Disk Mode or with an external drive. Free up space, then retry mac internet recovery. -
Can I fix macbook internet recovery not working by resetting NVRAM/PRAM?
Yes, resetting NVRAM (Option + Command + P + R) and PRAM can resolve macbook internet recovery not working issues caused by system misconfigurations. -
If internet recovery mac not working persists, what is the safest next step?
Create a bootable installer on USB and start from it; this bypasses internet recovery mac not working errors and allows safe OS reinstallation. -
Why does mac internet recovery not work after hardware changes or replacement?
Replacement parts may cause authentication failures. Ensure Apple hardware compatibility or seek support if mac internet recovery not working continues.


