


 TL;DR:
A Mac mounts external hard drives as read-only primarily due to NTFS format incompatibility, restricted user permissions, or file system errors, all of which can be resolved using built-in macOS settings or disk management tools.
● If the drive is locked due to access restrictions or minor corruption, right-click the drive to select "Get Info" and change the "Sharing & Permissions" setting to "Read & Write," or run the "First Aid" tool in Mac Disk Utility to repair the errors.
● Drives using the Windows-native NTFS format cannot be written to on macOS and must be reformatted via Disk Utility to APFS (for macOS 10.13 and later), HFS+ (for older macOS), or exFAT/FAT32 (for Mac and PC compatibility), which will erase all existing data.
● Advanced users can avoid formatting an NTFS drive by editing the fstab file in the Mac Terminal to enable Apple's experimental NTFS write support, though this method requires precise command-line inputs and carries a higher risk of unreliability.
Ask AI for a summary
 ChatGPT
 Perplexity
 Gemini
 Claude
 Grok
Grok
It's a common frustration: you plug in your drive, and suddenly your Mac external hard drive is read-only, preventing you from editing, saving, or deleting files. This issue can happen for several reasons, but the good news is that most of them are easily fixable without data loss.
This comprehensive guide will walk you through the primary causes of the read-only problem, from simple permission settings to file system conflicts like NTFS. We will provide effective, step-by-step solutions to help you regain full read-and-write control over your external hard drive.
| Situation | Most Likely Cause | Best First Fix | Data Loss Risk |
| You can open files but cannot copy files to the drive | NTFS file system | Back up data, then reformat to exFAT/APFS or use NTFS write support | High if formatting without backup |
| Some folders are locked or unavailable | macOS permission settings | Change Sharing & Permissions to Read & Write |
Low |
| Drive suddenly becomes read-only after errors | File system corruption | Run Disk Utility First Aid | Low to medium |
| Drive clicks, disconnects, or fails to mount | Physical damage | Stop using the drive and recover data first | High |
Why Is My External Hard Drive Read Only on Mac
There are several reasons why an external hard drive becomes read-only on Mac. The most common cause is an NTFS file system, but permission settings, disk errors, and physical drive problems can also prevent macOS from writing to the drive.
| Cause | How to check it | Best fix |
| NTFS file system | Right-click the drive in Finder, choose Get Info, and check the Format field. | Reformat to exFAT/APFS after backup, or install a trusted NTFS driver. |
| Read-only permission settings | Open Get Info and check Sharing & Permissions. | Change your account permission to Read & Write. |
| Ownership restrictions | Check whether “Ignore ownership on this volume” is available in Get Info. | Enable “Ignore ownership on this volume.” |
| File system errors | Run First Aid in Disk Utility. | Repair the drive with Disk Utility. |
| Physical damage or unstable connection | Listen for clicking, buzzing, or repeated disconnects. | Try another cable/port, back up data, or seek professional repair. |
Before Fixing Your Read-Only External Drive on Mac
Since the problem has different causes, the solutions also differ. However, before you get to the fixes, you must make preparations. First, when dealing with the problem, you might lose data on that drive, so recover it before doing anything else.
Recover and Back Up All Your Data
Before changing permissions, repairing the file system, enabling NTFS write support, or reformatting the drive, make sure your important files are safe. Some fixes are low risk, but formatting a drive will erase its data, and repeated repair attempts on a failing drive may make recovery harder.
If the read-only external hard drive contains important files, use a dedicated Mac data recovery tool such as Wondershare Recoverit to scan the drive and recover files before you make changes. Recoverit can help recover deleted, formatted, corrupted, or inaccessible files from external hard drives, including drives from WD, Seagate, Toshiba, Samsung, Dell, and other brands.
No matter what kind of data you have on your drive, you can rely on this tool to do the job. Here are the steps for Mac external hard drive data recovery:
- Download and install Wondershare Recoverit on your Mac.
- Connect the read-only external hard drive to the Mac.
- Open Recoverit and choose Hard Drives and Locations.
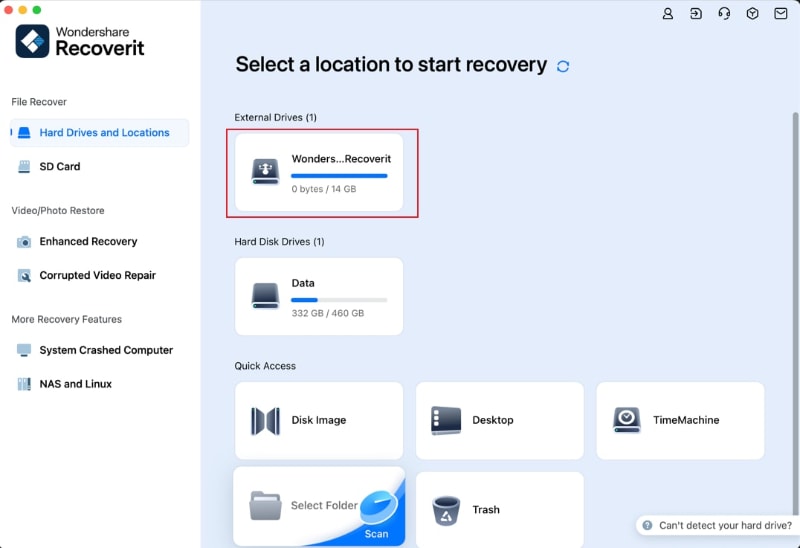
- Select the external hard drive under External Drives

- Let Recoverit scan the drive for recoverable files.

- Preview the files you need, then click Recover.
- Save the recovered files to another healthy drive, not back to the same read-only external drive.
After the backup or recovery is complete, you can safely continue with the fixes below.
Check if You've Connected Your External Drive Correctly
It might sound obvious, but many people focus so much on software issues that they don't check the hardware elements. External drives usually connect through USB, USB-C, Thunderbolt, or a docking station. Check whether the cable is firmly connected to both your Mac and the external drive. If the drive keeps disconnecting or stays read-only, try another cable, another USB/Thunderbolt port, or a different Mac if available.
Avoid using a loose hub or damaged adapter while troubleshooting, because an unstable connection can interrupt writing and make the drive behave incorrectly.
Check Your Drive for Physical Damage
Checking your external hard drive for irregularities is always a good idea. First of all, inspect it for any visible damage. Apart from the visual elements, you should also listen to your drive and look for unusual noises like buzzing, beeping, grinding, or clicking.
Top 5 Ways to Fix a Read-Only External Hard Drive on Mac
| Your situation | Try this first | Why |
| The drive format is NTFS | Reformat to exFAT/APFS after backup or use an NTFS driver | macOS cannot write to NTFS drives by default. |
| The drive is not NTFS but your account has no write access | Change Sharing & Permissions to Read & Write | The issue may be caused by user-level permission restrictions. |
| The drive was used on another Mac | Enable “Ignore ownership on this volume” | Ownership rules from another system may block write access. |
| The drive shows errors or disconnects often | Run Disk Utility First Aid | File system errors can force the drive into read-only behavior. |
| You have a backup and want the most reliable fix | Reformat the external drive | Formatting rebuilds the file system and removes incompatible settings. |
Here are the five ways to fix your read-only external hard drive on a Mac.
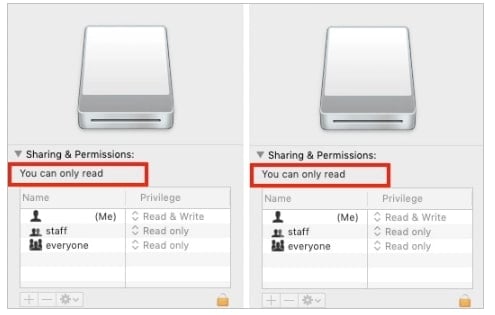
Way 1. Change the External Hard Drive Read-only Permission on Mac
Permissions can be set on a file, folder, or entire hard drive to determine who has access and what actions they can perform on them. It's a common security feature used by those that wish to protect their work.
This is often the cause of read-only errors when one of the external hard drive's previous users or owner must've set read-only permissions on it. whether intentional or by accident, setting the external hard drive's permissions to read-only means you can't perform any write actions.
Here's how to change the external hard drive permissions back to "Read & Write":
- Connect the read-only external hard drive to your Mac.
- Right-click the drive's icon on the desktop and select Get Info to view the drive's details.
- At the bottom of the drive info window, click on the golden padlock if it's locked.
- Enter your Mac administrator password to unlock the hard drive's permission settings.
- Look under Sharing & Permissions to find a list with your user account name along with the staff and everyone groups with their current permissions.
- Click the drop-down menu beside the account or group name whose permissions you wish to change and pick "Read & Write" permission.
- If your account name isn't listed in the Name column, click the Add button
 to add your account to access this drive.
 - After updating the hard drive's permissions, click the gear icon below the permissions list and select Apply to enclosed items. This will prevent permission conflicts.
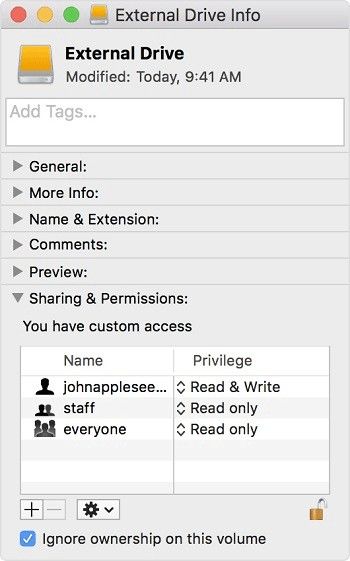
Way 2. Ignore Ownership to Fix a Read-Only External Hard Drive on Mac
If the external hard drive was previously used on another Mac or under another user account, macOS ownership rules may prevent your current account from writing to the drive. In this case, enabling Ignore ownership on this volume can help your Mac treat the external drive as writable for the current user.
Follow these steps:
- Open Finder and locate the external hard drive under Locations.
- Right-click the external drive and choose Get Info.

- Expand the Sharing & Permissions section at the bottom of the window.

- Click the lock icon and enter your administrator password to unlock changes.
- Check the box next to Ignore ownership on this volume.

- Close the Get Info window, then try copying a small test file to the external drive to verify it works.
If you do not see the Ignore ownership on this volume option, the drive format or volume type may not support it. In that case, continue with Disk Utility First Aid or check whether the drive is formatted as NTFS.
Way 3. Repair Your Read-Only External Drive Using Mac Disk Utility
You can fix formatting and other errors that might be causing read-only issues in your external hard drive with Disk Utility:
- Open Finder and go to Applications > Utilities.
- Start Disk Utility.
- In the left sidebar of Disk Utility, you will see your external drive listed. Select it.
- Click on the First Aid button located at the top of the Disk Utility window and hit Run.
- Disk Utility will check the drive for errors and attempt to repair them. This process may take a few minutes.
- Once the process has finished, you will see a report showing any issues found and the actions taken to fix them. If the report says the drive appears to be okay, then the repair was successful. If the report mentions any problems that could not be fixed, it may be necessary to reformat the drive or seek professional assistance.
- If the repair was successful, click Done to close the First Aid windo

Your external drive should now be working properly, and you should be able to read and write files on it. If you continue to experience issues with your external drive, consider backing up your data and reformatting the drive. If the problem persists, it may be necessary to seek professional assistance or replace the drive.
Way 4. Reformat Your Read-Only Hard Drive on Mac
If the external hard drive is empty, or you have a backup of all its contents, an easy way to resolve the read-only issue on your Mac external hard drive is by formatting it. This means clearing everything on the hard drive and turning it into a clean slate. The method of reformatting your hard drive will be able to restore read and write permissions to your external device on macOS, especially if the issue is due to it using an NTFS file system.
There are three different formats to choose from when using this fix, so make sure you pick the one that suits your needs. Here are the options you have:
| File System Formats | Compatibility |
| APFS | Format your external hard drive to APFS if you plan to use it on a Mac with macOS 10.13 High Sierra or later. |
| HFS+ | Also known as Mac OS Extended, HFS+ can be used if you intend to use the external hard drive on macOS Sierra and earlier Mac operating systems. Later versions of this format added journaling to prevent a drive's file system structure from becoming corrupt. |
| exFAT or FAT32 | Also known as MS-DOS, this format is compatible with both Mac and PC, so if you intend to format your hard drive for both Mac and PC, pick this. The other two file systems mentioned above are only compatible with Mac. |
Once you have determined the file format, follow these steps to fix the issue of external hard drive not writable on Mac:
- Open Finder, go to Applications > Utilities, and launch Disk Utility.
- In the left sidebar of Disk Utility, you will see your external drive listed.
- Click the external drive and hit Erase in the action pane.

- Specify the formatting details, including the file system (APFS, Mac OS Extended, FAT, or exFAT) and scheme (e.g., GUID Partition Map). Once you're ready, click Erase, and formatting will start.

Your external hard drive should now be formatted and no longer read-only. You can now read and write files on the drive. Remember to transfer your backed-up data back to the external drive if needed.
Which Format Should You Choose for an External Hard Drive on Mac?
| Format | Use it when | Mac compatibility | Windows compatibility |
| APFS | You only use the drive on modern Macs | Read and write | Not supported by default |
| Mac OS Extended (HFS+) | You use older Macs or older macOS versions | Read and write | Not supported by default |
| exFAT | You need to use the drive on both Mac and Windows | Read and write | Read and write |
| NTFS | The drive mainly comes from Windows | Read only by default | Read and write |
For most users who move files between Mac and Windows, exFAT is the most practical choice. For Mac-only use, APFS is usually the better option.
Way 5. Enable NTFS Write Support on Mac Using Terminal
This method is only for advanced users. Terminal does not convert the NTFS drive into a Mac-compatible format. Instead, it attempts to enable Apple's experimental NTFS write support for a specific external drive. Because this approach can be unstable, back up or recover your files before trying it.
Follow these steps only if you are comfortable using Terminal:
- Connect the NTFS external drive to your Mac.
- Open Finder, navigate to Applications > Utilities, and launch the Terminal app.
- Run the following command to edit the system's file system table configuration:
sudo nano /etc/fstab - Type your macOS administrator password when prompted and press Return.
- Add the following line to the file, replacing
DISKNAMEwith the exact name of your external drive as it appears in Finder:LABEL=DISKNAME none ntfs rw,auto,nobrowse - Press Control + O to write the changes to the file, hit Return to confirm, and then press Control + X to exit the Nano editor.
- Unplug (eject) the external drive and reconnect it to your Mac.
- Because the
nobrowseflag hides the drive from your desktop and normal Finder sidebars, open Finder and select Go > Go to Folder from the menu bar. - Type
/Volumesinto the search path field and press Return. - Open your mounted NTFS drive from the Volumes folder and test whether you can now copy, edit, or write files to it.
If you need reliable long-term access to the drive on both Mac and Windows, backing up the data and reformatting the drive as exFAT is usually safer than relying on experimental NTFS write support.
Conclusion
We've covered the five best options for fixing the "Mac external drive read-only" issue. Try changing permission settings, formatting your drive into a different file system, enabling NTFS external drive write support, and repairing your drive using Disk Utility.
Remember to recover the data from your drive using a recovery tool before doing anything to ensure you don't lose any valuable files or information. If you can't deal with the issue, we recommend visiting the nearest professional Mac repair shop.
FAQs About External Hard Drives Being Read-only on Mac
-
Why does it say you can only read my external hard drive on Mac?
The most common reason is that the drive is formatted with the NTFS file system, which is native to Windows. By default, macOS can read files from NTFS drives, but it cannot write to them. This is the primary cause when you can only read an external hard drive on a Mac. -
How do I change a hard drive from read-only on a Mac without formatting?
First, select the drive icon and press Command + I to "Get Info." At the bottom, check the "Sharing & Permissions" tab and ensure your user account has "Read & Write" access. If this doesn't solve the hard drive read only on Mac issue, it's likely an NTFS problem that requires a specific driver. -
Can a corrupted drive cause the read-only error on a Mac?
Yes. If the drive has file system errors, macOS may mount it in read-only mode to prevent further damage. You can try to fix this by running "First Aid" from the Disk Utility application. This can often resolve issues when your Mac can't write to an external drive due to corruption. -
Will I lose my data if I fix the read-only permission?
You will only lose data if the solution requires you to reformat the drive. Methods like changing permissions, using Disk Utility's First Aid, or installing an NTFS driver will not erase your files. Always back up your data if you decide formatting is the only option left.


