Stuck thinking about “How to recover an Excel spreadsheet that was not saved”? Well, losing an unsaved Excel spreadsheet can be a nightmare. Isn’t it? The good news is that you can recover your unsaved Excel spreadsheets from Excel temporary files. This article will guide you through the process of finding temporary Excel files and recovering your lost work. You'll learn various methods to recover your files quickly and easily.
But how does Excel handle unsaved files? Excel saves temporary files in specific locations on your computer. These temporary files can be a lifesaver when you need to recover an Excel spreadsheet that was not saved. We'll explain where to find these files and how to use them to recover your unsaved work.
Imagine the relief of knowing you can recover your unsaved Excel spreadsheets. We've got you covered with multiple methods of how to recover an unsaved Excel spreadsheet From using the AutoRecover feature to locating Excel temp files in the AutoRecover folder. This guide will provide step-by-step instructions. Use it to recover your unsaved spreadsheets effectively.
Try Wondershare Recoverit to Perform Unsaved Excel Spreadsheet Recovery

In this article
Part 1: Where to Find Temporary Excel Files?
Excel saves temporary files in specific locations on your computer. These files can help you recover an unsaved Excel spreadsheet. Knowing where to look is crucial. We'll guide you through the process of finding these files on your computer.
One of the simplest methods to locate temporary Excel files is by examining the AutoRecover folder. Excel automatically generates AutoRecover files, which can be used to recover unsaved work. We'll guide you on how to locate these files and utilize them to restore your Excel spreadsheets.
In addition to the AutoRecover folder, there are other locations where you can find temporary Excel files. These locations can vary depending on your computer's settings and the version of Excel you're using. We'll explain how to find these files and recover your unsaved work.
Part 2: How to Recover an Unsaved Excel Spreadsheet?
Losing an unsaved Excel spreadsheet can be really frustrating, but don't worry! There are several ways to recover it. You can use tools like Recoverit, rely on Excel's AutoRecover feature, or find temp files in specific folders. These methods will help you quickly and easily get back your lost data.
Let's look at each method in detail to help you recover your unsaved Excel spreadsheets.
Method 1: Use Recoverit for Excel Temp File Recovery
Recoverit is a powerful tool designed for data recovery, specifically including unsaved Excel spreadsheets. This software can scan your computer thoroughly, finding temporary files that are hard to locate. Recoverit identifies these temp files and helps you restore unsaved Excel spreadsheets. This ensures that your important data isn't lost.
Using Recoverit is simple and user-friendly. You select the location where your Excel file was last saved, and Recoverit starts scanning for temp files. After the scan, you can review the results and choose which files to recover. This makes Recoverit an essential tool for anyone looking to safeguard their data and quickly recover unsaved work.
Follow these steps:
- Download and install Recoverit on your computer. Launch Recoverit and select the location where your Excel file was last saved. Click on the Start button.

- Recoverit will initiate the scanning process for temporary files.

- Once the scan is complete, browse through the results to find the Excel temp files you want to recover. Select the desired files and click on the Recover button to save them to a secure location on your computer.

Method 2: Use the AutoRecover Feature
The AutoRecover feature in Excel is designed to save your work at regular intervals automatically. This feature helps you recover unsaved work in case of unexpected shutdowns or crashes. AutoRecover ensures that most of your work is saved periodically, so you don't lose significant progress if your computer crashes or you forget to save manually.
To use AutoRecover, make sure it is enabled in Excel. When AutoRecover is on, you can relax knowing that your work is being saved regularly in the background. If you lose your work, you can easily retrieve unsaved content by accessing the AutoRecover files.
Follow these steps to recover an unsaved Excel spreadsheet:
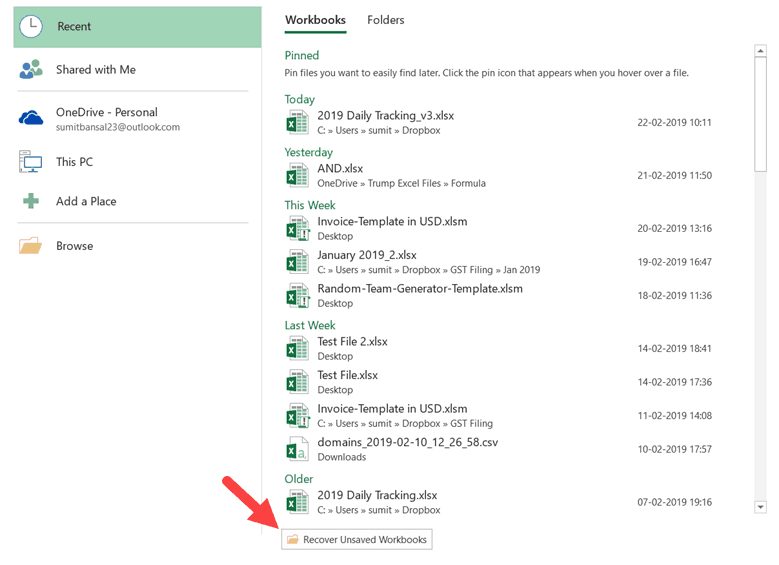
- Open Excel and click on the File tab. Navigate to the Open section and click on Recent. Find the Recover Unsaved Workbooks option and click on it.

- A list of unsaved Excel spreadsheets will appear. Browse through the list. Find files you want to recover. Click Open to restore the unsaved Excel spreadsheet and save it to your desired location.
Method 3: Find Excel Temp Files in the AutoRecover Folder
The AutoRecover folder is a specific location where Excel saves temporary files. These files are created automatically and can help you recover unsaved work. When you experience an unexpected shutdown or crash, the AutoRecover folder stores versions of your Excel spreadsheets. This makes it easier to restore your lost work.
To find Excel temp files in the AutoRecover folder, follow these steps:
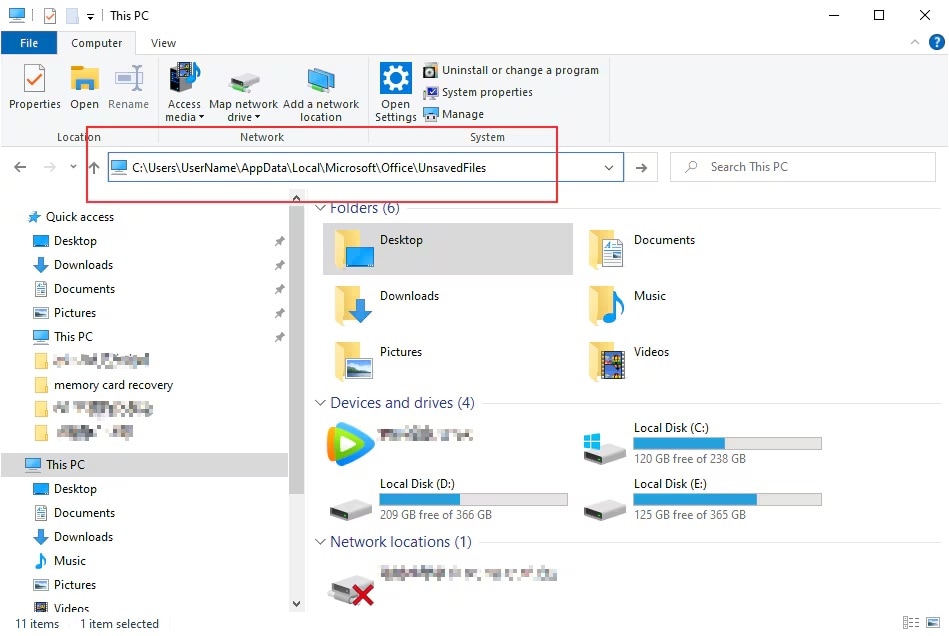
- Open Windows Explorer and navigate to the AutoRecover folder. Common locations include:
C:\Users \[Your Username]\AppData\Local\Microsoft\Office\UnsavedFiles
C:\Users \[Your Username]\AppData\Roaming\Microsoft\Excel\

- Look for files within the AutoRecover folder. These files are temporary versions of your unsaved work. Open the temporary files in Excel and save them as new spreadsheets to ensure your work is not lost.
Method 4: Use OneDrive for Excel Temp File Recovery
If you use OneDrive to store your Excel files, you gain an extra layer of protection for recovering unsaved work. OneDrive automatically saves versions of your files, including temporary versions. This feature ensures your work is still accessible even if you forget to save or face an unexpected shutdown.
To recover unsaved Excel spreadsheets from OneDrive, follow these steps:
- Open Excel on your computer and go to the File tab. Click on Open and then select OneDrive from the list of locations. Navigate to the folder where your Excel file was last saved within OneDrive.

- Look for the temporary files that OneDrive saves automatically. Select the temporary file that you want to recover. Open the temporary file in Excel. Save the recovered file as a new spreadsheet to ensure your data is safe.
Method 5: Use Restore Previous Versions
The "Restore Previous Versions" feature in Windows is a handy tool for recovering previous versions of files and folders. This feature is especially useful when you need to recover unsaved Excel spreadsheets. It works by saving snapshots of your files at different times. These snapshots allow you to go back to a previous version if something goes wrong.
Here’s how to recover temp files in Excel:
- Right-click on the folder where your Excel file was last saved and select Restore previous versions from the context menu. A list of previous versions of the folder will appear. Browse through the list to find the version that contains your unsaved Excel spreadsheet.

- Select the desired version and click Restore to recover the unsaved Excel spreadsheet to its previous state.

Method 6: Use the Manage Versions Option
Excel has a "Manage Versions" option that allows you to recover unsaved versions of your spreadsheets. This feature is especially useful when you forget to save your work before closing Excel. The Manage Versions option keeps track of different versions of your Excel files, so you can easily go back to a previous version if needed.
To use this option, follow these steps:
- Open Excel and click on the File tab. Navigate to the Options section and click on Version History.

- A list of available versions of your Excel file will appear. Browse through the list to find the version you want to recover. Select the desired version and click Open to restore the unsaved Excel spreadsheet. Save it to your desired location to ensure your work is not lost.
Part 3: Pro Tips to Recover Temp Files Excel
Recovering temp files in Excel can sometimes be tricky, but with a few pro tips, you can make the process smoother and more efficient. These tips will help you minimize the risk of losing important data and ensure that your Excel files are always recoverable.
Let's explore some essential practices to help you recover temp files in Excel effectively.
- Save your work regularly: Make it a habit to save your Excel spreadsheets frequently. Regularly saving your work reduces the risk of losing important data.
- Enable AutoRecover: Ensure that the AutoRecover feature is turned on in Excel. This feature automatically saves your work at intervals, helping you recover unsaved files in case of unexpected shutdowns.
- Back up your files: Regularly back up your Excel files to an external storage device or cloud storage service. This practice ensures that you have copies of your files in case of data loss.
- Check the AutoRecover folder: Know the location of the AutoRecover folder on your computer. Being familiar with this location can help you quickly find and recover temp files if needed.
- Use reliable recovery tools: Consider using trusted recovery tools like Recoverit to scan your computer for temporary files and recover unsaved Excel spreadsheets effectively.
By following these pro tips, you can minimize the risk of losing your valuable Excel data and ensure that your files are always recoverable.
Conclusion
Losing an unsaved Excel spreadsheet can be frustrating, but there are several methods to recover your work. By following the steps outlined in this article, you can recover your Excel spreadsheets from Excel temporary files. Whether you use Recoverit, the AutoRecover feature, or other methods, you can quickly and easily recover your unsaved work.
Remember to save your work regularly and enable the AutoRecover feature to minimize the risk of losing important data. By taking these precautions, you can ensure that your Excel files are safe and recoverable.
If you ever find yourself in a situation where you need to recover an unsaved Excel spreadsheet, refer to this article for guidance. With the right tools and knowledge, you can recover your unsaved work and get back to being productive.
FAQs
-
How can I recover an unsaved Excel spreadsheet?
You can recover an unsaved Excel spreadsheet by using the AutoRecover feature, finding temporary Excel files, or using third-party recovery tools like Recoverit. The AutoRecover feature automatically saves your work at intervals, making it easier to recover unsaved files. Temporary files can be found in specific folders on your computer, and recovery tools can help scan and restore lost data effectively. -
Where can I find temporary Excel files?
Temporary Excel files are usually stored in the AutoRecover folder or other specific locations on your computer. Common locations include C:\Users\[Your Username]\AppData\Local\Microsoft\Office\UnsavedFiles and C:\Users\[Your Username]\AppData\Roaming\Microsoft\Excel. By navigating to these folders, you can locate files with extensions like ".asd" or ".tmp" which can help you recover your unsaved work. -
What should I do if I can't find my Excel temp files?
If you can't find your Excel temp files, try using a third-party recovery tool like Recoverit. These tools are designed to scan your computer for lost data, including unsaved Excel spreadsheets. Additionally, check if the "Restore Previous Versions" feature in Windows is available. This feature can help you recover previous versions of your files and folders, providing another option for data recovery.


 ChatGPT
 Perplexity
 Google AI Mode
 Grok
Grok


