Windows computers come with a useful System Restore feature that can help resolve many errors and issues you face after application installation. It can even fix system crashes and other computer malfunctions. If you are also facing troubles with your computer and want to restore computer to earlier date, follow along with the article for a step-by-step guide to how to use the System Restore feature. We included steps for how to enable, create a restore point, and use the System Restore feature on your Windows PC.
In this article
Part 1: What is System Restore in Windows and Its Uses
The System Restore feature in Windows computers is a built-in tool that creates a snapshot of your computer's current state. This snapshot, known as a restore point, includes system files, certain program files, registry settings, and hardware drivers. You can manually create a restore point at any time, but Windows also automatically creates one once per week.
For example, your computer experiences a critical issue after installing an update, driver, or app. You can use a System Restore to revert your computer to an earlier working state without losing your files. It will restore to previous date of system settings, files, and drivers.
It is important to note that System Restore is not a substitute for making backups. It specifically focuses on the Windows system and does not save copies of your files. It also does not delete or replace any of your files when performing a restoration. Therefore, it should not be relied upon as a complete backup solution.
Part 2: How to enable System Restore in Windows
System Restore is not enabled on your computer for all drives by default. You should enable System Restore on your computer, or at least turn it on for your system drive, to stay safe in unexpected situations. Also, everything System Restore preserves is typically stored on the system drive. You can also enable System Restore protection for other disks on which you have installed programs.
Here are steps to enable System restore to help restore computer to earlier date:
Step 1: Click the “Start” icon and enter “restore” into the search box. Select the “Create a restore point” search result.
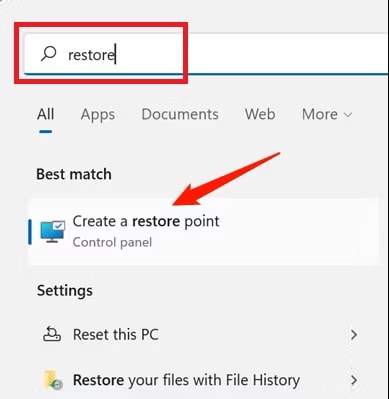
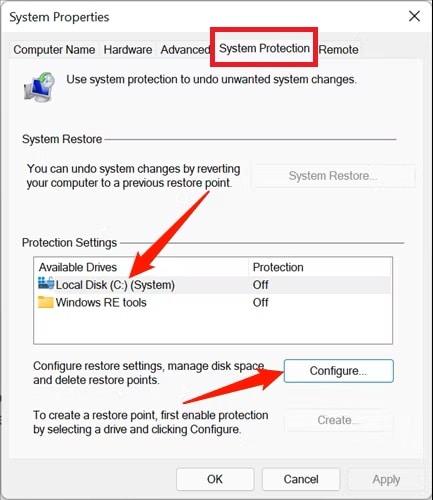
Step 2: On the “System Properties” window, select the “System Protection” tab at the top. You will be able to view all the available drives on your computer and whether the “Protection” is enabled for each or not.
Step 3: Select the “Local Disk (C:) (System)” drive option under the “Protection Settings” and click the “Configure” button.
Step 4: Select and enable the “Turn on system protection” option on the new window and adjust the “Max Usage” slider option to set the amount of hard drive space for System Restore.
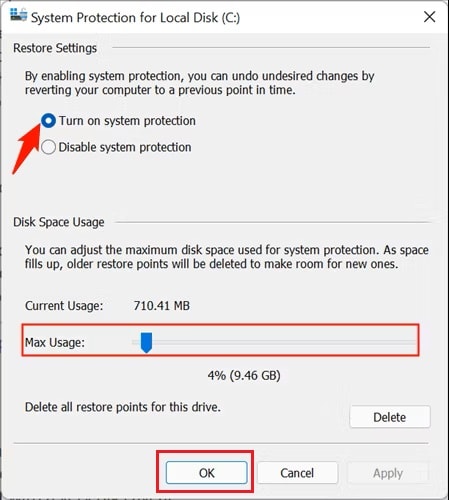
Step 5: Click the “OK” button at the bottom to enable System Restore. Windows will create a restore point on all the drives that have system protection enabled when applying a new update or specific system changes.
Part 3: How to create a System Restore checkpoint in Windows
When System Restore is enabled, it automatically creates a checkpoint each week or whenever it detects a system change. However, if you want to make system configurations manually, you should always create a restore point beforehand.
Follow the below steps to create a System Restore checkpoint to help restore system files and settings:
Step 1: Click on the “Start” icon and enter “restore” into the search box. Select the “Create a restore point” search result.
Step 2: On the “System Properties” window, select the “System Protection” tab at the top.
Step 3: Click on the “Create” button under “Prtection Settings” to create a restore point for the drives that have system protection turned on.
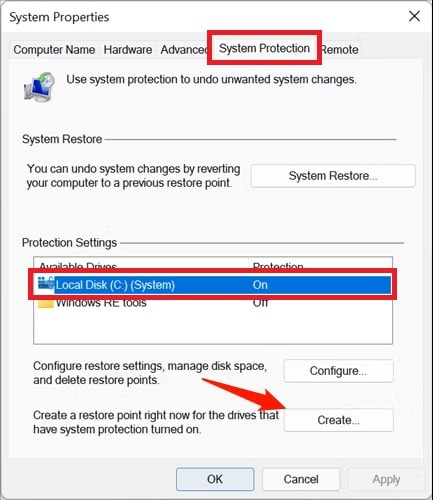
Step 4: Enter a relevant description for your restore point to identify why it was created, and click on the “Create” button.
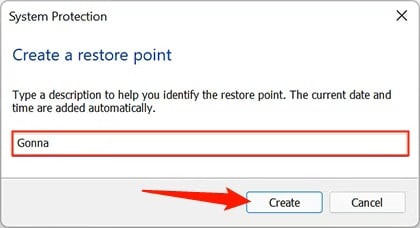
Step 5: Wait until your system creates a restore point for the selected drives. Click on the “Close” button on the successfully created message window to exit.
Part 4: How to recover the computer using System Restore in Windows
Now that you have enabled System Restore and also created a restore point for your computer. Your computer is facing any errors or issues after installing or updating system settings. You can use the System Restore feature to undo the changes. You can use System Restore in a couple of ways depending on the computer's status.
Method 1. Using System Restore from Desktop
If your computer can start and function properly, albeit with some errors. You can use the System Restore feature from the desktop itself.
Here are below steps to restore PC to earlier date Windows using the System restore point:
Step 1: Click on the “Start” icon and enter “restore” into the search box. Select the “Create a restore point” search result.
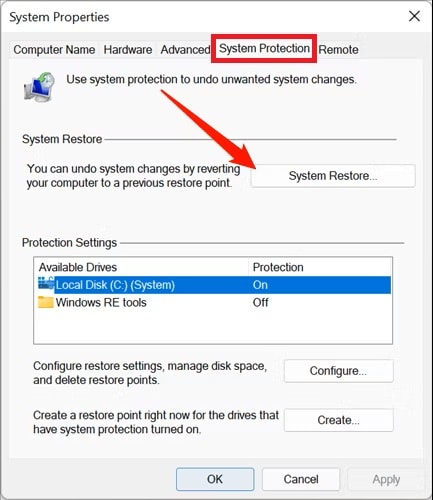
Step 2: On the “System Properties” window, select the “System Protection” tab at the top.
Step 3: Next, click on the “System Restore” button to undo system changes by reverting your computer to a previous restore point.
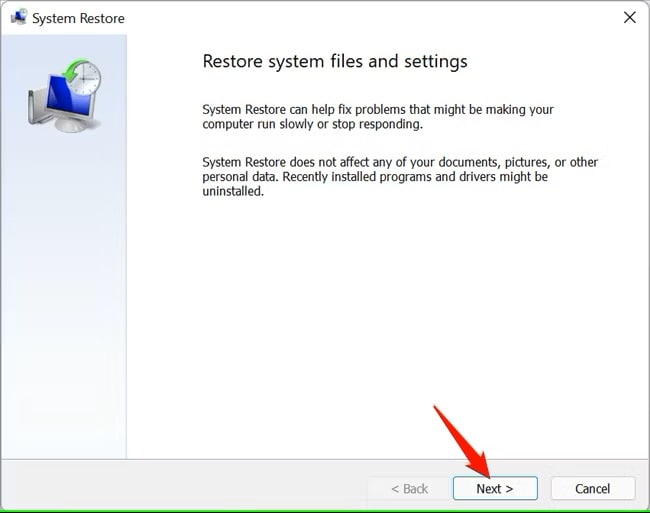
Step 4: Go through the brief explanation regarding “Restore system files and settings”. Click the “Next” button to proceed.
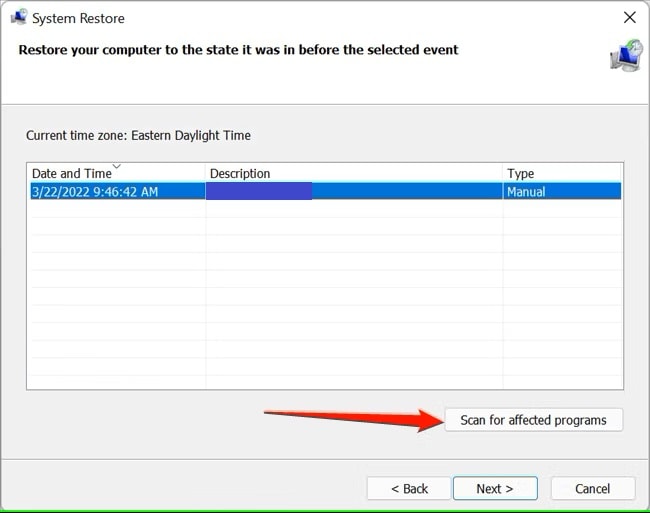
Step 5: All the available restore points will be displayed that were created automatically each week or any manual restore points you had created. Click on the “Show more restore points” option to check if any other automatic restore points have been created before application or driver installations.
Step 6: Select the most recent working restore point from the list. Click on the “Scan for affected programs” at the bottom to let System Restore analyze your computer to confirm changes made, such as programs that will be uninstalled during the restoration process.
Step 7: After the analysis is over, System Restore will display all the programs and drivers that will be uninstalled during the restoration process for the selected restore point. It will also display all the programs and drivers that might be restored to the computer.
Step 8: If you are okay with the selected restore point to install or uninstall the programs and drivers, click the “Next” button.
Step 9: Here, go through the provided details of the restore point and confirm the selected restore point is correct. Click on the “Finish” button.
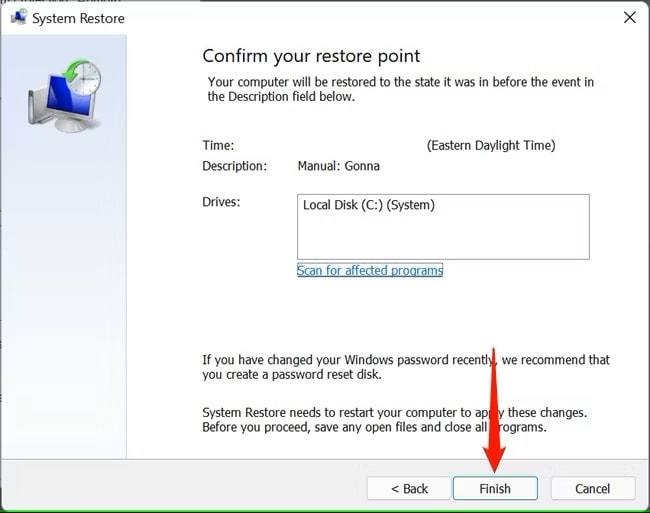
Step 10: Confirm the “Once started, System Restore cannot be interrupted” warning message and click on “Yes” to proceed.
Windows will restart your computer and start the recovery procedure. When your computer reboots, check if the System Restore process has solved the issues you were facing. Also, keep in mind that System Restore automatically creates a new restore point just before it starts restoring, allowing you to reverse the restoration by selecting this newly created point.
Method 2. Using System Restore from Advanced Startup
If your computer is not booting properly and you are stuck at the startup. You can use the System Restore from the Advanced Startup settings to enter the Windows Recovery Environment.
Follow the below steps to restore system files and settings through Windows Recovery Environment:
Step 1: Boot your computer from the power button. As soon as you see the booting logo, press and hold the F11 key until the boot options are visible. Select “Boot Menu” from the list to enter Windows Recovery Environment.
Step 2: Click on the “Advanced options” on the screen.

Step 3: Select the “Troubleshoot” option on the next screen.
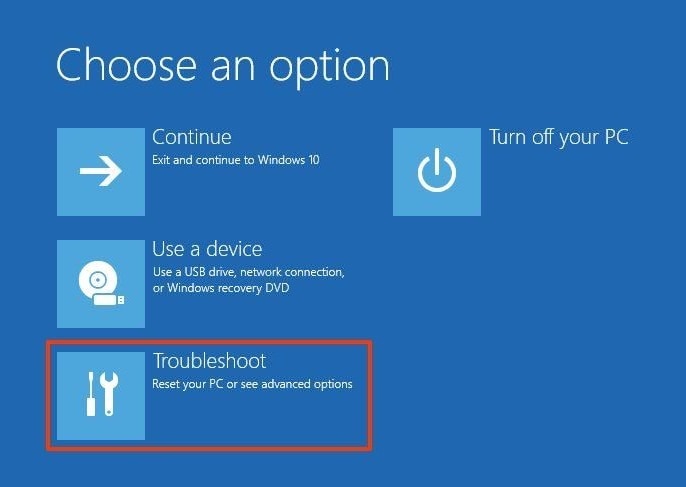
Step 4: Click on the “Advanced options” and select “System Restore” from the list.
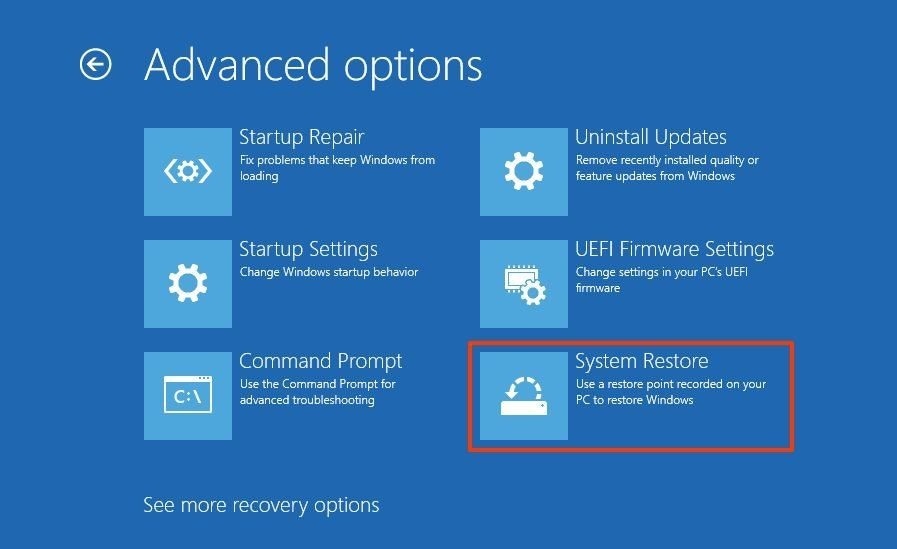
Step 5: Select your Windows account and enter the account password to proceed. Click “Continue”.
Step 6: All the available restore points will be displayed. Click on the “Show more restore points” option to check any other automatic restore points.
Step 7: Select the most recent working restore point from the list. Click on the “Scan for affected programs” at the bottom to confirm changes made during the restoration process.
Step 8: If you are okay with the selected restore point, click the “Next” and “Finish” buttons, respectively.
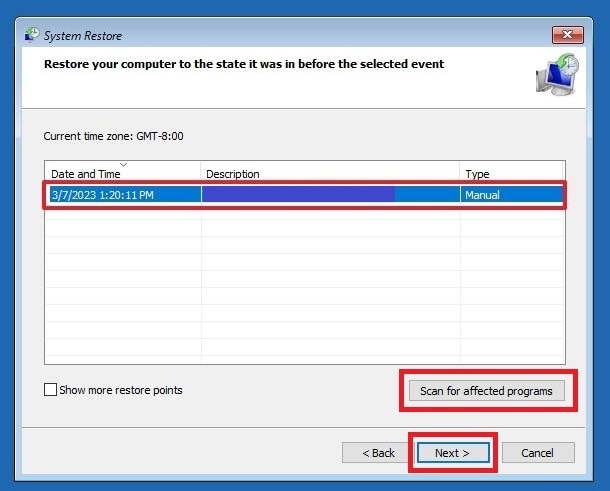
Step 9: Once the process is finished, the restore point will be used to undo any system changes that are causing problems, including preventing your computer from starting correctly.
Video Tutorial: How to Recover Deleted Folders in Windows 10?
Tips and Notes: How to Recover Lost Data Using Recoverit
Keep in mind that System Restore is only a Windows feature to recover a device from configuration problems quickly. However, to recover lost data from your computer, you can use Recoverit - Data Recovery software. It is one of the best and most reliable data recovery tools that can help recover various data file formats in an easy-to-use interface.
Here are a few key card data recovery features of Recoverit:
- The program includes an easy-to-use layout, making it ideal for individuals of all technical skill levels.
- It can recover many different kinds of file types, including videos, pictures, files, and messages.
- The tool can recover data from lost partitions that have been deleted, cleared, altered, or damaged.
- It can retrieve files from storage devices that have been formatted.
- During the recovery process, users can review recoverable files to ensure that they have restored the correct data.
- It works with every kind of file system, including FAT16, FAT32, exFAT, NTFS, and more.
- It can recover data from many storage devices, such as internal drives, SSDs, USB flash drives, SD cards, and external hard drives.
It handles over 500 data loss scenarios, including deletion, formatting, and memory card damage.
Follow the below steps to recover data from your computer using Recoverit:
Step 1: Download and install the Recoverit - Data recovery application on your computer. Make sure not to install the program on the same partition or hard drive where your deleted data were.
Step 2: Launch the program and select the “Deleted File Recovery” mode option to recover data from your computer.
Step 3: Click on the “Hard Drives and Locations” option on the left side panel and select the location where you have lost data.
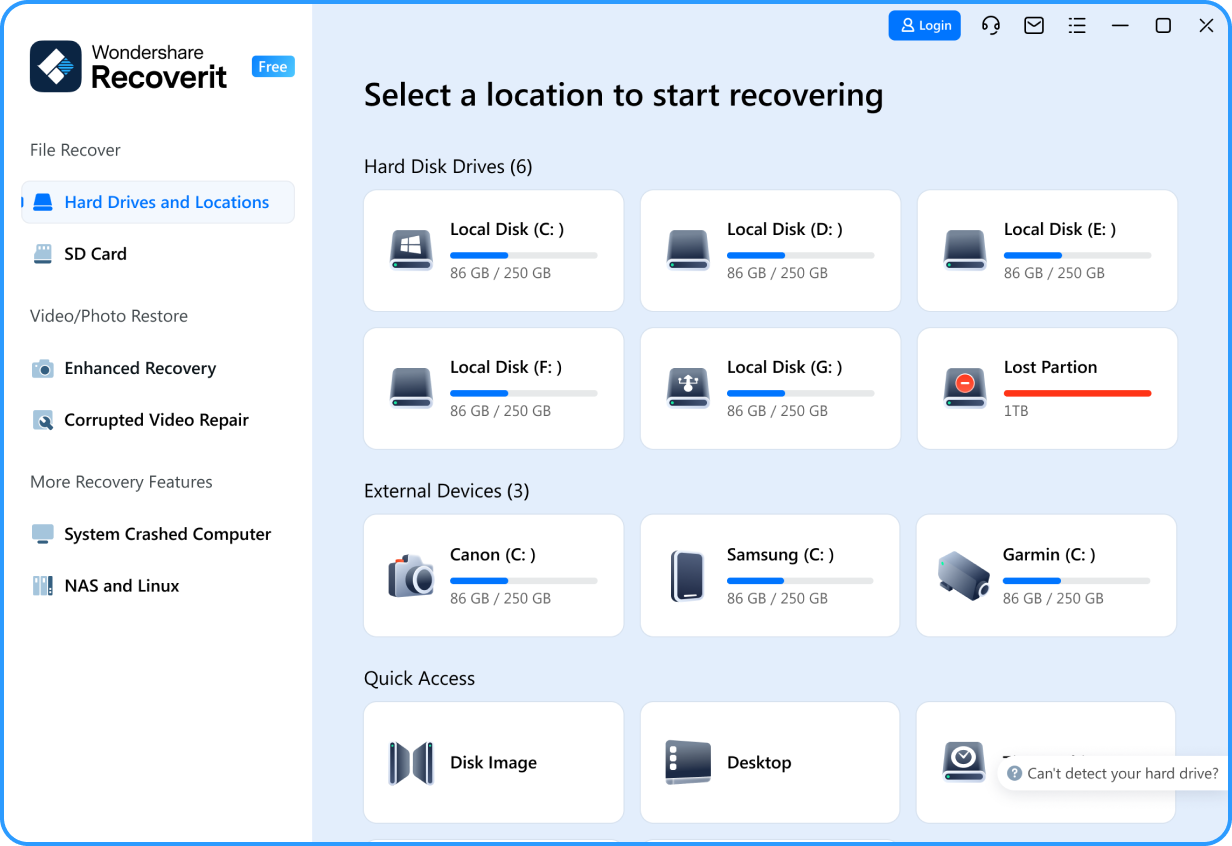
Step 4: Click the “Start” button to begin the finding lost data process. The app will start a quick scan of your computer.
Step 5: After the scan, you can preview all the recoverable files. Select the files that you want to restore and click “Recover.”

Step 6: In case you cannot find your files in the list, select the “All-Around Recovery” option to search for more files on your computer.
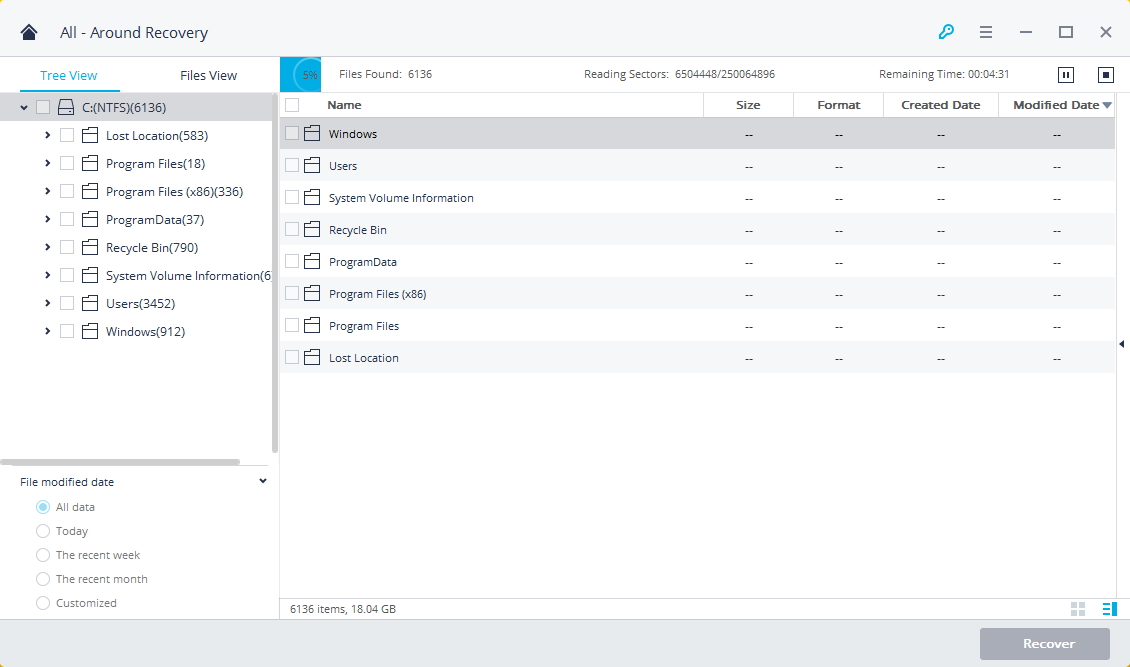
Step 7: After the scan is completed, all the recoverable files are displayed with file types or file paths. Preview your lost files and click the "Recover" button to retrieve the data. Make sure to save the recovered data not in its original path.

Conclusion
While you cannot create a backup of your data or reset your computer using the System Restore feature, it can, however, help you to restore your computer configuration to fix problems effectively. It can fix a surprising number of problems causing your computer to malfunction after installing or uninstalling programs and drivers. However, make sure to use the Recoverit - Data Recovery tool to recover any deleted or lost data after the System Restore process.
Try Wondershare Recoverit to Recover Your Data

FAQ
-
1. What are the ways to restore Windows?
Assuming you have previously enabled the System Restore feature on your computer. You can restore your Windows to its previous working stage either from your desktop or Windows Recovery Environment. In case that did not help resolve your issues, you can always reset your computer to factory settings using the Reset PC feature. -
2. How to reset PC from BIOS?
You can reset your PC from BIOS by pressing the F2 or Delete key during the booting process and entering BIOS settings. Here, use the arrow keys to select the “Reset to Defaults” option and press “Enter”. Your PC will restart and the factory reset process will begin. -
3. How to create a System Restore?
You can create a System Restore point by opening the System Properties window from the Start menu. Select the System Protection tab and click on the Create button to provide the restore point name. Lastly, click the Create button to begin creating a system restore point for your computer.


