


For Windows users, the Recycle Bin icon missing from the desktop may cause panic. It is quite normal to lose the Recycle Bin icon, but the worst-case scenario is to lose valuable files in the Recycle Bin. When you perform a desktop clean, you may accidentally remove the Recycle Bin icon. A corrupt operating system or a malware attack may also lead to loss of the Recycle Bin icon.
It is possible to restore Recycle Bin icon. However, when Recycle Bin is disappeared or removed, the files temporarily kept in Recycle Bin will be totally emptied. How to recover deleted files from Recycle Bin after empty? Permanent lost files can still be recovered using the correct recycle bin recovery software. In the following parts, we will show you how to make Recycle Bin reappear on your desktop and how to restore files deleted from recycle bin on Windows 11/10/8/7.
How to Restore Recycle Bin Icon on Desktop
Your Recycle Bin may disappear from the desktop due to a number of factors. It may be caused by a malware virus, system corruption, aftermarket clean tool or accidental deletion. Encouragingly, you can still recover lost Recycle Bin to its original location by following the steps below.
Windows 11/10
1. Right-click anyplace on your desktop.
2. Select the Personalize option.
3. Select the Themes tab, then clickDesktop icon settings under Related Settings.
4. Ensure that the box next to Recycle Bin is ticked, and then clickApply or OK.
Older Versions of Windows (7/8)
1. Right-click anyplace on your desktop.
2. Select the Personalize option.
3. Click Change desktop icons in the left of the page.
4. Ensure that the box next to Recycle Bin is ticked, and then click Apply or OK.
You may also want to read:
How to Recover Deleted Files from Recycle Bin after Empty
If you accidentally deleted vital files, the Recycle Bin still has your files. It is easy to restore files from Recycle Bin when your files are not permanently deleted. But if you accidently emptied the Recycle Bin or your Recycle Bin disappeared, you will find your files are no longer in the Recycle Bin. What now? Your best option is to use a recycle bin recovery software application to undelete recycle bin and recover all missing files. Wondershare Recoverit can quickly and efficiently restore permanently deleted files from recycle bin.
The Best Recycle Bin Recovery Software - Recoverit
Individuals and even companies dread losing vital data. Currently, vital data of companies and individuals are usually stored in local computers, however such data is not usually backed up. Thus the loss of such important data can cause serious panic among the users. To deal with such kind of situations, several data recovery tools have been invented. If you are looking for the most efficient and high-quality software, Wondershare Recoverit is your best choice.
Wondershare Recoverit is an awesome tool to retrieve any kind of lost data. From secondary storage devices( including and not limited to hard drives, flash drives, SD cards) to mobile phones to digital cameras. This software is user-friendly and beginners or starters can use it without difficulty. It also possesses a good interface, which makes it easier to use.
Recoverit - Data Recovery Software for Recycle Bin Recovery
- Recover lost or deleted files, photos, audio, music, emails from any storage device effectively, safely and completely.
- Supports data recovery from recycle bin, hard drive, memory card, flash drive, digital camera, and camcorders.
- Supports to recover data for sudden deletion, formatting, hard drive corruption, virus attack, system crash under different situations.
Steps to Retrieve Deleted Files from Recycle Bin Using Recoverit
Step 1: Select the recovery scenario
Here you are required to select the type of recovery scenarios you meet. In this case, you should select Recycle Bin under Quick Access.

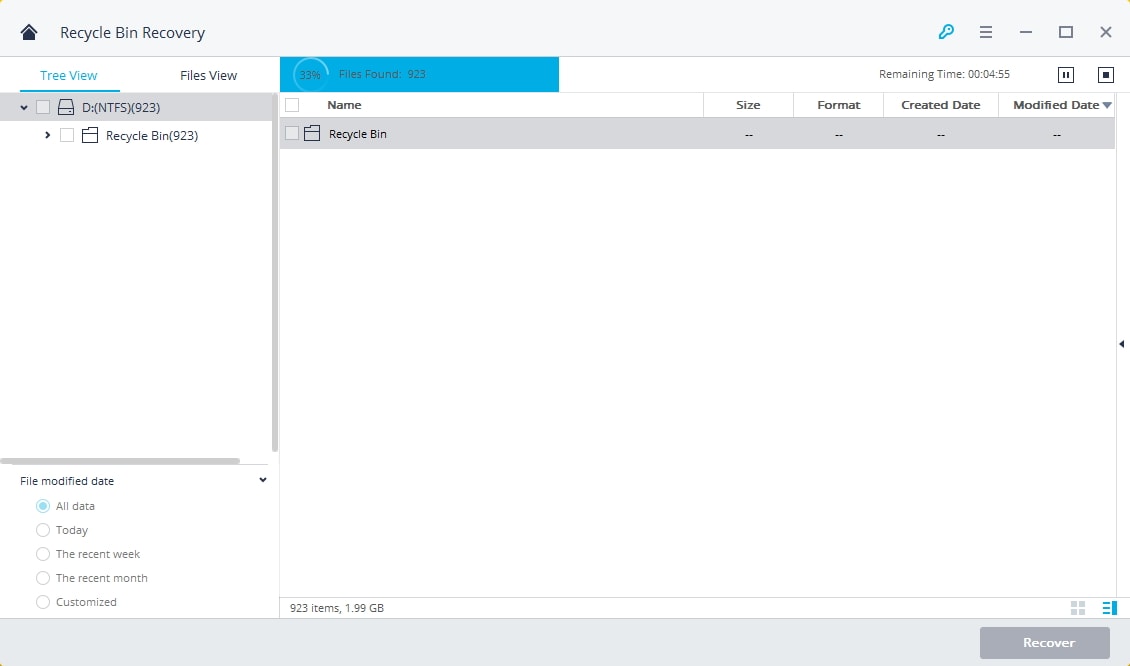
Step 2: Launch quick scan
The quick scan will be launched immediately. If you could not find the result from the quick scan, you should enable Deep Scan to give the recovery tool the highest possible chance of recovering all your lost files. The process may take several minutes given the number of files required to be scanned.
Step 3: Recover deleted files
After scanning is completed, go through all the types of files. You can preview the files and click Recover to start recovery.

Conclusion
Many Windows users may encounter Recycle Bin icon disappearing on Windows 11/10/8/7. Equipped with the methods and instructions mentioned in this article, you are now able to solve this annoying issue on your own to regain access to your lost files.
Try Wondershare Recoverit to Perform Photo Recovery
 Security Verified. Over 7,302,189 people have downloaded it.
 ChatGPT
 Perplexity
 Google AI Mode
 Grok
Grok


