Losing important files is super frustrating, especially when your antivirus decides to delete them. It happens for various reasons, but don't worry, there are ways to get those files back. This guide will show you how to recover files deleted by antivirus applications, focusing on McAfee. Whether you need to restore files deleted by McAfee, restore McAfee deleted files, or figure out how to restore files deleted by MacAfee, I've got your back. Plus, if Avast deleted your files, I’ll help you recover them too.
Recovering your files is essential since losing important data can affect both your work and personal life. Knowing why antivirus applications delete files can help prevent this in the future and assist you in getting your files back. I'll also share some pro tips to restore McAfee quarantined files to keep your data safe. So, let's jump in and learn how to recover your important files and avoid future data loss!
Try Recoverit to Restore McAfee quarantined files
Security Verified. Over 7,302,189 people have downloaded it.
In this article
Part 1: Why Do Antivirus Applications Delete Files?
Antivirus applications are designed to protect your system from threats. However, they sometimes delete files that they mistakenly identify as harmful. Here are some reasons why antivirus applications delete files:
- False Positives: Sometimes, antivirus applications mistakenly identify safe files as threats.
- Infected Files: Real threats are often deleted to protect your system.
- Outdated Software: Old antivirus programs might misidentify new files.
- Aggressive Settings: Some programs have settings that err on the side of caution.
- User Settings: Customized settings might lead to file deletion.
- Corrupted Files: Damaged files might get flagged.
- Suspected Malware: Files that behave like malware might get deleted.
- Periodic Scans: Regular scans might remove files without user intervention.
Part 2: Can I Recover Files Deleted by Antivirus Applications?
Yes, you can recover files deleted by antivirus applications. When your antivirus deletes a file, it is often moved to a quarantine folder rather than being permanently deleted. This is a safety measure that allows you to review and restore the file if it is mistakenly identified as harmful. Checking the quarantine folder is the first step in recovering deleted files.
If the file is not in the quarantine folder, you can use recovery software to scan your computer for deleted files. These tools are designed to retrieve lost data and are usually user-friendly and effective. Many recovery tools are available online, and they can help you recover your lost files.
Another method to recover deleted files is to restore them from a backup. Regular backups are essential in preventing data loss and ensuring you can recover files if they are accidentally deleted. If you have a backup of your important files, you can easily restore them and avoid the hassle of using recovery tools.
Part 3: How to Restore Files Deleted by McAfee
Restoring files deleted by McAfee can seem daunting, but with the right methods, it becomes manageable. There are several techniques you can use to recover your important files, whether by employing recovery software, checking the quarantined folder, or utilizing backup solutions.
Each method has its unique steps and benefits, ensuring that you have multiple options to choose from based on your specific situation. Let’s explore these methods in detail to help you restore your deleted files effectively.
Method 1: Use Recoverit
Using data recovery software like Recoverit is a reliable way to restore files deleted by McAfee. This software recovers lost or deleted files from various storage devices. It's user-friendly and effective, making it a popular choice. You can easily use it to retrieve your lost files.
Recoverit performs deep scans to find files that other methods may not recover. It identifies and recovers various file types, including documents, photos, and videos. The software also provides a preview feature, so you can view files before recovery. This ensures you restore the correct files and prevents further data loss.
Follow these steps to recover files:
- Download and install the Recoverit software. Choose the location where the file was deleted.

- Run a scan to find deleted files.

- Preview the files and select the ones to recover. Click Recover.

Related Video >>: How to Recove Lost Files After Virus Attack?
Method 2: Check the Quarantined Folder
McAfee often moves suspected malicious files to a quarantine folder instead of permanently deleting them. This folder isolates the files to prevent them from causing harm. By checking the quarantined folder, you can identify and restore files that were mistakenly flagged as threats. This simple step ensures that you don't lose important data due to false positives.
- Launch the McAfee application. Navigate to the Quarantine section. Select the files you want to restore.
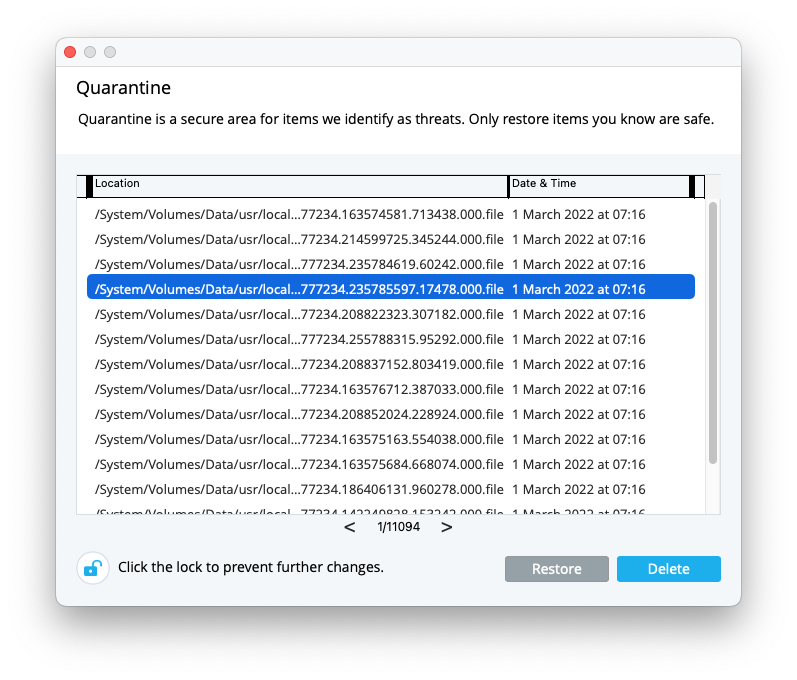
- Click Restore to recover the files.
Method 3: Restore From Local Backup
Having a local backup of your important files is crucial for data recovery. If you have previously backed up your files, you can easily restore them from the backup. This method is straightforward and effective in retrieving lost data. By regularly creating backups, you ensure that your important files are always safe and easily accessible, even if they are mistakenly deleted by antivirus applications.
Restoring from a local backup is simple and doesn't require any specialized tools or software. Just access your backup folder or service, locate the files you need, and copy or restore them to your desired location. This proactive approach minimizes the risk of data loss and provides peace of mind, knowing that you can recover your files whenever needed.
- Access your backup folder or service. Find the files you need.
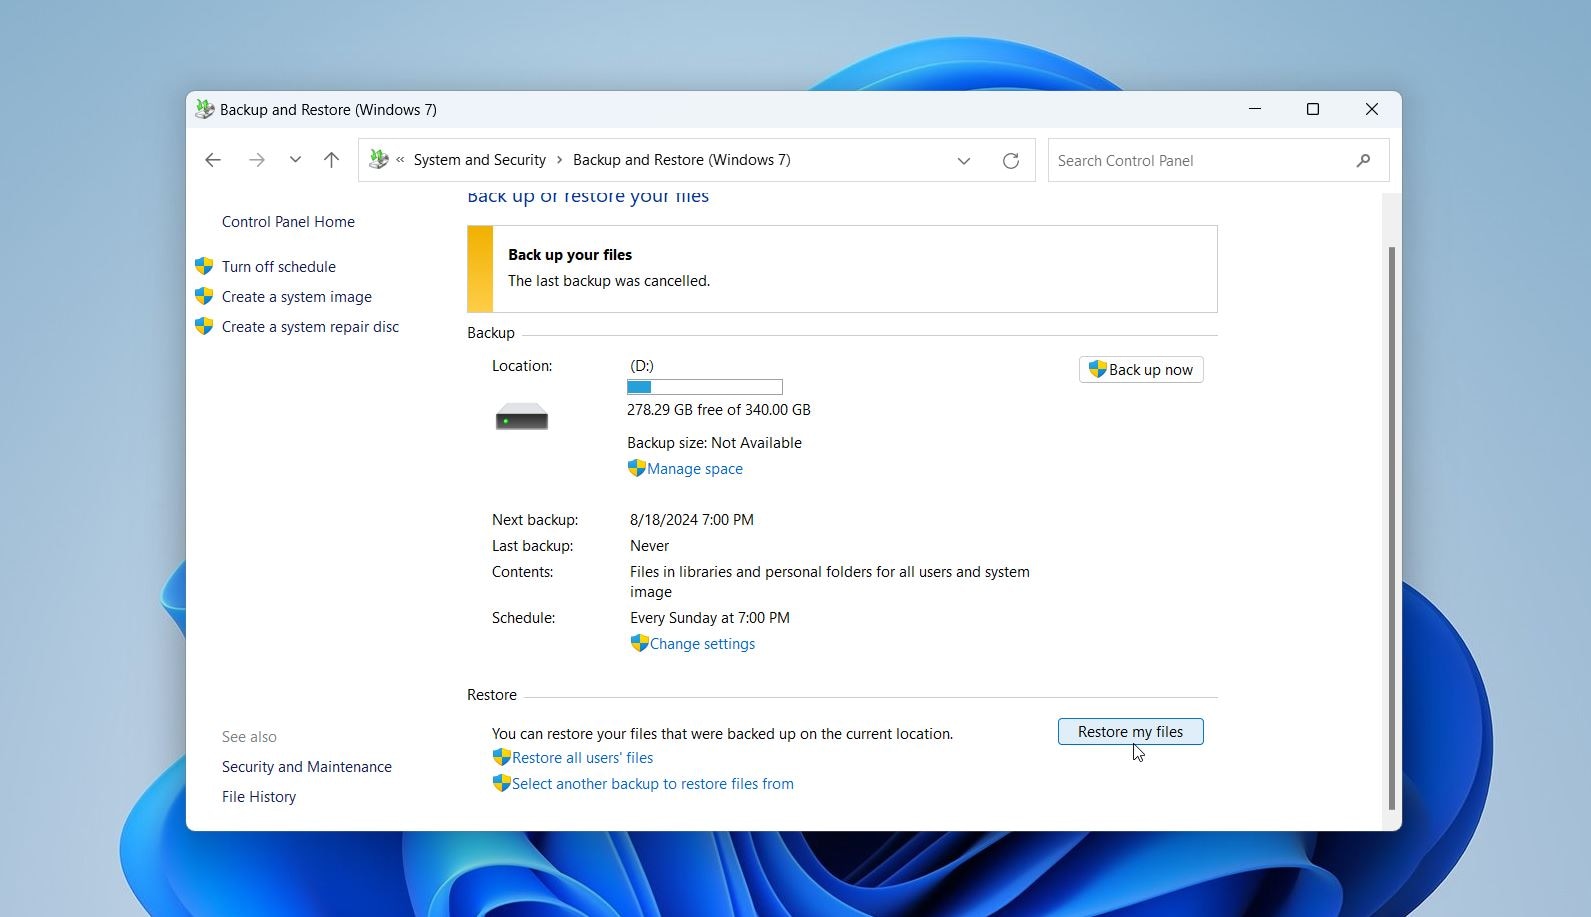
- Copy or restore the files to your desired location.
Method 4: Check Recycle Bin
Before files are permanently deleted, they are often moved to the Recycle Bin. This temporary storage allows you to review and restore them if necessary. By checking the Recycle Bin, you can identify and recover files that were recently deleted, preventing permanent data loss.
Checking the Recycle Bin is a simple yet effective way to recover files. Just open the Recycle Bin, locate the files you want to restore, and right-click to select 'Restore.' This action returns the files to their original location, making them accessible once again. It's a quick and convenient method to recover your important data.
- Double-click on the Recycle Bin icon. Locate the files deleted by McAfee.
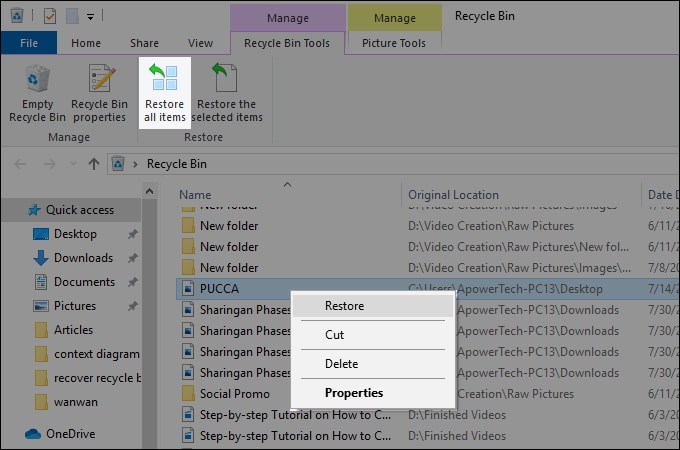
- Right-click on the file and select Restore.
Method 5: Use System Restore
System Restore is a built-in feature in Windows that allows you to revert your computer to a previous state. This powerful tool can help you recover files that were deleted by McAfee if you restore your system to a point before the files were deleted. By selecting a restore point from a time when the files were still present, you can effectively bring back your system and recover the lost data.
Using System Restore is straightforward. You simply need to access the System Restore feature, choose a restore point, and follow the prompts to complete the process. This method is effective in recovering deleted files and reversing any unwanted changes made to your system. It ensures that your important data is restored, and your computer is returned to a stable state.
- Type 'System Restore' in the search bar and open it. Choose a restore point before the files were deleted.
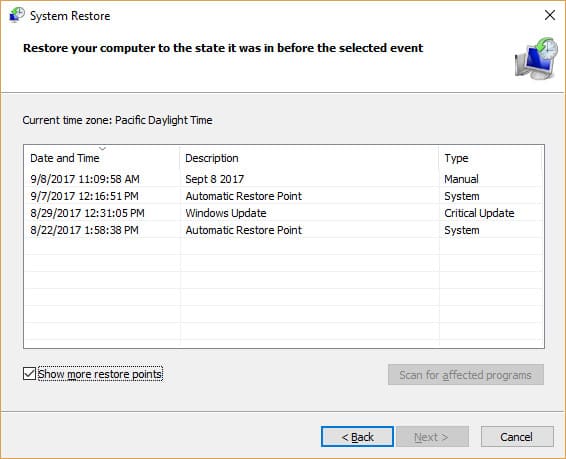
- Follow the prompts to complete the restore.
Method 6: Contact McAfee Support
If you are unable to recover the files using the above methods, contacting McAfee support is a viable option. The support team can provide professional assistance and guide you through the recovery process.
- Go to the McAfee support website. Describe your issue to the support team.
- Follow the guidance provided by McAfee professionals.
Part 4: Pro Tips to Restore McAfee Quarantined Files
Restoring quarantined files can save you from unnecessary data loss and ensure your important documents are safe. Here are some pro tips to help you restore McAfee quarantined files effectively:
- Regularly Check Quarantine: Make it a habit to periodically review the quarantined files in your McAfee antivirus application. This will help you identify any mistakenly quarantined files early on.
- Update Antivirus Software: Keeping your antivirus software up to date is crucial. Updates often include improvements in threat detection algorithms, which can reduce the chances of false positives.
- Adjust Settings: Customize your McAfee settings to minimize false positives. You can adjust the sensitivity levels and create exceptions for certain files or folders that you trust.
- Create Exceptions: If you notice that specific files or applications are frequently quarantined, create exceptions for them in the McAfee settings. This will prevent them from being flagged in the future.
- Backup Important Files: Regularly backup your important files to an external drive or cloud storage. This ensures that you have a copy of your files in case they are mistakenly quarantined or deleted.
- Use Restore Points: Regularly create system restore points. These can help you revert your system to a previous state if important files are quarantined or deleted.
- Monitor Scan Logs: Keep an eye on the scan logs generated by McAfee. This will give you insights into which files are being flagged and quarantined, allowing you to take proactive measures.
- Educate Yourself: Stay informed about the latest security threats and updates from McAfee. Being aware of new developments can help you better understand why certain files might be quarantined and how to restore them.
By following these pro tips, you can effectively restore McAfee quarantined files and keep your important data safe. Regular maintenance and staying informed are key to preventing unnecessary data loss.
Conclusion
In summary, recovering files deleted by antivirus applications is possible. You can use recovery tools, check quarantine folders, or restore from backups. Whether you need to recover files deleted by McAfee, restore McAfee deleted files, or find out how to restore deleted files from McAfee, the methods are similar. Always remember to keep your antivirus updated and regularly back up your important files. This ensures you have a safety net in case of accidental deletions.
Recovery tools are a great help and make the process easier. If you follow the steps mentioned, you can recover your files successfully. Data recovery is not as hard as it seems with the right knowledge.
Keeping your files safe is crucial. Ensuring regular backups and using recovery tools effectively can save you from data loss. If Avast deleted your files, how to recover them follows the same principles. By staying informed and prepared, you can handle file deletions with ease. Stay proactive in managing your data, and you'll avoid the stress of losing important files.
Try Recoverit to Recover McAfee quarantined files
Security Verified. Over 7,302,189 people have downloaded it.
FAQ
-
1. Can I recover files deleted by McAfee?
Yes, you can recover files deleted by McAfee. To do this, check the quarantine folder first, as the files might be there instead of being permanently deleted. If the files are not in quarantine, use data recovery software or restore them from a backup if you have one. These methods are effective and can help you retrieve your lost files. -
2. How do I restore McAfee deleted files?
You can restore McAfee deleted files by navigating to the McAfee application and opening the quarantine folder. Select the files you want to restore and click 'Restore.' If the files are not in quarantine, use data recovery tools to scan your system. Additionally, you can restore files from a backup if available. -
3. What if Avast deleted my files, how to recover?
If Avast deleted your files, you can recover them by checking Avast's quarantine folder. If the files are not there, use a data recovery tool to scan your computer for deleted files. Additionally, you can restore the files from a backup if you have one. The process is similar to recovering files deleted by McAfee. -
4. How can I prevent antivirus applications from deleting important files?
To prevent antivirus applications from deleting important files, regularly update your antivirus software and adjust the settings to minimize false positives. Create exceptions for trusted files or folders, and ensure you have a backup of your important files. By taking these precautions, you can reduce the risk of accidental deletions and keep your data safe.


 ChatGPT
 Perplexity
 Google AI Mode
 Grok
Grok


