Have you ever worked hard on your next submission for hours and suddenly lost it all? Well, not once you get to use Microsoft Word AutoSave. It is a critical function that saves your documents so you can retrieve your work with a few seconds’ loss instead of starting the whole thing all over again. Throughout this piece, you will learn about the Microsoft Word AutoSave location and the benefits you can reap from it long-term.
Part 1. What Is Microsoft Word AutoSave?
Microsoft Word AutoSave is a document recovery feature that automatically saves your document in a temporary file every few seconds. It was first introduced with Microsoft Office 365 and works with other Office apps as well, like Powerpoint and Excel.
It is enabled by default, although you can choose to enable/disable it through a single toggle switch. To make the most of it, you should save your Word file on OneDrive, OneDrive for Business, or SharePoint Online. If you wish to keep your files locally, you can use the AutoRecover feature. It saves the files every 10 minutes, although you don’t need an internet connection for it.
Versions
Microsoft Word AutoSave comes brand new for Office 365. You don’t need to pay any extra charges for it. AutoSave receives consistent updates as it makes your writing experience as seamless as possible without interfering with your files too much.
Uses
The AutoSave feature lets you recover any progress you may lose with your document accidentally, such as when your system has a virus infection, or there is a power surge.
Features
In addition to recovering your documents, Microsoft Word AutoSave has several valuable features:
- It keeps your file secured as you can only have access to your temporary document with a valid Microsoft account.
- It doesn’t take up unnecessary space as all the recovery files are temporary.
- AutoSave doesn’t overwrite the data on your current file. It only makes a temporary copy so that you can recover it in case of losing progress without saving. If required, you may choose not to recover the data at all.
- It is easy to enable/disable AutoSave with a single toggle switch.
More related: Word AutoSave Location Guide: How to Recover Unsaved Word Documents
Part 2. Where Is the Word Autosave Location and How to Change It?
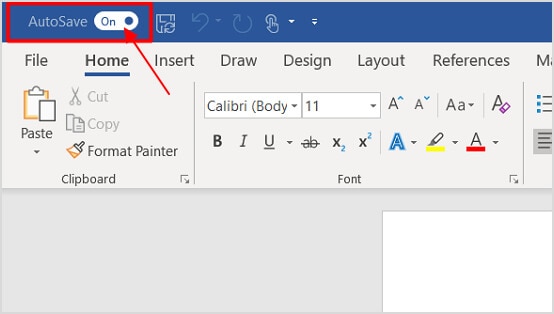
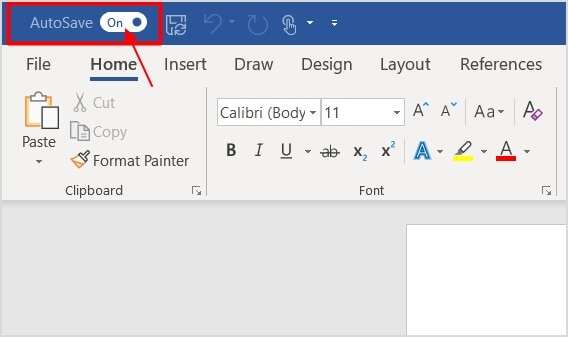
You can conveniently locate Word AutoSave in the top pane of Word just above the ‘File’ tab. It is hard to ignore as it is the only toggle switch in that vicinity.
The temporary document for AutoSave is stored in the exact location you installed Word. Below is the Word Autosave Location by default:
For Windows: C:\Users<User Name>\AppData\Roaming\Microsoft\Word
For Mac: /Users/<username>/Library/Containers/com.Microsoft/Data/Library/Preferences/AutoRecovery
You can quickly locate it with its name as ~wrfxxxx.tmp or ~wraxxxx.tmp.
How to Change Where to Save AutoRecover Files in Word on Windows
If you wish to locate the temporary files conveniently, you can create a custom save location for all AutoSave and AutoRecover files. Just follow the procedure described below.
- Launch Microsoft Word either through the Start Menu or from Office 365.
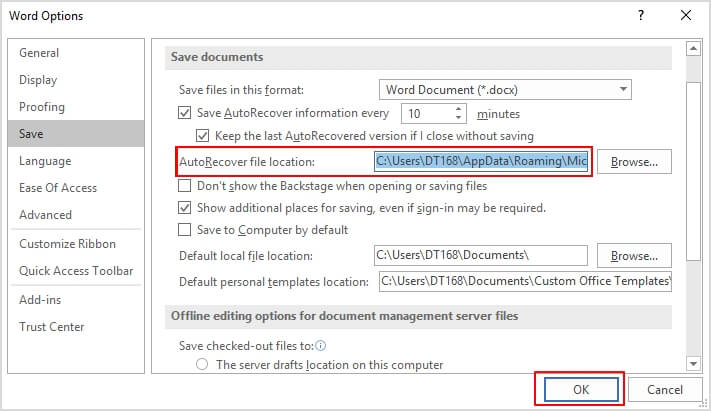
- Go to the ‘File’ tab and choose ‘Options.’
- Click on the ‘Save’ tab.
- Observe the ‘Save documents’ section from the dialogue box. Then, enter the desired path for the AutoRecover file under ‘AutoRecover file location.’
- Click OK to confirm your changes.
How to Change Where to Save AutoRecover Files in Word on Mac
The process to change the location for AutoRecover files on Mac is somewhat different from on Windows.
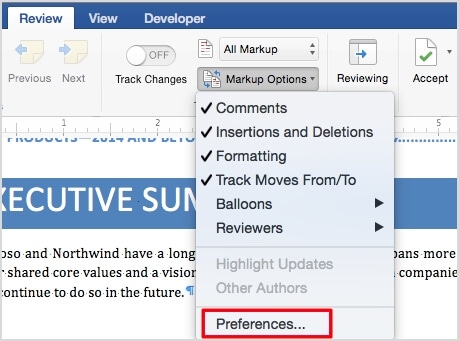
- Launch Microsoft Word and go to ‘Preferences.’
- Select the ‘File Locations’ option under the ‘Personal Settings’ tab.
- Go to AutoRecover Files > Modify.
- Browse to the location where you desire to save the AutoRecover files.
- Finally, click Choose or Open.
Part 3. How to Turn on or Turn off Autosave in Word
You can enable or disable the Word Autosave function by toggling the switch in the top-most pane to On or Off. Remember, it will reflect on every document until you turn it back on.
Alternatively, you can turn on or turn off Microsoft Word AutoSave for specific files by using the following method:
- Open the ‘File’ tab and select ‘Options.’
- Click Save.
- Tick or uncheck the ‘AutoSave’ box to enable or disable the feature for that specific file.
Part 4. How to Restore Unsaved Word Documents Using AutoSave
As mentioned above, you can check the Word AutoSave Location for backup files:
C:\Users<UserName>\AppData\Roaming\Microsoft\Word
If you don’t find the desired file in the location, you can go through the following steps:
- Launch MS Word through the Taskbar or Office 365.’
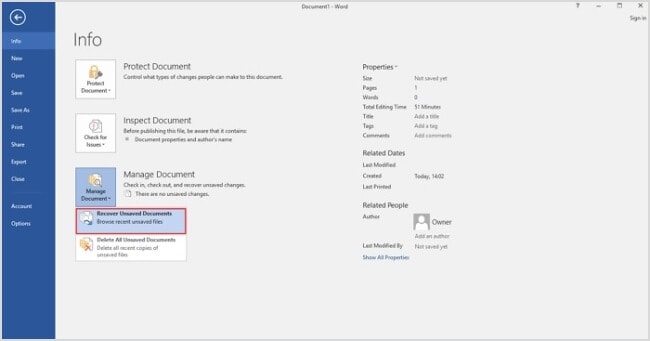
- Go to the File > Info > Manage Document > Recover Unsaved Documents.
- The drafts will open in a new window. Choose the ‘Save As’ option to save the documents you want. They shall now remain stored on your computer/OneDrive account.
People Also Ask
How do I manage AutoSave in Word?
You can toggle AutoSave on or off from a switch above the ‘File’ tab. If you wish to edit other settings, you can go to the ‘Save’ option under that same tab.
Where do Word AutoSave files go?
AutoSave uses temporary files to save your document’s progress. Those are in the Word installation directory by default, but you can change them from the ‘File’ tab.
Why is AutoSave turned off in Word?
Word may turn off AutoSave for your computer if you disconnect from OneDrive or accidentally delete the temporary files. Thus, you should check your OneDrive login and the integrity of your hard drive to ensure that it doesn’t happen again.
Does AutoSave only work with OneDrive?
Yes. AutoSave is a feature exclusive to Microsoft OneDrive. You need to have a Microsoft account and connect to OneDrive to use it adequately.
How do I AutoSave Word Documents without using OneDrive?
You can save your documents manually or use the AutoRecover function if you wish to keep them offline.
Is AutoRecover the same as AutoSave?
Sort of. AutoRecover saves your documents locally, whereas AutoSave lets you access them through the cloud. Moreover, AutoRecover is faster but less reliable than AutoSave.
How often does Word save an AutoRecover File?
By default, Word saves your AutoRecover files every ten minutes, though you can modify it in the ‘Save’ section under the ‘File’ tab.
Conclusion
Microsoft Word AutoSave and AutoRecover are twofeatures you should get hang of if you don’t want to lose much of your work unexpectedly.



 ChatGPT
 Perplexity
 Google AI Mode
 Grok
Grok


