When a device (such as a DVD player or digital decoder, etc.) only supports FAT file systems, users may need to format USB to FAT16. You can format USB drive to FAT16 on Windows in one of two methods for both novice and experienced users. Using Disk Management is feasible for USB flash sticks with small storage capacities between 1GB and 4GB, while using Windows Command Prompt can format a USB larger than 4GB to FAT16.
Why There Is No FAT16 Option on Format Window
Sometimes, when you try to format your USB drive to FAT file system with Disk Management or Windows File Explorer, you may find only FAT32, exFAT, and NTFS are available on the Format window.
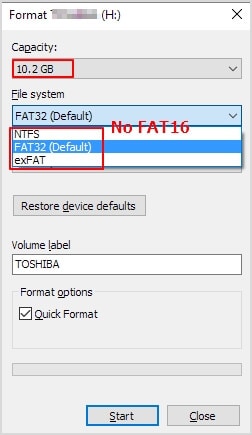
This is because the capacity of your USB flash drive is more than the max. volume size of FAT/FAT16. Below is a comparison of the different Windows file system on maximal volume and file size.
File System |
Max. Volume Size |
Max File Size |
| FAT/FAT16 | 4GB | 2GB |
| FAT32 | 2TB | 4GB |
| exFAT | 128PB | 128 PB (theoretical 16 EB – 1 byte) |
| NTFS | 8PB | 256TB |
If your USB flash drive is 8GB or more, you will need to resize it to 4GB using CMD before formatting it to FAT16 file system.
Related tips:
Note: Formatting a USB will erase all data in it. So, back up your essential data before formatting. However, if you find that you accidentally deleted or lost important files on the USB drive, no panic; Wondershare Recoverit can help you recover them in only three steps.
Wondershare Recoverit - Recover Your Precious Files
5,481,435 people have downloaded it.
Support data recovery from all file systems, including exFAT, FAT16/FAT32, NTFS, APFS, HFS+, Raid, RAW, ext2, ext3, and ext4 under the Linux OS.
Support 500+ real-life data loss scenarios, including accidental deletion, formatting, computer crash, virus attack, etc.
Recover lost data from 2000+ storage media with ease, such as hard drive, USB flash drive, SSD, external hard disk, pen drive, floppy disk, etc.
Free version to try and paid version to enjoy more.
Method 1: Format USB Flash Drive to FAT16 Using Disk Management
Applicable: USB drive size < 4GB
Here we assume the USB is FAT32, and we want to convert it to FAT16. This FAT16 format tool is straightforward to use.
Step 1. Connect the USB to the computer.
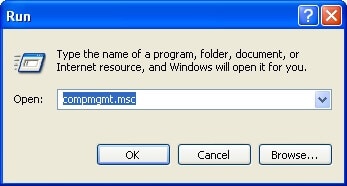
Step 2. Activate "Computer Management" by selecting "Start > Run," entering "msc" into the dialog box, and then selecting "OK."
Step 3. Choose "Disk Management" (point A) in Computer Management, then look for your USB. The current format should be FAT32 (point B).
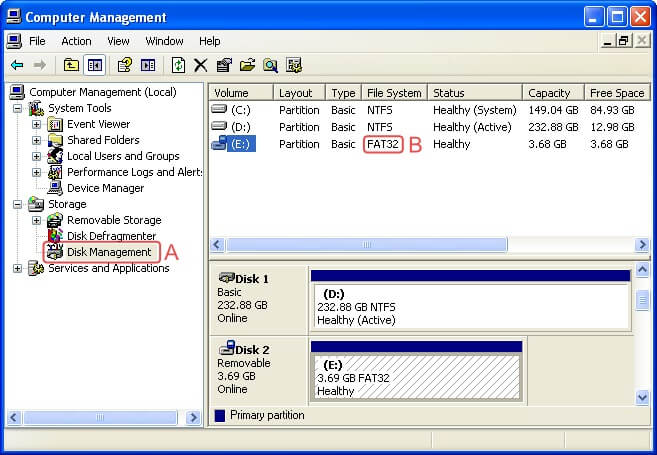
Step 4. Right-click on the USB and click "Format.."
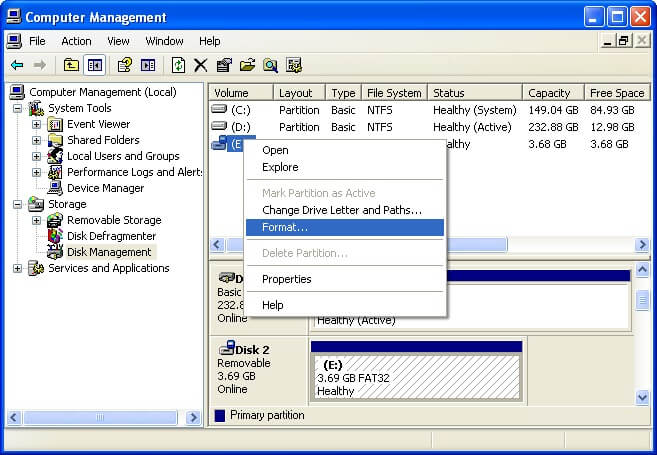
Step 5. Under "File system" in the Format dialog, select "FAT" (FAT in this case means FAT16). The "Perform a quick format" checkbox is another option. It is not covered here how a rapid format differs from a normal format, but rapid formats take a few seconds, whereas a normal format procedure can take longer.
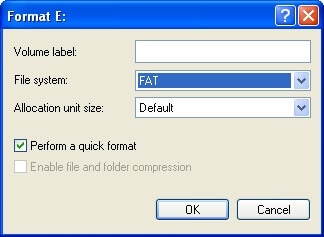
Step 6. Click OK. There are other warning dialogs that pop up, and one of them lets you know that formatting a drive would delete all of the data on it. If you are confident that you have chosen the correct disk containing no critical information, then go ahead and format the disk.
Step 7. Your USB should have been formatted after a short time, and Computer Management should list it as "FAT" under the file system (point C).
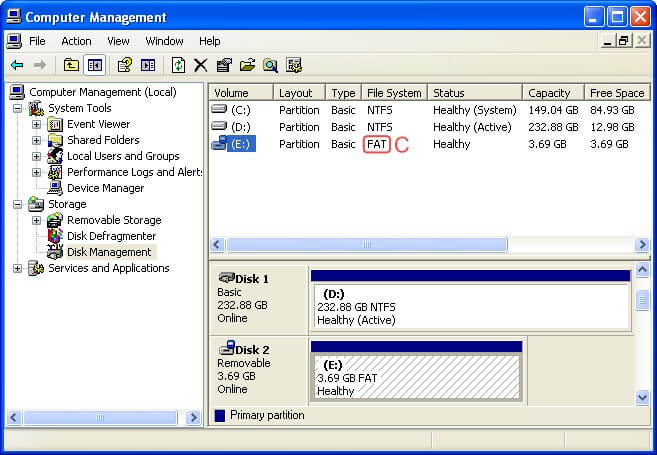
There you go! Now it is formatted as FAT16. Repeat the process, this time choosing "FAT32" at step 5 if you want to format it as FAT32 once again.
Method 2: Format USB Flash Drive to FAT16 Using CMD
Applicable: USB drive size > 4GB
Fortunately, Diskpart has been accessible on Windows since Windows NT and is still an actively supported component, so we can use it as a FAT16 formatter. But, we must resize the USB drive for it to be formatted using the FAT16 file system since the current flash drive far surpasses its file system limitations.
Step 1. Enter the "Diskpart" at the command prompt, which is in the folder x:\Windows\System32.
Step 2. To find the USB flash drive, type "list disk." For example, it is disk 6 in this instance.
Step 3. Simply type "select disk 6" to choose the USB drive. (Where the number found in step 2 is 6) list-disk
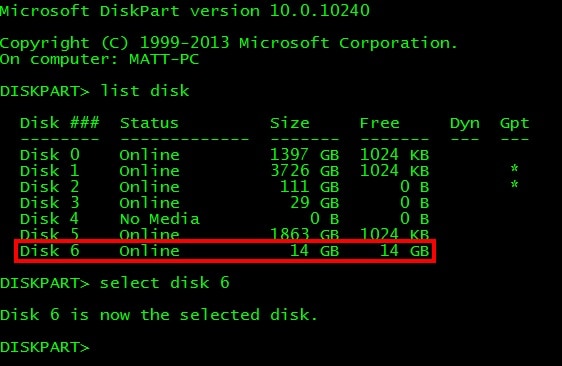
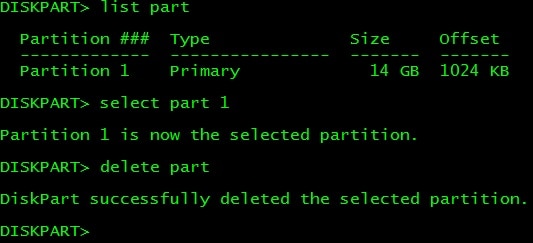
Step 4. Delete all partitions if the USB drive has already been formatted with a contemporary file system by entering "list part." Type "select part 1" since this disk has only one partition. Then, enter "delete part."
Step 5. Type "create part primary size=4000" to create a partition with a size of 4 GB.

Step 6. Enter exit.
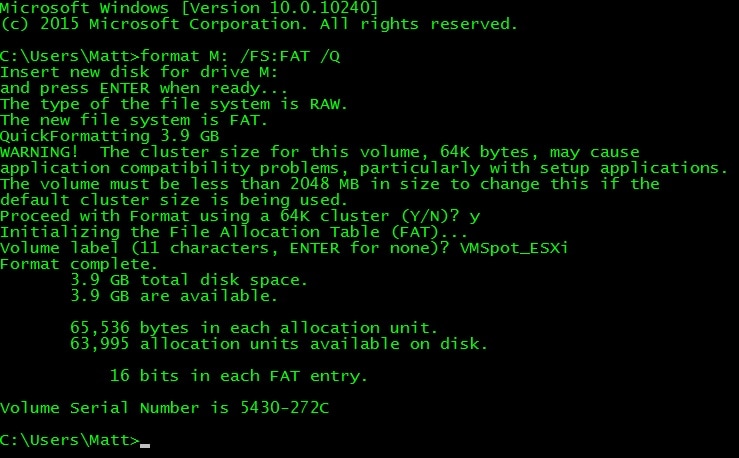
Step 7. By entering "format X: /FS:FAT/Q" at your command prompt, where X: is the drive letter of your USB flash drive, you may format the disk to FAT16.
Read More: How to Format and Repair Corrupted TF Card?
Video Tutorial - How to Format a USB Drive to FAT 16 or FAT 12
Conclusion
A large number of old devices do not support FAT32, exFAT, and NTFS. They can only understand the FAT16 file format. Therefore, you must first format the USB flash drive into a suitable system. Here, we learned how to format a USB Flash Drive to FAT16 based on its size. You can use our step-by-step guide whether your USB Flash Drive is smaller or bigger than 4GB. Don't forget to back up your data before formatting.
For Windows XP/Vista/7/8/10/11
For macOS X 10.10 or later
Why would I need to format a USB drive to FAT16 instead of FAT32?
FAT16 is an older file system with limitations (such as a 2GB partition size), but some legacy devices (like older cameras, medical equipment, or industrial machines) only support FAT16. FAT32 and exFAT may not be compatible with these systems.
Can I format a USB drive larger than 2GB to FAT16?
No, FAT16 has a maximum partition size of 2GB. If your USB drive is larger, you must either create a 2GB partition or use a third-party tool to force FAT16 formatting (though this may cause compatibility issues)。
How do I format a USB drive to FAT16 in Windows?
Windows does not natively support FAT16 formatting via the GUI for USB drives, but you can use Command Prompt. 1.Open Command Prompt as Administrator. 2.Type the following commands one by one and press Enter each time to conduct the process: diskpart/list disk/select disk X (replace X with your USB disk number)/clean/create partition primary size=2000 (for a 2GB partition)/format fs=fat label="USBDRIVE" quick/exit
Will FAT16 work on modern computers and devices?
Most modern systems (Windows 10/11, macOS, Linux) can read FAT16, but it is not ideal for general use due to its 2GB file limit and inefficiency with large drives. It’s mainly used for compatibility with old embedded systems or specialized hardware.

 ChatGPT
 Perplexity
 Google AI Mode
 Grok
Grok


