


 TL;DR:
Deleting CCTV footage requires using a method specific to your exact storage location, because most DVR and NVR systems rely on age-based retention limits or full-drive formatting rather than allowing you to erase a recording from one specific day or time.
● Cloud and app deletion permissions vary strictly by vendor: Google Nest requires clearing your entire camera video history, Ring allows selecting individual history events, and Reolink limits single-file deletion to a restricted supported-device list and its Home Hub.
● Never use the initialization or format command to remove a single incident, as this action wipes all recordings on the selected hard drive, making it critical to export and verify legally required evidence before clearing storage or changing expiration settings.
● Accidental local deletions on removable microSD cards or PC-detectable drives can sometimes be retrieved using data recovery software if you immediately stop recording to prevent continuous data overwrite, whereas confirmed cloud deletions are permanent and irreversible.
Ask AI for a summary
 ChatGPT
 Perplexity
 Gemini
 Claude
 Grok
Grok
Quick answer: To delete CCTV footage, first identify where that copy is stored. Delete exported files in File Explorer, use the event-delete control only when the camera or cloud service supports it, or use the recorder's retention and storage tools. Do not format a DVR/NVR hard drive to remove one clip: formatting erases the entire selected drive. On Hikvision systems, deleting footage for one particular day or time is not a universal playback function; model-specific retention or full-drive formatting may be the only documented options.
Security recordings can be personal data, business records, or evidence. These instructions are for the system owner or an authorized administrator performing legitimate retention, privacy, maintenance, or decommissioning work. They do not bypass passwords, audit controls, or legal holds.
In This Article
Part 1. Choose The Correct CCTV Deletion Method
There is no single “delete CCTV” button that works across every recorder and camera. The correct method depends on the storage location, the vendor's permissions, and whether you want to remove one event, enforce a retention period, clear a drive for reuse, or sanitize media before disposal.
| Your Goal | Where The Footage Is Stored | Correct Action | What It Removes |
| Delete an exported clip | Windows PC, Mac, USB drive, or readable microSD card | Delete the exact file in the operating system after previewing it | Only that file copy; the recorder or cloud copy remains |
| Delete one camera event | Supported camera app or cloud history | Select the event in Playback or History and use the vendor's Delete control | The selected event in that service or storage location |
| Delete footage from one particular day or time | DVR/NVR timeline | Check the exact model manual; many recorders do not support granular deletion | Model-dependent; do not assume that timeline playback includes deletion |
| Automatically remove old recordings | DVR, NVR, camera, hub, or cloud plan | Configure retention, expired time, or overwrite | Recordings older than the configured policy or the oldest files when storage fills |
| Clear a recorder drive for reuse | DVR/NVR HDD or SSD | Use the recorder's Format or Initialize command | All recordings on the selected storage device, not one chosen day |
| Dispose of storage securely | Retired HDD, SSD, microSD card, or recorder | Follow an approved media-sanitization process for that media and risk level | Data according to the selected sanitization method; ordinary deletion is not enough |
Deleting an app download does not delete the original NVR recording. Deleting a cloud event does not erase a copy already exported to a phone. Likewise, formatting a camera's microSD card does not clear a separate cloud subscription. Inventory every copy before claiming that footage has been removed.
Part 2. Checks To Make Before Deleting Security Footage
A few checks prevent the two most common mistakes: deleting evidence that must be retained and erasing an entire drive when only one exported file was intended.
- Confirm Authority: Sign in with an administrator account assigned to you by the system owner. If the system belongs to an employer, landlord, client, public body, or another person, obtain documented approval. Do not attempt to bypass credentials or tamper protection.
- Check For A Legal Hold: Do not delete footage related to an accident, crime, insurance claim, complaint, access request, litigation, or investigation. Ask the responsible legal, privacy, security, or records officer when the status is unclear.
- Export The Required Segment: Preserve any incident that must survive normal retention. Include video from the relevant cameras before and after the event, and record the export's date, time zone, camera name, and native player requirements.
- Verify The Recorder Clock: Compare the recorder time with actual local time and confirm daylight-saving settings. A timeline labeled 10:00 may not represent 10:00 local time if the device clock is wrong.
- Identify The Storage Target: Check the camera, channel, HDD number, microSD capacity, cloud account, and event date. If the interface shows several disks, never identify the target by position alone.
- Understand The Scope: Read every confirmation message. “Delete event,” “Delete all,” “Format,” “Initialize,” and “Restore defaults” have different effects.
- Preserve An Audit Trail: Record who approved the deletion, the reason, the footage range, the storage affected, the method, and the completion time. Do not disable or erase system logs unless the approved retention policy specifically covers them.
Retention law varies by location and purpose. The UK Information Commissioner's Office, for example, does not prescribe one universal CCTV retention period; it advises organizations to keep footage only as long as necessary for the stated purpose and to preserve relevant material when authorities or an investigation require it. Apply the rules that govern your organization and jurisdiction rather than copying an arbitrary “7-day” or “30-day” setting from another system. See the ICO video-surveillance retention guidance.
Part 3. Delete CCTV Files From A PC Or Readable microSD Card
Use the computer method only for exported videos or a camera card that mounts as ordinary file storage. Do not attach a DVR/NVR system drive to Windows and delete folders at random. Many recorders use proprietary file systems, indexes, databases, encryption, or disk arrays; changing them outside the recorder can damage playback for every channel.
Method 1. Delete Exported CCTV Files In Windows
This method removes selected footage files from a Windows folder, USB archive, or readable microSD card. It does not delete the source recording still held by the recorder or cloud service.
- Sign in to the authorized Windows account and connect the archive drive or microSD card if needed.
- Open File Explorer and browse to the exported CCTV folder.
- Sort by date, camera name, or file name. Open the clip and verify its beginning and end before selecting it.
- Right-click the correct file and choose Delete. To select multiple nonadjacent clips, hold Ctrl while clicking each one.
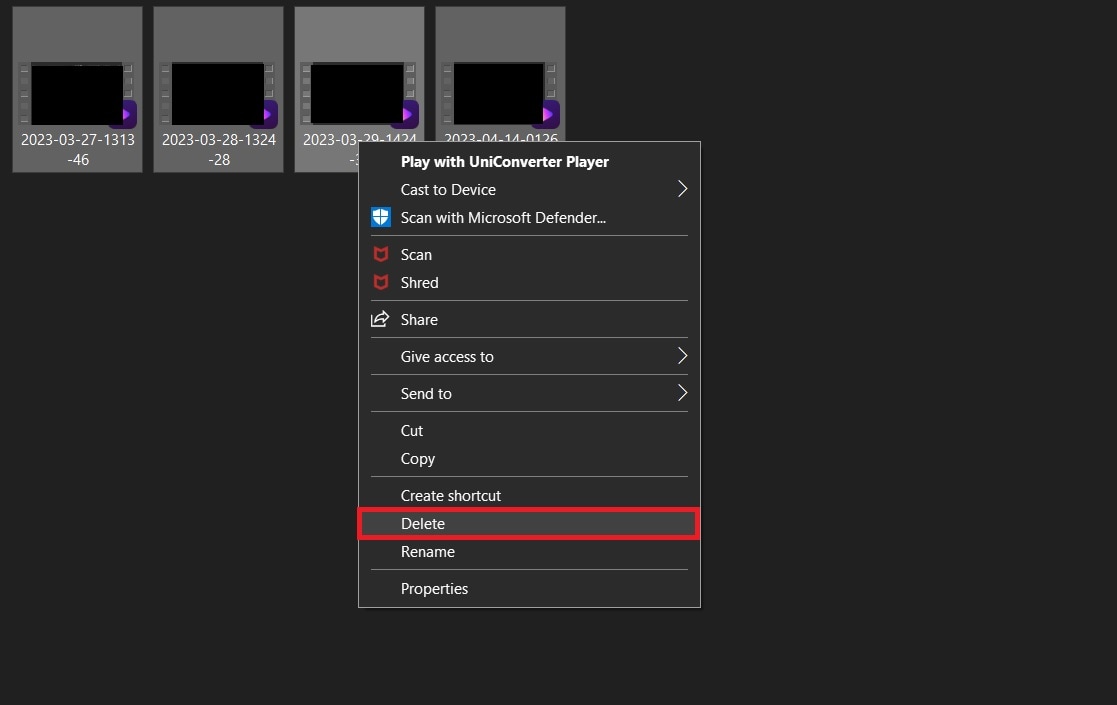
- If the file was on the computer's internal drive, open the Recycle Bin, verify the item again, and choose Delete or Empty Recycle Bin only when the other contents can also be removed.
- If the file was on removable storage, Windows may delete it without sending it to the Recycle Bin. Reopen the folder and confirm that the intended file is gone.
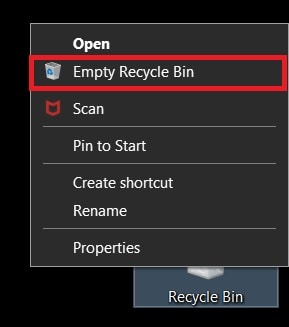
Microsoft's current file-deletion guidance notes that files on a hard disk normally move to the Recycle Bin, while files on some removable or network locations may be deleted directly. If deletion was accidental, stop using that storage before attempting recovery.
Part 4. Delete A Specific Recording In A Supported Camera App
Some cameras can delete selected microSD events from their playback interface, but support is model-, hardware-, firmware-, and storage-mode-specific. A trash icon shown for one camera does not prove that another camera or an NVR-connected channel has the same capability.
Method 2. Delete Selected Reolink Recordings
Reolink currently documents individual microSD recording deletion for a limited list of supported products and for Home Hub storage. Most other Reolink devices do not support deleting individual recordings in the app, and individual files on a Reolink NVR HDD cannot be deleted. Check the updated model list in Reolink's official deletion guide before following these steps.
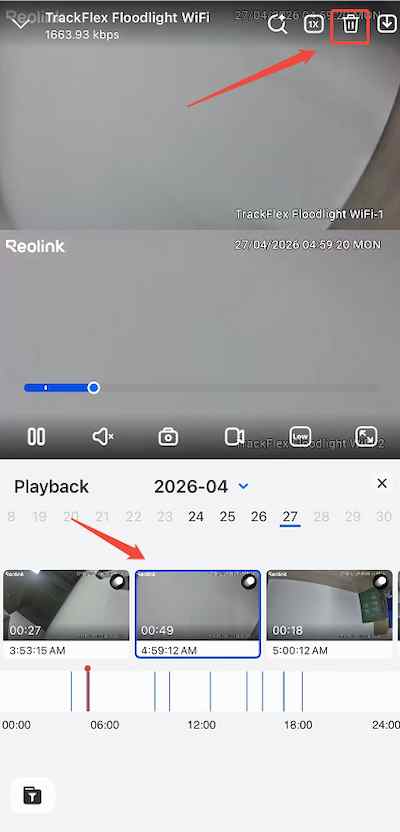
- Open the Reolink App, select the authorized camera, and tap Playback.
- Choose the correct date and confirm the camera's displayed time zone.
- Tap the selection control, choose the required recording segment, and verify its thumbnail and time range.
- Tap the trash icon.
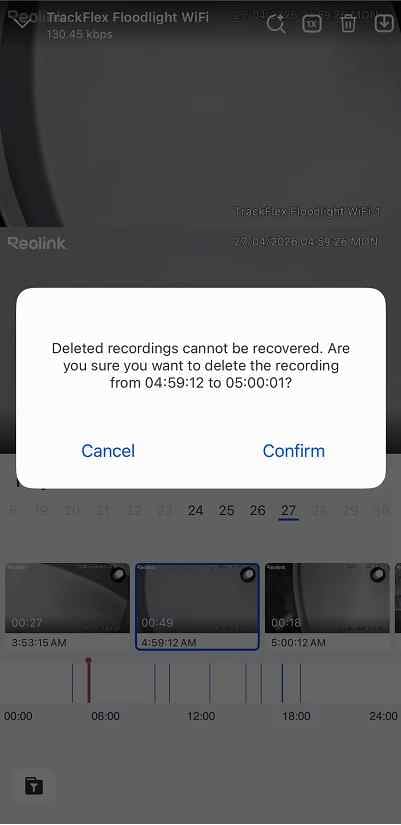
- Read the warning showing how many recordings will be removed, then tap Delete to confirm.
- Reload Playback and verify that only the selected segment has disappeared.
If the delete control is absent, do not assume that permissions are broken. The camera may be unsupported, connected through an NVR, or using a storage type that allows only overwrite or full formatting. For a supported removable microSD card, Reolink's documented fallback is to remove the card safely and delete ordinary files on a computer. For an NVR hard drive, use the recorder's retention or format controls rather than editing the drive in Windows.
Part 5. Delete Security Camera Footage From The Cloud
Cloud deletion must be performed inside the service that holds the recording. Removing the camera, uninstalling the app, deleting a phone download, or cancelling a plan does not necessarily delete cloud history. Export anything required first because many providers treat confirmed cloud deletion as permanent.
Method 3. Delete Selected Ring Videos
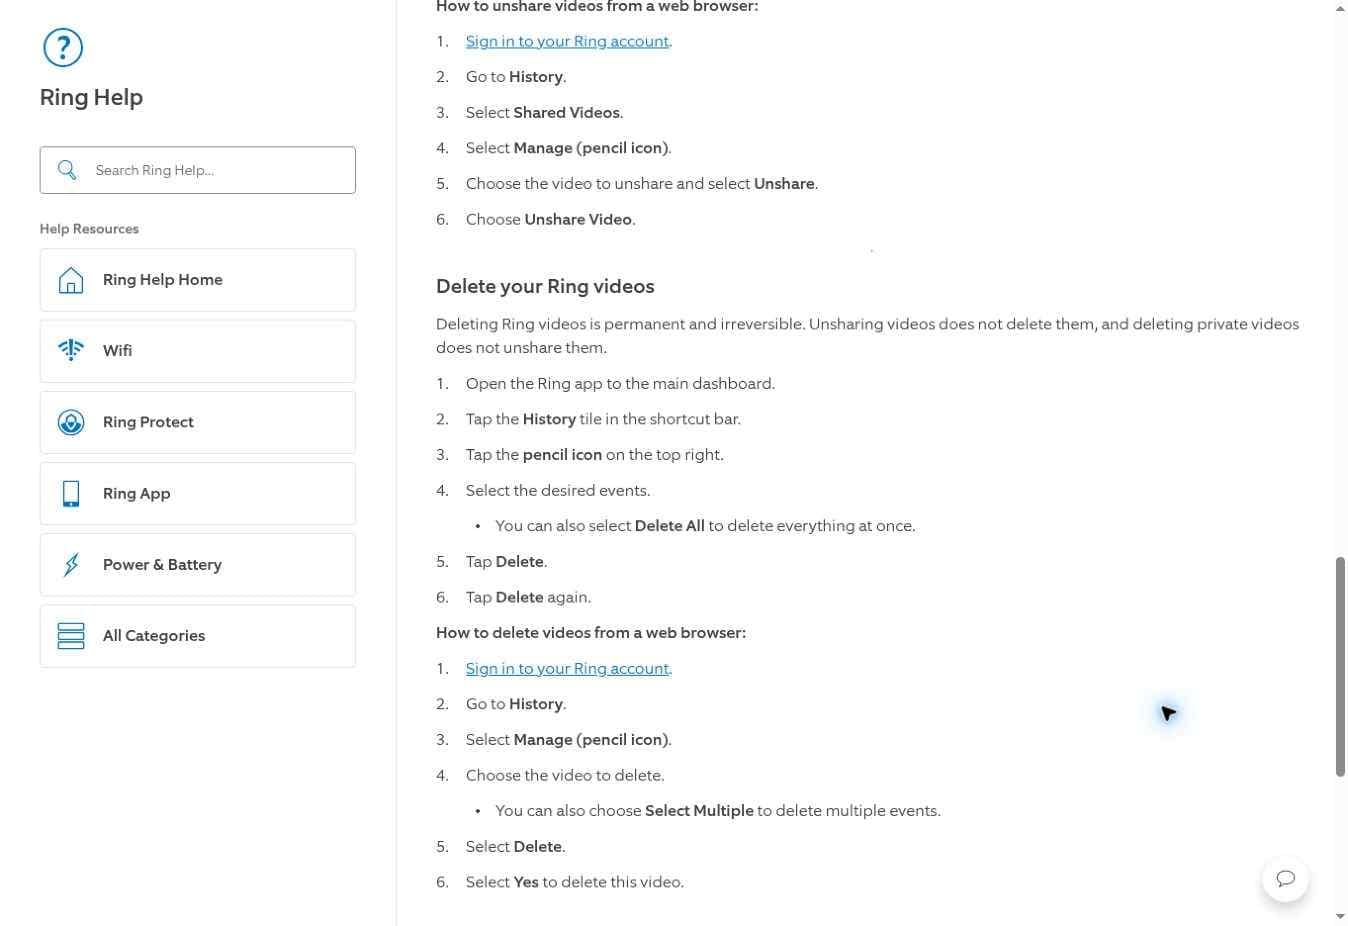
Ring currently lets an authorized account delete selected events or all videos from the Ring app and selected videos from a web browser. Ring states that deletion is permanent and irreversible. Unsharing and deleting are separate actions: deleting a private copy does not necessarily unshare a previously shared link.
- Open the Ring app and go to the main dashboard.
- Tap History in the shortcut bar.
- Tap the pencil icon at the top right.
- Select the required events. Avoid Delete All unless every event is authorized for removal.
- Tap Delete, then tap Delete again to confirm.
In a browser, sign in to the Ring account, open History, choose Manage, select the video or Select Multiple, choose Delete, and confirm Yes. The current steps are documented in Ring's official video deletion guide.
After deletion, check whether the event was downloaded, shared, exported to another account, or copied to another system. Cloud deletion affects the provider's history; it cannot recall independent copies already saved elsewhere.
Part 6. Delete Hikvision CCTV Footage By Day Or Time
Can you delete Hikvision footage from one particular day or time? Not through one universal NVR playback command. Hikvision's current NVR manual documents whole-HDD formatting, automatic overwrite, and a Video/Picture Expired Time setting. It does not document a general function that lets every Hikvision owner select July 12 from Playback and erase only that date or one timestamp.
The exact feature set varies by recorder family and firmware. Check the manual for the exact model before acting. Do not follow third-party instructions that claim every Hikvision DVR/NVR can delete individual timeline files. Also note that deleting a downloaded clip in the Hik-Connect app's Pictures and Videos area removes the phone copy, not the original NVR recording.
Method 4. Set An Expired Time For Future Hikvision Recordings
Use Expired Time as a future retention rule, not as an emergency delete-by-date tool. A setting such as 30 days removes recordings after they become 30 days old; it does not select one isolated calendar day while keeping older and newer footage.
- Export any incident or legally required footage before changing retention.
- Sign in locally or through the authorized Hikvision web interface as an administrator.
- Open System > Storage Management > Schedule Settings > Schedule Configuration. Menu wording can vary by firmware.
- Find the correct channel and click its Advanced Settings gear.
- Set Video/Picture Expired Time to the approved number of days. Hikvision documents 0 as no automatic deletion by expired time.
- Save the setting, repeat it only for the intended channels, and document the policy change.

Actual retention can be shorter than the expired-time value when available capacity, bit rate, resolution, camera count, recording schedule, or overwrite behavior requires older files to be removed sooner. Review the official Hikvision NVR V5.01.060 user manual and the manual for your exact recorder.
Method 5. Format A Hikvision NVR Hard Drive
Formatting is a last-resort whole-drive action for clearing storage, recommissioning a disk, or rebuilding the recorder's storage structure. It is not a method for deleting CCTV footage from one particular day or time. All recordings on the selected HDD become unavailable.
- Export and verify every recording that must be kept. If the system has several disks, determine which cameras and dates reside on the target disk.
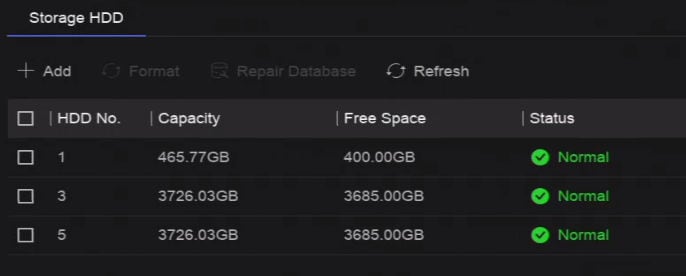
- Open System > Storage Management > Storage HDD > Storage HDD.
- Check the HDD number, capacity, free space, and status. Select the intended disk by its checkbox.
- Click Format, read the whole-drive warning, and confirm only if the selected HDD is correct.
- Keep the recorder powered on until formatting finishes. Do not disconnect the disk or restart the NVR.
- Confirm that the HDD returns to a normal recording status, then test live recording and playback.
A normal recorder format clears the storage for reuse, but it should not be described as certified secure erasure. If the disk is leaving organizational control, use an approved media-sanitization process that matches the drive type, device capability, sensitivity, and applicable policy.
Part 7. Deletion Options By Security Camera Brand
Vendor behavior differs enough that a brand table is safer than one generic set of instructions. Features can also change by model, hardware revision, firmware, account role, subscription, and whether the camera is connected directly, through a hub, or through an NVR.
| System | Selected-Event Deletion | Whole-Storage Or Retention Option | Important Limit |
| Hikvision NVR | No universal per-day or per-time deletion documented for all NVRs | Expired Time, overwrite, and whole-HDD format | Hik-Connect phone clips are separate from source NVR footage; check the exact recorder manual |
| Reolink | Yes on the current supported-device list and Home Hub; not on most other devices | Overwrite, retention where available, microSD format, or NVR HDD format | Individual NVR HDD files cannot be deleted; NVR-connected cameras may lose app-level delete support |
| Ring | Yes, selected History events can be deleted | Delete All and subscription-based history retention | Confirmed deletion is permanent; unsharing is a separate action |
| Google Nest | No, Google states that individual events cannot be deleted from video history | Delete video history removes all camera video history and snapshots in the selected scope | Deleted history cannot be recovered; save clips first |
| Wyze | Yes, supported Events can be selected and deleted from the Events tab | Cloud retention and local microSD management depend on the camera and plan | Deleting a cloud event and clearing a local microSD recording are separate actions |
| UniFi Protect | Use the current Protect interface and permissions for recording management | Storage Manager, retention, and Enhanced Retention on supported versions | Export, archive, flag, or place important footage in Case Manager before normal retention removes it |
| Dahua NVR | Model-dependent; do not assume a timeline clip can be deleted | HDD Manage provides whole-drive formatting | Formatting the selected HDD erases all recordings on it and may restart the device |
For current provider instructions, use Google Nest's video-history deletion guidance, Wyze Events guidance, UniFi Protect storage and retention guidance, and Dahua's current NVR user manual. The device's own on-screen warning and exact model manual take priority over a generic article.
Part 8. Use Retention And Overwrite Instead Of Manual Deletion
For an operating CCTV system, a documented retention policy is safer and more consistent than manually deleting dates whenever a drive fills. Retention should be based on purpose, legal requirements, incident-response needs, and risk—not merely on the largest number of days the disk can hold.
- Define The Purpose: State why each camera records and which events must remain available. A front entrance, payment area, production line, and private home may need different periods.
- Set The Shortest Justified Period: Choose the approved number of days for each camera group. Do not retain footage indefinitely just because capacity is available.
- Enable Overwrite Deliberately: When enabled, the recorder normally removes the oldest eligible recordings as storage fills. Confirm whether protected, locked, alarm, or manually archived events are exempt.
- Preserve Exceptions: Export or lock footage connected to an incident before the ordinary retention window expires. Verify the export on a separate device.
- Control Access: Limit deletion and retention changes to named administrator roles. Use unique accounts and retain audit logs where the system supports them.
- Test The Result: Review the oldest available recording after one full policy cycle. The configured number is a target, not a guarantee, when storage or bit-rate conditions change.
A rough capacity estimate is useful for planning: divide the storage's usable megabits by the combined recording bit rate and then by 86,400 seconds per day. For example, 4 TB of usable decimal capacity at a continuous combined 32 Mb/s is about 11.6 days before overhead. Motion-only recording, variable bit rate, audio, metadata, RAID, reserved space, camera count, and high/low-quality retention tiers can change the real result substantially.
| Factor | Effect On Retention | What To Verify |
| More cameras or higher bit rate | Shorter retention on the same storage | Actual aggregate bandwidth, not only the configured maximum |
| Continuous recording | Uses more storage than motion-only recording | Schedule, event sensitivity, and pre/post-event buffers |
| Dual-quality retention | Can keep older footage at lower quality | When quality changes and when final deletion occurs |
| Protected or archived events | May reduce space available to ordinary footage | Whether locked files are exempt from overwrite |
| Clock or time-zone error | Can make the apparent deletion date inaccurate | NTP source, time zone, daylight saving, and camera-recorder synchronization |
Part 9. Deleting, Formatting And Secure Erasure Are Different
The phrase “erase security camera footage” can mean making a clip disappear from playback or sanitizing retired storage so data cannot be reconstructed. Those are different goals and require different controls.
| Action | Normal Purpose | Recovery Risk | Use It When |
| Delete selected event | Remove one authorized cloud, app, or file-system item | Provider- and storage-dependent; local data may remain until overwritten | The system supports granular deletion and no retention obligation applies |
| Quick format or initialize | Prepare a drive or card for reuse in the recorder | Not a certified sanitization method; remnants may remain | Clearing all recordings for continued use in the same trusted environment |
| Normal overwrite by new recordings | Recycle limited recording capacity | Previously occupied areas are progressively replaced, but this is not a documented disposal process | Routine retention inside an active CCTV system |
| Vendor-supported sanitize or cryptographic erase | Make data infeasible to recover from supported media | Depends on correct implementation, media type, encryption, and verification | Authorized decommissioning under an approved sanitization policy |
| Approved physical destruction | Destroy media that cannot be safely reused | Depends on the method, fragment size, and verification | High-risk disposal performed by an authorized organization or certified service |
NIST published SP 800-88 Revision 2 in September 2025 for media sanitization programs. It treats sanitization as a risk-managed process with organizational responsibility, verification, validation, and documentation. Use your organization's current policy and the storage vendor's supported capabilities; do not advertise an ordinary delete or recorder format as guaranteed permanent erasure.
Part 10. Recover CCTV Footage Deleted By Mistake
Recovery is time-sensitive because an active recorder continuously reuses storage. If a needed recording was deleted or a microSD card was formatted accidentally, stop recording to that device immediately. Do not initialize it again, run repair commands, copy new clips to it, or reinstall it in the camera.
First check authorized exports, cloud history, NAS copies, backup drives, and another administrator's archive. If no copy exists, software recovery is most practical for a removable microSD card or a single disk that a computer detects as a stable storage device. A cloud-only deletion, overwritten footage, encrypted recorder array, or physically failing drive requires a different response.
Method 6. Recover Local CCTV Videos With Recoverit

Wondershare Recoverit can scan a removable camera microSD card or computer-detectable CCTV drive for deleted video files. It cannot sign in to a cloud camera service, restore a provider-deleted event, decrypt an unsupported recorder, or reconstruct sectors already overwritten by new recordings.
- Stop Recording And Connect The Storage: Power down the camera or recorder according to its manual, remove the microSD card or authorized drive, and connect it to a Windows PC or Mac through a stable reader or adapter. Do not format it if the computer asks.
- Select The Correct Location: Open Recoverit, choose the microSD card under SD Card Recovery or select the external drive under Hard Drives and Locations. Check the displayed capacity before scanning.

- Scan For Deleted Video: Start the scan. Filter by video type, file path, date, size, or name where available. Let the scan finish when the required footage is not found in the early results.

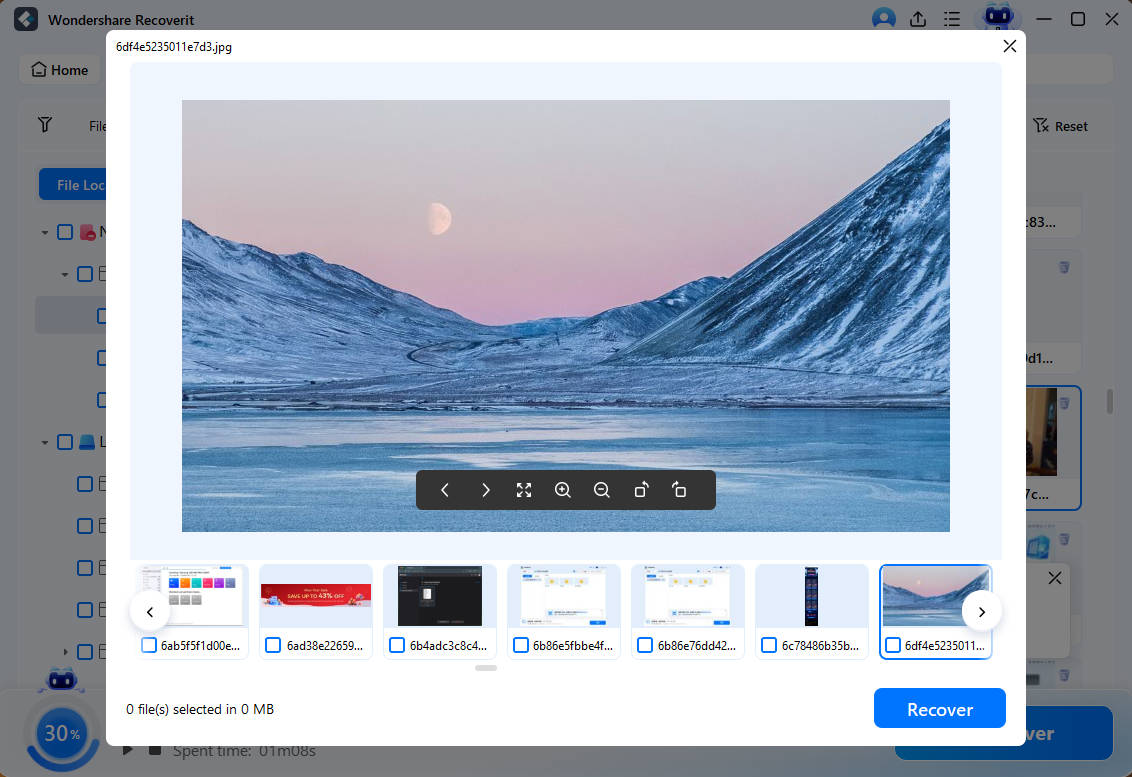
- Preview And Recover Elsewhere: Preview supported video results, select the required files, click Recover, and save them to a different healthy drive. Never write recovered files back to the source media.
Recovery is not guaranteed. Continuous overwrite, SSD TRIM, full-device encryption, proprietary file systems, RAID layouts, fragmentation, and physical failure can prevent usable results. For a more detailed device decision tree, use the dedicated CCTV footage recovery guide. Recoverit also has separate workflows for memory card recovery and hard drive recovery.
When the footage may be evidence, do not scan or modify the original media yourself. Stop the recorder, restrict access, document the condition, and consult a qualified forensic professional so acquisition and chain of custody are preserved.
Part 11. Verify And Document The Deletion
A confirmation dialog is not the end of the process. Verify the correct scope and leave enough documentation for another authorized administrator to understand what changed.
- Reload The Timeline Or History: Sign out and back in if necessary, then search the exact camera and time range again.
- Check Every Copy: Review the recorder, cloud service, phone downloads, shared links, export folders, NAS, USB archive, and backup system according to the approved deletion scope.
- Confirm Recording Resumed: After a format or storage change, create a short test event and verify live recording, playback, date, time, audio, and camera assignment.
- Review Retention: Confirm the oldest available footage and the next expected deletion date. Recheck after the next overwrite cycle.
- Inspect System Health: Make sure the selected HDD, SSD, or microSD card reports normal status. A format should not be used to hide recurring bad-sector, disconnection, or read-only errors.
- Record The Outcome: Log the approver, administrator, device, camera, date/time range, time zone, storage ID, method, verification result, and any preserved export.
The safest workflow is consistent: authorize, preserve, identify the storage copy, use the narrowest supported deletion control, verify the outcome, and retain an audit record. If the system cannot delete one event, do not improvise by editing recorder files outside the vendor interface.
Conclusion
How to delete CCTV footage depends on where the footage lives. Windows can delete exported files, some camera apps can remove supported microSD events, and cloud services such as Ring can delete selected history. DVR and NVR systems are more restrictive: a Hikvision recorder generally relies on age-based expiry, overwrite, or whole-HDD formatting rather than a universal delete-by-day command.
Always preserve required evidence and verify the camera, date, time zone, account, and storage target before confirming. Treat formatting as a whole-storage reset, not as a granular or certified erase. If local footage was deleted by mistake, stop recording immediately; Recoverit may help with a removable card or detectable drive before its data is overwritten, while cloud deletion and high-stakes evidence require provider support or professional handling.
FAQ
-
How Do I Delete CCTV Footage Of A Particular Day?
Open the authorized Playback or History view, select the date, and look for a vendor-supported Delete control. If none appears, the system may not support per-day deletion. Many DVRs and NVRs use retention, overwrite, or whole-drive formatting instead. Do not format the drive unless every recording on it can be erased. -
How Do I Delete Particular CCTV Footage In Hikvision?
There is no universal Hikvision NVR function for deleting one timeline clip, day, or timestamp. Current Hikvision documentation describes Video/Picture Expired Time, overwrite, and whole-HDD formatting. Check the exact recorder and firmware manual. Deleting a downloaded Hik-Connect phone clip does not delete the original NVR recording. -
Can I Delete CCTV Footage Of A Particular Time?
Only if that camera, app, or cloud service supports selecting an individual event or time segment. Confirm the recorder clock and time zone before deleting. If the device offers only retention or format, it cannot safely remove just one chosen timestamp through a generic method. -
How Do I Delete Footage From A DVR Or NVR?
Use the recorder's authorized storage interface. Configure retention or overwrite for routine removal, or format the selected HDD only when all footage on that disk can be cleared. Export required recordings first. Never delete unknown database or media files by attaching a proprietary recorder disk to Windows. -
Does Formatting A CCTV Hard Drive Permanently Erase The Footage?
Not necessarily. A normal recorder format makes the stored recordings unavailable to the recorder and prepares the disk for reuse, but it is not the same as verified media sanitization. For disposal or transfer, follow an approved policy based on NIST SP 800-88 Rev. 2 and the storage vendor's supported erase capabilities. -
Can Security Camera Footage Be Deleted Without A Password?
An authorized administrator should use valid credentials. If the owner lost access, use the vendor's documented account recovery or device-reset process and preserve any footage required by policy. Do not use bypass tools or remove storage to evade permissions. -
Can Deleted CCTV Footage Be Recovered?
Sometimes, if the footage was stored locally and its data has not been overwritten. Stop the camera or recorder immediately. Recoverit can scan a removable microSD card or computer-detectable drive, but it cannot restore a permanently deleted cloud event or data replaced by new recordings. -
Can I Delete One Google Nest Camera Event?
No. Google's current guidance states that individual events cannot be deleted from Nest video history. The Delete video history control removes the applicable camera history and snapshots, and deleted history cannot be recovered. Save any clips you need before confirming. -
How Long Is CCTV Footage Kept Before It Is Deleted?
There is no universal period. Retention depends on the stated purpose, law, organizational policy, subscription, capacity, camera count, bit rate, schedule, and overwrite settings. Choose and document the shortest justified period, preserve incident footage separately, and verify the actual oldest available recording. -
Will Deleting A Camera App Remove The CCTV Footage?
Usually not. Uninstalling an app does not automatically delete recordings held on a DVR/NVR, microSD card, hub, or cloud account. Sign in through an authorized interface and manage the storage copy directly. Also check exported downloads and shared copies if the approved scope requires them to be removed.


