Nest doorbells and cameras are excellent for home security. They record real-time indoor and outdoor videos, feature facial recognition and two-way audio, and send alerts whenever they detect motion or sound.
However, you don’t need all the recordings, primarily those without activity. How can you delete Nest camera videos? More importantly, can you recover deleted Nest footage if you accidentally erased it?
Quick Answer: Yes, you can delete individual Nest video clips using the Google Home app. For older setups or the Nest app, you may only be able to delete the entire video history. And you can recover deleted Nest videos only if you previously downloaded them to local storage. This guide covers all methods. Learn more below, where you’ll find steps for downloading, deleting, and recovering Nest videos.
Why Delete Nest Videos
No one needs security videos without activity. The same goes for footage showing your pets, vehicles passing by, or other moving objects or sounds that activate your Nest camera’s sensors. If the camera doesn’t capture anything suspicious, delete those videos to free up storage.
The Nest app won’t let you save clips from activity events if you’re out of storage space. It will ask you to download and delete them to make more room. Let’s see how to delete Nest videos to free up storage space.
How to Delete Your Entire Nest Video History
You can’t access your Nest camera to delete one clip – you can only erase all footage from a specific camera’s event history. For instance, you can delete an entire Front Door feed. You can do it in the Nest app, Google Home app, or the web interface.
Deletion Methods at a Glance: Nest App vs. Google Home App
Feature |
Google Home App |
Nest App |
| Delete Individual Clips | ✔ Yes | ✖ No |
| Delete Entire History | ✔ Yes | ✔ Yes |
| Recommended For | Most users, daily management | Full privacy wipe, older devices |
Method 1. Deleting Individual Clips in the Google Home App
Good news for users of newer Nest cameras and the Google Home app: you can delete individual video clips or events. This is the most common requirement and is perfect for removing unwanted alerts without losing your entire history. Here’s how to do it:
Step 1: Launch the Home app and go to Cameras.
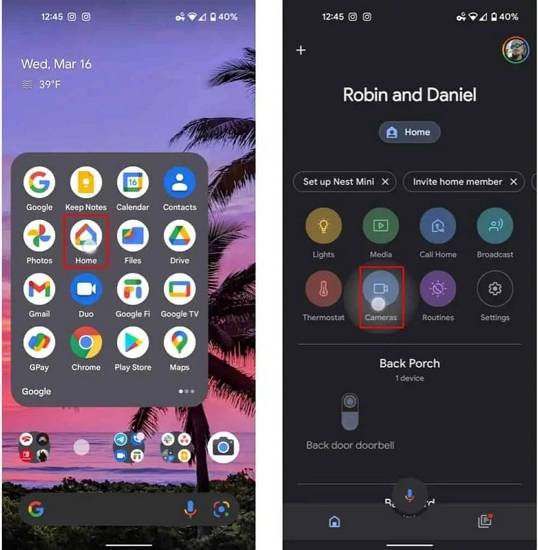
Step 2: Tap the desired camera feed and go to Settings.
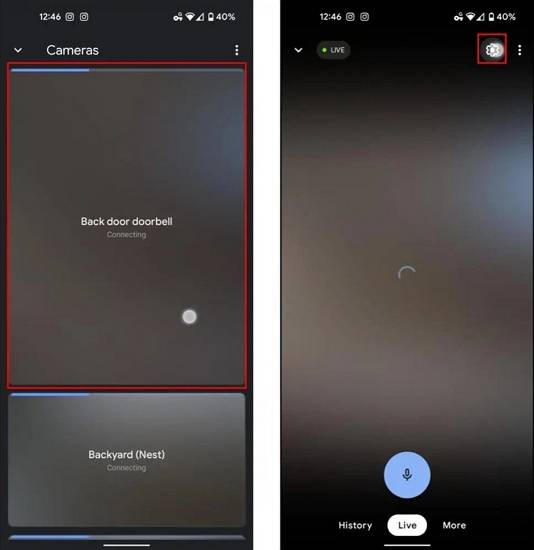
Step 3: Tap Delete video history > Delete.
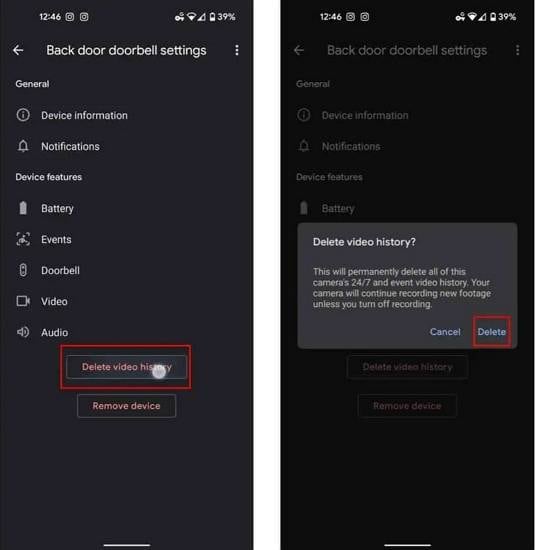
Method 2. Deleting Nest Camera Footage in the Nest App
If you are using the older Nest app or wish to clear all footage from a specific camera for privacy reasons, you can delete the entire video history. Be aware that this action is permanent and cannot be undone.
Step 1: Launch the Nest app and select the desired camera feed, such as Backyard or Driveway.
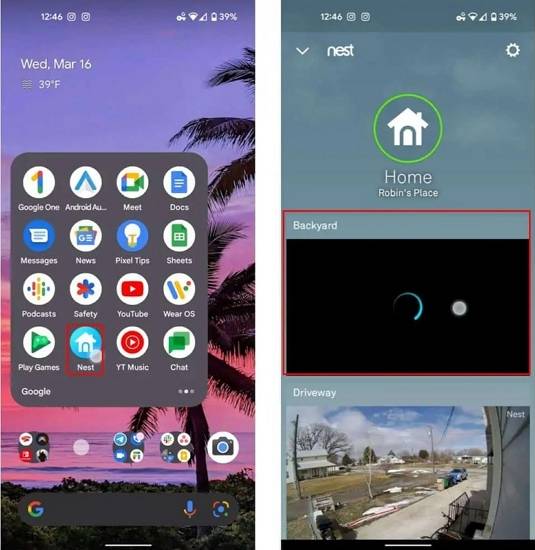
Step 2: Tap the Settings icon and scroll down to the bottom.
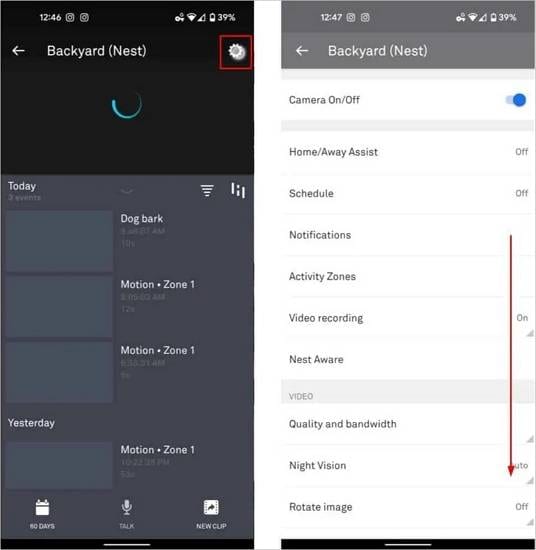
Step 3: Tap Delete video history and confirm your choice.
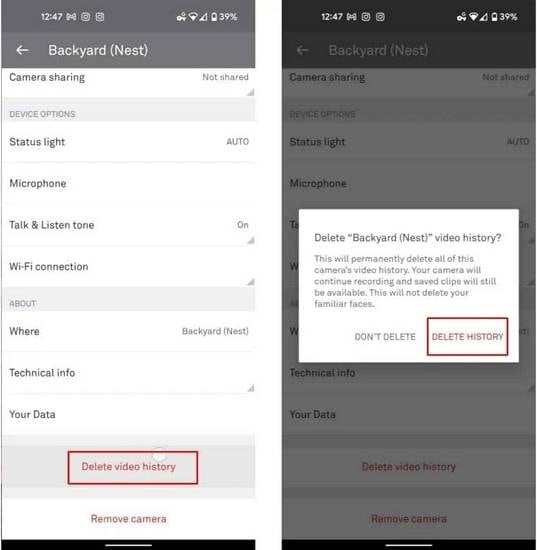
Method 3. Deleting Nest Videos in the Nest Web Interface
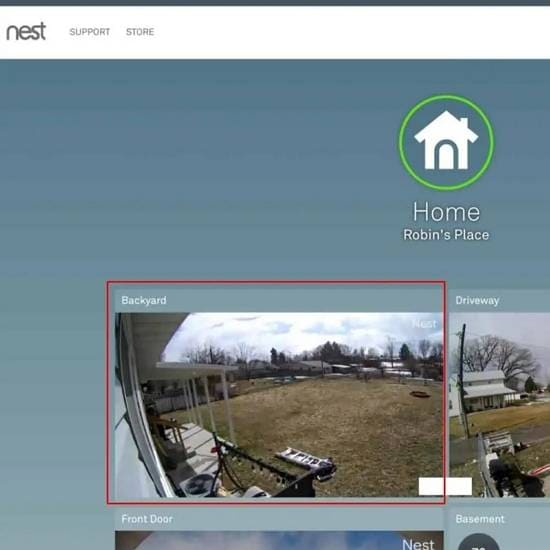
Step 1: Log into your Nest account and choose the camera feed to delete.
Step 2: Click the Settings icon.
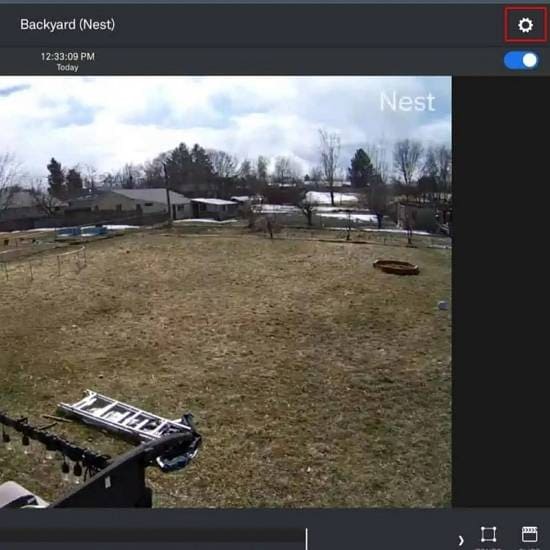
Step 3: Go to About.
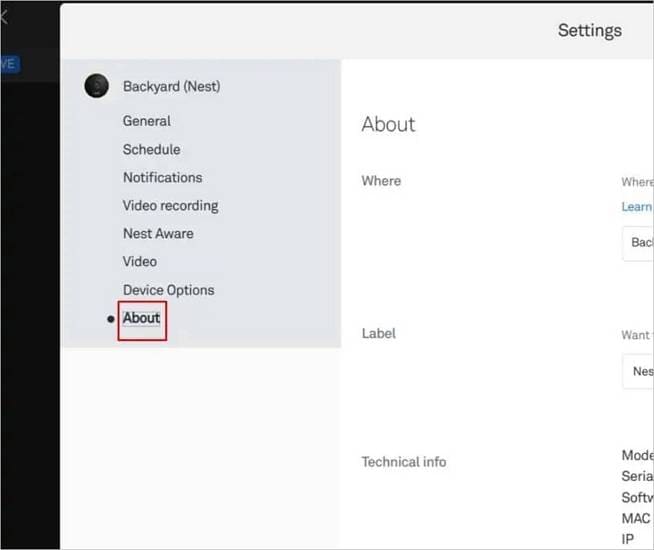
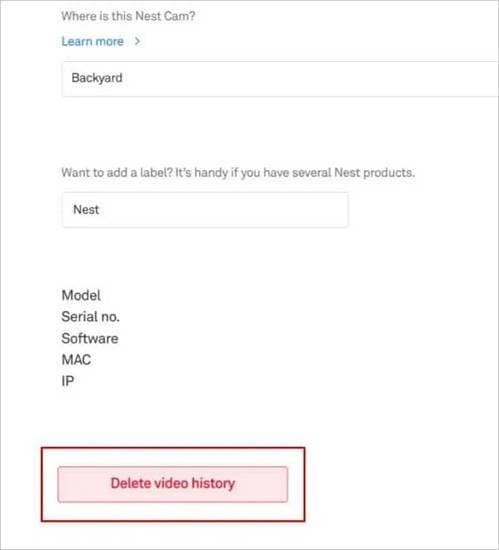
Step 4: Click Delete video history.
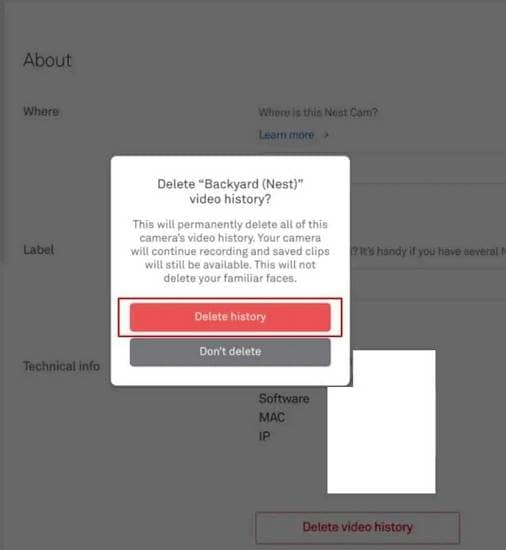
Step 5: Click Delete history to confirm your choice.
Now that you know how to delete Nest videos, it’s time to learn why you should download them beforehand.
Why You Should Back Up Data if You Want to Delete Nest Videos
Backing up your Nest videos is essential in case of an emergency. For instance, your cameras could record a potential burglar, providing critical evidence for a police investigation.
Doesn’t Google store Nest camera footage in the cloud? It does, but the maximum limit is three hours without a subscription. However, monthly and annual Nest Aware and Nest Aware Plus subscriptions provide 30-day and 60-day storage (respectively). The latter also allows ten-day 24/7 monitoring.
That means Google permanently deletes your videos from Nest servers after your chosen pricing plan’s time limit. It doesn’t create backups, so downloading them to local storage ensures you keep crucial data.
Additionally, you can recover deleted Nest videos from local backups. That’s ideal if you accidentally delete them or experience hardware issues that damage the files.
How To Download (Back Up) Nest Videos
You can download Nest videos from the Nest app, Google Home app, or the Nest web interface.
The Nest app lets you download instant and custom (only with Nest Aware) clips from any camera or doorbell footage. The maximum length per instant clip is 2.30 minutes.
Method 1. Download Instant Clips With the Nest App
Step 1: Launch the Nest app, choose the desired camera, and tap the event you wish to save. The portrait mode shows all the events and lets you fast-forward and rewind to mark the video clip’s beginning.
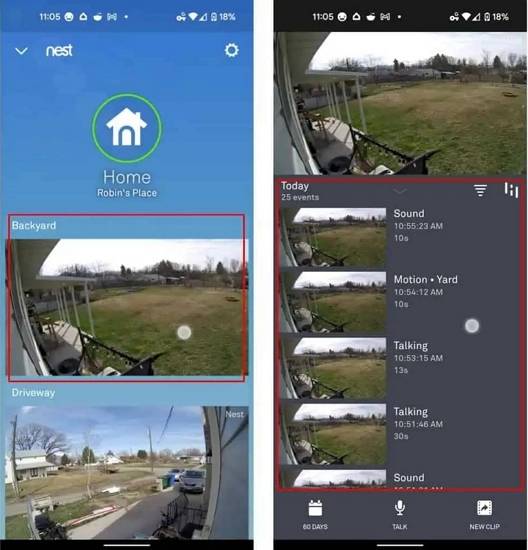
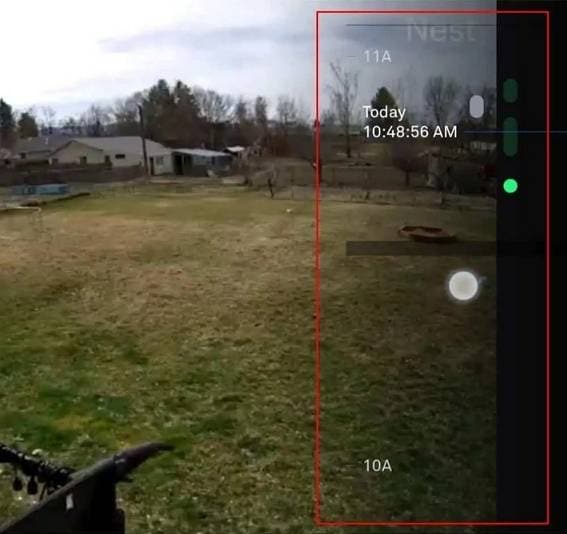
Step 2: Tap the screen if your phone is in landscape mode to see the history timeline, and scroll to find the desired event (the colored dots and bars mark all the recordings).
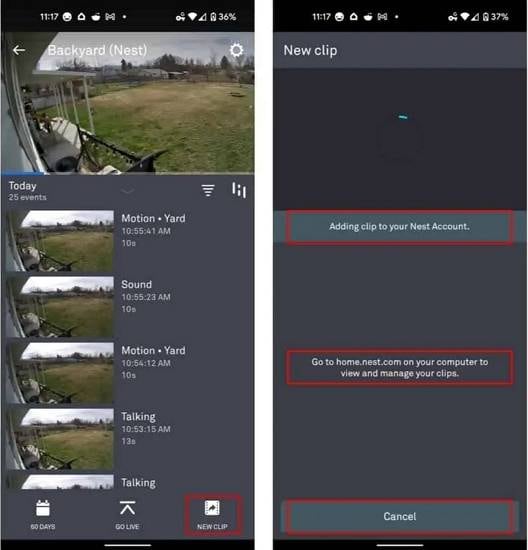
Step 3: Switch to portrait mode, tap New clip, and wait for Nest to save the video to your account.
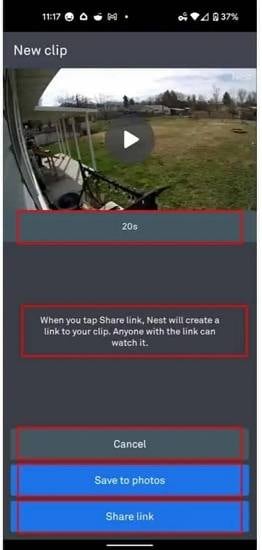
Step 4: Once Nest saves the clip, tap Save to photos to download it to your device.
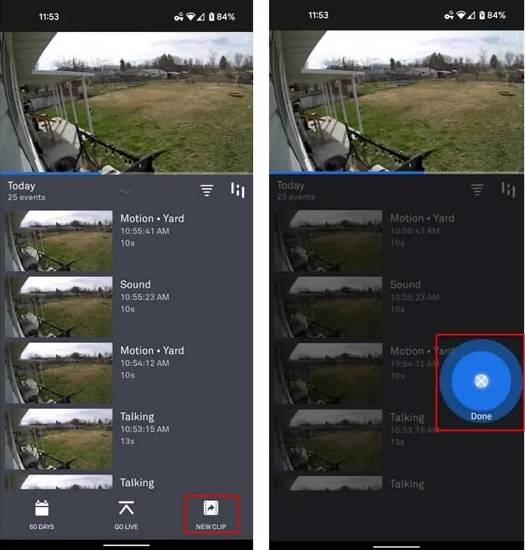
Follow the same steps to create custom clips, but tap and hold the New clip option now. Release at the point where you wish the clip to end, and save it to your device like you did with instant clips.
Downloading Nest videos via a browser includes the same steps. The only difference is you can download one-hour clips in the web interface, which also lets you make a timelapse of 24-hour footage. Remember that you can’t use the Nest app to download videos you create in the web interface.
Method 2. Download Nest Videos With the Google Home App
Step 1: Launch the Home app, select Cameras, and choose the desired video feed.
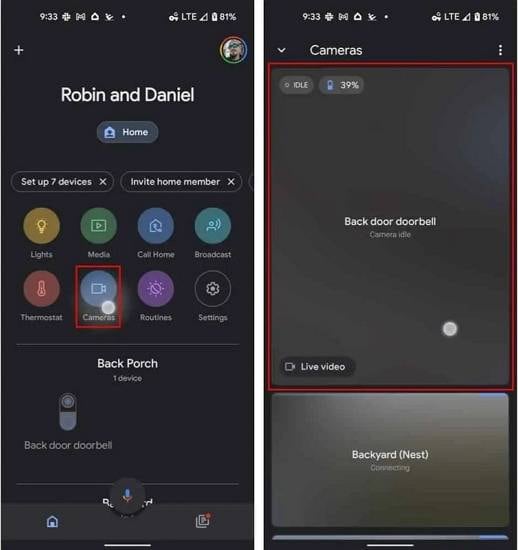
Step 2: Tap History, scroll the timeline to find the desired event, and tap Event details.
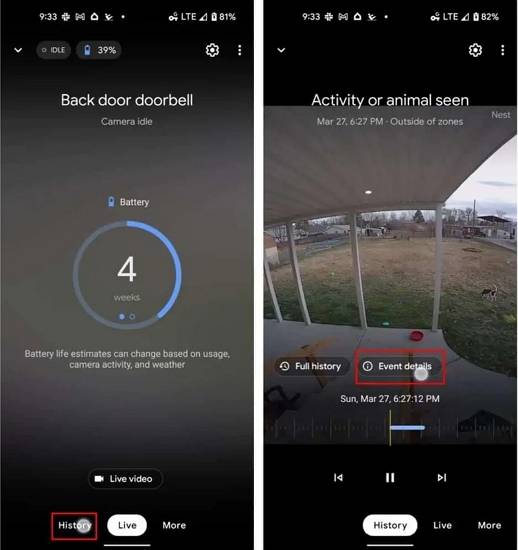
Step 3: Tap the Download icon to save the clip to your device.
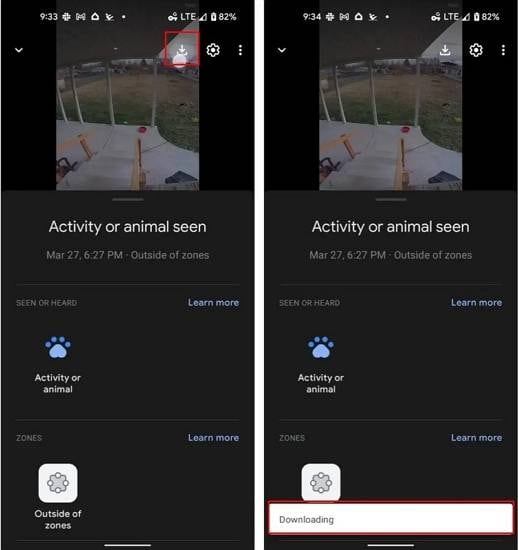
Now that you know how to save Nest videos to local storage, learn how to recover deleted Nest video in case of accidental deletion, hardware issues, or other unexpected circumstances.
How To Recover Deleted Nest Videos From Your Backup
Video recovery software enables you to recover deleted Nest videos from local backups. Wondershare offers the most reliable tools for retrieving deleted, damaged, or corrupted files from computer or mobile backups.
If you’ve lost or accidentally deleted Nest videos from your PC or Mac, Wondershare Recoverit can help you recover them. It supports all popular video formats and features Enhanced Recovery technology that patches video fragments (professional video devices store video files in fragments) to bring any footage back to life.
Here’s how to recover deleted Nest videos from a computer backup with Wondershare Recoverit:
Step 1: Download, install, and launch Wondershare Recoverit on your computer.
For Windows Vista or later
For macOS 10.10 or later
Step 2: Go to Enhanced Recovery and choose your deleted Nest video’s storage location.
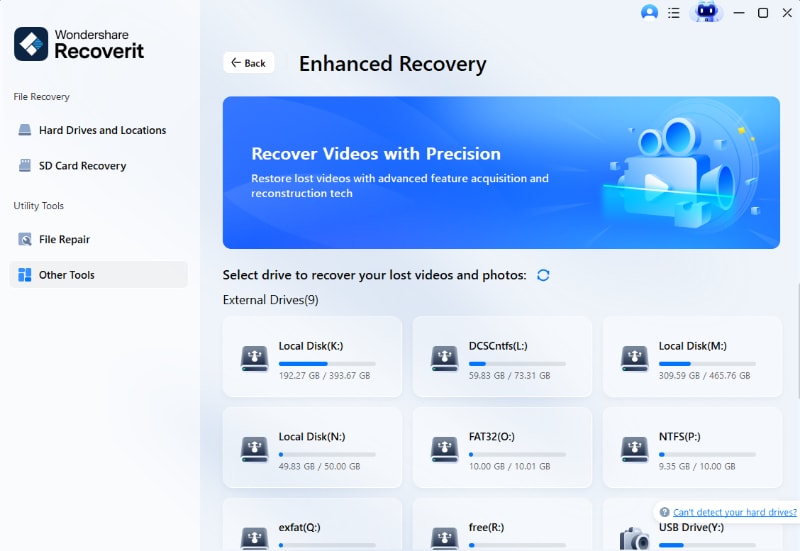
Step 3: Select the correct video format for deep scanning in the dialog box and click Start.
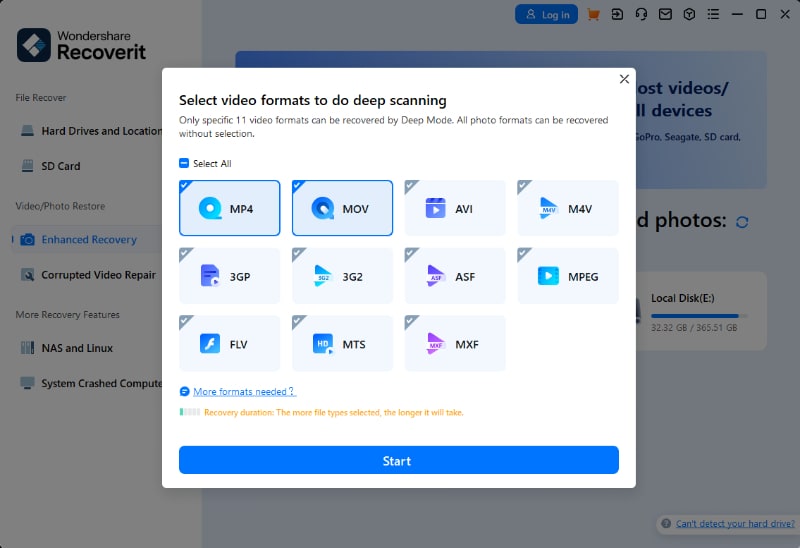
Step 4: Recoverit initiates both Quick Scan and Deep Scan simultaneously. Quick Scan scans all files, focusing on source files. On the other hand, Deep Scan takes longer as it searches for various video fragments and matches them to ensure the entire video is recovered.
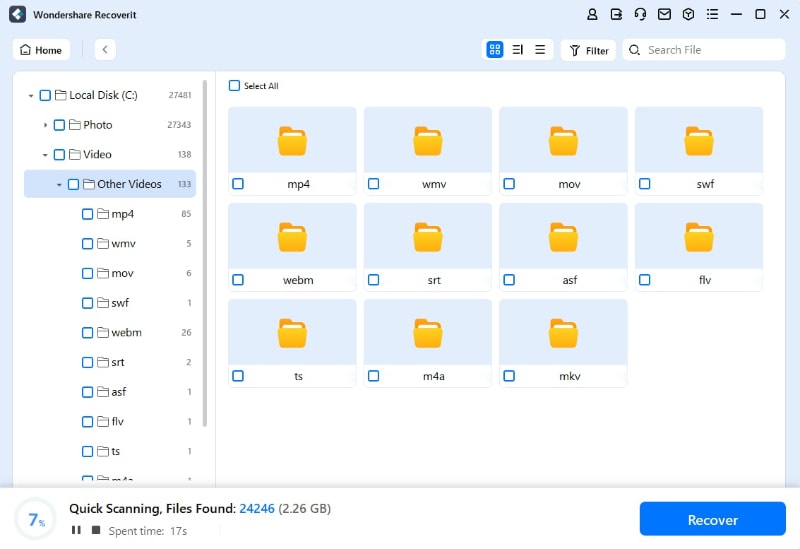
Step 5: Tick the checkboxes corresponding to the Nest videos you wish to retrieve, click Recover, and choose where to save them. You can also preview the videos before saving them.

For Windows 7 or later
For macOS 10.10 or later
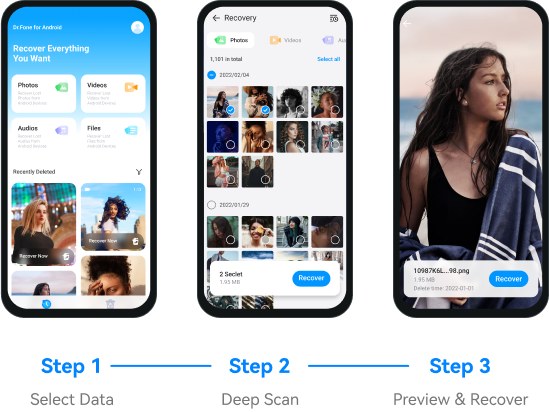
If you want to recover deleted Nest videos from a mobile backup, use the Wondershare Dr.Fone app for Android, which supports 6,000 Android devices and has a 100% success rate.
After downloading the Wondershare Dr.Fone app on your Android device, get your Nest videos back by following these steps:
- Launch the app and tap Videos.
- Once the app scans for deleted Nest videos, select those you wish to retrieve and tap Recover.
- Preview the video(s) and hit Recover.
You can recover deleted videos with any recovery software only if you have a local backup, so always save them on a computer or mobile phone.
Conclusion
Deleting Nest videos helps free up storage space, but you need a reliable solution to recover them in case of accidental deletion, hardware issues, or other problems.
Video recovery tools like Wondershare Recoverit and Wondershare Dr.Fone are your best bet – but only if you previously downloaded Nest videos to a local device.
Can you recover deleted Nest videos if you don't have a backup?
Unfortunately, no. Once a video is deleted from Nest's cloud servers, it is permanently gone. Recovery software like Wondershare Recoverit can only retrieve files that were previously saved to your local computer or phone.
How long does Nest keep video history?
Without a subscription, you get 3 hours of event video history. With a Nest Aware subscription, you get 30 days of event video history. The Nest Aware Plus subscription offers 60 days of event history plus 10 days of 24/7 video history.
Can police recover deleted Nest camera footage?
Similar to the user, if the footage is deleted from Google's servers, it is generally considered unrecoverable by any means, including by law enforcement, unless they have a legal warrant to obtain it from Google *before* it's deleted.
What's the difference between deleting a clip and deleting history?
Deleting a clip (in the Google Home app) removes a single, specific event. Deleting your history erases all recorded footage from a camera, which is an irreversible action.


 ChatGPT
 Perplexity
 Google AI Mode
 Grok
Grok


