
Quick Answer: How to Access QNAP NAS Remotely
To access your QNAP NAS remotely via myQNAPcloud, follow these three steps:
Register a QID: Create a QNAP ID and verify your email.
Configure NAS: Open the myQNAPcloud app on your QTS/QuTS hero desktop and sign in with your QID.
Connect: Use the myQNAPcloud Link (SmartURL) for easy access without complex router port forwarding, or use the Qfile mobile app.
Security Note: Always enable 2FA and use an SSL certificate to ensure your remote connection remains private and encrypted.
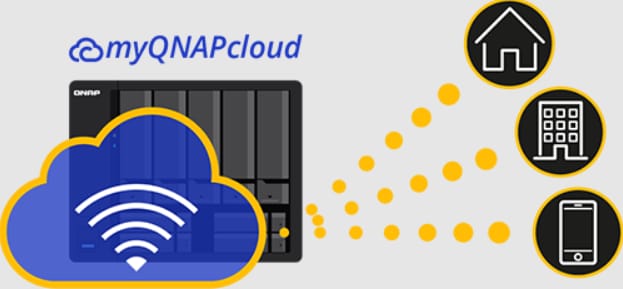
Are you worried about accessing your QNAP NAS device for being distant from it? Don't fret because myQNAPcloud provides a fluent experience by enabling you to securely access your remote NAS device anytime, anywhere. Using myQNAPcloud, you can smoothly share and upload your information on the NAS device and have your own Internet hostname.
Part 1. Is myQNAPcloud Free?
myQNAPcloud offers free-of-cost data-sharing services on QNAP NAS, and you don't have to pay for it. However, buying SSL certificates will help you establish a secure connection between web browsers and QNAP NAS devices. It is because an error can appear if you attempt to connect to your QNAP NAS using HTTPS before installing a myQNAPcloud certificate. Hence, data transferred between a QNAP NAS and a web browser may be intercepted and accessed by unauthorized users. To avoid this, purchasing and installing an SSL certificate is advisable to improve security while establishing a DDNS connection to your QNAP NAS.
Part 2. Is myQNAPcloud Installation Safe to Use?
You can rest assured while using myQNAPcloud because it is entirely safe. When a device uploads data to myQNAPcloud, all the traffic is HTTPS-encrypted. If the device goes inactive during startup, the Cloud Installation service will not permit you to look for the device using the Cloud Key. You must first reset the device to stop others from connecting to it. The device would disconnect from the myQNAPcloud server if the myQNAPcloud Link service was not enabled during the initial setup.
Pro Tip for 2026: The "Ransomware-Proof" Strategy
In 2026, remote access tools are primary targets for cyber-attacks. To secure your myQNAPcloud connection:
Enable 2-Step Verification (2FA): Never allow remote login without a mobile authenticator code.
Disable Default Admin Account: Rename or disable the "admin" user to prevent brute-force attacks.
Use Let's Encrypt: myQNAPcloud offers free SSL certificates via Let's Encrypt—install this to remove "Not Secure" browser warnings and encrypt your data streams.
Part 3. How Can I Download myQNAPcloud?
Setting up your account on myQNAPcloud is straightforward and easy. By following these steps, you can register to myQNAPcloud readily:
Operational Steps:
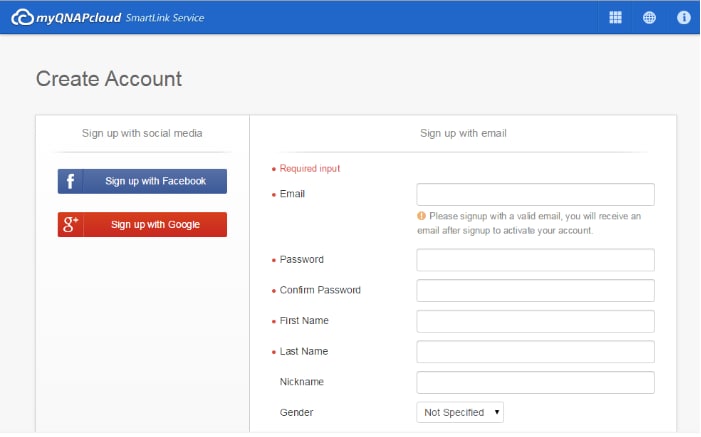
Step 1: Register a myQNAPcloud account (QID) using your email address before using the remote access service. If you prefer, you can register on the QNAP account center with a Google or Facebook account.
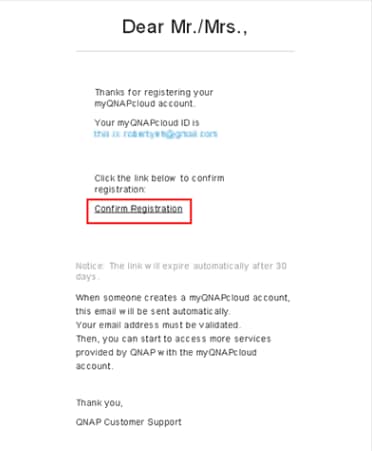
Step 2: Once you've finished registration, you'll get a verification email. Open this email as soon as you receive it and click the Confirm Registration button.
Step 3: Your QNAP ID will be activated once your registration is confirmed.

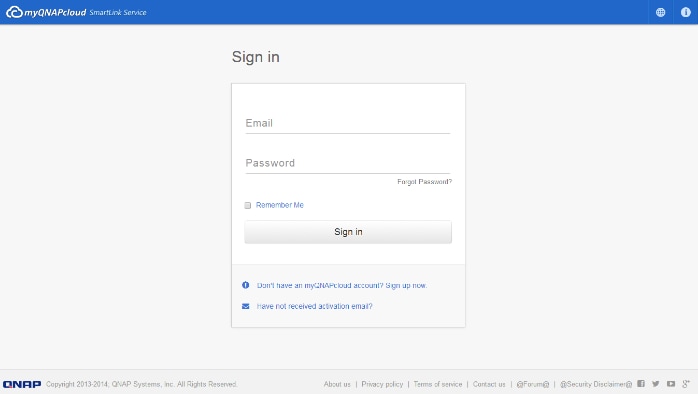
Step 4: After verifying your registration, you can sign in to your device with your QNAP ID. Alternatively, you can access your friends' or others' devices with their permission by logging in to the myQNAPcloud website.
Part 4. What Are the Main Features of myQNAPcloud?
Here is a list of salient features that myQNAP provides and their brief description to better understand its usage.
Main Features |
Description |
| Remote NAS Access | You can access your NAS device in any corner of the world using myQNAPcloud. To do so, sign in to the myQNAPcloud website and enter your device name and password. |
| Remote File Sharing | myQNAPcloud allows you to share files remotely with your friends or ones in your social circle by creating a myQNAPcloud file link. The myQNAP link supports various QNAP products, including QNAP NAS, QuTScloud(cloud NAS), Wake-on WAN devices, and others. Wide supportability helps you make the file-sharing process smooth and hassle-free. |
| Secure Data Backup | Don't worry if your data has been deleted from your smartphone or laptop because you can access that data on your QNAP NAS device via myQNAP cloud. |
| SmartURL | myQNAPcloud creates a file URL for file sharing called a smart URL. You would neither go through a series of complicated DDNS settings nor require in-depth networking knowledge. |
| SmartShare | SmartShare allows you to share files with multiple users with just one click. Moreover, you can add a date and time stamp to record sharing details. |
| Publish Services | You can directly publish files from your NAS device to myQNAPcloud, making them accessible via a web-based interface. This feature is helpful, especially for businesses, photographers, copywriters, and freelancers, to showcase their work to clients for a smooth workflow. |
| Multiple Device Management | If you have multiple devices, myQNAPcloud integrates them into one platform for easy management and data monitoring. To access a specific device from myQNAP, log in using the device's name and password. |
Part 5. How to Remotely Access Your QNAP NAS via myQNAPcloud?
Comparing Remote Access Methods for QNAP
Method |
Setup Difficulty |
Port Forwarding? |
Security Level |
Best For |
| 01. myQNAPcloud Link | Easy | No | High (Encrypted) | General users & File sharing |
| 02. DDNS (myQNAPcloud) | Medium | Yes | Moderate | Web hosting/FTP access |
| QVPN (VPN Service) | Advanced | Yes | Highest | Secure professional workflows |
| Qfile Mobile App | Easy | No | High | Mobile access & Auto-backup |
Knowing the features or downloading process of myQNAPcloud is not enough. You must know how to use this service to share and access your NAS files for a swift data-sharing experience. We have presented the profound procedure for accessing your QNAP NAS device on your computer and smartphone.
Remotely Access Your QNAP NAS via myQNAPcloud Using a Computer
Here's how you can access your QNAP NAS device remotely on a PC.
Operational Steps:
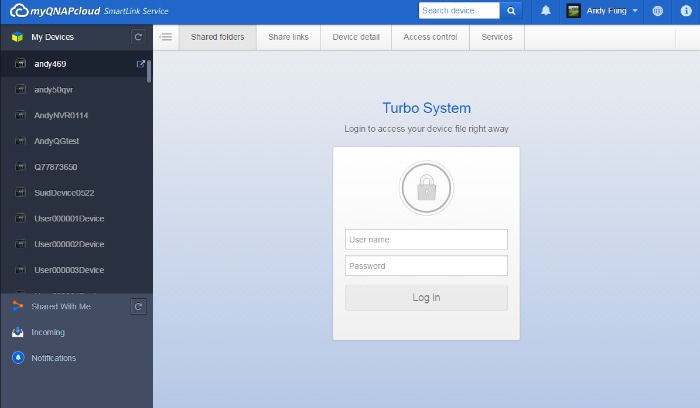
Step 1: Enter your QNAP ID to Sign in at the myQNAPcloud site.
Step 2: Log in by entering your device's name and password.
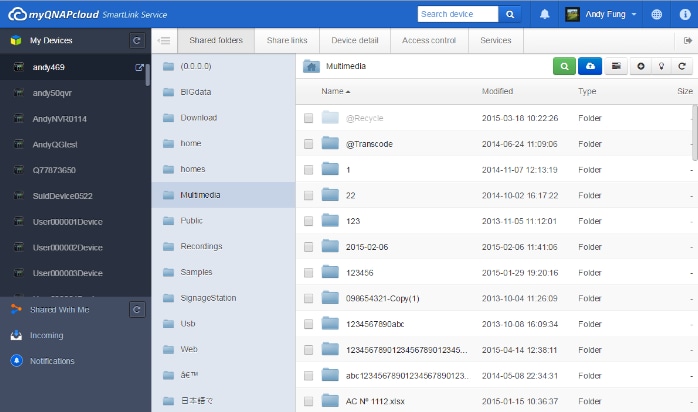
Step 3: You can easily access the shared folders via the myQNAPcloud website.
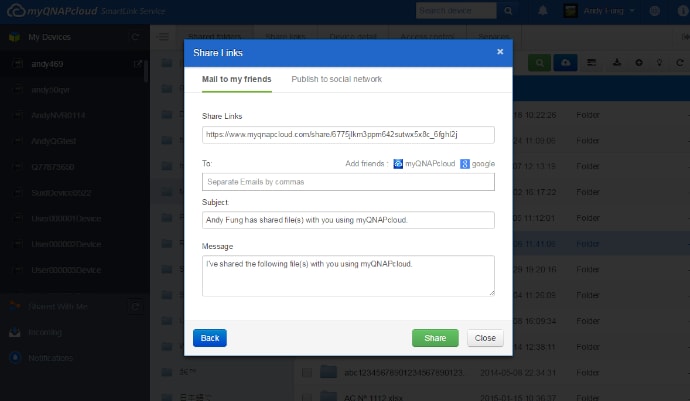
Step 4: Send the file or folder link to your friends to share files.
Managing Multiple NAS Devices on myQNAP Nextcloud
If you have more than one NAS device or want to access your friend's NAS data, here is the procedure for that:
Operational Steps:
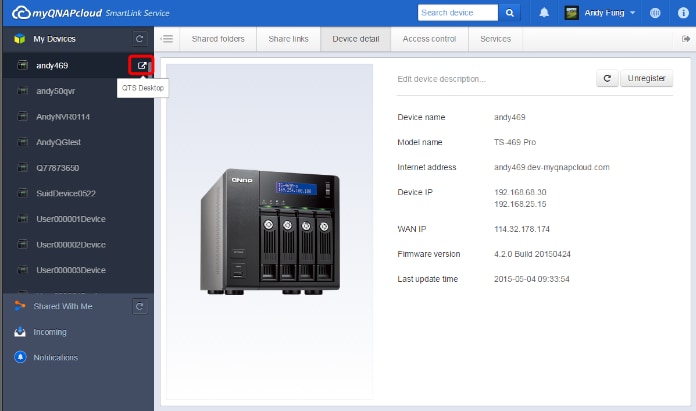
Step 1: Navigate to the left panel, showing devices' names.
Step 2: Click the icon next to the device name to access a specific device.
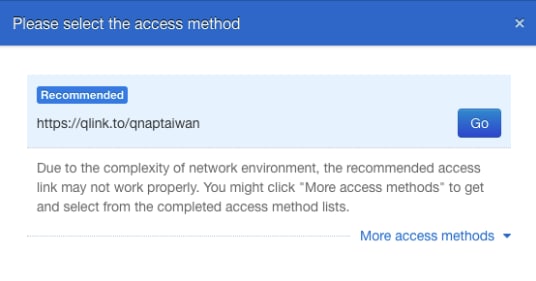
Step 3: myQNAPcloud will suggest the most effective method of connection for you: QNAPcloud Link. To connect to your QNAP device, click the Go You can also choose other access methods by clicking the More Access Methods option below.
Step 4: Enter the device name and password to sign in to that NAS device.
Remotely Access Your QNAP NAS via myQNAPcloud Using a Smartphone
If you want to remotely access your QNAP NAS device via your smartphone, follow the given below steps:
Operational Steps:
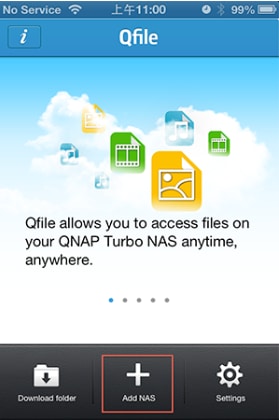
Step 1: Download and install the Qfile app from the Play Store or Apple Store if you use Apple.
Step 2: Tap "Add NAS" to add your QNAP device.
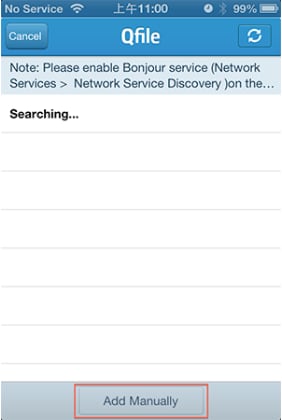
Step 3: Qfile will start Scanning all the QNAP device units on the same. You can also add your device by tapping the Add Manually button below if you didn't find your QNAP device.
Step 4: Enter the URL of your QNAP device and your login information, and tap Done to complete the setup procedure.
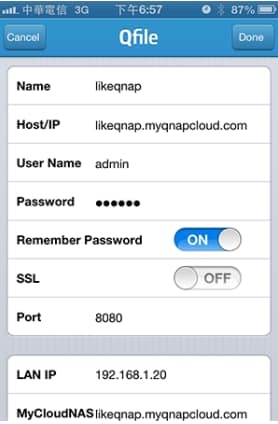
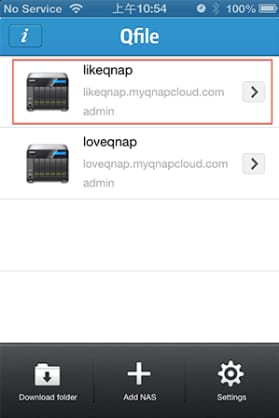
Step 5: Your Qfile home page will list your QNAP devices along with their name, URLs, and usernames when you click Done.
Step 6: You can now view and Access all folders on the QNAP device by tapping it.
Part 6. How Can You Recover Lost Files from Your QNAP NAS Easily & Securely?
Although your QNAP NAS device acts as a secure backup for your essential data. But what if you unintentionally deleted data from the NAS device itself? Not to worry, your NAS lost data is recoverable via reliable recovery software. In this regard, Recoverit is the most certified software that enables QNAP NAS recovery smoothly and efficiently.

Wondershare Recoverit – The Best Solution for Your NAS Data Recovery
5,481,435 people have downloaded it.
Recovers lost or deleted documents, images, videos, archives, and other 1000+ file types efficiently and securely.
Supports recovery data from 2000+ storage devices, including Windows/Mac/Linux computers, NAS Servers, USB drives, SD Cards, external hard disks, digital cameras, etc.
Supports recovery data from 500+ data loss scenarios, including unexpected deletion, formatting, hard disk corruption, virus attacks, computer crashes, etc.
The advanced video recovery with patented technology can automatically scan, gather, and match video fragments to completely recover your video files.
Though facing enormous challenges, Wondershare Recoverit for Mac is now fully compatible with Macs with T2/M1 chips.
Recoverit NAS Recovery: Success Probability
Loss Scenario |
Recovery Chance |
Requirement |
| Accidental Deletion | 98% (Excellent) | Immediate scan before overwriting |
| Formatted NAS Drive | 95% (High) | Supports RAID 0, 1, 5, 6, 10 |
| Firmware Update Failure | 92% (High) | Remote connection via SSH/NAS Recovery |
| Physical Disk Error | 85% (Moderate) | Connect drive to PC for deep scan |
Operational Steps:
Step 1: Launch Recoverit Data Recovery Software on your computer after downloading.
Step 2: Go to the left bar, and click the "NAS and Linux" option.
Step 3: Now, click the NAS Recovery button; this option will allow Recoverit to search for the NAS device from which you want to retrieve data.

For Windows Vista/7/8/10/11
For macOS X 10.10 or later
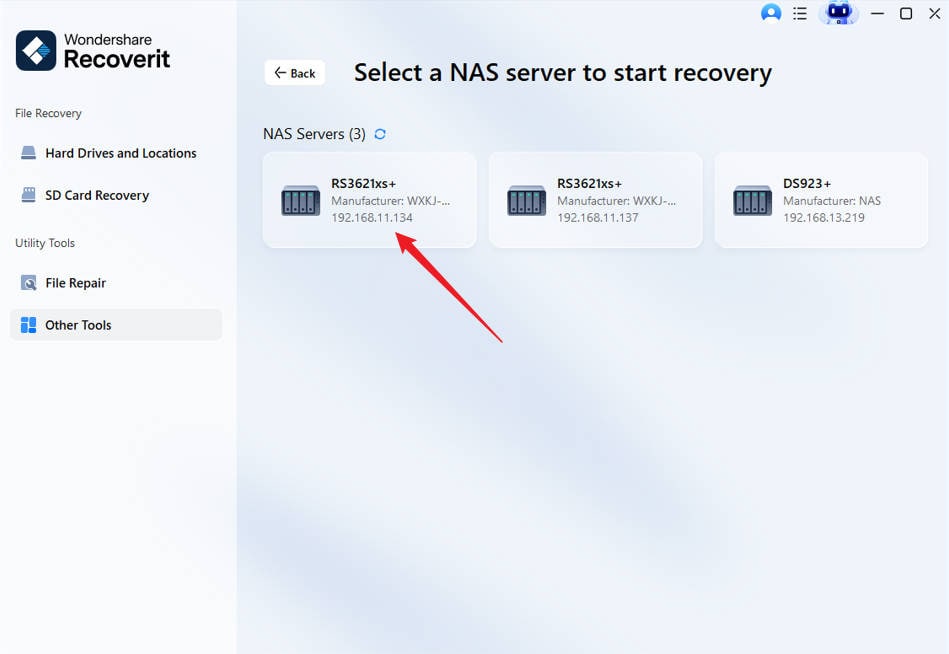
Step 4: Recoverit will display all the NAS devices under the NAS Servers option after completing the search.
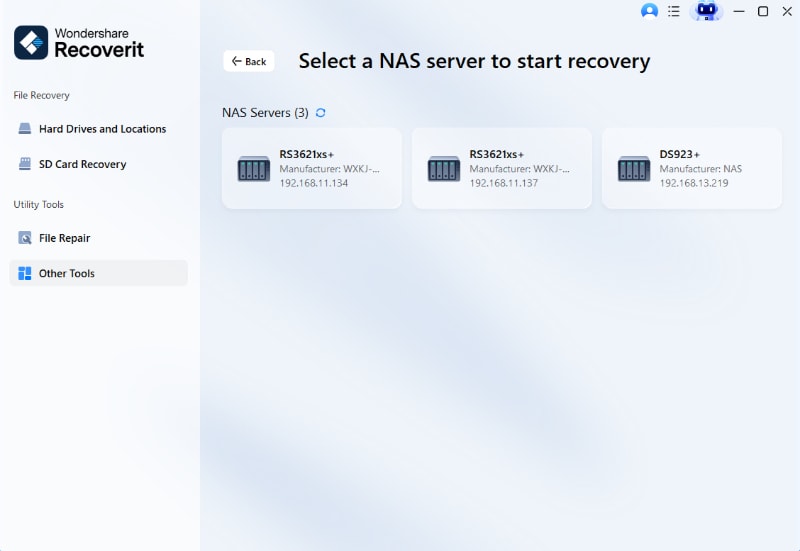
Step 5: Select the NAS device to initiate recovery.
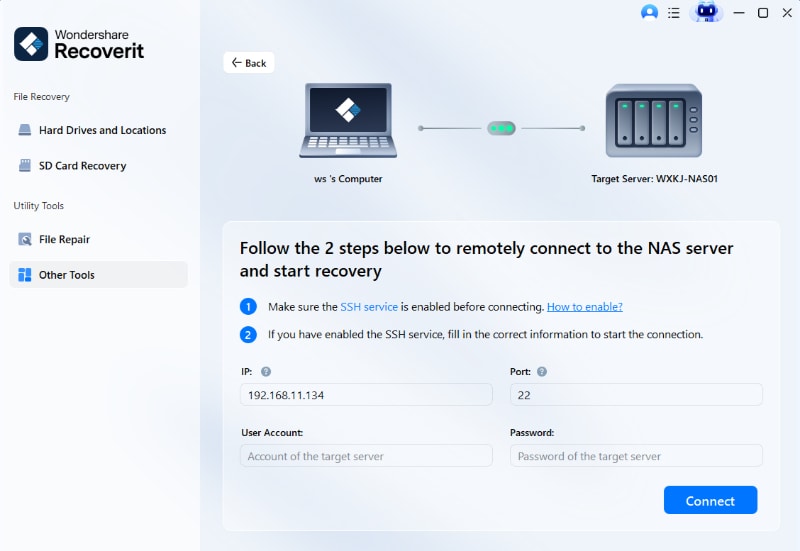
Step 6: Provide the information and click the Connect button to establish a remote connection.
Step 7: After developing the connection, Recoverit will initiate Scanning lost or deleted data in the specified NAS device.
Step 8: You can Preview the recoverable files to determine which files to recover.

Step 9: Once previewed, click the Recover option to restore the lost files.

Video Tutorial on How to Recover Files from NAS Server?
For Windows Vista/7/8/10/11
For macOS X 10.10 or later
Final Checklist for Secure QNAP Remote Access
- Connection: Use myQNAPcloud Link to bypass complex router settings.
- Certificate: Install an SSL Certificate to protect your login credentials.
- Mobile: Use Qfile for on-the-go access and automatic photo uploads.
- Backup: Always maintain a local and off-site backup.
- Recovery: Keep Wondershare Recoverit ready in case of unexpected RAID failure or accidental file deletion during remote transfers.
Conclusion
We thoroughly explained the features of myQNAPcloud, its downloading process, and the in-depth procedure of accessing your QNAP NAS device remotely using myQNAP service. Also, we have provided a solution for your accidental NAS data recovery in this article. Now you can completely feel unbothered by far-present NAS and your stored-in data.
For Windows Vista/7/8/10/11
For macOS X 10.10 or later


