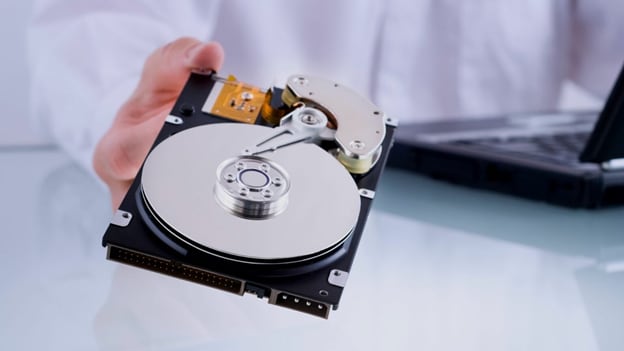
Formatting hard drives is usually an easy process. One of the most popular operating systems, Windows, has a built-in hard drive formatter, making the process convenient. However, due to various factors such as drive manufacturers, interfaces, and other compatibility issues that hard drives can have, choosing the best disk formatter can take time and effort.
Part 1. Why Is Formatting Hard Drives Necessary?
Formatting is a process that involves setting up a file system on a volume or partition so that an operating system can store and access data. Additionally, a file system provides a way to arrange and access data that has been written to a hard drive or another type of storage medium. It is produced during volume formatting.
Reasons for Formatting a Hard Drive
There are various reasons for formatting a hard drive. Here are our top picks:
1. Removing Data
The first reason for formatting a hard drive is to perform data removal. If you're erasing the data for your use, such as switching the hard drive to a different computer or setting it as a secondary drive, formatting is fine and even is an ideal option.
2. Computer Not Starting
Sometimes it is simpler to format the drive instead of attempting to repair registry errors that prevent the system from booting. By formatting the system, all files and errors are deleted, and the computer is reset to a clean slate. The operating system is almost always installed after it, allowing the user to start with a clean system.
3. Changing Operating System
You're not compelled to use Windows just because your computer came with it; you might want to switch to a different operating system. Additionally, you might need to replace the operating system on an obsolete computer. Formatting is best if you want to start with a new OS. It erases previous system settings and files and ensures you aren't bringing over any outdated junk files or computer viruses from your previous OS.
4. Changing your file system
Your hard drive is capable of working with other file systems. Formatting is the best option if you want to change the file system on a hard drive, whether inside your computer or on an external hard drive.
5. Erasing Partitions
Instead of a boot disc, most new computers come with a rescue partition, which you'll need if you need to manage your system or roll back to a previous version. You can use a single partition rather than multiple partitions to better use all the available space when formatting a hard drive.
Part 2. The 5 Best Hard Drive Disk Formatter in Windows
Using a hard drive formatter helps complete various standard computer maintenance tasks. However, choosing the best disk formatter depends on your needs.
Important tip: You must consider backing up your data before beginning the formatting process.
1. HP USB Disk Storage Format Tool
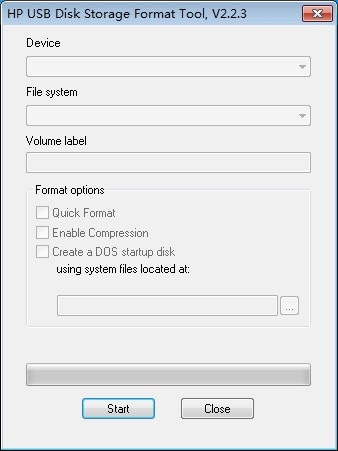
The HP USB Disk Storage Format Tool allows you to format a USB Flash drive to FAT, FAT32. It is important to note that this utility will only work with USB connected flash drives, not internal ones. It is compatible with all brands of pen drives, not only HP ones.
| Supported File System | FAT, FAT32, and NTFS |
| User Interface | User-friendly |
To format Windows using HP USB Disk Storage Format Tool, follow these steps:
Step 1: Connect Flash Drive and Launch Tool
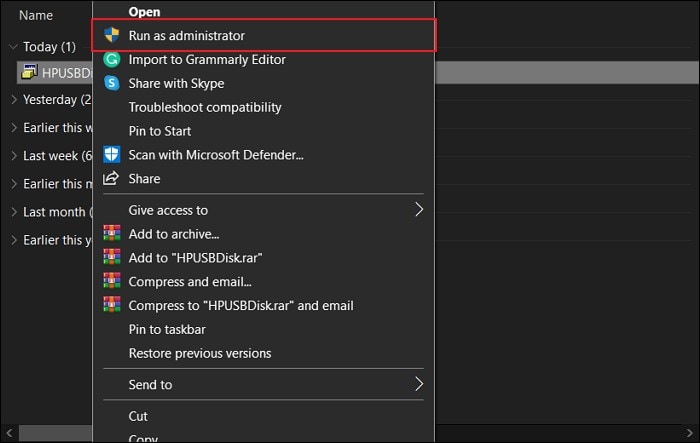
Start by connecting your USB drive to be formatted with the computer. As it is detected, download the HP USB Format Tool and open it on your PC. Use the “Run as Administrator” option while launching the tool.
Step 2: Select the Removable Disk
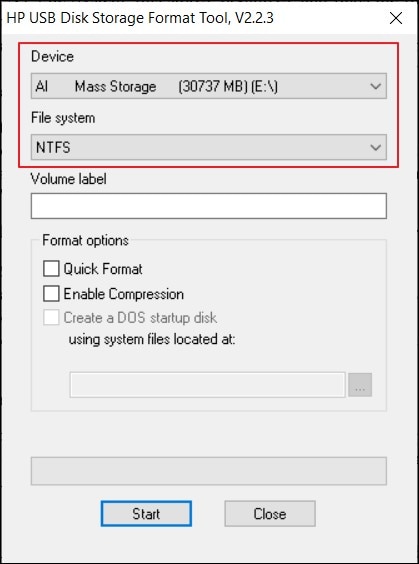
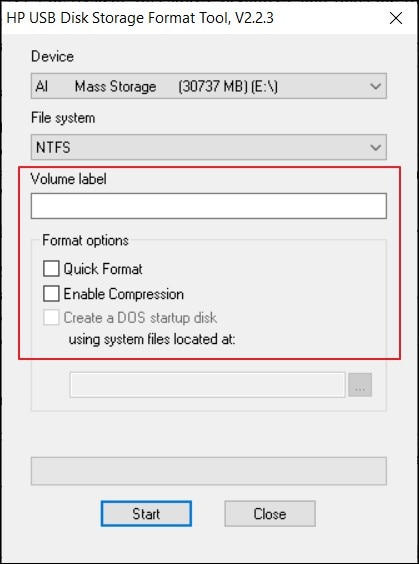
Find the list of all removable disks across the "Device" tab. Choose the appropriate USB drive and define the file system that you wish to format the drive.
Step 3: Define Parameters and Start the Process
Specify the "Volume Label" by typing in the information according to your need. Choose the needed format from the "Format options" then lick "Start" to format the drive.
Pros & Cons of HP USB Format Tool
Pros
It has a familiar GUI similar to Windows XP formatting tool
Cons
Uses old interface which may result to system crash
2. HDD Low Level Format Tool
The HDD Low-Level Format Tool removes data and effectively resets the drive, leaving empty platters. The software also supports Flashcards, which is helpful if you frequently transfer private data.
| Supported Operating System | Windows XP, Vista, 7, 8, and Windows Server 2003, 2008, 2008R2 |
| User Interface | A bit difficult to use |
Follow these steps to format your hard drive using HDD Low-Level Format Tool:
Step 1: Install the HDD Low-level Format tool
First, download the HDD Low-Level Format Tool. After that, launch the installer and complete the simple wizard to finish its installation.
Step 2: Select the Hard Drive to Format
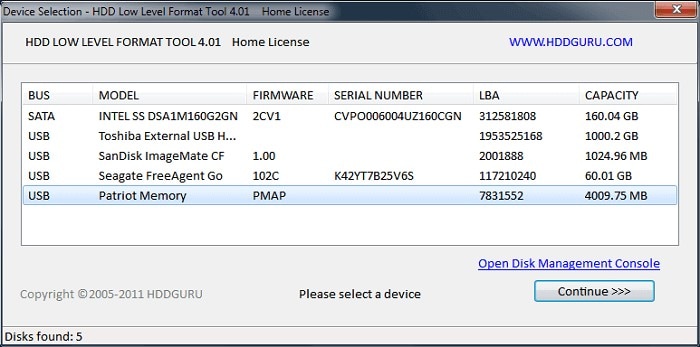
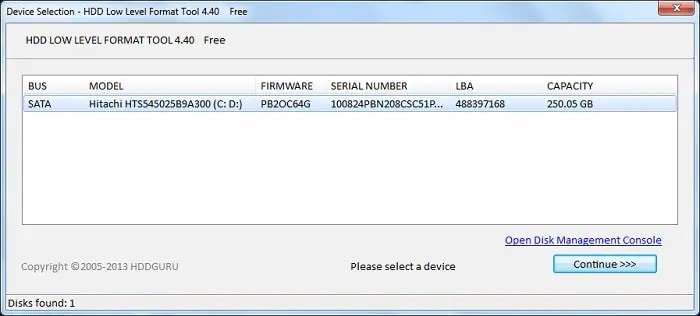
Launch the HDD Low-level Format tool on your computer and allow it to identify your system’s primary/secondary disk. Choose the disk you want to format on the wizard and click “Continue.
Step 3: Complete Formatting
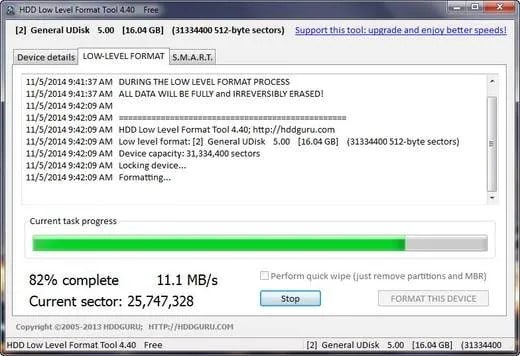
Let the application perform the low-level formatting on the disk. Once the data on the disk is deleted and the repartitioning is done, the computer will restart with factory settings.
Pros and Cons of Using HDD Low-Level Format Tool
Pros
Supports low level formatting
Cons
Requires payment to enjoy formatting with no speed limit
3. Windows File Explorer
It is a built-in Windows hard drive formatter that can be accessed through by pressing Windows + E keys. As long as the drive you tend to format is visible, you can use the Format option to start a quick format with a few simple steps.
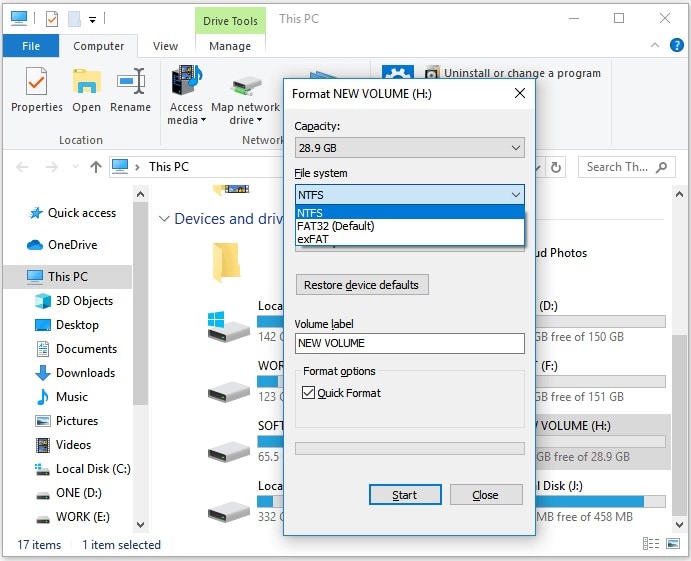
| Supported File System | NTFS, exFAT and FAT32 |
| User Interface | Simple design and operation |
Follow these steps to format your hard drive with Windows File Explorer:
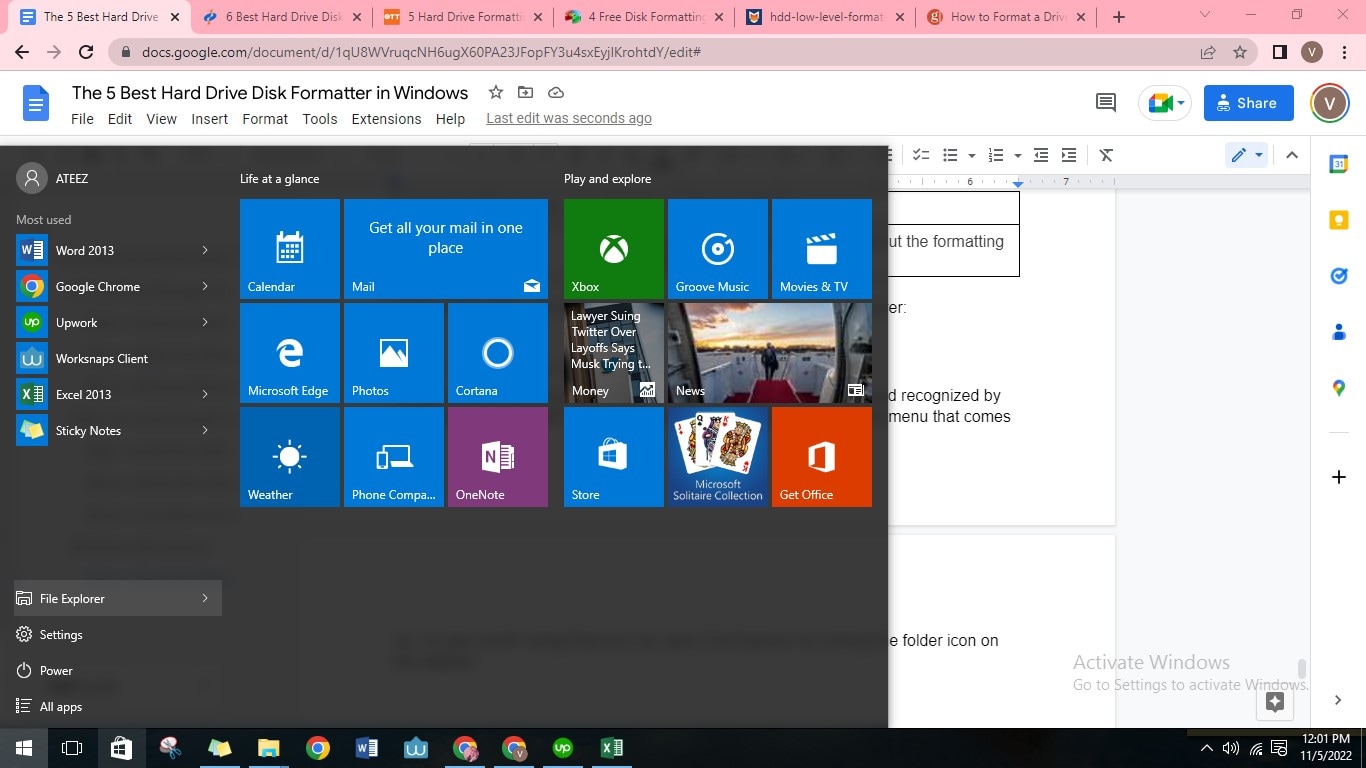
Step 1: Start and Click File Explorer
First, right-click on Start and click File Explorer from the menu that comes up. You can also open File Explorer by clicking the folder icon on the taskbar.
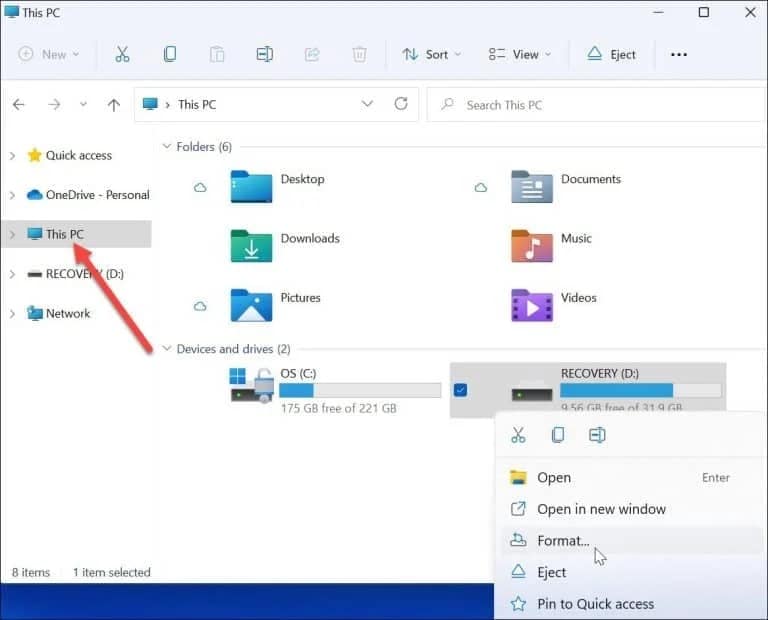
Step 2: Select the drive you want to format
Click on This PC from the column on the left. Then, right-click the drive you want to format under the Devices and Drives section. Click Format from the context menu that appears.
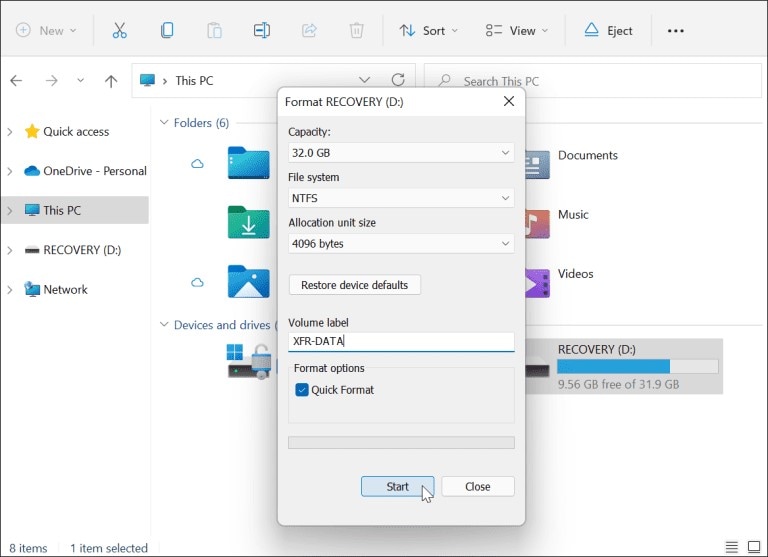
Step 3: Select Formatting Options
Choose from the following options in the Format menu to format your drive. Then, press the Start button in the Format window.
Pros and Cons of Windows File Explorer
Pros
Beginner friendly, free and uses simple steps
Cons
FAT32 is not available for a storage drive over 32GB
4. Windows Disk Management
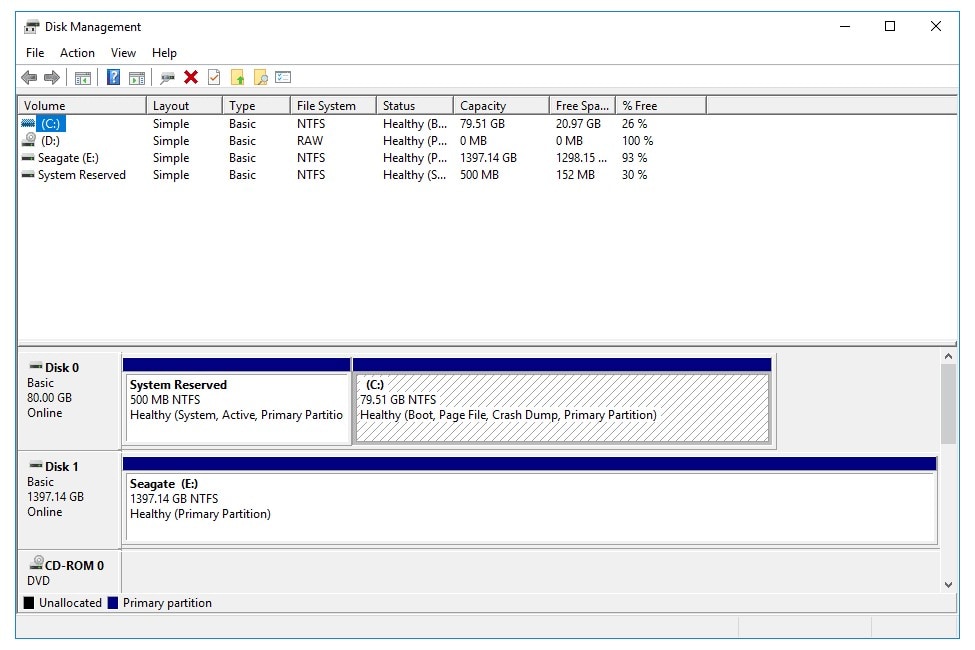
Since Windows Disk Management is a free built-in tool. It works well for formatting storage devices that have issues, such as file system corruption, formatting errors, accessibility issues, etc.
| Supported File System | NTFS, exFAT and FAT32 |
| User Interface | Has a useful disk management feature |
You can format your hard drive with Windows Disk Management through these steps:
Step 1: Open Windows Disk Management
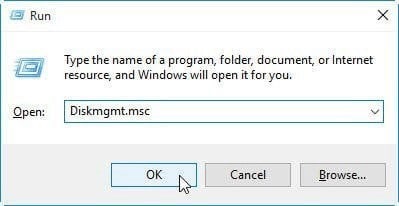
Press "Windows + R" keys, type diskmgmt.msc and click "OK" to open Disk Management.
Step 2: Initialize Disk
Right-click the hard drive or SSD marked as "Unknown" and "Not Initialized," and select "Initialize Disk".
Step 3: Check the disk to initialize
In the Initialize Disk dialog box, check the disk to initialize. And then click "OK" to accept the default partition style. Find the initialized disk, right-click the unallocated space, and select the "New Simply Value" option.
Step 4: Set up and format the created partition
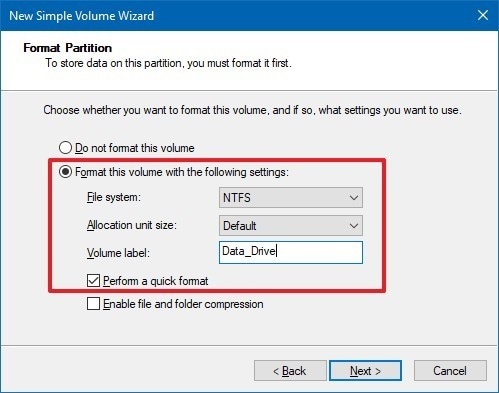
Follow the on-screen instructions to set up volume size, drive letter, NTFS as the file system, Click "Next" > "Finish" button.
Pros and Cons of Windows Disk Management
Pros
Free and available to all Windows OS
Cons
FAT32 is not available for a storage drive over 32GB
5. Windows Command Prompt (CMD)
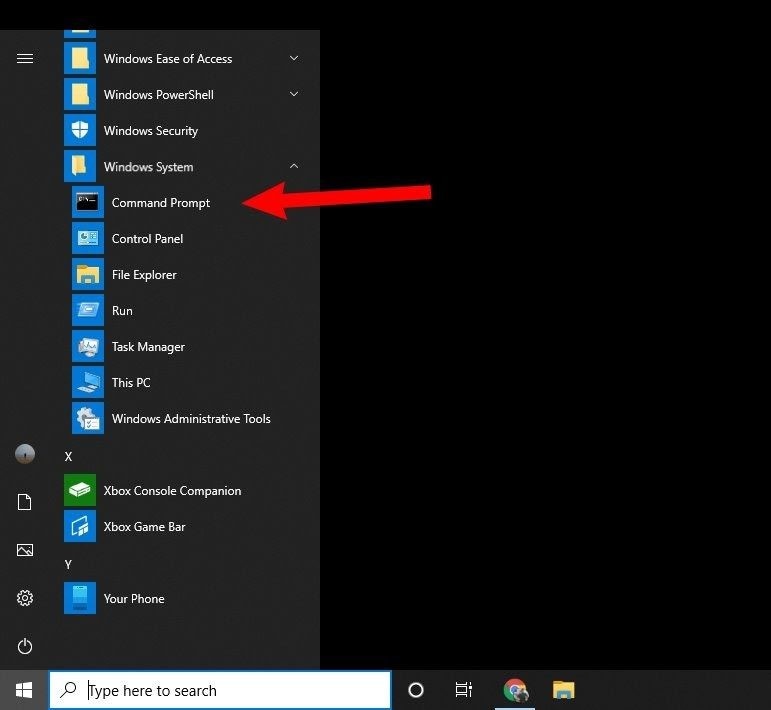
Windows Command Prompt, is a hard drive formatter that solves computer and hard drive problems using a variety of commands.
| Supported File System | NTFS, FAT16, FAT32, EXT2, EXT3, and EXT4 |
| User Interface | Very unfamiliar to beginners |
These steps will help you format your hard drive with Windows Command Prompt:
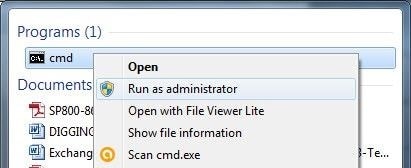
Step 1: Open Command Prompt as Administrator
Search for command prompt, right click and run as Administrator.
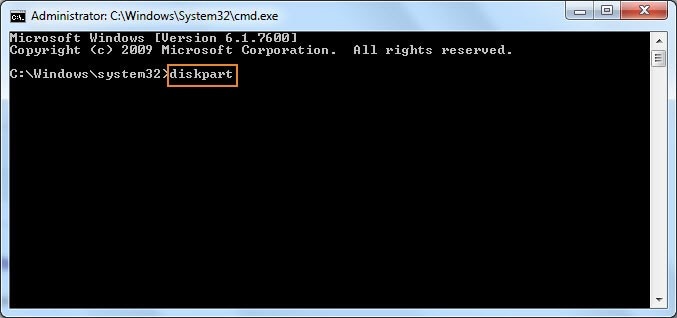
Step 2: Use Diskpart
Once the command line is open, type 'diskpart' and press Enter.
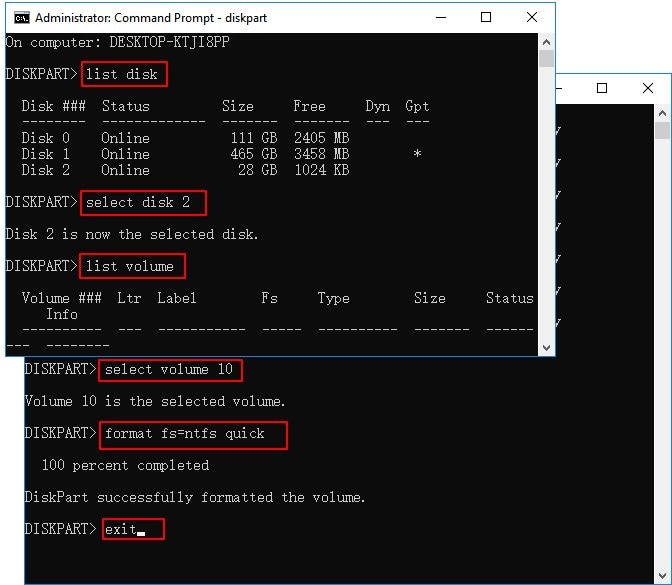
Step 3: Type the necessary commands
Type format command lines in DiskPart and hit Enter each time so as to quick format the hard drive:
- list disk
- select disk (plus your disk number)
- list volume
- select volume (plus the volume number your partition)
- format fs=ntfs quick
Pros and Cons of Windows Command Prompt
Pros
Can format any file system
Cons
/
Part 3. What To Do After Using Hard Drive Disk Formatter?
Here is a list of the things you need to do after formatting your hard disk:
# 1. Re-partition hard drive to make full use of space on your hard drive
Use a partition management tool to partition the hard drive on your Windows 10. You can merge partitions or extend hard drive partitions based on your needs.
# 2. Save files to the formatted hard drive
Since the hard drive is now clean, you can save the files you need to the formatted hard drive and use it as if it was new.
# 3. Recover lost files due to formatting
If you missed to perform a data backup before formatting, you may use a data recovery software to retrieve lost files
How To Recover Formatted Hard Drive Free
Is it possible to recover the formatted hard drive and get lost data back? Yes, of course. With the help of an excellent hard disk formatter like Wondershare RecoverIt, restoring data after formatting is not a problem anymore. But don't worry, continue reading as we introduce the best hard drive recovery program to help you recover lost files from formatted hard drives.
Wondershare Recoverlt- The Most Powerful Hard Drive Recovery Program
5,481,435 people have downloaded it.
Recover deleted, formatted, lost and inaccessible data from PC, USB drive, mobile phone and other storage media.
Performs thorough scanning through hidden files.
Restore all types of files and file systems, e.g., NTFS, FAT, HFS+, APFS, with no data, no charge commitment.
A tool with the highest recovery success rate in the industry to retrieve data from all data loss scenarios.
Recoverlt offers free trial.
Here are the steps you need to follow to recover formatted hard drive using Wondershare RecoverIt:
Step 1: Launch RecoverIt on your Windows
Launch Recoverit Data Recovery program and select the formatted hard disk to get started.

Step 2: Scan the selected hard drive
Recoverit will start scanning the disk to search for the lost data and files.

Step 3: Preview and Recover
After scanning, you can check all the recovered files. Preview recovered photos, videos, music, and office files. Select your files and click "Recover" to save all recovered files.

FAQs
We provided answers to the most frequently asked questions about this topic:
Can I format my hard drive multiple times?
Yes. Formatting the hard drive several times will be fine. It just cleans your hard disk drive for better use.
Is it safe to throw away a hard drive?
Disposing of hard drives simply through the trash is a bad idea. Not only are you negatively impacting the environment by contributing to landfill waste, but you could also be exposing yourself to major data breaches!
What is HDD formatting?
HDD formatting is performed to prepare a data storage device for initial use.
Are Mac and PC hard drives the same?
Related. Windows and Mac computers use different hard drive formats, but they support sharing external storage in most cases.
What is the best file format for a hard drive?
NTFS (New Technology for File System) is the recommended format if you intend to use a drive on the Windows operating system.
Conclusion
Hard drive formatters are great tools to help you clean your hard drive and make it adaptable to newer operating systems. Be sure to choose the disk formatter that fits your needs. In case of file recovery, Wondershare RecoverIt is the perfect program that can recover any data or file lost after formatting.
For Windows XP/Vista/7/8/10/11
For macOS X 10.10 or later

 ChatGPT
 Perplexity
 Google AI Mode
 Grok
Grok


